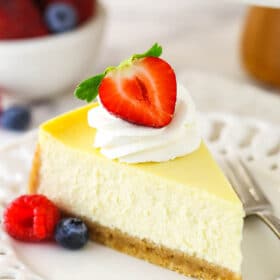
This cheesecake recipe makes a classic, rich, ultra-smooth cheesecake. It’s seriously the best and so creamy! Learn how to make a classic cheesecake using all my tips for everything from making the crust to setting up the perfect water bath.

An Easy Cheesecake Recipe for Beginners
I’m a big fan of cheesecake and it’s no secret around here. I have a ton of cheesecake recipes. But just like with a vanilla cupcake, it’s super important to nail the classic vanilla cheesecake! After making so very many cheesecakes, I can say that this one is hands down the best!
This simple cheesecake recipe is as straightforward as it gets for a baked cheesecake. I daresay it’s the best recipe for beginners! It doesn’t dry out, fall in the middle, crack or any of that nonsense. Nope, with this recipe you get a fool-proof cheesecake.
The vanilla cheesecake filling sits in a vanilla wafer or graham cracker crust and is the perfect base for any number of toppings. In fact, one of the best things about this cheesecake is that you can make it and serve it with so many different things. Everyone can pick their favorite topping and everybody’s happy!
For a lighter Italian-style variation, you’ll also want to try this ricotta cheesecake.

How to Make Cheesecake
I’ve broken everything down step-by-step and included tons of detail so that you can make the best cheesecake ever!
Assemble Your Tools and Ingredients
- Make sure you have a springform pan. The removable sides make it much easier to remove the cheesecake from the pan after it’s done baking and cooling. Unlike a regular cake, you aren’t going to want to flip this baby upside down.
- Prep your pan. This first step to making your cheesecake is often over-looked, but important. Spray the sides of the pan with non-stick baking spray and line the bottom with parchment paper. This will making removing your cheesecake from the pan much easier later.
- Have another pan that’s larger than the springform pan handy. This cheesecake is going to need a water bath (which we’ll talk more about later), so you’ll need a bigger pan to put the water into.
- Leave yourself plenty of time. While putting everything together is pretty easy and simple, it can take a little time and you do need about five to six hours for the cheesecake to cool and firm up once it’s baked.
Make the Crust
Every great classic cheesecake recipe starts with a great crust and in this case, you can use a vanilla wafer or graham cracker crust. I personally love the flavor of the vanilla wafer cookies, but if want to use a graham cracker crust, you can do that too. It’s a one to one swap!
Regardless of what you use, the process is the same.


- Grind up those cookies so you have fine crumbs. You don’t want any big chunks or it’ll disturb the ability of your crust to hold together well.
- Add a touch of sugar and some melted butter. Stir everything together.

- Add the crust to your springform pan and press it into the bottom and up the sides. You can make the sides as tall as you like. There’s really no wrong way to do it. There’s plenty of crust here to make a nice bottom and sides. I like to use a cup with straight sides or a measuring cup to press the crust in firmly and get good corners.
- Bake it for about 10 minutes. That will ensure that it stays sturdy when you slice into it later.
Make the Cheesecake Filling
Next up is the filling of the cheesecake. You want to use room-temperature cream cheese to prevent a lumpy cheesecake. I also recommend the full-fat stuff for the creamiest cheesecake!


- Add sugar and a little bit of flour to the cream cheese and combine it all together. The flour is a nice little touch to give you a creamier textured cheesecake that isn’t quite so dense.
- Now add your sour cream, vanilla, and eggs. The sour cream adds great flavor and creaminess and is a must!
Pro Tip: When mixing all the ingredients together, you want to be sure to use a lower speed setting and not over-mix. It can add more air to the batter, which can lead to cracks. One of cheesecake’s biggest enemies is cracks, so let’s avoid them and steer clear of excess air bubbles.
Bake Your Cheesecake
I know water baths can seem intimidating with cheesecakes, but it really is the best way to go. You’re going to get a more creamy cheesecake that doesn’t crack, brown around the edges or fall in the center while it cools. When you put so much time into a dessert, you don’t want any of those things to happen.
One of the biggest problems people encounter with water baths is leaking. Springform pans are unreliable and aluminum foil easily gets tiny little tears when you’re wrapping it around your pan. I have a fantastic little trick I use to keep water out of my cheesecake and it works every time. See exactly how I set it up in my tutorial for a leak-proof cheesecake water bath.

- Cover the outside of the springform pan. There are several ways to do this, as shown in my water bath tutorial. This is to prevent water from leaking into your cheesecake while it bakes in a water bath. My preferred methods are to either use a slow cooker bag or a silicone pan, so that you don’t get leaking.
- Add the batter to the crust.
- Place the springform pan inside another larger pan. Fill the outside pan with enough warm water to go about halfway up the sides of the springform pan. The water should not go above the top edge of the aluminum foil on the springform pan.
- Bake! The cheesecake will be done in 1 hour 15 minutes. The center should be set, but still jiggly. It might not seem like it’s fully baked, but that’s ok! One of the other important parts of a perfect cheesecake is to let it cool gradually (and finish baking).
Let Your Cheesecake Cool
- Leave the cheesecake in the oven with the door closed for another 30 minutes. During that time, the cheesecake will continue to bake, but also begin to gradually cool. At the end of that time, it’ll be perfectly baked! Cool, right?!
- Continue to cool the cheesecake in the oven for another 30 minutes. But this time the door is cracked to let it cool even more. This slow cooling process helps to prevent cracks, so be sure not to skip it!
- Chill. Finally, pop the cheesecake into the fridge to cool completely and firm up for about 5 to 6 hours. When it’s ready, take it out of the springform pan and serve it with your favorite toppings! I’ve got several listed in the recipe, but the options are endless!

Must-Have Tips for the Perfect Cheesecake
In addition to these tips, you might also like this tutorial with 10 Tips and Tricks for Perfect Cheesecake. If this is your first time making homemade cheesecake, this recipe and that tutorial pretty much guarantee success.
Ok, so what do we need to keep in mind for our cheesecake?
- Use a springform pan. This is not 100% necessary. However, using a springform pan makes it so much easier to remove your cheesecake and achieve a perfect crust.
- Use room temperature ingredients. Making sure your cream cheese is at room temperature is probably the most important step. Room temperature cream cheese blends easier and ensures that your cheesecake filling is smooth with no lumps.
- Use brick-style cream cheese. The tub-style cream cheese is thinner and won’t give you the same results. The same goes for the fat content – use the full fat stuff. It’s worth it!
- Mix the filling on low speed and don’t over-mix it. Over mixing your filling (including over-beating your eggs) will ruin the cheesecake and cause cracks. Make sure to keep your mixer set to low speed, and to only mix your ingredients until they are just combined. Pause between adding ingredients to scrape down the bowl and make sure everything gets incorporated.
- Use a water bath and use my secret trick for no leaks! I get it, water baths can seem intimidating! But if you follow a few simple steps, using a water bath to make the best cheesecake of your life is actually very doable. Here is a tutorial on how to use a water bath and avoid any leaks!
- Don’t open the oven during baking. Opening the oven door will let the hot air out and can cause your cheesecake to fall in the middle.
- Cool the cheesecake slowly. You can’t rush cheesecake and your patience will be rewarded, I promise! Letting your cheesecake cool properly keeps it from cracking and allows it to firm up, will give you that creamy cheesecake texture you’re craving.

Frequently Asked Questions
I get quite a few questions about cheesecakes, given that there are so many different recipes on the site. Here are some of the most common ones.
Do I have to use a water bath?
I highly recommend it. The benefits of a water bath are plenty. It gives you a cheesecake that doesn’t crack or over-brown around the edges, doesn’t sink in the middle and stays nice and creamy.
Can I just put a pan of water on the rack below the cheesecake?
While this gives you a better result than no water bath, it’s still not as good as a water bath. For more information on the various ways of setting up a water bath, check out my guide to setting up a water bath.
How do I tell when my cheesecake is done baking?
I like to use gloves and gently shake my cheesecake pan to get it to jiggle. You want the outer 2-3 inches of the cheesecake to look more set and less jiggly, and in the center to be the party that’s jiggly. It should wobble a bit, but not too much. If it looks liquid-y still and has kind of a sloshy wiggle, it’s not done it. If it’s just set and still jiggly, it should be good. Learn more about how to tell when your cheesecake is done baking.
How do I remove my cheesecake from the springform pan?
After your cheesecake has cooled completely, you’ll want to run an offset spatula (or a thin knife, if you don’t have an offset spatula) between the bottom of the cheesecake and the bottom of the pan. This will loosen the cheesecake from the pan (assuming that you set up your pan with parchment paper on the bottom). Then you can push the cheesecake off of the pan. See my full tutorial for how to remove your cheesecake from the springform pan.
Topping Ideas
One of the best things about a classic vanilla cheesecake is how many options you have when it comes to toppings. Here are some of my favorite ideas:
- Chocolate sauce – This hot fudge sauce is great with cheesecake.
- Caramel sauce – You can make a simple caramel sauce to serve with cheesecake, or even make an elegant salted caramel sauce.
- Fruit sauce – Blueberry sauce and strawberry sauce are both lovely with cheesecake. I also have a raspberry sauce recipe if that is your preferred flavor.
- Fresh berries – Use whatever is in season. Strawberries, raspberries, blackberries – you name it.
- Sauteed apples – During the autumn I love cooking up peeled apples slices with a bit of cinnamon sugar, then spooning them on top of a slice of cheesecake once they have cooled.
- Whipped cream – A dollop of whipped cream to top it all off is never a bad idea either.

How to Store Cheesecake
Cheesecake should be stored in the refrigerator. I usually leave the springform ring on the cheesecake, then cover it with saran wrap. I also add the ring back to the cheesecake if a few slices have been eaten. The springform pan ring prevents the saran wrap from sticking to the surface of the cheesecake and ensures that everything looks pretty next time you want to grab a slice! You can also store it in an air tight container, if you’ve decorated your cheesecake and can’t add the ring back on. A cake carrier works well.
Cheesecake will keep in the fridge for 5-6 days.
Can I Freeze It?
Generally speaking, cheesecake should be fine when frozen. This is a great cheesecake to freeze since it’s simple and there aren’t any toppings or anything complicated about it.
Just make sure you’ve cooled it completely before freezing. Cover it well with a couple of layers of clear wrap, then a layer of aluminum foil. When you’re ready to use it, pop it in the fridge to thaw overnight. If you freeze this cheesecake, it should be fine for at least a month.
Check out my post for more information on storing and freezing cheesecake.
Watch How to Make Cheesecake
The Best Cheesecake Recipe
- Prep Time: 45 minutes
- Cook Time: 1 hour 10 minutes
- Total Time: 3 hours, 10 minutes
- Yield: 12 1x
- Category: Dessert
- Method: Oven
- Cuisine: American
Description
This cheesecake recipe makes a classic, rich, ultra-smooth cheesecake. It’s seriously the best and so creamy!
Ingredients
CRUST
- 2 ¼ cups (302g) graham cracker or vanilla wafer crumbs
- ½ cup (112g) salted butter, melted
- 3 tbsp (39g) sugar
CHEESECAKE
- 24 ounces (678g) cream cheese, room temperature
- 1 cup (207g) sugar
- 3 tbsp (24g) all purpose flour
- 1 cup (230g) sour cream
- 1 1/2 tbsp vanilla extract
- 4 large eggs, room temperature
TOPPING OPTIONS
- Caramel Sauce
- Lemon Curd
- Homemade Whipped Cream
- Chocolate Sauce
- Fresh Fruit
Instructions
Make the Crust
- Preheat oven to 325°F (163°C). Line a 9-inch (23cm) springform pan with parchment paper in the bottom and grease the sides.
- Combine the crust ingredients in a small bowl. Press the mixture into the bottom and up the sides of the springform pan.
- Bake the crust for 10 minutes, then set aside to cool.
- Cover the outsides of the pan with aluminum foil so that water from the water bath cannot get in (see how I prepare my pan for a water bath). Set prepared pan aside.
Assemble and Bake
- Reduce oven temperature to 300°F (148°C).
- In a large bowl, beat the cream cheese, sugar and flour on low speed until well combined and smooth. Be sure to use low speed to reduce the amount of air added to the batter, which can cause cracks. Scrape down the sides of the bowl.
- Add the sour cream and vanilla extract and mix on low speed until well combined.
- Add the eggs one at a time, mixing slowly to combine after each addition. Scrape down the sides of the bowl as needed to make sure everything is well combined.
- Pour the cheesecake batter into the crust.
- Place the springform pan inside another larger pan. Fill the outside pan with enough warm water to go about halfway up the sides of the springform pan. The water should not go above the top edge of the aluminum foil on the springform pan.
- Bake for 1 hour 15 minutes. The center should be set, but still jiggly (how to tell when your cheesecake is done baking).
- Turn off the oven and leave the door closed for 30 minutes. The cheesecake will continue to cook, but slowly begin to cool as well.
- Crack the door of the oven for 30 minutes to allow the cheesecake to continue to cool slowly. This process helps prevent cracking.
- Remove the cheesecake from the oven and water bath wrapping and refrigerate until firm, 5-6 hours or overnight.
- Remove the cheesecake from the springform pan and place on a serving dish. Refrigerate cheesecake until ready to serve.
- Serve with your favorite toppings. Cheesecake best for about 5 days. More on how to store and freeze cheesecake.
Nutrition
- Serving Size: 1 slice
- Calories: 357
- Sugar: 19.2 g
- Sodium: 239.3 mg
- Fat: 27.1 g
- Carbohydrates: 22.8 g
- Protein: 6.2 g
- Cholesterol: 125.4 mg
This is a simple, easy cheesecake recipe that you can use over and over. Change up in all kinds of ways and serve with a multitude of toppings.
And once you’ve mastered this recipe, you can venture out to other fun versions. Here are a few favorites you could try:
- Chocolate Covered Strawberry Cheesecake
- Banana Cream Cheesecake
- Kahlua Coffee Brownie Cheesecake
- Lemon Blueberry Cheesecake
- Caramel Cheesecake
- S’mores Cheesecake
Enjoy!
This post contains affiliate links.
Categories:
Cheesecakes, Christmas, Easter, Holidays, Recipes, Recipes with video, Sweets and Treats, Thanksgiving, Valentine's Day,


Can you use gluten free flour in place of the all purpose flour? I’ve made this recipe a couple times and love it but my son in law is gluten free now.
I believe people have had success and commented about it before. Should be fine.
Hi Lindsay:
Thank you for all the great recipes. I’ve made this cheesecake a lot & it’s always been amazing. The last time It stayed more softer & never really firmed up like I think cheesecake should. Any tips on how I can improve the texture. The taste is amazing but it’s not as dense as it’s been in the past and I’m not sure what I’m doing wrong.
It’s really hard to say from a distance. I’m guessing it just needs a little more bake time.
Amazing recipe! Cheesecake came out clean and dense with a creamy texture that wasn’t too cheesy. The sweetness was perfect and the crust although crumbly was delicious. Great recipe!
I’m so glad to hear that!
Can you use a store-bought crust with this recipe?
As long as it’s big enough – like a 9 inch springform pan. Otherwise you’d need to modify it. If it’s a pie pan, you may need to cut the recipe in half, or have two crusts.
Love this recipe finally someone who puts the sour cream in the cake not on it! (Yes I know it’s traditional for a NY cheesecake but the cake is too heavy..) Your hint about using the silicone pan to shield the cake pan from the water bath is SHEER GENIUS and I bow to you, simply life changing. October to Dec is birthday season around here and all six want cheesecake! Using the silicone pan saves on the leaky aluminum wrap. I bought one to fit my larger 9in springform but I use a regular 8in cake pan to protect the 7 in springform.I highly recommend all cheese cake bakers buy the silicone pan. Thank you for all your hard work. One of the best sites on Pinterest.
I’m so glad to hear it’s been a hit! Glad the silicone pan is helpful, too!
It was my first time making a cheesecake or really baking in general. I found this recipe and decided to make it for Thanksgiving dinner. Everyone loved it!! Followed the recipe and it was absolutely delicious. Best cheesecake I’ve ever had! & I made it! Thank you!! xx
Awesome! So glad to hear that!
Is it necessary to use parchment paper ? If so how do you cut cheese cake without getting the paper on your slices? I am looking forward to making this for Thanksgiving. May your family have a happy Thanksgiving
.
The parchment paper makes it easier to remove the cheesecake from the pan (and remove the parchment paper, so you don’t get it on your slices). I have a video that shows the process, if you’d like to take a look.
Never made cheesecake before, but I gave this a shot, and it was easy to follow and it looks like its great results so far, no cracks or anything. I just trusted the process and it looks fantastic. Will be eating it later for my husbands birthday.
Awesome! Glad to hear that! I hope you all enjoy it!
Could i make this in a 10 inch pan vs a 9 inch pan? Should cook time be changed
Sure, it just wouldn’t be as thick/tall. You probably would want to reduce the baking time a bit.
You are my go to for anything cheesecake! I was wondering if you have any tips on keeping the crust from sticking to the pan? I have tried butter with flour and baking spray and I still get one side that sticks 😞
I’m so glad you enjoy the recipes! So I typically use Bakers Joy baking spray on the sides and parchment paper on the bottom of the pan. I would think that should work. If you have one side of your pan that’s really stubborn, maybe you could try loosening it with a knife or something in that spot before removing the pan? You could try parchment paper in that area, but it may be hard to make the crust in that spot.
First time ever my cheesecake came out perfect. My family loved it. No cracks, no dark spots. 10/10
Awesome! So glad to hear that!
Made this for Christmas dessert with a biscoff crust, topped with salted caramel. It was so good, and didn’t crack! My family says that this is their favorite of all of the cheesecakes I’ve made.
So glad to hear that!
Hi, one question, what is the diameter of the springform?
I use a 9 inch springform pan.
Hi not a problem, there’s something else I also wanted to know your baked cheesecake is it more light an moist an creamy or is your no bake more
Well, the baked cheesecake is going to be more dense. The no bake one would be lighter, as far as texture. They are both very smooth and creamy.
Hi ok can I make this eggless
I’ve never made an eggless baked cheesecake. But I do have a regular no bake cheesecake recipe.
Hi I did see baked cheesecake without egg so i was thinking if i could do it here or do you have another baked eggless cheesecake recipe
I don’t personally have an egg-less baked cheesecake recipe.
How could I do this with an Oreo crust?
Just use my oreo crust in place of the graham cracker crust.
This recipe is perfect! Could it be used to make mini Cheesecakes?? Or do you have a specific recipe for that?
Glad you enjoyed it! Yes, you can find the mini cheesecake recipe here.
This was the first cheesecake I have made. It came out PERFECT! The consistency is smooth and creamy. I used the graham cracker crust and it is the perfect compliment to the filling. Followed your instructions using foil and the crockpot liner as well as the cooling instructions and zero cracks. Seriously the BEST cheesecake we’ve ever had AND I made it. Thanks for making me look like pro baker!
Awesome! So glad to hear that!