Today I’m sharing my tutorial for How to Fill and Stack a Layer Cake! If you’ve ever had trouble with a cake that slides around or wobbles, this tutorial is for you! You’ll never wonder how to make a layer cake again!
How to Make a Layer Cake
With so many cake recipes on my site, I find that wobbly, unstable cakes can often be a problem for people. While it can seem like there’s an issue with the recipe, it’s often just that there are a few simple tips that would make all the difference. I talked a couple days ago about the importance of leveling and torting your cakes. Today we’ll chat about filling your cake and the first thing we need to talk about is frosting.
Frosting Consistency is Key
My standard vanilla buttercream recipe is the base of the majority of the frostings I use when layering cakes. I even use it as I begin to create different flavors. I go into more depth about the frosting itself in that post, if you’re interested in giving that a read. The most important thing to note is the ratios of ingredients. It’s easy to assume that adjustments to those ratios won’t make a difference, but it does.
Having the right frosting consistency is key to a successful layered cake. You can also check out that post for more information, but what you should really focus on here is again all about ratios. The base of your frosting is more than likely going to be butter/shortening. To that you’re going to be adding powdered sugar and some sort of liquid ingredient or flavoring. Ultimately the consistency of your frosting is determined by the amount of liquid you use, which thins out the frosting, compared to the powdered sugar, which thickens it.
For your cake to not slip around, the frosting needs enough powdered sugar to make the frosting stable. It might be surprising how much powdered sugar is needed in a truly stable frosting, but it’s necessary in an American buttercream. As much as you might be tempted to reduce the powdered sugar, if you’re making a layered cake with a thin filling, you’re going to want to be very careful about how much you adjust it.
In my post about frosting consistency, I show a few images of what to look for to make sure your frosting is the consistency you’ll need, so check that out if you aren’t sure.
What You’ll Need to Make a Layer Cake:
Cake layers (of course)
Offset spatula (I prefer the 9 inch)
Piping bag
Large round piping tip (I use Ateco 808)
Frosting
Filling
Turntable
Cardboard cake round
Cake lifter, optional
How To Fill and Stack a Cake
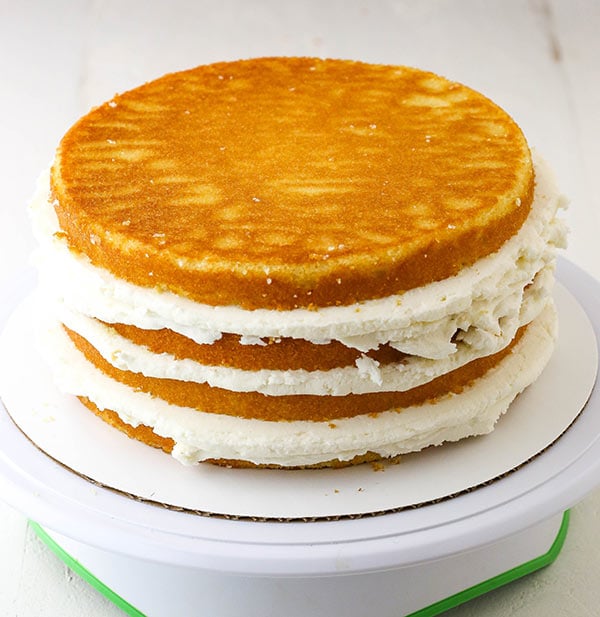
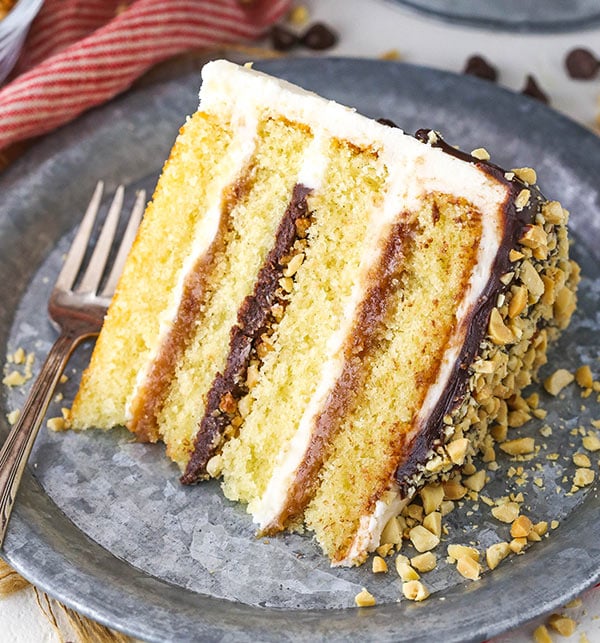
I used a cake with a few different kinds of filling in one cake so that I could show this a few ways, so let’s take a look.
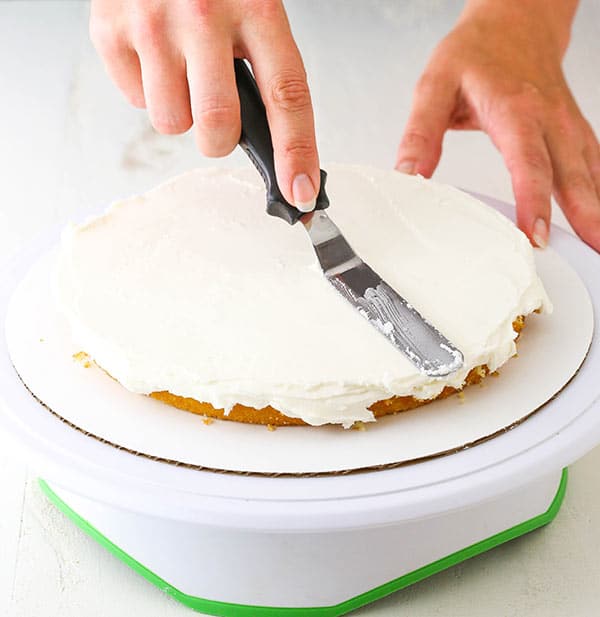
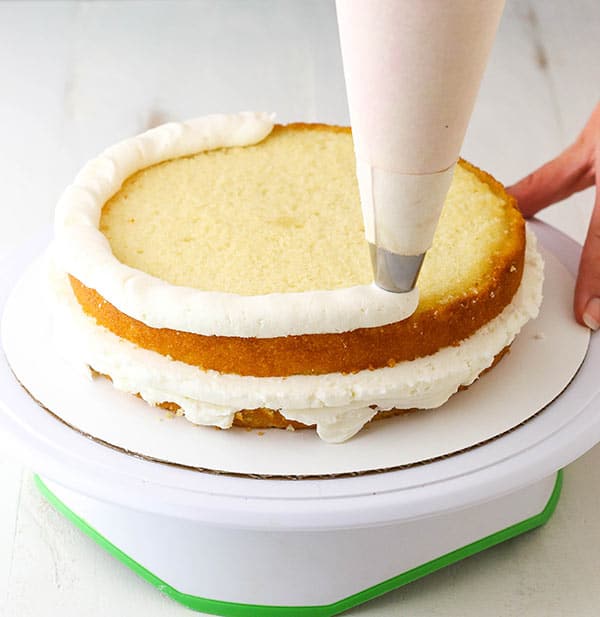
If you’re just adding a layer of buttercream between your cake layers, your frosting can have a thinner consistency and hold together just fine. I tend to add about 1 cup of frosting between my 8 inch cake layers and spread it into an even layer. You want to be sure it’s nice and even/level. One of the keys to a cake that doesn’t wobble is even layers.
For this cake, I was adding two fillings in one so I started with just 1/2 a cup of frosting. Add your frosting to your cake layer and spread evenly, allowing some to hang over the edges of the cake.

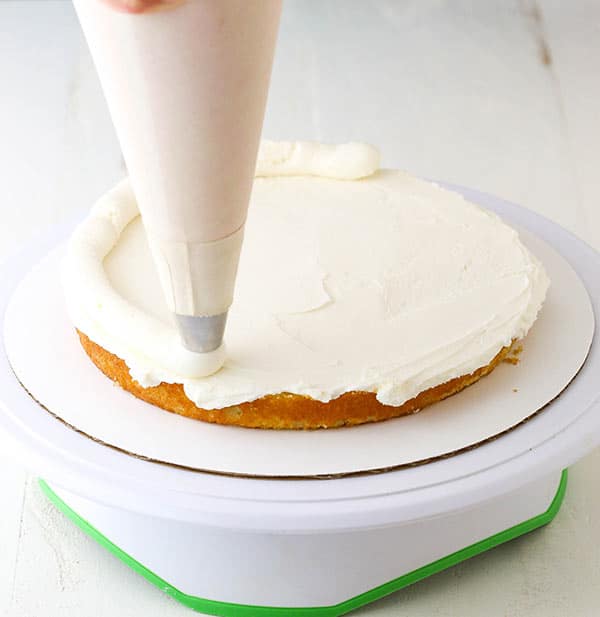
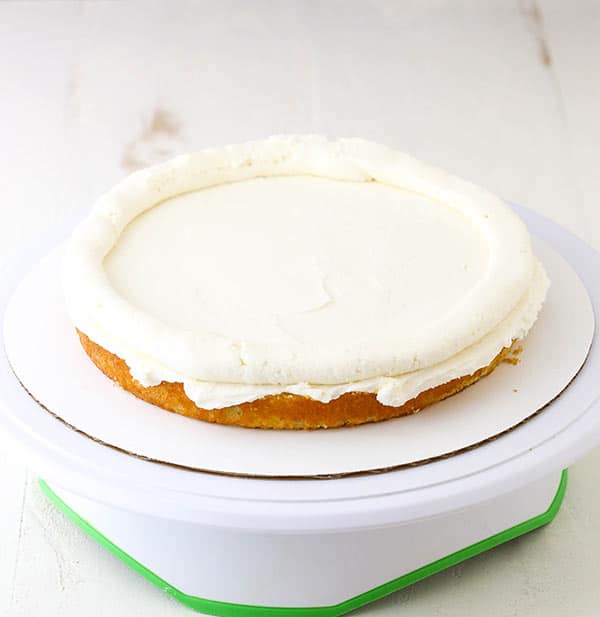
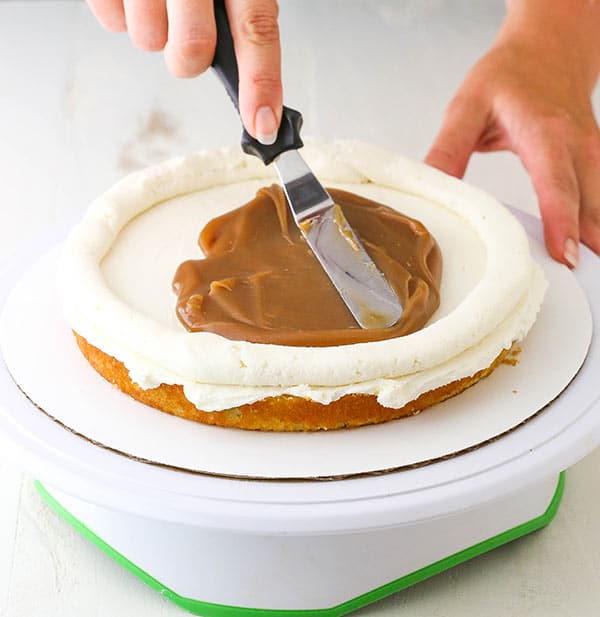
The next thing being added is a layer of caramel sauce. To keep it from spilling out from between the cake layers and creating a wobbly cake, we’ll add a dam of frosting around the outer edge of the cake. In this case, it’ll also be on top of the first layer of frosting. Again, this is where the consistency of your frosting is key. In order for things to stay in place, that dam of frosting needs to be firm enough. I like to pipe my dam so that it goes right up against the edge of the cake, potentially with a little bit of it hanging over the edge.
Another thing to keep in mind is the amount of filling you add. I mentioned above that I use about a cup of buttercream, but when it comes to thinner fillings I tend to stick with 1/2 to 3/4 cup, depending on how thin it is. No matter how strong your buttercream is, if the filling is quite thin and too tall, you’ll still end up with a wobbly cake.
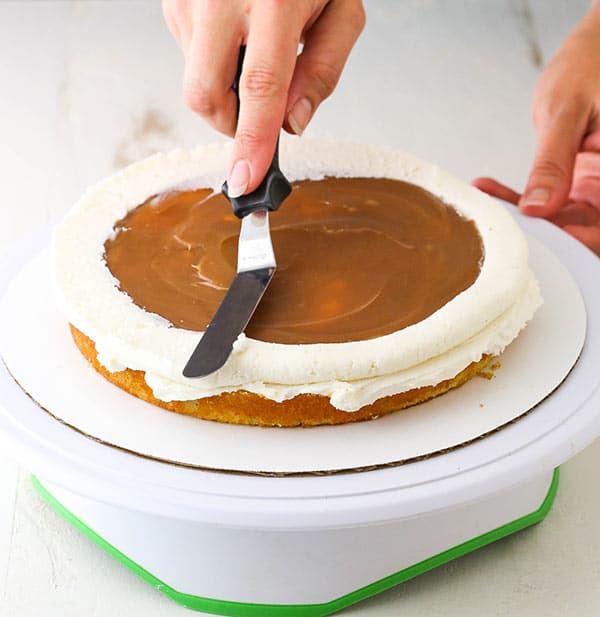
I also like to be sure to add a dam that has plenty of height, so that I’m sure that all my filling will fit within it. This is where I use my large round piping tip for that height. After you’ve added your dam by piping it around the edge of your cake, add your filling and spread it into an even layer.
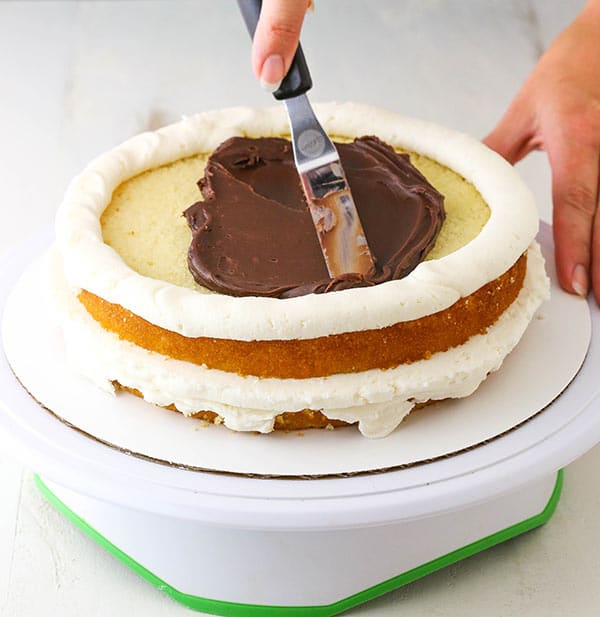
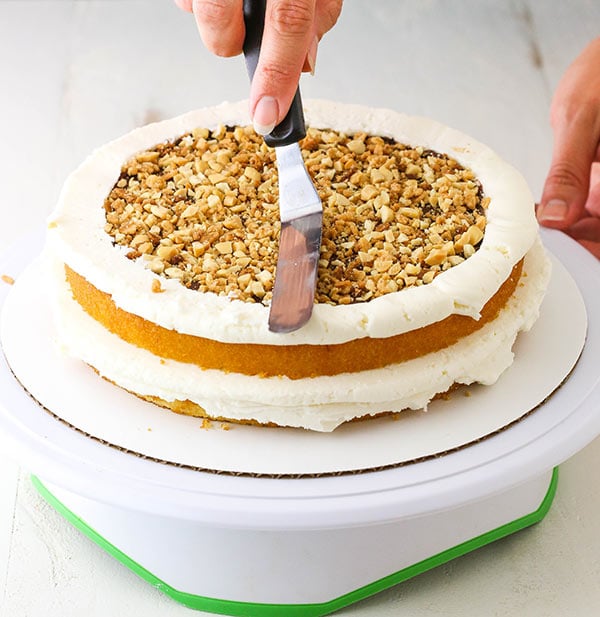
Before adding the next layer of cake, make sure that your filling layer is level. If your dam is taller than your filling (which mine usually is), use your offset spatula to go around the outer edge/the dam and smooth out the frosting so that it’s level with the filling.
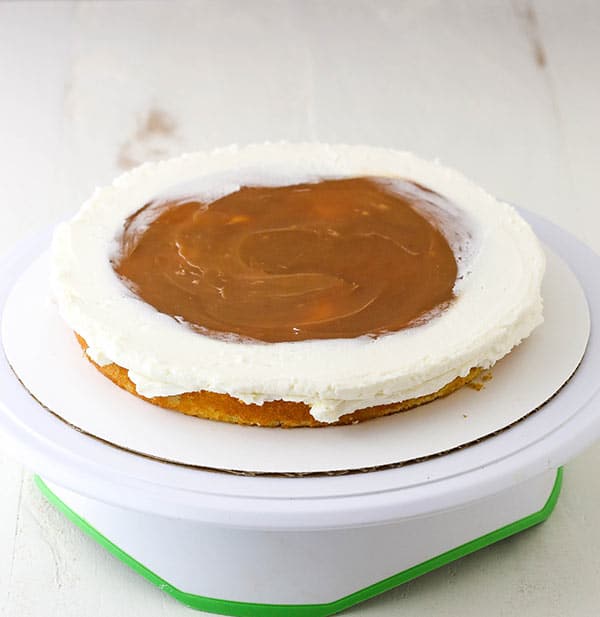
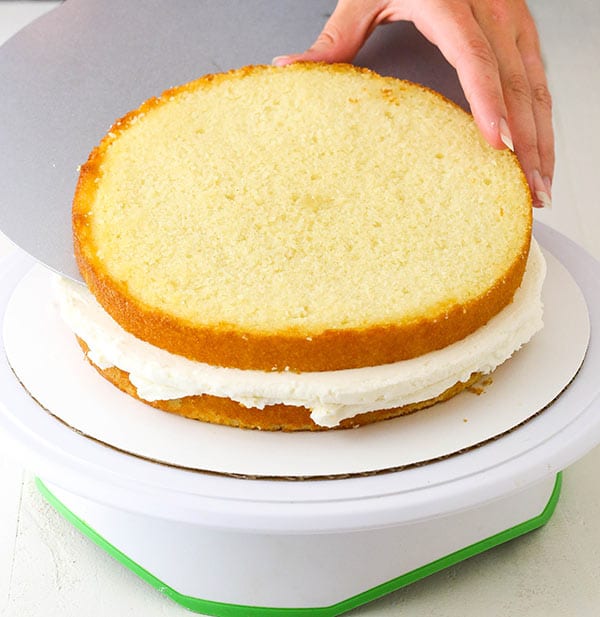
Add your next layer of cake. I like to use my cake lifter for thinner cake layers to make sure they don’t break apart.
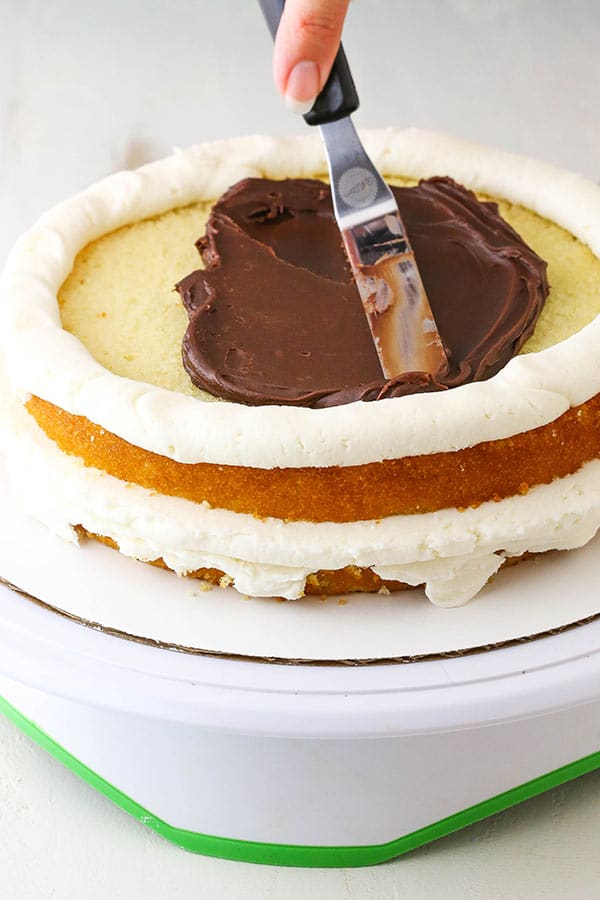
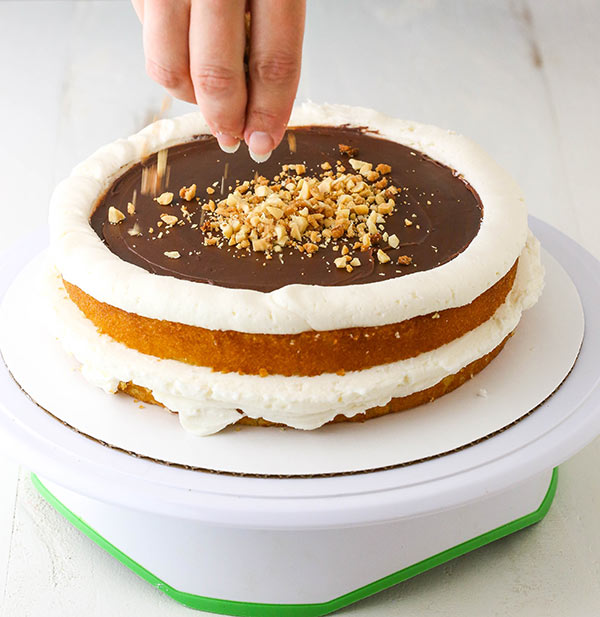
The next steps are really just variations of above. I add another dam and fill it with chocolate ganache and a crunchy streusel. Again, it’s a tall dam that evens up needing to be leveled off before adding the next layer of cake.
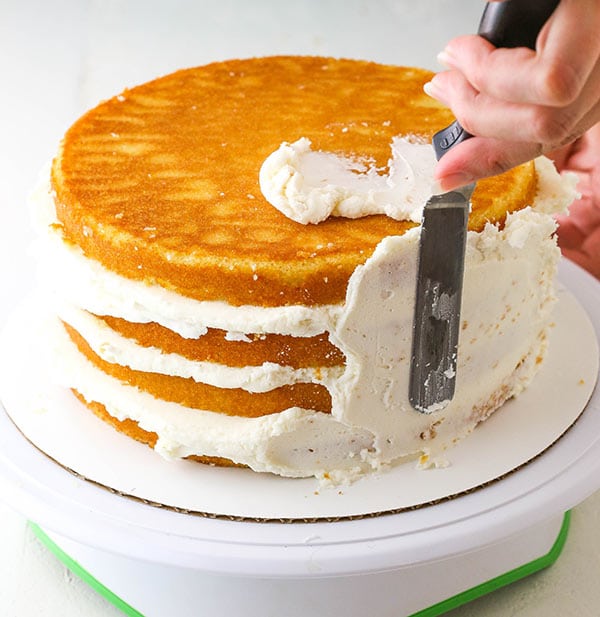
Once you’ve stacked and filled all your cake layers, your cake should look something like below. There’s a fair amount of frosting hanging over the sides. I use this frosting to spread around the outside and top of my cake to create the crumb coat. The crumb coat is a thin layer of frosting on the outside of a cake that holds in the crumbs so that they don’t mix into your final layer of frosting. You could always add frosting to the cake for the crumb coat, but I find that having the frosting in the filling layers already spread out to the edges actually helps to eliminate air bubbles, which can get caught in the frosting and work their way out, giving your cake a very un-lovely “pimple”.
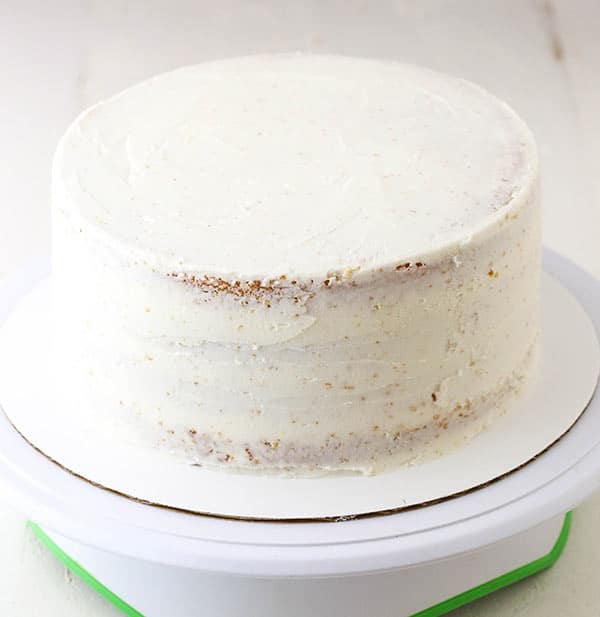
Once you’ve got your crumb coat, you are ready to frost your cake. If needed, you can refrigerate your cake prior to frosting it. I’ve got a terrific tutorial for frosting a smooth cake with buttercream you should check out. It includes a step-by-step video where I walk you through the process.
I hope you found today’s post helpful! If you’re interested in making the cake in the photos, be sure to check it out! It’s my Drumstick Layer Cake.
Some Cake Recipes with Yummy Fillings to Try:
Brown Sugar Layer Cake with Peach Filling
Lemon Cake with Lemon Bavarian Cream
Berry Mascarpone Layer Cake
Pina Colada Layer Cake
Almond Custard Cake
Raspberry Chocolate Layer Cake
Banana Cream Layer Cake
Pecan Pie Layer Cake
Hot Chocolate Cake


All this was so useful for me. What piping tip did you use for the beautiful design ,around the top of cake?
Which design do you mean? The one I used for making the frosting “dam” is the Ateco 808.
Thank you so much, l have learnt and understood in such a short tutorial. Thank you for availing your knowledge, it’s truly amazing and selfless. Much appreciated.
Do you have a recipe for the Crunchy Streusel?
Thanks
The cake in the photos is my Drumstick Cake, so the recipe is in there. 🙂
I love this u are the best
Glad it’s helpful!
Noticed first layer had both a dam and thin layer of frosting before caramel but not on 2nd layer? Reason?
I was making this drumstick cake and just using it to show the tutorial. The reason for the fillings has to do with the flavors I wanted in that cake.
Thank you so much for this Lyndsey, I have been having a lot of trouble with this, and you have just opened my eyes on how to do it properly.
What is the piping tip you use for damming?
I like to use a large round tip. I typically use my Ateco 808 tip.
Do you let your cakes settle or rest to avoid bulging between layers? How long should you rest a cake and should it be done at room temperature or in the refrigerator?
I don’t typically, but you could. I’d let it rest for an hour or two at room temperature. In the fridge, things firm up and they don’t really settle the same way.
Thank you Lindsay, I needed a visual before doing a “dam and filling” for a Valentine’s Day cake!
I used to be an instructor for Wilton. You are spot on with your techniques and your pictures are wonderful.! You do a great job of explaining the techniques as well. Great job!
Thank you so much, Judy!
How long do you recommend to refrigerate the cake with the crumb coat before adding frosting?
It depends on the cake. If I’m just using a regular buttercream, I don’t refrigerate it before frosting. If there’s a soft filling that’s making the layers move around a bit, then I might refrigerate it for 30 minutes to an hour, again depending on the filling.
I am sure it is in the post but I can not find the name of this cake. I would love to make it!
Oh yes, I meant to add the link when I shared the cake. It’s my Drumstick Layer Cake.
I so appreciate that you include your “preferred” baking tools/equipment in your blogs. I have been looking for a turntable and, though several local stores sell Wilton, I don’t know that I have seen the one you featured here. I have actually never shopped Amazon, but guess I need to get with the program! Perhaps it would be a daunting task, but maybe sometime you could share all of your preferred tools in one post (at least the ones that really take the cake…pun intended!). Thanks for all of your efforts. I really don’t know how you find the time and energy to do all that you do.
I have always admired your cake decorating skills so thank you for your great tips!
“This Cake”, with all the yummy layers, had my mouth watering! I. Can’t. Wait!!! These are great tutorials, Lindsey; getting my cakes leveled and then iced like this is going to make such a huge difference! I make very flavorful moist cakes, but only my cheesecakes “look” pretty! Thanks again for another great one:)
Dee
This post was very convenient and helpful for me as I am using two of your layer cake recipes this weekend for a graduation party. Thank you!
Such a helpful tutorial! Pictures of the individual steps make this so easy to follow – thank you!!