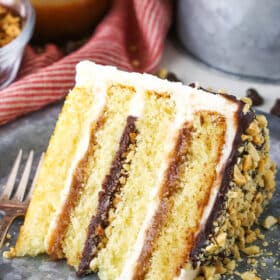
This Drumstick Layer Cake is inspired by one of my favorites – drumstick ice cream cones! With layers of moist vanilla cake, caramel sauce, chocolate ganache, vanilla buttercream, peanuts and waffle cone pieces, it combines the best parts of a drumstick into one tasty cake!

Dreamy Drumstick Layer Cake
As far as store but ice cream treats go, drumsticks are a big favorite in our house. They were a big favorite of mine growing up and the hubs still enjoys them quite regularly. In fact it’s on my grocery list right now to get another box at the store.
The drumsticks with the caramel in the center are my favorite, since I’m such a big lover of all things caramel. So when I decided to make a drumstick cake, I decided I had to include the caramel core. So we’ve got vanilla buttercream in place of a ice cream, caramel filling, chocolate filling in place of the chocolate in the bottom of the cone on and on the outside of the ice cream, and plenty of peanuts in place of those on the outside of the ice cream cone. So fun and yummy!

How to Make this Drumstick Layer Cake
To get started making this Drumstick Layer Cake, you want to make the caramel sauce. I shared a new caramel sauce a few days ago and that is what I used in this recipe. It’s a delicious and straight forward caramel sauce that can be made up to two weeks ahead of making this cake. Don’t you love it when steps can be done ahead of time?
When you have your caramel sauce ready, you can make the vanilla cake layers. I used my Moist Vanilla Layer Cake, with one slight difference. I added some extra vegetable oil to the cake to make it even more moist. And in order to have more layers of filling, I baked the cake in two cake pans and then split them into four cake layers with three filling layers. More filling is always better.

In addition to the layer of caramel filling, there’s the chocolate filling layer. It’s made with chocolate ganache and topped with some peanut and waffle cone crunchies. The crunchies are SO yummy! To make them, combine some crushed up sugar cones, a little sugar and salt, and melted butter. Toast it in the oven a bit, then crumble it all up and add some chopped peanuts. It’s got great flavor and toasting it helps it keep it’s crunch inside the cake.
The cake is covered with vanilla frosting and has some mixed in with the caramel layer as well. Once the frosting and everything else is made, it’s time to build the cake!
Once the cake is put together, it’s decorated as a chocolate drip cake with some sugar cones dipped in chocolate and place on top to look like melted drumsticks that are upside down. Sprinkle more of the sugar cone and peanut crunchies on top of the cake to finish it off. Such a fun way to decorate a cake and give a little teaser of what you’re going to find on the inside!
With all the layers and parts, this Drumstick Layer Cake is a little bit of a doozie in terms of time to make it, but the final result is SUCH a fun and tasty cake! Definitely perfect for a special occasion or a summer birthday! I hope you enjoy it!


You might also like
Peanut Butter Chocolate Ice Cream Cone Cake
Chocolate Piñata Cake
Milk and Cookies Layer Cake
Oreo Brookie Layer Cake
Drumstick Layer Cake
- Prep Time: 2 hours
- Cook Time: 1 hour 5 minutes
- Total Time: 3 hours 5 minutes
- Yield: 12–14 slices 1x
- Category: Dessert
- Method: Oven/Stove
- Cuisine: American
Description
This Drumstick Layer Cake is inspired by one of my favorites – drumstick ice cream cones! With layers of moist vanilla cake, caramel sauce, chocolate ganache, vanilla buttercream, peanuts and waffle cone pieces, it combines the best parts of a drumstick into one tasty cake!
Ingredients
Vanilla Cake Layers
- 2 1/2 cups (325g) all purpose flour
- 2 1/2 tsp baking powder
- 1/2 tsp salt
- 1/2 cup (112g) unsalted butter, room temperature
- 1/2 cup (120ml) vegetable oil
- 1 1/2 cups (310g) sugar
- 1 tbsp vanilla extract
- 4 large eggs
- 1 1/4 cups (300ml) milk
Chocolate Ganache Filling
- 2 oz (about 6 tbsp) semi-sweet chocolate chips
- 3 tbsp (45ml) heavy whipping cream
Sugar Cone and Peanut Crunchies
- 1 cup sugar cone crumbs
- 2 tbsp (26g) sugar
- Pinch of salt
- 1/4 cup (56g) unsalted butter, melted
- 1 cup (140g) peanuts, chopped
Vanilla Buttercream
- 1 1/2 cups (336g) salted butter
- 1 cup (189g) shortening
- 10 cups (1150g) powdered sugar
- 1 tbsp vanilla extract
- 2–3 tbsp (ml) water or milk
Cake Topping
- 6 oz (1 cup) semi-sweet chocolate chips
- 1/2 cup (120ml) heavy whipping cream
- 3 sugar cones
Instructions
1. Prepare the caramel sauce according to the directions in that recipe. The caramel sauce can be made up to two weeks ahead. When you’re ready to build the cake, I’d suggest letting the caramel sit out to get to room temperature so that it’s spreadable.
2. Prepare two 8 inch cake pans with parchment paper circles in the bottom and grease the sides. Preheat oven to 350°F (176°C).
3. Combine the flour, baking powder and salt in a medium sized bowl and set aside.
4. Add the butter, sugar, oil and vanilla extract to and large mixer bowl and beat together until light in color and fluffy, about 3-4 minutes. Do not skimp on the creaming time.
5. Add the eggs one at a time, mixing until mostly combined after each. Scrape down the sides of the bowl as needed to be sure all ingredients are well incorporated.
6. Add half of the dry ingredients to the batter and mix until mostly combined.
7. Slowly add the milk and mix until well combined. The batter will look curdled, but that’s ok.
8. Add the remaining dry ingredients and mix until well combined and smooth. Scrape down the sides of the bowl as needed to be sure all ingredients are well incorporated. Do not over mix the batter.
9. Divide the batter evenly between the cakes pans and bake for 32-36 minutes, or until a toothpick comes out with a few crumbs.
10. Remove the cakes from the oven and allow to cool for about 2-3 minutes, then remove to cooling racks to cool completely.
11. To make the chocolate ganache filling, add the chocolate chips to a small bowl.
12. Heat the cream just until it begins to boil, then pour it over the chocolate chips. Let it sit for a few minutes, then whisk until smooth.
13. Put the ganache in the fridge to firm up a bit so that it’s firmer but still spreadable.
14. To make the crunchies, preheat oven to 350°F (176°C) and prepare a cookie sheet with a silicone baking mat or parchment paper. Combine the sugar cone crumbs, sugar, salt and melted butter and toss until well coated.
15. Spread the mixture evenly onto the cookie sheet and bake for 6-8 minutes, or until lightly golden.
16. Remove from the oven and use a fork or something similar to toss the mixture and break it up, then set aside to cool.
17. Once cooled, add the chopped peanuts and combine. Set aside.
18. To make the vanilla buttercream, beat the butter and shortening together until smooth.
19. Slowly add half of the powdered sugar and mix until smooth.
20. Add the vanilla extract and 2 tablespoons of water or milk and mix until smooth.
21. Slowly add the remaining powdered sugar and mix until smooth. Add additional water or milk, as needed to get the right consistency of frosting.
22. To put the cake together, use a large serrated knife to remove the domes from the top of the cakes so that they’re flat. Next, cut each cake horizontally to make 4 layers of cake total. See my tutorial for leveling and torting a cake for additional help.
23. To build the cake, place the first layer of cake on a cardboard cake circle or a serving platter.
24. Spread about 1/2 a cup of vanilla buttercream into an even layer on top of the cake layer, then use the frosting to create a dam around the outer edge of the cake. See my tutorial on how to build a cake for more guidance (I actually used this cake for the tutorial, so the pictures are quite helpful).
25. Spread about 1/2 a cup of caramel sauce into an even layer in the middle of the dam of frosting, then level out the dam and caramel sauce so that it’s all an even layer.
26. Add another layer of cake on top of the caramel sauce. For help moving cake layers around, I like to use a cake lifter.
27. Pipe another dam of frosting around the edge of the cake, then fill it with the chocolate ganache and spread into an even layer.
28. Sprinkle an even layer of the sugar cone/peanut crunchies over the chocolate ganache.
29. Add the third layer of cake, then repeat another layer of vanilla buttercream, a dam around the outer edge and another 1/2 cup of caramel sauce (the same as steps 24-25).
30. Add the final layer of cake on top, then frost the outside of the cake with the remaining vanilla buttercream. Refer to my tutorial for frosting a smooth cake, if needed.
31. To decorate the cake, add the chocolate chips for the topping to a medium bowl.
32. Heat the cream just until it begins to boil, then pour it over the chocolate chips. Let it sit for a few minutes, then whisk until smooth.
33. Dip the sugar cones into the chocolate one by one and then add the to the top of the cake.
34. Use the remaining chocolate ganache to create a drip around the sides of the cake, then fill in the top. Refer to my tutorial for making a chocolate drip cake, if needed.
35. Finish off the cake with the remaining sugar cone/peanut crunchies.
36. Refrigerate the cake until ready to serve, then let sit out for 1-2 hours before serving. Cake is best when stored well covered in the fridge. Best if eaten within 2-3 days.
Nutrition
- Serving Size: 1 slice
- Calories: 1202
- Sugar: 113.7 g
- Sodium: 609.6 mg
- Fat: 71.8 g
- Carbohydrates: 135.9 g
- Protein: 10 g
- Cholesterol: 154 mg


This cake looks amazing and I have been wanting to make it for awhile now so I am finally going to try. Just a question, the peanuts you use are salted or unsalted?
And also the crunchies mix, can I make it a day or two in advance?
Thanks
Sumayyah
You could use salted or unsalted. I believe I used salted. And yes, the crunchies could be made in advance.
I hope you enjoy it!
Which caramel recipe did u use?
It’s linked in the ingredient list, but it’s this caramel sauce.
This cake was over the top -I brought it to a baby shower and it was gone within 20 minutes! 2 people told me it was the best cake they had ever eaten!!!! It was time consuming but so worth it!!! I will definitely be making this again! Thank you Lindsay-your detailed instructions are incredible!
I’m making this cake for our first family gathering since the pandemic for Easter tomorrow. I love this recipe. I will be substituting chopped pecans for the peanuts.
Can you give me the measurements for the cake part for an 11×15 cake pan?
I haven’t made this in that pan, but I’ve made a similar cake as a sheet pan and you should be able to use the cake part of the recipe as is. I’m not sure about the rest.
I would like to make this into a sheet cake. Would you be able to give me the measurements for an 11x15x2 inch sheet pan?
Thank you so much. I’m making it for my birthday next week
WAY too much frosting, I generously frosted this baby and have so much left over! Next time, and there will be a next time, I’ll cut it in half.
This cake was amazing. Takes a little patience, but the results are well worth it. Came out exactly as pictured. Alll agreed the flavors are perfect.
Wonderful! I’m so glad to hear you enjoyed it!
Hey Lindsay I just make the cake part and both cakes are less than one inch thick. I won’t be able to cut them in half. I followed the instructions to a tee. What went wrong? It smells delicious though. Do I need to make two more? Thanks.
It’s hard to say for sure. Sounds like they didn’t rise properly. A common issue is not fully creaming the butter and sugar. That process adds air to the better that helps the cake rise. You may also want to check your baking powder and make sure that it is still good. The other possibility is you don’t want to over mix the cake batter after adding the flour at the end. Just mix until things are nicely combined.
Can you put this in the fridge overnight with the crumb coat and frost the next day? My husband loves Drumsticks and I’m going to attempt to make this for his birthday. Thank you!
Yes, just be sure to have it in an airtight container so it doesn’t dry out too much. It’d be better fully frosted in the fridge.
ATTENTION: YOU MUST MAKE THIS CAKE!!! This tasted so incredible and the mix of flavors was *perfect*! Everyone said this was one of the best cakes they’d had and that it tasted just like a drumstick!
One note- if you’re an amateur like me, it’s worth studying the tutorials on torting the cakes and stacking them correctly. I didn’t slice them as neatly, which meant that even with the frosting dam some of my bottom layer of caramel leaked out through the sides with the weight of the cake. But even with that mess up, it looked a little less perfect but was still stunning and delicious!!!
Awesome! I am so glad to hear it was such a hit! Thanks Brian!
Caramel, chocolate, and vanilla is an amazing combination – I’d love to try this cake!
Would it work if I divided the batter between four shallower pans? My 8″ ones are only 2″ deep, so I don’t think I could tort them.
I used 2 inch pans and it was fine. But you could also bake it in four separate pans if you wanted.
You were holding out on us for so long with this one! I was dying to see when you would post the final results of this cake. So gorgeous! When I read the post about torting cake layers and you showed the caramel sauce going on over the cake layers, I almost lost my mind. Caramel is my kryptonite. I cannot WAIT to make this one.
Lol! I’m glad to have finally shared it! I hope you enjoy it!