If you’ve ever wanted to know How to Properly Level and Torte a Cake without a leveler so that it’s easier to stack and fill, this tutorial is for you!
What is Leveling and Torting a Cake? Why Do You Do It?
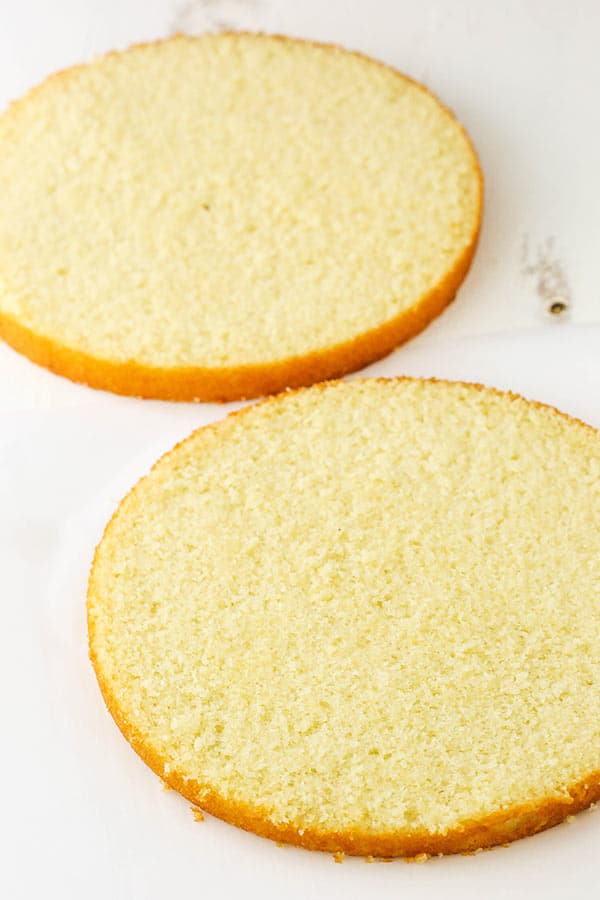
A dome typically forms on top of a cake when it’s baked. Leveling the cake refers to removing that dome so that the top of the cake is flat.
Torting the cake is when you divide the cake horizontally into layers so that you can add a filling and stack the layers evenly.
While it may seem like an unnecessary step, it’s important to have level cake layers to ensure the stability of your cake. A domed cake that is stacked with another domed cake can eventually put too much pressure on the center of the cake, causing it to crack right down the middle.
Tools You’ll Need:
Cake
Turntable
Long serrated knife
Ruler, optional
Cake lifter, optional
How to Level and Torte a Cake Without a Leveler
There are many ways to do level and torte a cake. When I first started making cakes, I used a leveler. But ultimately I found that they tend to be flimsy and not really give me a nice, level layer. So today I’ll show you how to level/torte a cake without a leveler.
You’ll want to start by leveling your cake, then torting it. Leveling it first allows you to be accurate when you gauge where the middle of the cake is when you begin torting it. I’m showing the steps with torting, rather than leveling, because it’s a little easier to show.
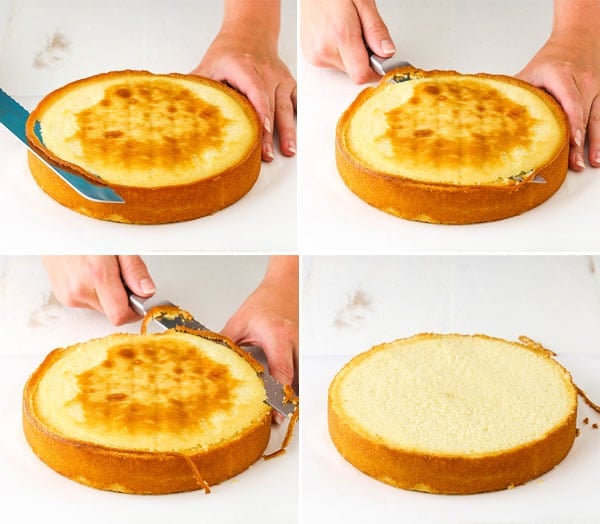
So to get started, place your cake on a turntable and have a large serrated knife ready. Place the blade of the knife where you’re going to want to make the cut. In this case, that’s the middle of the cake so that it can be split into two layers. Make a little mark with the blade of the knife. I usually just eye it to make sure it’s in the middle, but you could also use a ruler.
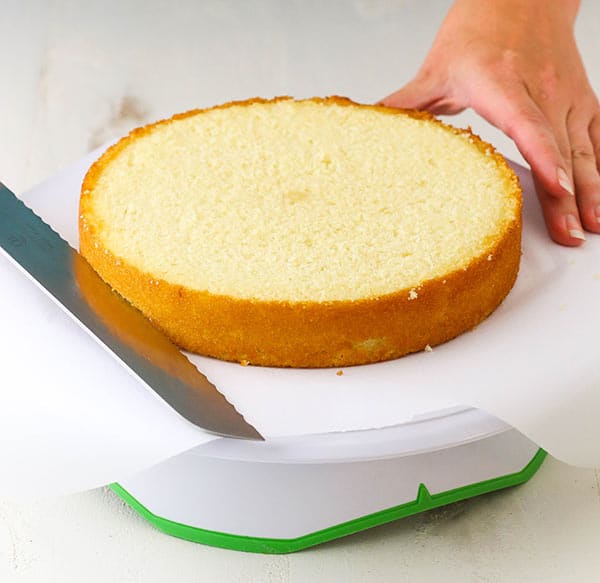
Next, keep your knife in place and slowly turn the turntable so that your knife makes a shallow cut all the way around, marking where you’ll cut. Do this slowly, keeping an eye on the position of the knife. Again, you could use a ruler if you prefer and work your way around the cake by measuring and creating marks.
Once you have your markings around the outside of the cake, keep your knife in place and use a slow, careful sawing motion to divide the cake. Be sure to go slowly and keep an eye on the position of the knife, making sure it lines up with the markings. You could also continue turning the cake on the turntable, slowly moving the knife inward as you cut in towards the center of the cake. I’ve just found that I prefer the sawing motion.
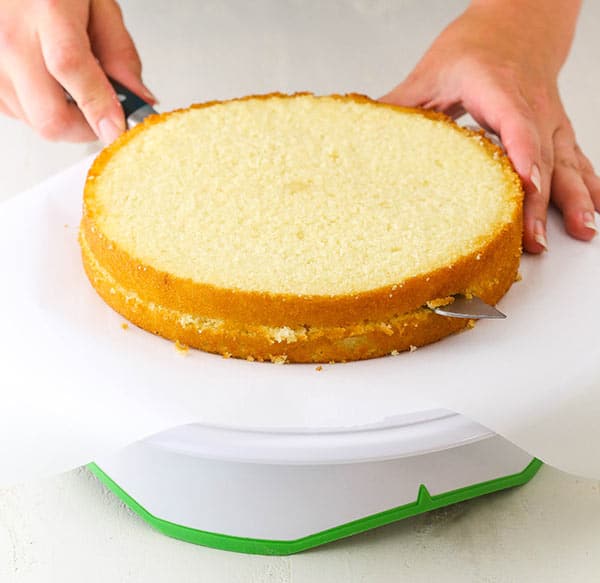
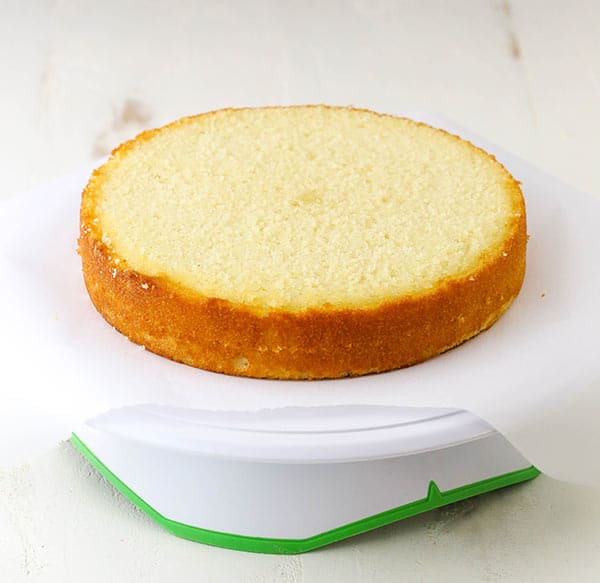
Once the cut is made, remove the top layer so that you have the two layers. I have a cake lifter that I like to use. It makes it really easy to handle thin, tender cake layers.

The above method can be used for both leveling the top of the cake and torting the layers. However when it comes to leveling the cake, I often find it’s not entirely necessary to make the markings. It depends on the way your cake has baked, but I tend to use the little outer edge of the cake as my “mark” when leveling it. It’s even simpler than the method above, if you are comfortable free handing it. You can see in the photos below that those top edges (my “marks”) come off with the dome, but not much else. I like to make sure I leave as much cake on top as I can. However, if your cake has a more serious dome to be removed, feel free to make the markings as shown above.
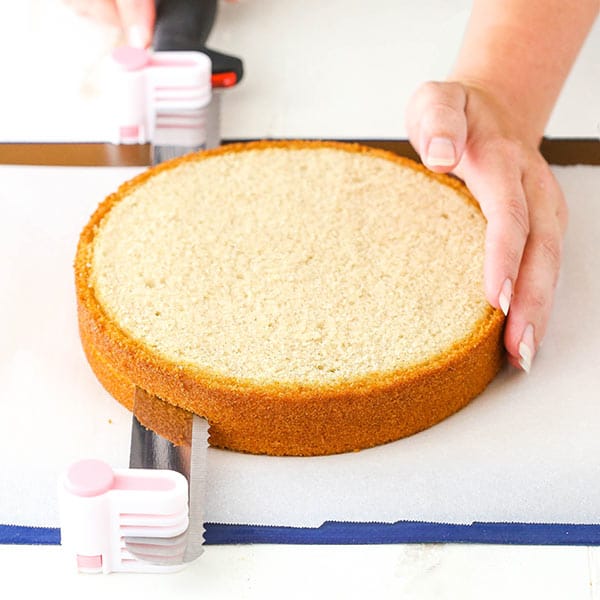
How to Level and Torte a Cake with a Leveler Alternative
Now if you really are new to this and want to start with a leveler, I’ll suggest this option. They are little clips that you can attach to the ends of your knife and basically have it act as a leveler. The thing that I like about this is that your knife is what’s making the cut, so you know it’s sturdy and won’t slip around. You will need to make sure you have a long knife though. If you’re going to use it on cakes larger than 8 inches, I’d suggest the one I linked to above (and show in the photos below). It’s quite long, but you do need that length. While I still prefer the method without a leveler, this is the best option I’ve found if you’d prefer the comfort of a leveler when getting started.
So there you have it! A quick and easy tutorial for leveling and torting your cakes! I hope you found it helpful. And be sure to check out my post on how to stack and fill your cakes!

This post contains affiliate links.


Best cake ever! Everyone loved it! It was so easy to make and follow your instructions! I will try more of your recipes. Thank you!!!
Your tutorials are wonderful! You are a saint for dealing with these crazy questions. Too much sugar in your cake recipe?! How dare you put sugar in your “Dessert” recipes. 🙂
LOL! Thanks! Glad you enjoy the tutorials!
Hi,
I would love to make your cakes, but there is too much sugar in them, How much sugar do I use if I want to reduce the sugar in the Smores Chocolate cake or any other cake? Please reply back asap. Thank you, Nancy
What part of the cake are you referring to? The cake layers themselves or the frosting? I would say my cake layers have a pretty average amount of sugar. You could reduce it, but sugar not only adds sweetness to a cake but also moisture. So reducing it will affect the texture of the cake. As for the frosting, the powdered sugar adds volume and gets it to a consistency that is ideal for cake decorating, which is what I like. If you want to reduce it, you certainly can. You just probably want to experiment with it and familiarize yourself with the consistency that you like. Thinner frosting is fine if you don’t want to be able to pipe borders and such. Here’s a blog post about consistency of frosting. Another thing to consider is using Swiss meringue buttercream. It is more complicated to make, but has less sugar because the base is whipped egg whites. https://www.lifeloveandsugar.com/get-right-frosting-consistency/
If you still feel really strongly about reducing sugar even further, you may want to look for a site that specializes in lower sugar and healthier versions of desserts. They use certain substitutes to help offset the lower amounts of sugar in cakes and bakes goods.
Lindsey, I love your cakes and get rave reviews when I make them. I was taught to torte cakes with dental floss. Measure half way up the side of the cake and place a toothpick. Go around the cake with toothpicks placing them a few inches apart. Place a long piece of dental floss around the cake on top of the toothpicks. Cross the ends and pull. Perfect torte!
Hi Lindsay,
The strawberry cake looks fantastic and would love to give it a try. Are you able to recommend substitute for eggs?
I’m sorry, but I haven’t worked with any egg substitutes before.
HI Lindsay,
I am new to your site! but I love it! so beautiful and great tips and recipes. Thank you for sharing. I have a question. If you make the cakes in advance, how would you store them making sure they so not get dry? Could I bake the cake, let it cool a few hours and then how can I store them in the fridge? Would the cake get dry? I wan to make your Nutella Chocolate cake but I have to do it on several days bc of a full-time job. How would you suggest I do it and without jeopardizing the quality of the cake. Thanks so much!
You want me to store them in an airtight container, like a cake carrier. You can even leave the cake on the counter at room temperature. If you don’t have a cake carrier, you could wrap it in clear wrap, then foil. The main thing is that you want it to be air tight. The Nutella chocolate cake is a very moist one and should hold up very well to making it the day before.
I have a doubt..when should I actually level and torte the cake? I am new, and the first time, I did it while it was still kind of hot.. It was a mess haha.. So I guess it needs to be cold? How many hours after you take it out from the oven, you actually level and torte it? And after you level and torte it, can you immediately proceed to put the frost on? Thank you in advance!
You want to let your cake cool completely before doing anything to it. The amount of time it takes to cool probably varies a little based on the cake and environment, but a few hours is usually enough. Once it’s cool, you can torte it and as soon as you’ve done that you’re fine to move on to filling and frosting. The main thing is that it should be completely cool first.
I couldn’t edit the comment I made earlier today, so I will make a new comment.
Never Mind! Lol My hubby got the lap top working again and upon viewing it on there, I now see where you state you are showing torting rather than leveling. Ads kept popping up and moving the structure of the text around the page. I just missed that paragraph. I apologize Lindsay!
I hope to make this cake for a friends birthday Sat. It looks amazing!
Hi Lindsay,
You have done a great job describing how to cut a cake in half. However, I don’t understand how to accurately level a cake without using a leveler which is what I thought this post was discussing. There are so many advertisements that show up on my cell I wonder if it has blocked the portion about leveling. I do see where you talk about using marks as shown above if your cake has a large dome. However, I don’t see the marks you are referring to? I am sorry, I am confused. You have done a great job explaining how to split a cake in half, which is why I hope to get your instructions on leveling rather than just going on to another blog. No one else mentions being unclear on leveling which leads me to think I am missing something. However, I have gone through the post several times and can’t find instructions. Thanks for your time!
What are the best brand cake pans to use? Also, do you use the wet wraps around your cake pans to keep the cake level while baking? I’m new to baking and am learning all this! Thanks for sharing!
I use Wilton brand cake pans. I tried using those wet wraps for a while. I eventually stopped using them. I find them to be kind of a pain and I don’t remember feeling like they made a huge difference. But it has been along time since I use them. I’d probably need to try them again to say for sure.
No worries, I would never share without permission. You have an incredible site and your recipes look beautiful and are not so hard for the novice baker.
Great tip, when I saw sometimes I have ridges in the cakes slices. This may end that. I belong to a site “Just a Pinch” and would love to share this tip with fellow bakers if it’s alright with you. I have some of your recipes saved to my recipe box there and find keeping everything in one location is great for me. I enjoy this page and have tried some of your masterpieces with good results. Thanks for all your hard work.
Hi Jennifer, I’m glad to hear you enjoy the recipes, but please do not share my tutorial/recipes and photos on “Just a Pinch”. My understanding of that site is that the creator of the recipe and images doesn’t get credit for their work or anything. Please refer to my recipes within my site or print them for your use. Thanks!
I love your tips! Also, your short videos are wonderful; thanks for all of your hard work:)
Thanks Dee! Glad you enjoy them!
Just be really careful, the way your hand is opposite the knife coming towards it, I cut my left thumb REALLY bad doing it like that, lots of stitches and a scar and it’s been 35+ years ago. I now bake my cakes ahead of time and when they are slightly frozen, level and then torte, easier for me. Love to see the cake lifter, never knew they had those, that’s nice. Enjoy your postings and recipes….thanks!
Oh goodness! Yes, I work very slowly when leveling my cakes and have plenty of time to move my hand out-of-the-way. Thank you! I had a similarly unfortunate experience once with a mandolin slicer though. My ring finger has quite a scar.
Such great tips. I just made a cake for my sisters birthday (out of the box, don’t judge ha!) and I thought I leveled it enough, but the whole top layer slid off! I also blame the terrible thin/runny store bought icing. Either way, next time I’m leveling!
xo Jessica
My Style Vita
Lol! Yes, it could be the store-bought frosting. Definitely check out my post today on filling and stacking your cake too. I’m sure it still taste great though!
Thanks for all these tips!!!