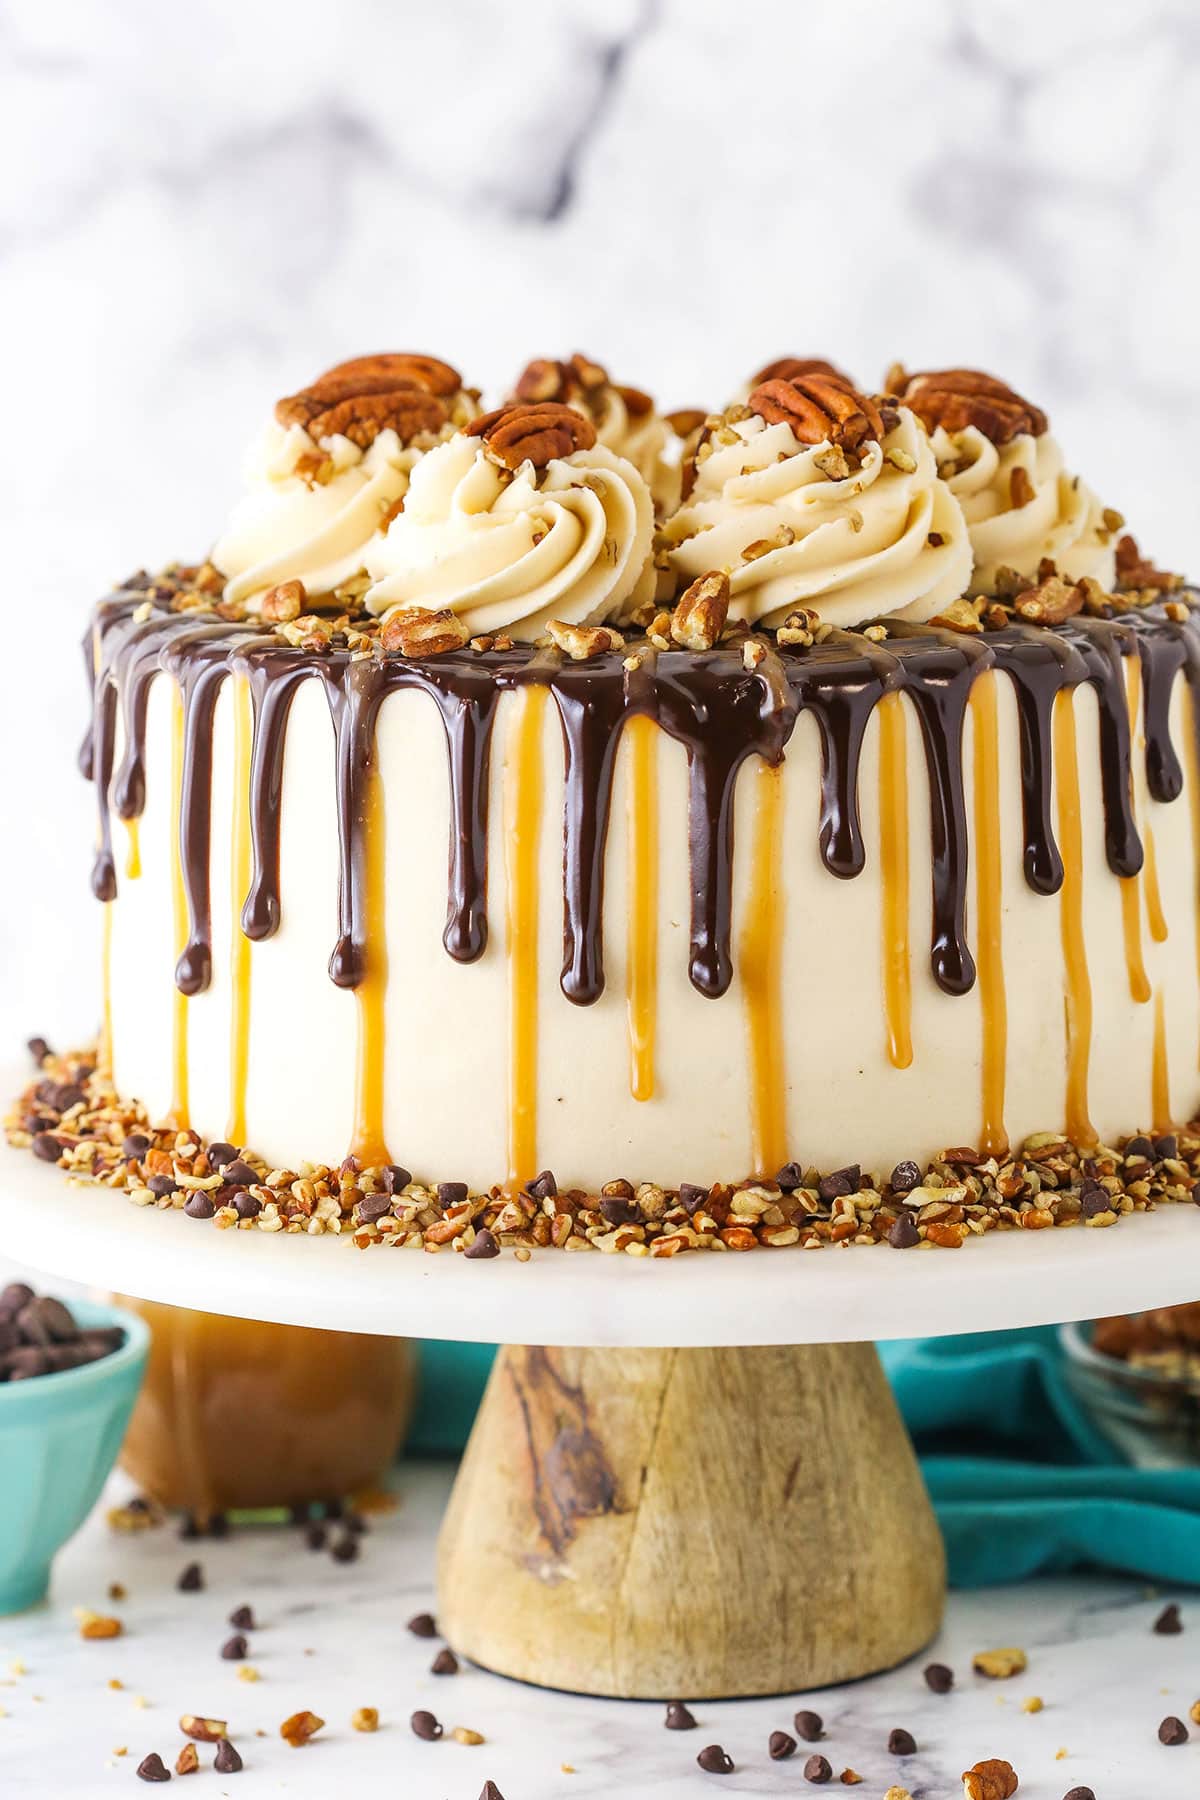
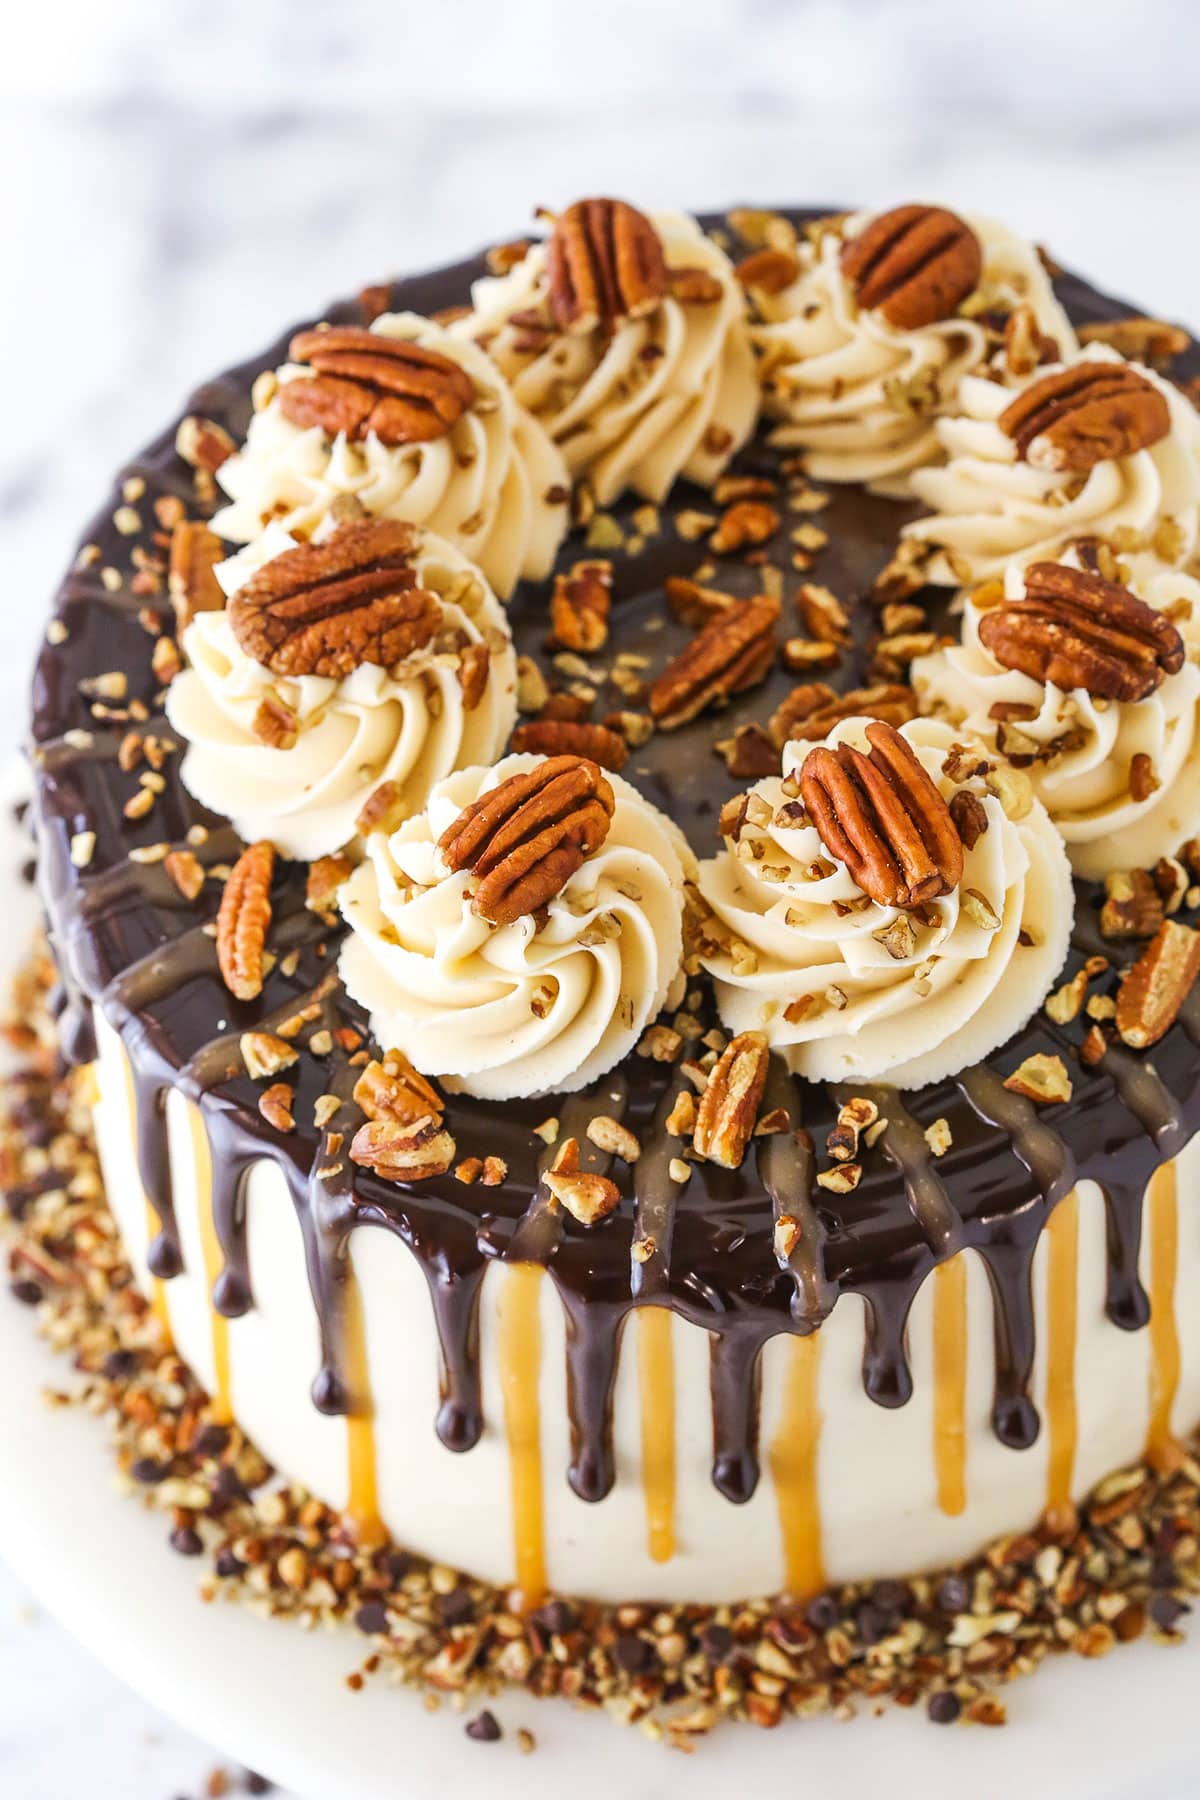
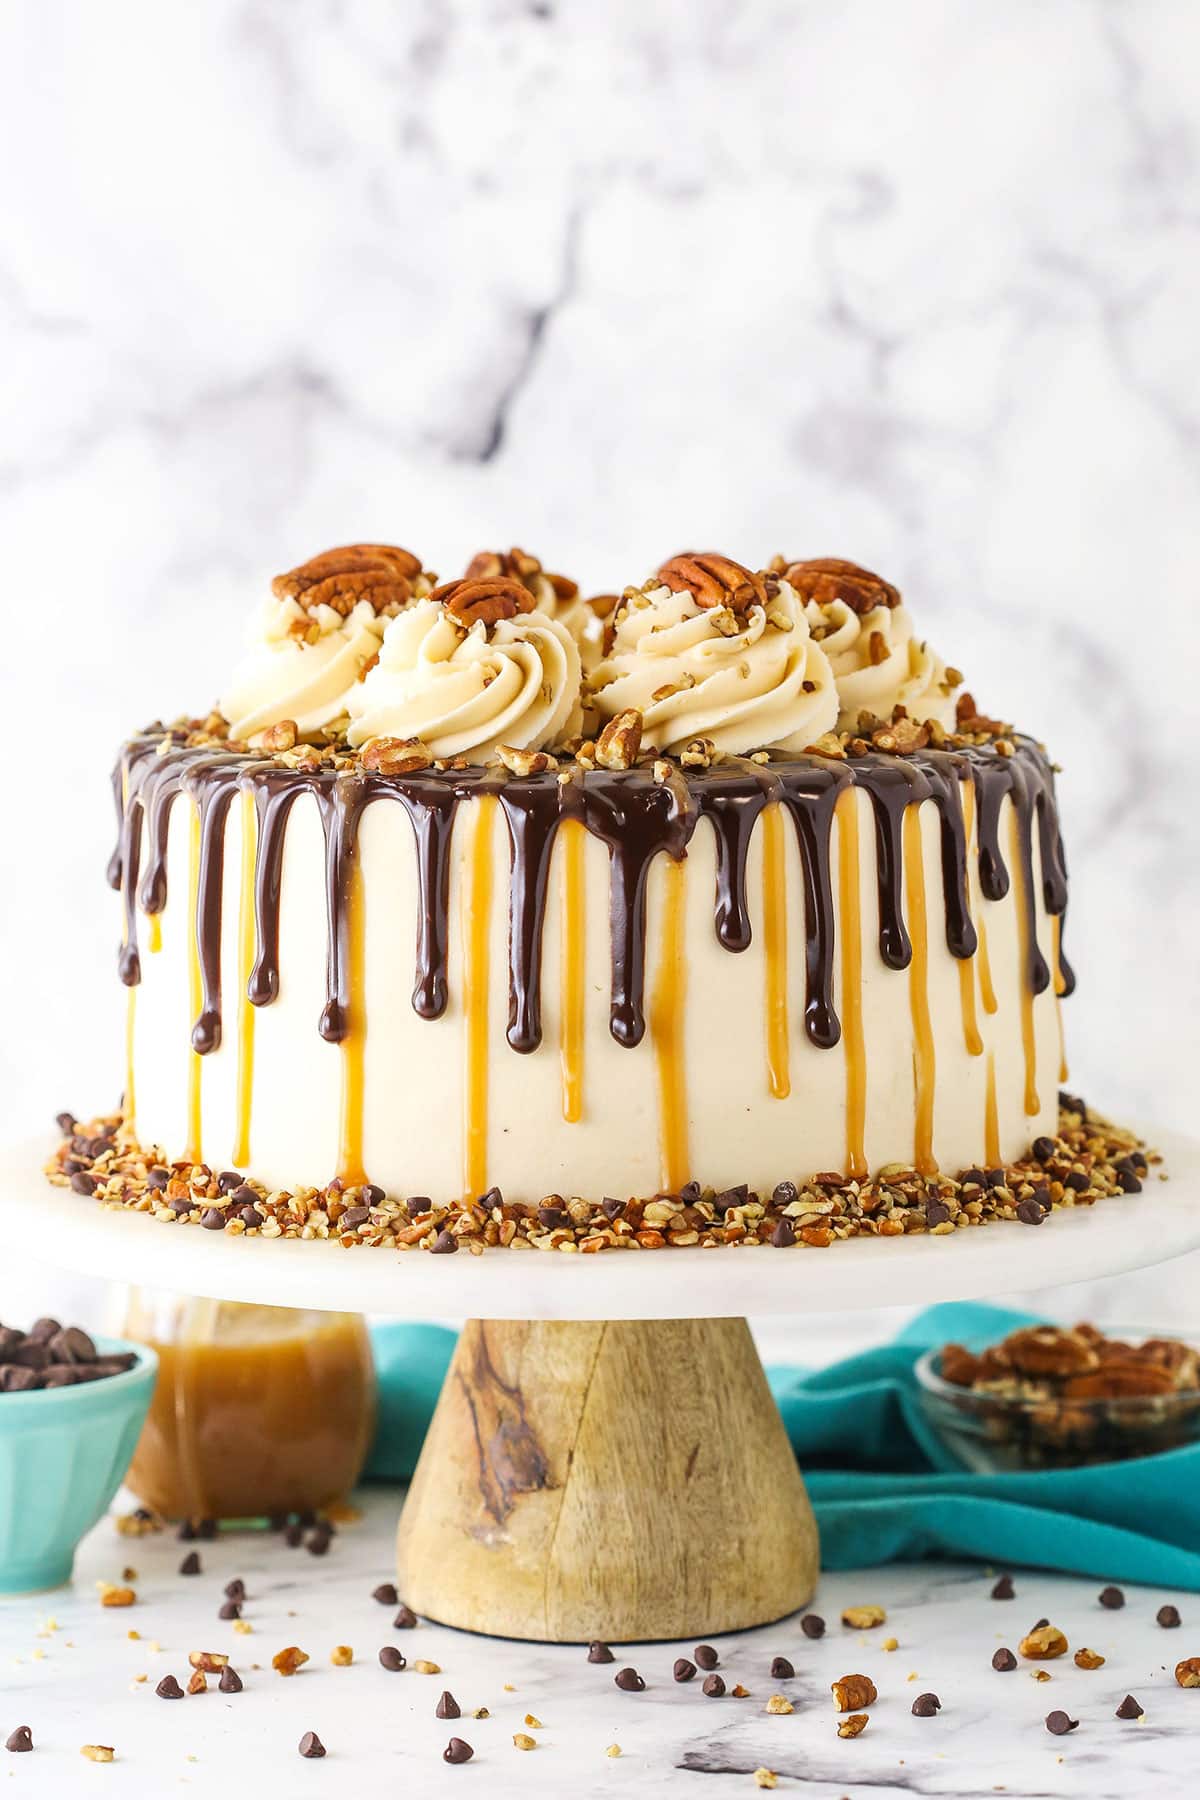
This Turtle Chocolate Cake is made with super moist chocolate cake, caramel sauce, chopped pecans and caramel buttercream! It’s like turtle candies in cake form and it’s heavenly!
If you’re looking for more delicious and easy turtle candy-inspired desserts, try my turtle thumbprint cookies and turtle cheesecake!
Turtle Chocolate Layer Cake
This cake has so much going for it. Not only is it made with my favorite Best Chocolate Cake recipe as the base, but it’s full of caramel, chocolate and pecans. What’s not to love?!
If you aren’t familiar with turtle candies, then you might be wondering what in the world a turtle cake is. Surely it has nothing to do with the animal? And you’re right! Turtle candies are actually made to look like the shape of a turtle, hence the name. Pecans are used to kind of look like the little legs and caramel sauce and chocolate make up the body of the turtle. It’s a delicious candy and just might be even better in cake form.
I originally shared a different version of this cake about 5 years ago. While I loved that cake, more people than I’d like had trouble with the caramel sauce and buttercream. So I’m finally sharing an updated version where everything is a little more simplified. Plus, there’s a video this time where I actually show you just how to make the cake! Yay!
What’s in a Turtle Chocolate Layer Cake?
- Moist Chocolate Cake – As I mentioned before, this chocolate cake is my very favorite one. It’s moist for days and could not be more simple to put together. You really just combine your dry ingredients, add your wet ingredients and then bake it! Such a simple cake with amazing results – it doesn’t get any better!
- Caramel Sauce – The previous version of this recipe used a dry method style caramel sauce, which can be tricky and caused people too many headaches. This one uses my newer caramel sauce, which is a wet method sauce. It’s much more straight forward and works perfectly in this cake.
- Caramel Buttercream – A classic American-style buttercream with some caramel sauce added it. The main thing with the buttercream is that you want to add enough caramel sauce to it that you get that nice caramel flavor, but not so much that you thin out the frosting a bunch and end up with a frosting that won’t stay in place or hold your cake together.
- Chocolate Ganache – Because there’s no such thing as too much chocolate. Plus, I love the look of drip cakes.
- Pecans – An essential part of a Turtle Cake and adds a lovely little crunch. I’m always a fan of toasting pecans when adding them to baked goods. It brings out their flavor and softens them a bit.
How to make Turtle Chocolate Cake
First up is to make the caramel sauce. It’s made right on the stove and is pretty straightforward. It can actually be made ahead too, which is great. Make the caramel sauce and let it cool to room temperature. If you make it ahead, you can definitely refrigerate it, but I do recommend having it at room temperature when you make the frosting, just so that you know the consistency of the frosting is right. If you use cold caramel, the frosting will seem thicker and then actually thin out as the caramel warms up, which could impact the stability of your cake.
Next, you’ll make the cake layers. I mentioned before just how easy the cake batter is to put together, so that’s a big win. Make those layers and let them cool. This cake is so moist and lovely, you can definitely make it the day before you’re layering the cake. I actually do that most of the time and it works great.
When you’re ready to build the cake, make the caramel buttercream. You’ll beat your butter until smooth, slowly add the powdered sugar and caramel sauce, plus a little salt if you like, and you’re ready to go. As I mentioned before, you just want to pay attention to the consistency of the frosting. Too thin and your cake will end up with bulges between the cake layers where the frosting and caramel sauce don’t stay put. No fun.
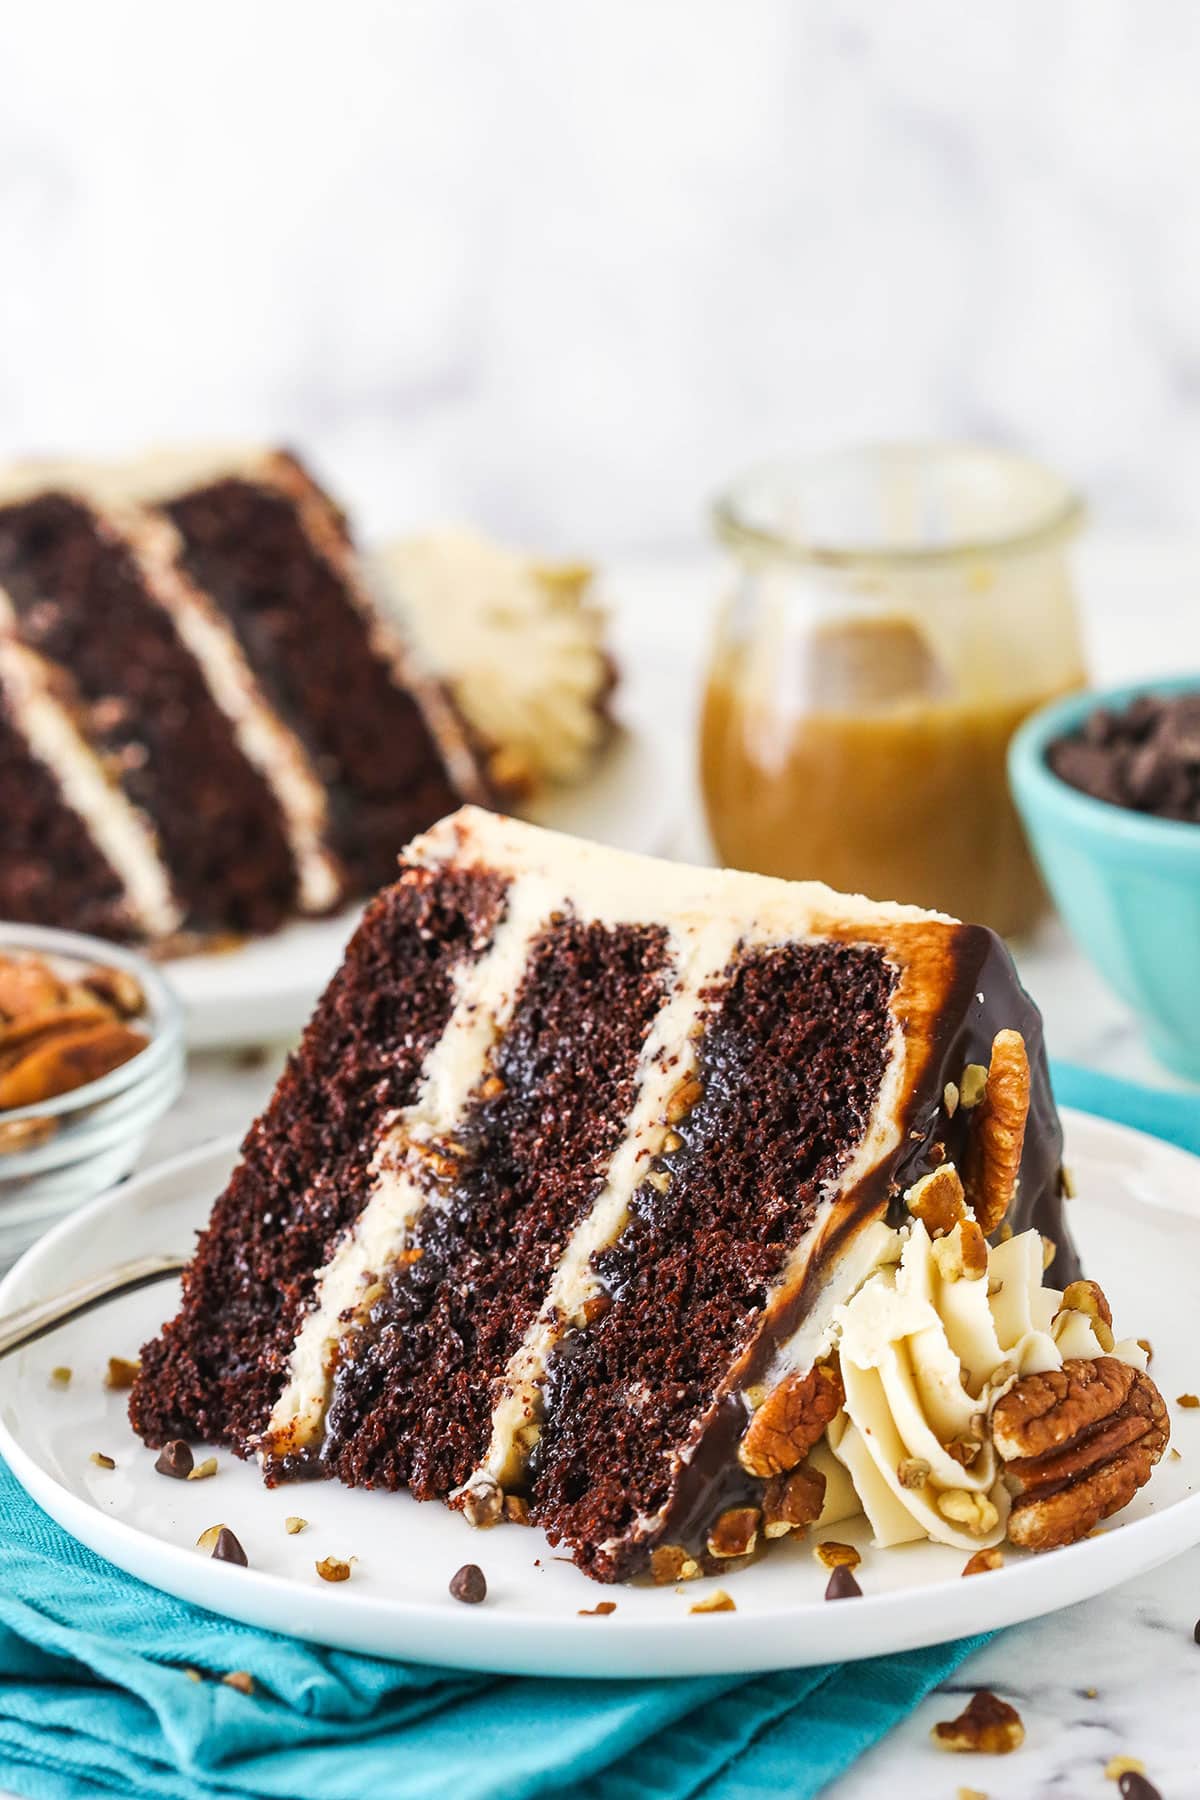
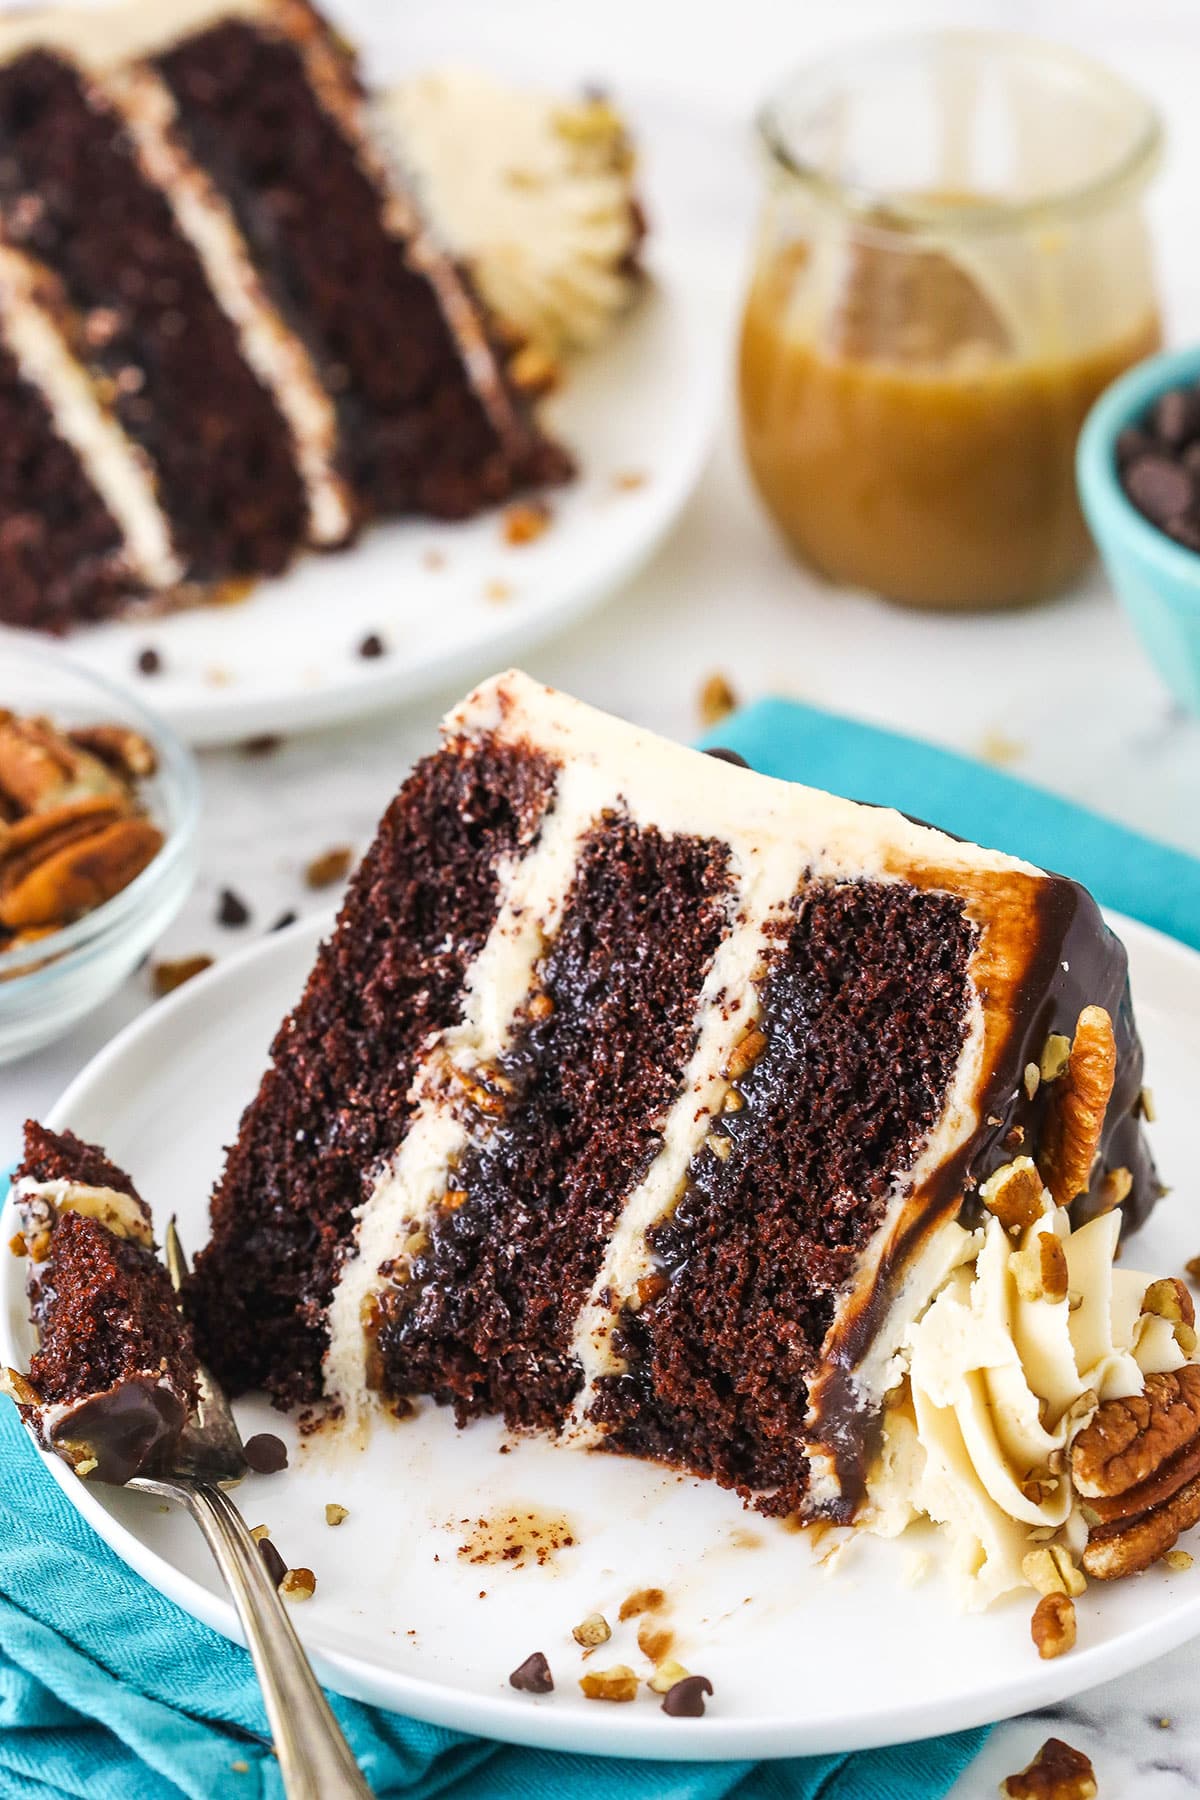
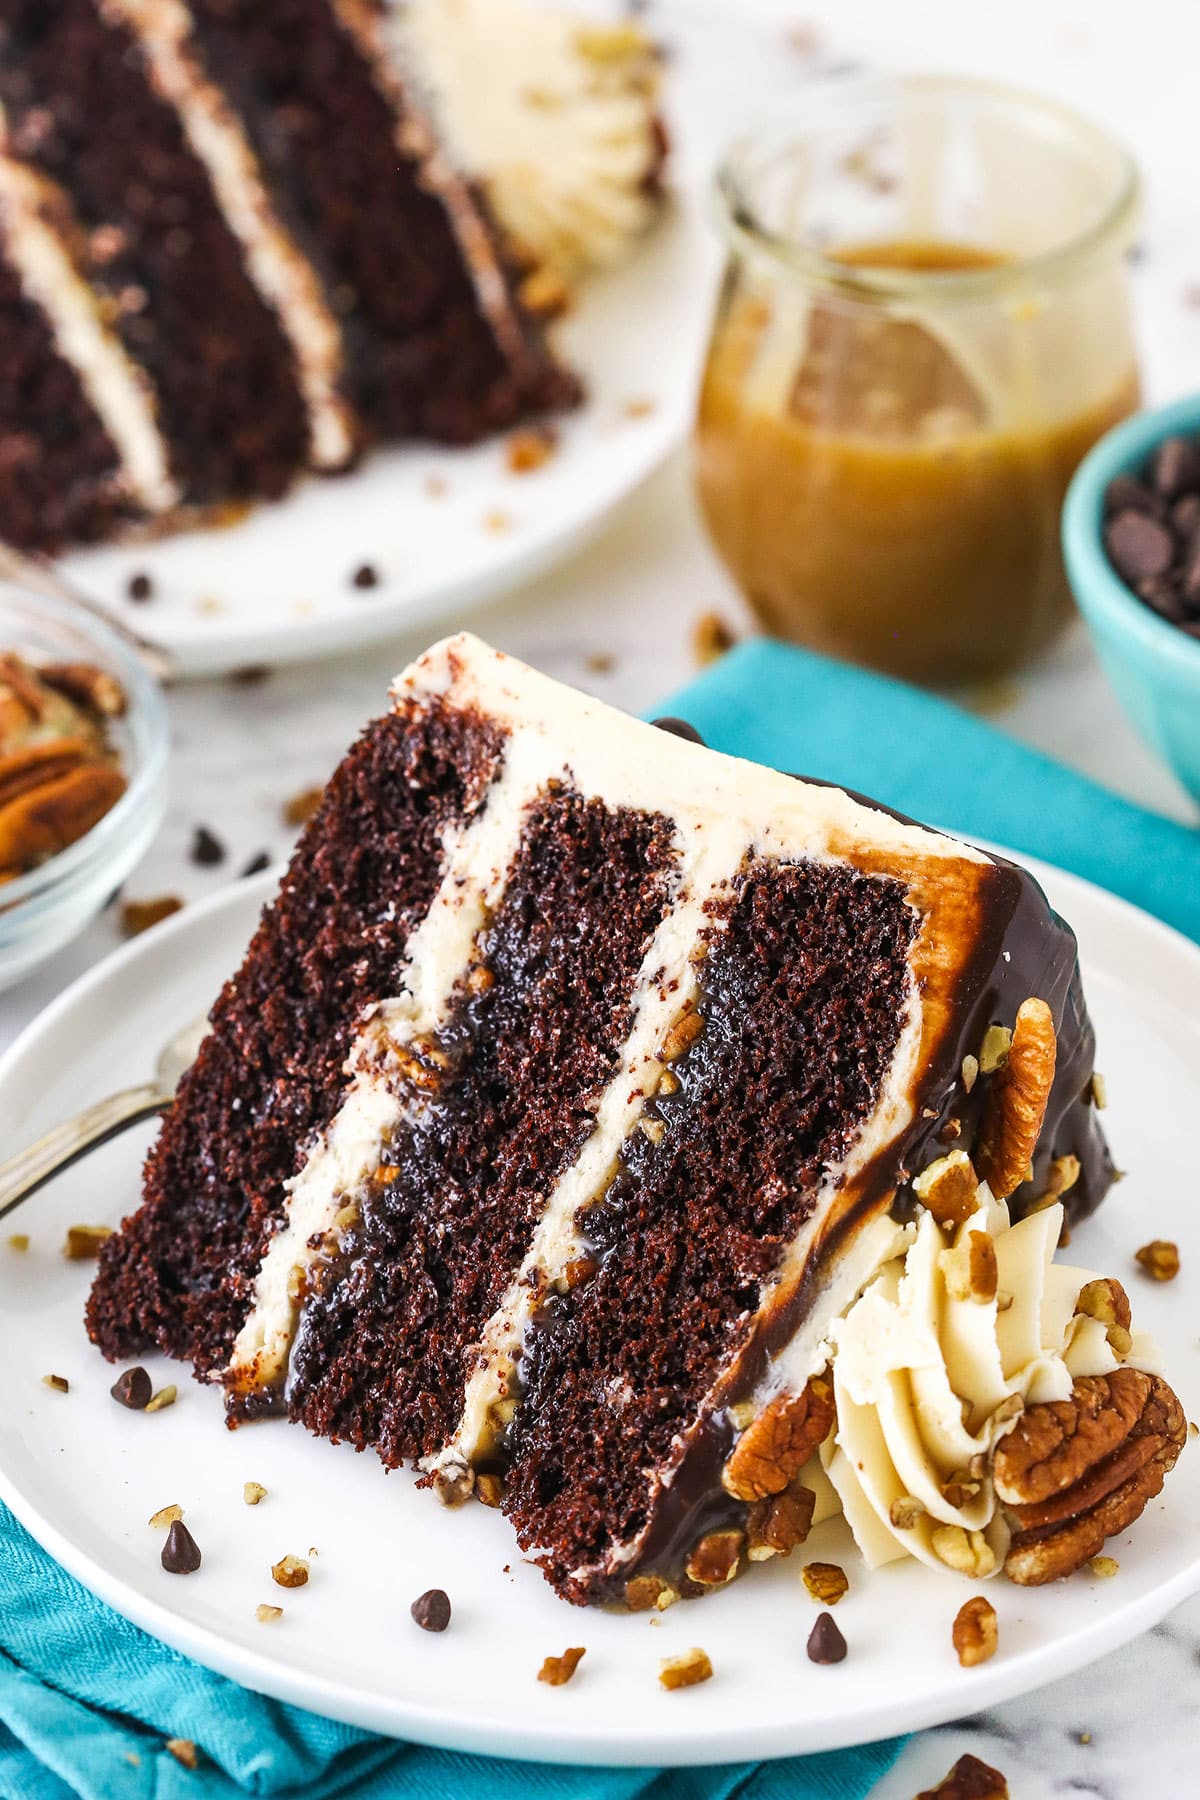
From there, you’ll build your cake. Between the cake layers is a layer of caramel buttercream that’s topped with caramel sauce and chopped pecans. You’ve got three layers of cake and two filling layers. After it’s all built, put a quick crumb coat on the cake and let it set up in the fridge or freezer for 30 minutes to an hour. With all that yummy filling in between the cake layers, it’s just nice to let it set a bit before frosting the outside to ensure that things don’t shift around.
Now you’re ready to frost the outside of the cake and add the decor. Drizzle some chocolate ganache around the edges and spread it on top, pipe some buttercream swirls, drizzle on a little more caramel sauce (because there’s never too much caramel) and then add a few pecans. What a masterpiece! Refrigerate the cake until you’re ready to serve it. I generally like to serve cake at room temperature, but with the caramel sauce, this one also does well when it’s still a little chilled. I don’t love super cold cake, so I would let it sit out at least a bit before serving. The flavors and textures are just better that way.
If you’re looking for an impressive dessert to serve for an occasion or the holidays, this is it! The flavors and textures are amazing, the cake is super moist and despite looking hard, the parts are all fairly simple to make. It just takes a little time. Fortunately you could do it over a few days, if you wanted. I hope you enjoy it!
More Great Turtle Inspired Recipes:
Turtle Cheesecake
Chocolate Turtle Poke Cake
Turtle Chocolate Cookie Cups
Turtle Brownie Cheesecake
Chocolate Turtle Cupcakes
Turtle Chocolate Layer Cake Video Tutorial
For the original Turtle Chocolate Layer Cake recipe, download the PDF.
Print
Turtle Chocolate Layer Cake
- Prep Time: 1 hour 45 minutes
- Cook Time: 53 minutes
- Total Time: 2 hours 38 minutes
- Yield: 12–14 Slices 1x
- Category: Cake
- Method: Oven
- Cuisine: American
Description
Turtle Chocolate Layer Cake is a moist chocolate cake filled with caramel buttercream, pecans & chocolate ganache. It’s delicious and the perfect celebration cake!
Ingredients
Caramel Sauce
- 2 cups (414g) granulated sugar
- 1 cup (240ml) water
- 1/2 cup (112g) unsalted butter
- 1 cup (240ml) heavy whipping cream
- 1 tbsp vanilla extract
- 1 tsp salt
Chocolate Cake
- 2 cups (260g) all purpose flour
- 2 cups (414g) sugar
- 3/4 cup (85g) natural unsweetened cocoa powder
- 2 tsp baking soda
- 1 tsp salt
- 2 large eggs
- 1 cup (240ml) milk
- 1 cup (240ml) vegetable oil
- 1 1/2 tsp vanilla
- 1 cup (240ml) hot water
Caramel Buttercream
- 2 1/2 cups (560g) unsalted butter, room temperature
- 10 cups (1150g) powdered sugar
- 1/2 cup – 3/4 cup caramel sauce, above
- Salt, to taste
- 1/2 cup chopped pecans, toasted
Chocolate Ganache
- 6 oz (1 cup | 169g) semi-sweet chocolate chips
- 1/2 cup (180ml) heavy whipping cream
Instructions
1. Combine the granulated sugar and water in a medium to large saucier pan. Cook over medium-low heat until the sugar is completely dissolved, about 3 to 5 minutes. Add the butter and let it melt
2. Over medium heat, bring the mixture to a boil. Stop whisking and don’t whisk at all during this part to help avoid crystallization. Allow to boil until the mixture turns a deep golden copper color, about 15-20 minutes, maybe longer depending on your stove. Keep an eye on it, but do not stir. If needed, you can occasionally tip the pan from side to side to help things cook evenly.
3. Remove the pan from the heat and immediately add in the heavy whipping cream in a slow, steady stream. The caramel will bubbly up quite a bit, so be careful with this step. Whisk quickly and well as you add the cream, whisking until well combined.
4. Add the vanilla extract and half a teaspoon of salt and whisk to combine. Add additional salt to your desired saltiness.
5. Set the caramel sauce in the fridge to cool. It will be fairly thin, but will thicken as it cools. You can make this caramel sauce up to a week or so head, if you like.
To make the chocolate cake layers:
6. Prepare three 8 inch cake pans with parchment paper circles in the bottom, and grease the sides. Preheat oven to 300°F (148°C).
7. Add all dry ingredients to a large bowl and whisk together.
8. Add eggs, milk and vegetable oil to the dry ingredients and mix well.
9. Add boiling water and vanilla extract and mix well.
10. Divide batter evenly between cakes pans and bake for 30-33 minutes, or until a toothpick comes out with a few crumbs.
11. Remove cakes from oven and allow to cool for about 10 minutes, then remove to cooling racks to cool completely.
To make the caramel buttercream:
12. Make the buttercream while cakes cool. Add the butter to a large mixer bowl and beat until smooth.
13. Slowly add about half of the powdered sugar and mix until well combined and smooth.
14. Add about 1/2 a cup of caramel sauce and mix until well combined and smooth.
15. Slowly add the remaining powdered sugar and mix until well combined and smooth.
16. Add additional caramel sauce to achieve the right flavor and consistency of frosting. You don’t want to thin out the frosting too much or it won’t hold your cake together well.
17. Add salt to taste.
To build the cake:
18. Once the cakes are cool and the frosting is ready, remove the cake domes from the tops of the cakes with a large serrated knife. See my tips on how to level a cake and how to stack a cake.
19. Place first layer of cake on cake plate. Spread about 2/3 cup of frosting on top in an even layer.
20. Pipe a dam around the edge of the cake, on top of the frosting. This is help hold your caramel sauce in place (and is why you don’t want your frosting to be too thin – you want it to hold in place well).
21. Add about 1/2 cup of caramel sauce and gently spread into an even layer. The caramel sauce is easiest to work with when at room temperature, but should be workable when cold as well.
22. Spread about 1/4 cup of chopped pecans evenly over the caramel sauce and level out the frosting dam, if needed, so that everything is level.
23. Add the second layer of cake and add another layer of frosting, caramel and chopped pecans.
24. Add the final layer of cake on top and then add a thin crumb coat to the cake.
25. Refrigerate the cake for about 30 minutes to an hour so that everything firms up a bit, which will help keep everything in place while you frost the cake.
26. Frost the outside of the cake with the remaining caramel frosting. Feel free to use my tutorial for frosting a smooth cake.
To decorate the cake:
22. To make the chocolate ganache, add the chocolate chips to a medium sized bowl (see my tips on making chocolate ganache).
23. Heat the heavy whipping cream just until it begins to boil, then pour it over the chocolate chips. Allow it to sit for 2-3 minutes, then whisk until smooth.
24. Drizzle the chocolate ganache around the edge of the cake, then pour the remainder of the ganache on top of the cake and spread evenly. I like to use a squeeze bottle for drizzling around the edges. See my tips on making a chocolate drip cake.
25. Allow the ganache to firm up a bit, then pipe the remainder of the frosting around the top edge of the cake. You can also finish it off with a drizzle of caramel sauce and some chopped pecans.
26. Refrigerate cake until ready to serve. Serve chilled or at room temperature. Cake is best when stored well covered and eaten within 3-4 days.
Nutrition
- Serving Size: 1 Slice
- Calories: 1290
- Sugar: 156.3 g
- Sodium: 583.4 mg
- Fat: 67.4 g
- Carbohydrates: 175.4 g
- Protein: 6.4 g
- Cholesterol: 146 mg
Enjoy!
Categories:
Cakes and Cupcakes, Christmas, Holidays, Recipes, Recipes with video, Sweets and Treats, Thanksgiving,


This is a wonderful cake recipe. I made this for my mom’s birthday this past weekend and it was a huge hit!! Everyone loved it and was taking a slice home to have later. I followed the recipe to a T and the cake was so moist and the caramel and caramel buttercream was so flavorful. I wish I could rate it more than 5 stars.
I’m so glad it was a hit!
If I want to make this cake as a 9×13 sheet cake would I need to change the recipe amount to 2x or 3x or make as is?
No, you can bake as it is, similar to this 9×13 cake. Time is 40-45 minutes.
Hi! What adjustments would I need to make to use 9″ instead of 8″ pans? thanks!! Can’t wait to make it!
I would make just two layers at that size. The bake time would actually be similar, give or take a few minutes. Just keep in mind that the cake won’t be as tall. I hope you enjoy it!
Hi! If I triple this recipe and use a 13×17 pan to make a sheet cake do I bump the oven to 350 like your chocolate sheet cake recipe? I noticed all ingredients are the same except for AP is 684g for your sheet cake recipe and this one would be 780g if I triple but the rest of the ingredients are the same amount..
There’s actually less oil and different baking soda/powder in the chocolate sheet cake. If I were to adjust this for a bigger size, I’d still use 300 degrees, but you could try it at 350.
I made this for my mom’s 70th birthday and she said it was the best cake I’ve ever made! Two tips for anyone who might be thinking of trying it:
1) I halved the ingredients for the frosting since 10 cups of sugar and over a pound of butter seemed like it would make an insane quantity of frosting. Joke was on me…I ran out! I didn’t need twice what I made, so maybe a 3/4s recipe would do it?
2) The ganache made per the recipe’s directions was too thick to drip down the sides of the cake with a spoon, which is how I usually do it. If I make it again, I’ll use a little more cream.
Thanks for sharing your tips! I’m so glad the cake was a hit!
Can I substitute half and half for the whipping cream? I wasn’t able to get any
Half and half is going to be thinner and then make the caramel sauce and ganache thinner. It might not be so bad for the ganache, but probably isn’t ideal for the caramel sauce.