This post may contain affiliate sales links. Please read my disclosure policy.
This homemade ice cream cake is so easy to make with detailed step-by-step instructions! Chocolate cake, ice cream, chocolate fudge, and cookie crunchies are layered together in this decadent dessert! You can change up the ice cream and cake flavors for different combinations – it’s the perfect summer treat!

Table of Contents
The Best Ice Cream Cake Recipe
I am such a fan of ice cream cakes! Wether you’re enjoying a slice on a hot summer day or for a birthday any time of year, it’s the perfect treat. It is the best of both worlds – cake and ice cream in one. And this recipe is so versatile, you never need another one!
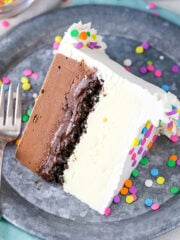
This recipe is based on my LOVED Copycat Dairy Queen Ice Cream Cake. Instead of 2 layers of ice cream separated by a decadent fudge layer and chocolate crunchies, this dessert features one layer of chocolate cake (from my Best Chocolate Cake recipe) and one layer of ice cream separated by that same fudge-y, crunchy filling. It’s the perfect combination of textures and flavors. I can’t wait for you to try it.
Making a homemade ice cream cake may seem intimidating, but trust me, you can do it. This recipes uses a simple method and I have lots of step-by-step photos below (and a video) to help ensure your success!

What You’ll Need
Here is a list of ingredients needed to make this homemade ice cream cake. Don’t forget to scroll to the recipe card below for measurements.
Cake Layer
- All-purpose flour – Feel free to use your favorite 1:1 gluten-free flour instead.
- Sugar
- Unsweetened cocoa powder
- Baking soda
- Salt
- Egg – The egg should be at room temperature. It will incorporate into the batter more easily.
- Milk – Allow the milk to come to room temperature before using. It will mix more easily with the other ingredients.
- Vegetable oil – This will add moisture to the cake.
- Vanilla extract
- Hot water – The heat from the hot water helps the cocoa “bloom” and produces a richer chocolate.
Chocolate Cookie Crunchies
- Oreo crumbs – I like the original Oreos but you could use vanilla Oreos or another cookie of your choosing instead. You can leave the filling in the Oreos and crush them in a food processor.
- Butter
Chocolate Fudge
- Semi-sweet chocolate chips – I recommend sticking with semi-sweet for this to get the right fudge-y consistency.
- Corn syrup – This keeps the fudge layer soft, even when frozen.
- Vanilla extract
- Heavy whipping cream
Ice Cream
- Ice cream of your choice – The sky is the limit here. Feeling adventurous? Make your own. My Birthday Cake Ice Cream is to die for.
Whipped Cream Frosting
- Heavy whipping cream – The heavy whipping cream must be cold. If it is not it will not whip up and hold volume properly.
- Powdered sugar – To stabilize the whipped cream.
- Vanilla extract – For flavor.
- Mini chocolate chips – You could use a different garnish such as rainbow sprinkles or cookie crumbles if you would like.
Chocolate Ganache Drip
- Semi-sweet chocolate chips
- Heavy whipping cream

Recipe Variations
This chocolate ice cream cake is so fun because there is a lot of room to make it your own. Here are a few fun variations that will help you customize this delicious dessert to your taste preferences.
- Play with ice cream flavors. The obvious way to make this dessert your own is to select your favorite ice cream flavor. I used cookie dough ice cream here but feel free to experiment.
- Try a different cake layer. I love the chocolate cake in this recipe, but you could easily use a different cake. Just make sure the recipe is meant to fill an 8-inch round pan. You could cut my Moist Vanilla Layer Cake recipe in half for one 8 inch layer, or even use my Moist Vanilla Cupcakes (also cut in half) for one 8 inch cake layer.
- Try a different cookie (for the cookie crunchies). Instead of original Oreos, try vanilla Oreos or chocolate chip cookies instead.
- Use a different garnish. Sprinkles, caramel sauce, strawberries – the sky is the limit. Pull garnish ideas from your ice cream of choice or your event.

How to Make Ice Cream Cake
At first glance, this recipe might seem intimidating because it is made up of several components. Each component on its own is not complicated to make, however. So take your time, follow the steps, and you’ll be on your way. Here’s how to do it. Make sure to scroll to the recipe card below for more detailed instructions.
To make the cake
- Prep. Preheat the oven to 300°F and line the bottom of an 8-inch cake pan with parchment paper and grease the sides.
- Whisk together the dry ingredients.
- Add the wet ingredients. Add the egg, milk, and vegetable oil to the dry ingredients and mix to combine.


- Add water. Add the vanilla extract and hot water and whisk to combine.
- Bake. Pour the batter into the prepared pan and bake for 35-40 minutes.


- Cool the cake for about 5 minutes before transferring to a wire rack to cool completely.
To make the crunchies and chocolate fudge filling
- Prep. Preheat oven to 350 degrees and line a cookie sheet with parchment paper.

- Bake. Mix together the Oreo crumbs and melted butter, spread onto the cookie sheet, and bake for 8-10 minutes.
- Combine the chocolate chips, corn syrup, and vanilla extract.
- Heat the heavy whipping cream until it begins to boil, pour it over the chocolate chips, allow to sit for 2-3 minutes, and whisk until smooth.
To build the cake
For ease of assembly, this cake is built upside down.
- Thaw the ice cream for 15-20 minutes.
- Prep the pan. Line an 8-inch pan with two pieces of clear wrap (they should extend beyond the pan) and press it into the bottom and sides of the pan.
- Stir the ice cream until creamy and smooth and
- Pour the ice cream into the lined pan. Spread it into an even layer.
- Add the chocolate cookie crunchies to the top and spread evenly.


- Add the chocolate fudge mixture to the top and spread evenly.
- Freeze the cake for about 10 minutes.
- Place the chocolate cake on top of the chocolate fudge layer. Use the excess clear wrap to wrap up around the top of the cake and freeze for 3-4 hours or until completely firm.


To finish the cake
- Turn the cake over onto a serving platter and remove the clear wrap.
- Make the whipped cream frosting. Whip the heavy whipping cream, powdered sugar, and vanilla on high speed until stiff peaks form.
- Frost the cake with the whipped cream, press mini chocolate chips into the bottom of the cake, and freeze.


- Make the chocolate ganache. Heat the heavy whipping cream until it boils ad pour it over the chocolate chips. Allow to sit for 2-3 minutes and whisk until smooth.
- Drizzle the ganache over the cake. Check out my tutorial for two methods of adding the chocolate drip.
- Decorate. Pipe shells of whipped cream around the top edge of the cake and garnish with decorations that reflect the ice cream inside.

What’s The Best Way To Assemble An Ice Cream Cake?
Ice cream cakes can be tricky in that they fall apart easily. It is important to assemble them with care so as to avoid a mess. Here are a couple of helpful tips that will give you with a mess-free, visually appealing dessert.
- Use clear wrap. Before spreading the ice cream into the pan, line it with clear wrap. The clear wrap should extend above the pan sides. You will use it to wrap up and over the cake to prepare it for the freezer. The clear wrap will also be your means to lift the dessert out of the pan without a mess.
- Build it upside down. Place the base of the dessert (the cake section) on top of the ice cream portion before allowing it to set in the freezer. When the cake comes out of the freezer, invert the dessert so that the cake is on the bottom and the ice cream is on the top. From there you can decorate as you see fit.
- Alternative methods. You can also layer everything together in a tall 8×3 inch cake pan like I do in my Copycat Dairy Queen Ice Cream Cake.

Tips for Making Homemade Ice Cream Cake
We already talked about assembling the cake but here come a few more helpful tips and tricks that will get you the best frozen dessert you can imagine.
- Let the ice cream soften for about 20 minutes before. Otherwise, it will not spread smoothly into the pan.
- Don’t over-mix the batter. When making the cake, it is important not to over-mix the batter as this will cause the glutens in the flour to overdevelop, giving you with a dense, tough cake.
- Freeze completely. I suggest 3-4 hours in the freezer before decorating but don’t just take my word for it. Give the cake a few pokes to make sure it has solidified before taking it out to decorate. The more solid it is, the better for decorating.
- Decorate quickly. When frosting and decorating the cake, it is important to do so quickly so that the cake doesn’t melt during the process. For more tips on decorating, check out my Ice Cream Cake Decorating Tutorial.

How Long Does Ice Cream Cake Last?
This delicious dessert needs to be stored in the freezer until it is ready to be served. It should be wrapped in saran wrap or stored in an airtight container and eaten within a week’s time.
More Ice Cream Cake Recipes:
Interested in exploring the world of homemade ice cream cake further? Here are a handful of other delicious recipes for you to try.
- Cake Batter Fudge Brownie Ice Cream Cake
- Oreo Cookies and Cream Ice Cream Cake
- Orange Creamsicle Ice Cream Cake
- Chocolate Chip Cookie Ice Cream Cake
- Mocha Brownie Ice Cream Cake
- Red Velvet Ice Cream Cake
- Cherry Almond Amaretto Ice Cream Cake
Watch How to Make Ice Cream Cake
Print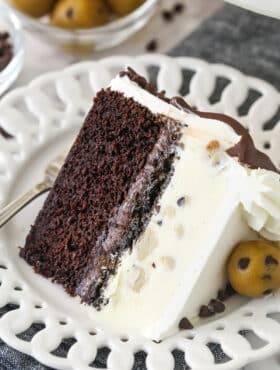
Ice Cream Cake
- Prep Time: 1 hour 30 minutes
- Chill Time: 3 hours
- Total Time: 4 hours 30 minutes
- Yield: 14 slices
- Category: Cake
- Method: Baking
- Cuisine: American
Description
Chocolate cake, ice cream, fudgy chocolate, cookie crunchies, and a rich chocolate ganache make up this decadent ice cream cake. Grab your forks and dive in.
Ingredients
Cake Layer
- 1 cup (130g) all-purpose flour
- 1 cup (207g) sugar
- 6 tbsp (43g) unsweetened cocoa powder
- 1 tsp baking soda
- 1/2 tsp salt
- 1 large egg
- 1/2 cup (120ml) milk
- 1/2 cup (120ml) vegetable oil
- 3/4 tsp vanilla extract
- 1/2 cup (120ml) hot water
Chocolate Cookie Crunchies
- 3/4 cup (100g) Oreo crumbs (about 9 Oreos)
- 1 1/2 tbsp butter, melted
Chocolate Fudge
- 6 oz | 1 cup semi-sweet chocolate chips
- 3 tbsp light corn syrup
- 1/2 tsp vanilla extract
- 1/2 cup (120ml) heavy whipping cream
Ice Cream
- 1.5 quart container ice cream of your choice
Whipped Cream Frosting
- 2 cups (480ml) heavy whipping cream, cold
- 1 cup (115g) powdered sugar
- 1 1/2 tsp vanilla extract
- 1 cup mini chocolate chips, optional
Chocolate Ganache Drip
- 3 oz (1/2 cup | 86g) semi-sweet chocolate chips
- 1/4 cup (60ml) heavy whipping cream
Instructions
To make the cake:
- Prepare an 8-inch cake pan with a parchment paper circle in the bottom and grease the sides. Preheat oven to 300°F (148°C).
- Add the dry ingredients to a large bowl and whisk together to combine.
- Add the egg, milk and vegetable oil to the dry ingredients and mix until well combined.
- Add the vanilla extract and hot water and whisk together to until well combined. The batter will be very thin.
- Add the batter to the prepared cake pan and bake for 35-40 minutes, or until a toothpick comes out with a few crumbs.
- Remove cake from oven and allow to cool for about 5 minutes, then remove to cooling rack to cool completely.
To make the crunchies and chocolate fudge filling:
- To make the crunchies, preheat oven to 350 degrees. Line a cookie sheet with parchment paper or a silicone baking mat and set aside.
- Combine the Oreo crumbs and melted butter and stir until well combined. Spread the crumbs evenly onto the prepared cookie sheet. Bake for 8-10 minutes, then allow to cool. Use your fingers to break any big clumps into smaller ones. Set aside.
- To make the fudge layer, add the chocolate chips, corn syrup and vanilla extract to a medium sized bowl.
- Heat the heavy whipping cream just until it begins to boil, then pour it over the chocolate chips. Allow to sit for 2-3 minutes, then whisk until smooth. Set aside.
To build the cake:
- Set your ice cream out for 15-20 minutes before you need it to let it soften, but not melt.
- Line your 8-inch pan with two pieces of clear wrap, one on top of the other going in opposite directions. The pieces of clear wrap should be long enough that you can use them later to lift the cake out of the pan. Press the clear wrap into the pan and press against the bottom and sides to flatten it.
- Put the ice cream in a large bowl and stir until creamy and smooth, then pour the ice cream into the lined pan and spread it into an even layer.
- Add the chocolate cookie crunchies on top of the ice cream layer and spread evenly.
- Add the chocolate fudge mixture on top of the cookie crunchies and spread evenly. Set the pan in the freezer for about 10 minutes so that the chocolate fudge firms up a touch.
- Place the chocolate cake on top of the chocolate fudge layer. The part of the cake that’s sticking up will become the bottom of the ice cream cake. Use the clear wrap hanging over the sides of the pan to wrap up the cake (cover it with more clear wrap, if needed), then freeze for 3-4 hours or until completely firm.
To finish the cake:
- When the cake is frozen and firm, use the clear wrap to loosen and lift the cake out of the pan. Turn it over onto a cardboard cake circle or a serving platter. Remove the clear wrap from the top of the ice cream.
- To make the whipped cream frosting, add the heavy whipping cream, powdered sugar and vanilla extract to a large mixer bowl and whip on high speed until stiff peaks form.
- Frost the cake with the whipped cream, working quickly so that the ice cream doesn’t melt. Press the additional mini chocolate chips into the bottom of the cake, then immediately place in the freezer.
- To make the chocolate ganache, add the chocolate chips to a medium sized bowl. Heat the heavy whipping cream just until it begins to boil, then pour it over the chocolate chips. Allow to sit for 2-3 minutes, the whisk until smooth.
- Use the chocolate ganache to add the chocolate drip to the cake. Feel free to check out my tutorial for two methods of adding the chocolate drip.
- Use the remaining whipped cream to pipe shells around the top edge of the cake and garnish with some cookie dough or other decorations to reflect the ice cream inside the cake. Store the cake in the freezer until ready to serve. If you have room in your freezer, store it in an air tight container. The cake is best if eaten within a week or so.
Nutrition
- Serving Size: 1 slice
- Calories: 649
- Sugar: 58.8 g
- Sodium: 266.3 mg
- Fat: 39.2 g
- Carbohydrates: 71.2 g
- Protein: 7.5 g
- Cholesterol: 127.7 mg


You have THE BEST recipes, photographs, illustrations, and narratives ever! You interject great cooking tips, and I appreciate the nutrition content. I absolutely LOVE your posts! Thank you so much for what you do. And I’m very pleased that you share your faith with Bible verses! Thank you.
Thank you so much! That’s really lovely to hear!
Great recipe! Made this for my son’s 15th birthday and it was a hit!! Thank you!
Awesome! So glad to hear that!
Hello. I’m looking forward to making the ice-cream cake. I have a question in your recipe for the ice cream cake you mention that it is the same recipe as your best chocolate cake recipe altered to my ale one layer instead of two. Yet in the best chocolate cake recipe you use buttermilk and in the ice cream cake version you use milk. Please clarify whether to use buttermilk or plain milk. Thank you!!
You can use either. Both work perfectly. I find that people more likely have regular milk on hand, which is why I switched it in this recipe.
Thank you!
Hi Lindsay! I am looking forward to making this recipe! I was wondering if the oreo crunch layer stays crunchy? I have tried several other versions of making a ‘crunch’ layer and they always go soft!
I am also thrilled to have exact measurements for making one of your cakes, but in a single layer! Sometimes, just a small cake is all the two of us need. Now I don’t have to do the ‘math’ !! Thanks in advance for your reply.
So I find that the method I show for this cake doesn’t stay quite as crunchy as the method of building my copycat Dairy Queen ice cream cake. If you want them to stay as country is possible, I might build it that way, which requires two pans and a little more time.
The ice cream looks like it has chocolate chips and maybe cookie dough in it yet the recipe. Doesn’t mention anything other than the ice cream.Am I missing something?I tried to look through several times before posting this comment. Thank you.
Yes, it’s a cookie dough ice cream. It’s just store-bought ice cream. You can use any store-bought ice cream you like, which is why you see just ice cream listed.