This post may contain affiliate sales links. Please read my disclosure policy.
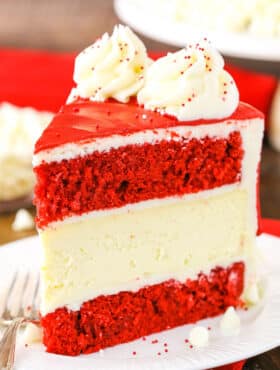
This Red Velvet Cheesecake Cake recipe has layers of moist red velvet cake and creamy cheesecake, covered in cream cheese frosting! If you’ve ever had the cheesecake by the same name at The Cheesecake Factory and loved it, this is the perfect recipe to make at home!

Table of Contents
- WHAT IS A RED VELVET CHEESECAKE CAKE?
- IS RED VELVET CAKE JUST A CHOCOLATE CAKE?
- WHAT IS THE FLAVOR OF RED VELVET CAKE?
- HOW DO YOU MAKE A RED VELVET CHEESECAKE CAKE?
- HOW DO YOU MAKE SURE THE CHEESECAKE LAYER IS THE SAME AS THE RED VELVET CAKES?
- THE BEST RED VELVET CHEESECAKE CAKE
- HOW TO BUILD A RED VELVET CHEESECAKE CAKE
- Watch How To Make It
- You might also like these Red Velvet recipes:
- Get the Recipe
So by now you guys know that I love a good cheesecake. I have SO many on my site, it’s nutty. I’ve got other copycats from the Cheesecake Factory (or at least ones inspired by their cheesecakes), including the Banana Cream Cheesecake (my all-time fave), Oreo Dream Extreme Cheesecake, Kahlua Coffee Brownie Cheesecake and the Outrageous Chocolate Coconut Cheesecake Cake. Add to that list the other cheesecake cakes I’ve got for you – like this Strawberry Cheesecake Cake and Carrot Cake Cheesecake Cake – and there’s a lot to get excited about!
That said, this Red Velvet Cheesecake Cake quickly became a classic for us. So moist, so delicious and perfect for a special occasion or holiday like Valentine’s Day or Christmas. I’ve become a lover of red velvet cake since I started making it myself from scratch, so I personally LOVE the flavor of this cake. And it combines two amazing things – cake and cheesecake. Score!
WHAT IS A RED VELVET CHEESECAKE CAKE?
If the name doesn’t give it away, it’s a cake that’s layered with both cheesecake and cake. In this case, the cake layers are red velvet and the cheesecake is classic vanilla.
IS RED VELVET CAKE JUST A CHOCOLATE CAKE?
As someone who genuinely enjoys red velvet, I do not think that red velvet cake is just chocolate cake. I feel like I see everywhere that it is, but let’s talk about how it isn’t, ok?
First, red velvet cake has always been made with vinegar and buttermilk and the acidity reacts with the cocoa to reveal the red anthocyanin in the cocoa, which would give it it’s red-ish color. These days, food coloring is added to really give it the red color we’re familiar with. These ingredients not only contribute to the color, but also the flavor. Red velvet cake has a lovely tang to it that simply isn’t present in chocolate cake.
Second, and in my opinion this is the even bigger argument, chocolate cake has considerably more cocoa in it. If you look at my Best Moist Chocolate Cake, you’ll see it has three quarters cup of cocoa in it. This cake has 4 teaspoons of cocoa. So if we break that down, that’s 36 teaspoons in a chocolate cake versus 4 in this one. Just because Red Velvet Cake has cocoa in it, it doesn’t mean it tastes like chocolate cake. I’m telling you, if you made a chocolate cake with 4 teaspoons of cocoa and tried to pass it off as chocolate, people would call you on it.


WHAT IS THE FLAVOR OF RED VELVET CAKE?
So there we have it. Red velvet cake and chocolate cake are not the same. Yes, there’s a little cocoa, but the flavor is harder to describe than that. It’s tangy, delicious and uniquely “red velvet”. You just have to try it to know and love it. 🙂
HOW DO YOU MAKE A RED VELVET CHEESECAKE CAKE?
Now that we’ve covered the basics, let’s talk about how to make this delicious cake. Start by making the cheesecake. I use my classic, creamy vanilla cheesecake. One of the great things about this cake is that various parts can be made ahead and the cheesecake layer is definitely one of those things. Cheesecakes hold up well for several days, so making it a day or so ahead would be fine.
As always, I bake it in a water bath. I know it’s a step that many go to great lengths to avoid, but it really does make a creamier cheesecake that doesn’t fall in the middle, brown on the edges or crack.
HOW DO YOU MAKE SURE THE CHEESECAKE LAYER IS THE SAME AS THE RED VELVET CAKES?
The key to making the cheesecake for a cheesecake cake is to bake the cheesecake in same pan you’ll use for the cakes. This will ensure that the cheesecake layer is the same size as the cake layers and make it much easier to build and frost it later.
So, even if you’re making a 9 inch cake (which this one is), and you tend to use a 9 inch springform pan for cheesecakes and then 9 inch cake pans for cakes, you’ll want to use the same cake pan for the cheesecake and cake layers this time. Not all 9 inch pans are actually the same size, so line your cake pan with aluminum foil and press it tightly against the sides. Then bake the cheesecake in that pan, let it cool and use the foil to lift it out of the cake pan. You can then put that cheesecake back in the fridge and use the cake pan for the cake layers.

THE BEST RED VELVET CHEESECAKE CAKE
Once the cheesecake is made, it’s time for the cake layers. I used my favorite Red Velvet Cake recipe and it really is SO good!
Bake up those layers and let them cool. When you’re ready to build the cake, make the Cream Cheese Frosting. It’s such a classic frosting to pair with red velvet and this one pipes and frosts beautifully.
HOW TO BUILD A RED VELVET CHEESECAKE CAKE
To build the cake, you’ll layer it much like you layer other cakes. Remove the domes from the tops of the cakes, then add the first cake layer to your serving plate. Add a layer of cream cheese frosting, then the cheesecake layer. You’ll add another layer of cream cheese frosting, then the final cake layer.
Frost the outside of the cake as usual, then decorate it to your liking. I decided to use a fun red drip, some sprinkles and some white chocolate chips, but you could also cover the sides entirely in white chocolate chips to keep it simple, but elegant. Totally your call.
However you decorate it though, you really must try it! The cake is wonderfully moist, the cheesecake thick and creamy, the frosting wonderfully tangy. Together they make the perfect Red Velvet Cheesecake Cake. So good you won’t want to share. 🙂


Watch How To Make It
You might also like these Red Velvet recipes:
Red Velvet Cheesecake
Red Velvet Layer Cake
Red Velvet Cheesecake Bundt Cake
Red Velvet Cheesecake Cookie Cups
Red Velvet Cheesecake Swirl Brownies
Red Velvet Cupcakes with Chocolate Cream Cheese Frosting
Red Velvet Cheesecake Cake
- Prep Time: 2 hours
- Cook Time: 2 hours 26 minutes
- Total Time: 4 hours 26 minutes
- Yield: 14-16 slices
- Category: Dessert
- Method: Oven
- Cuisine: American
Description
This Red Velvet Cheesecake Cake is made with layers of moist red velvet cake and thick and creamy cheesecake! If you’ve ever had the cheesecake by the same name at The Cheesecake Factory and loved it, this is the perfect recipe to make at home!
Ingredients
VANILLA CHEESECAKE
- 24 oz (678g) cream cheese, room temperature
- 1 cup (207g) sugar
- 3 tbsp (24g) all purpose flour
- 1 cup (230g) sour cream
- 1 tbsp vanilla extract
- 4 large eggs, room temperature
RED VELVET CAKE LAYERS
- 2 1/2 cups (325g) all purpose flour
- 2 cups (414g) sugar
- 1 1/4 tsp baking soda
- 1/2 tsp baking powder
- 4 tsp (9g) natural unsweetened cocoa
- 1 tsp salt
- 1 cup (240ml) buttermilk
- 1/2 cup (120ml) vegetable oil
- 2 tsp vanilla extract
- 2 large eggs
- 2 tsp white vinegar
- 4 tsp red food coloring
- 1 cup (240ml) hot water
CREAM CHEESE FROSTING
- 16 oz (452g) cream cheese, room temperature
- 1 1/4 cups (280g) unsalted butter, room temperature
- 12 cups (1380g) powdered sugar
- 2 tsp vanilla extract
- 6 oz white chocolate chips
RED GANACHE
- 6 oz red Wilton candy melts
- 3 tbsp heavy whipping cream
- Sprinkles
Instructions
1. Preheat oven to 300°F (148°C). Line the entire inside of a 9-inch (23cm) cake pan with aluminum foil. Press it into the pan to get it as flat as you can. You’ll use the aluminum foil to lift the cheesecake out of the pan when it’s baked and cooled.
2. In a large mixer bowl, mix the cream cheese, sugar and flour together until combined. Use low speed to keep less air from getting into the batter, which can cause cracks. Scrape down the sides of the bowl.
3. Add the sour cream, and vanilla extract and mix on low speed until well combined.
4. Add the eggs one at a time, mixing slowly and scraping the sides of the bowl after each addition.
5. Pour the cheesecake batter into the lined cake pan.
6. Place the cake pan inside another larger pan. I use a larger cake pan, but you can use a roasting pan or any other larger baking pan. Fill the outside pan with enough warm water to go about halfway up the sides of the cake pan. Bake for 1 hour.
7. Turn off the oven and leave the cheesecake in the oven with the door closed for 30 minutes. Do not open the door or you’ll release the heat.
8. Crack oven door and leave the cheesecake in the oven for another 30 minutes. This cooling process helps the cheesecake cool slowly to prevent cracks.
9. Remove cheesecake from oven and chill until firm, 5-6 hours.
To make the cake layers:
10. Preheat the oven to 350°F (176°C). Line the bottoms of two 9-inch (23cm) cake pans with parchment paper and grease the sides.
11. Add the flour, sugar, baking soda, baking powder, cocoa and salt to a large mixer bowl and combine. Set aside.
12. Add the buttermilk, vegetable oil, vanilla extract, eggs, vinegar and red food coloring to a medium sized bowl and combine.
13. Add the wet ingredients to the dry ingredients and beat until well combined.
14. Slowly add the hot water to the batter and mix on low speed until well combined. Scrape down the sides of the bowl as needed to make sure everything is well combined.
15. Divide the batter evenly between the two pans and bake for 23-26 minutes, or until a toothpick comes out with a few moist crumbs.
16. Remove the cakes from the oven and allow to cool for 3-5 minutes, then remove to a cooling rack to finish cooling.
To make the frosting:
17. When you’re ready to build the cake, make the frosting. Add the cream cheese and butter to a large mixer bowl and beat until smooth.
18. Slowly add about half of the powdered sugar and beat until well combined and smooth.
19. Add the vanilla extract and mix until well combined.
20. Slowly add the remaining powdered sugar and beat until well combined and smooth.
To build the cake:
21. Use a large serrated knife to remove the domes from the top of the red velvet cakes.
22. Place the first layer of cake on a serving plate or a cardboard cake round. Spread about 1 cup of frosting evenly on top of the cake layer.
23. Use the aluminum foil to lift the cheesecake out of the cake pan, remove the foil and place the cheesecake on top of the cake.
24. Spread another cup of frosting evenly on top of the cheesecake, then add the second layer of cake on top. If the sides of the cake don’t line up, use a serrated knife to trim off the excess cake or cheesecake.
25. Frost the outside of the cake. Check out my tutorial for frosting a smooth cake, if you’d like.
To decorate the cake:
26. Press white chocolate chips into the bottom of the cake, around the bottom edge. Refrigerate cake for about 20 minutes.
27. To make the red ganache, place the red candy melts in a small bowl
28. Heat the heavy whipping cream just until it begins to boil, then pour over the candy melts. Allow it to sit for about a minute, the whisk to melt. If it isn’t completely melted (and it probably won’t be), heat it for another 20-30 seconds, the whisk until smooth.
29. Allow the ganache to cool until it thickens up a good bit, but is still pourable, then transfer to a squeeze bottle.
30. Drizzle the ganache around the edge of the cake.
31. Heat the remaining ganache (you can leave it in the bottle) for about 10 seconds to soften it up again, then pour it onto the top of the cake and quickly spread to the edges.
32. Allow the ganache to cool and firm, then pipe swirls of the frosting around the top edge of the cake. I used the Ateco 844 icing tip. Add sprinkles, if desired.
33. Store the cake (in an airtight container, if possible) in the refrigerator until ready to serve. Cake is best for 2-3 days.
Nutrition
- Serving Size: 1 Slice
- Calories: 1035
- Sugar: 128.8 g
- Sodium: 575.6 mg
- Fat: 44.5 g
- Carbohydrates: 149.5 g
- Protein: 13.2 g
- Cholesterol: 160.5 mg
Categories
Enjoy!