With silver ice cream cone horns and tiny marshmallow ears, these easy unicorn cupcakes will be the life of any unicorn-themed party. Piped with small flowers and winged eyes, they’re perfectly mystical.

Easy Unicorn Birthday Cupcakes
There are so many options when it comes to unicorn cupcakes – fondant horns, food-related decor, sprinkle-filled centers. It’s hard to decide what to do! What I love about these particular unicorn cupcakes is that there are several options for the horn. You can make it as simple or complicated as you want with the mini ice cream cones. The ears are made of marshmallows, so that’s also nice and simple. And then the rest is buttercream. Aside from assembling them, you can also prep most elements ahead.
And while these cupcakes aren’t filled with sprinkles in the center, you could easily add that. Pick sprinkles that mirror the colors you use for your buttercream and they’ll be beautiful!
The final unicorn cupcakes are perfect for any fun and whimsical gathering! They’re colorful and can be made with any colors you like. They definitely have a wow-factor about them and are sure to be a hit!

What You’ll Need
If you’re a fan of unicorns, then this ingredients list is for you. Check the recipe card at the bottom of the post for exact ingredient amounts.
For the Cupcakes
- Mini ice cream cones – You can read more about the cone options below. Regular mini ice cream cones or Muddy Bites Waffle Cone Snacks make great options.
- Melting white chocolate – There are lots of options here. Ghirardelli melting wafers and almond bark are easily found in grocery stores, but Wilton candy melts also work well. Just don’t use white chocolate chips. They won’t set as well.
- Silver luster dust – I typically use the Wilton brand, which you can usually find at Michael’s craft store. It’s usually available online as well, although I can’t locate it on Amazon right now. This Sunflower Sugar Art luster dust should work well too. Feel free to use gold luster dust too, if you’re going for that look.
- Pink luster dust – The same as the silver one above, just in pink. It may also be called color dust.
- Mini marshmallows – Be sure to get the mini size, or the ears will be too big.
- Vanilla Cupcakes – I love my Easy Homemade Vanilla Cupcakes Recipe, but use your favorite. You can also swap them for my chocolate cupcakes.
For the Buttercream
- Unsalted butter – Be sure it’s at room temperature so that it’ll mix well.
- Powdered sugar – This is also called confectioners’ sugar. It’s added the give the buttercream volume and thicken it.
- Vanilla extract – For flavor. Almond would also be tasty.
- Heavy cream – Whole milk or half-and-half is a good substitute.
- Gel icing colors – Be sure to use gel colors, rather than food coloring. The gel colors are much thicker and won’t thin out your frosting too much.

Muddy Bites vs Ice Cream Cones
I experimented with a couple options for the mini ice cream cones. Muddy Bites Waffle Cone Snacks are definitely the tastiest option because they’re filled with white or milk chocolate. Unfortunately, they’re relatively small and are harder to coat in chocolate because they’re already filled and harder to hold on to. If you’ve got some time and patience, though, you should definitely give them a go.
On the other hand, the mini ice cream cones have a much more plain flavor since it’s just simple wafer cones. They’re not filled, but that also means it’s easier to coat them with chocolate. However, you’ll have to snip off a part of the bottom of the cones, unlike with the Muddy Bites. You could leave them full-sized but they’d be BIG horns.
The other thing to keep in mind as you decide which cone to go with is that the regular mini ice cream cones absorb more moisture once assembled onto the buttercream on the cupcake. As a result, the cones can crack if added to the cupcake too soon. With regular mini ice cream cones, you’d want to add the cones to the cupcakes the day you’re serving them. With the Muddy Bites, you don’t have to worry about that happening. The chocolate filling keeps them firm and from cracking.
One other option you have with the mini ice cream cones is simply to leave them plain and not add the white chocolate to them. They’ll have a more “natural” look, but still look great and won’t require as much work. The good news is – you have options!
How to Make Unicorn Cupcakes
Baking the cupcakes and making the buttercream in advance will make the process super simple, giving you more time to decorate when it’s time to assemble them.
Make the Unicorn Horns
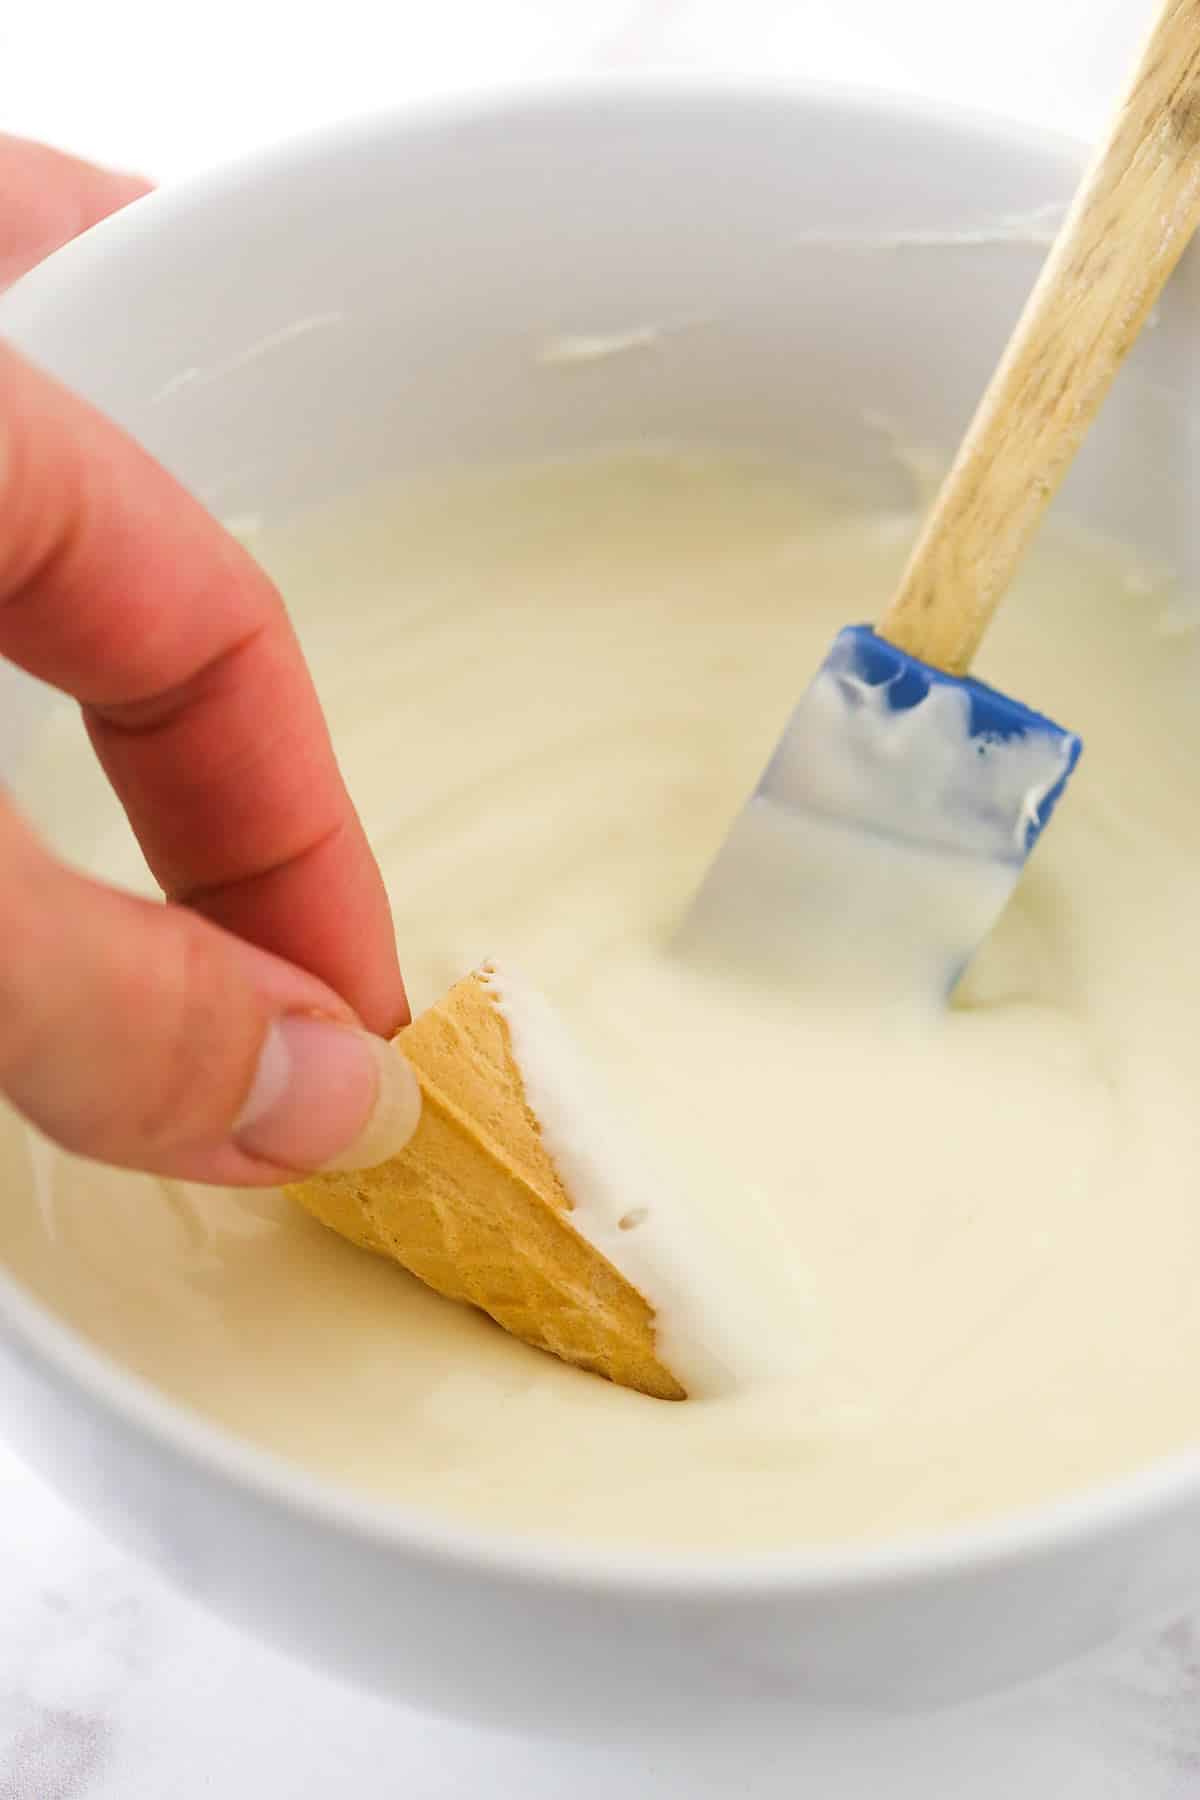
- Trim the horns. Use scissors to carefully snip off the pointy ice cream cone tips above the two main rings. If you’re using Muddy Bites, you can skip this step. Set them aside.


- Melt the chocolate. Melt the chocolate according to your package directions. Most melting chocolates, like the Ghirardelli ones or the Wilton ones melt really easily in the microwave.
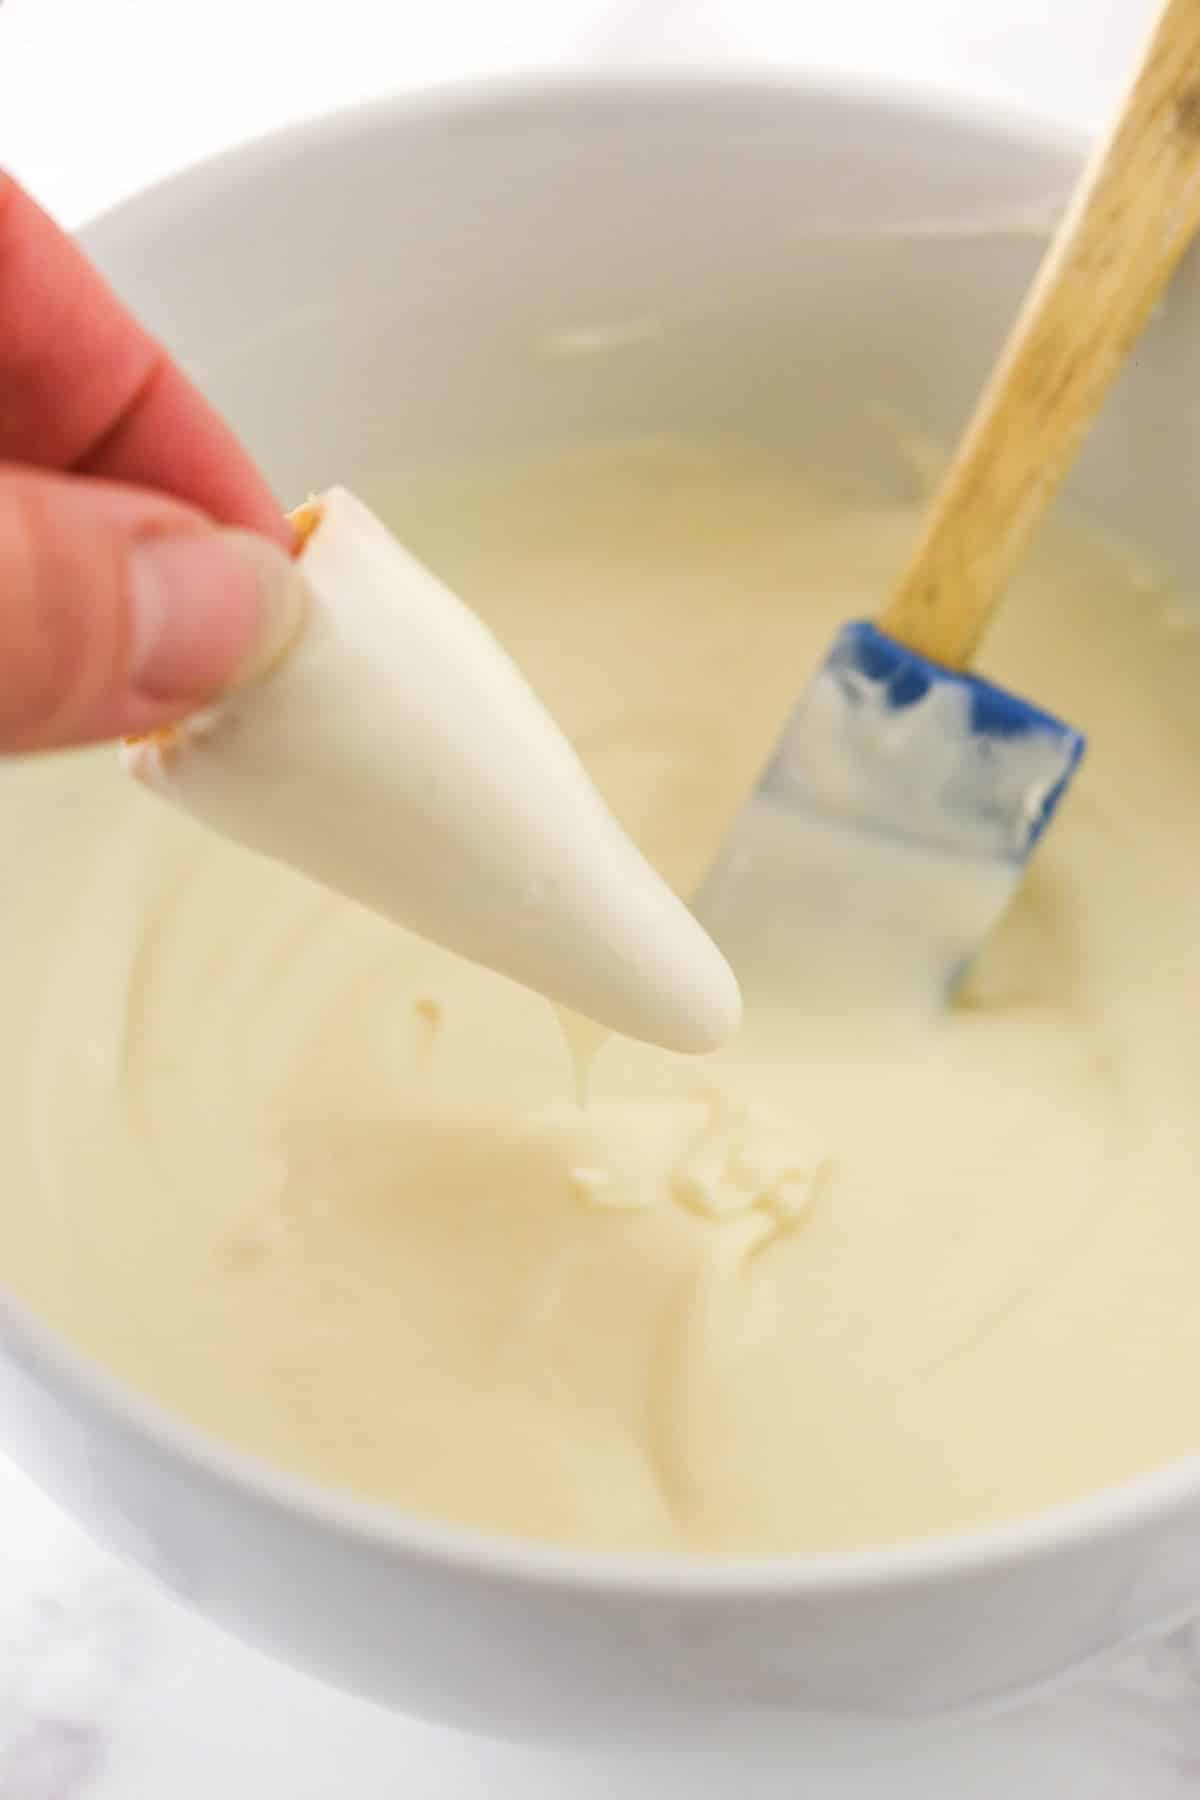
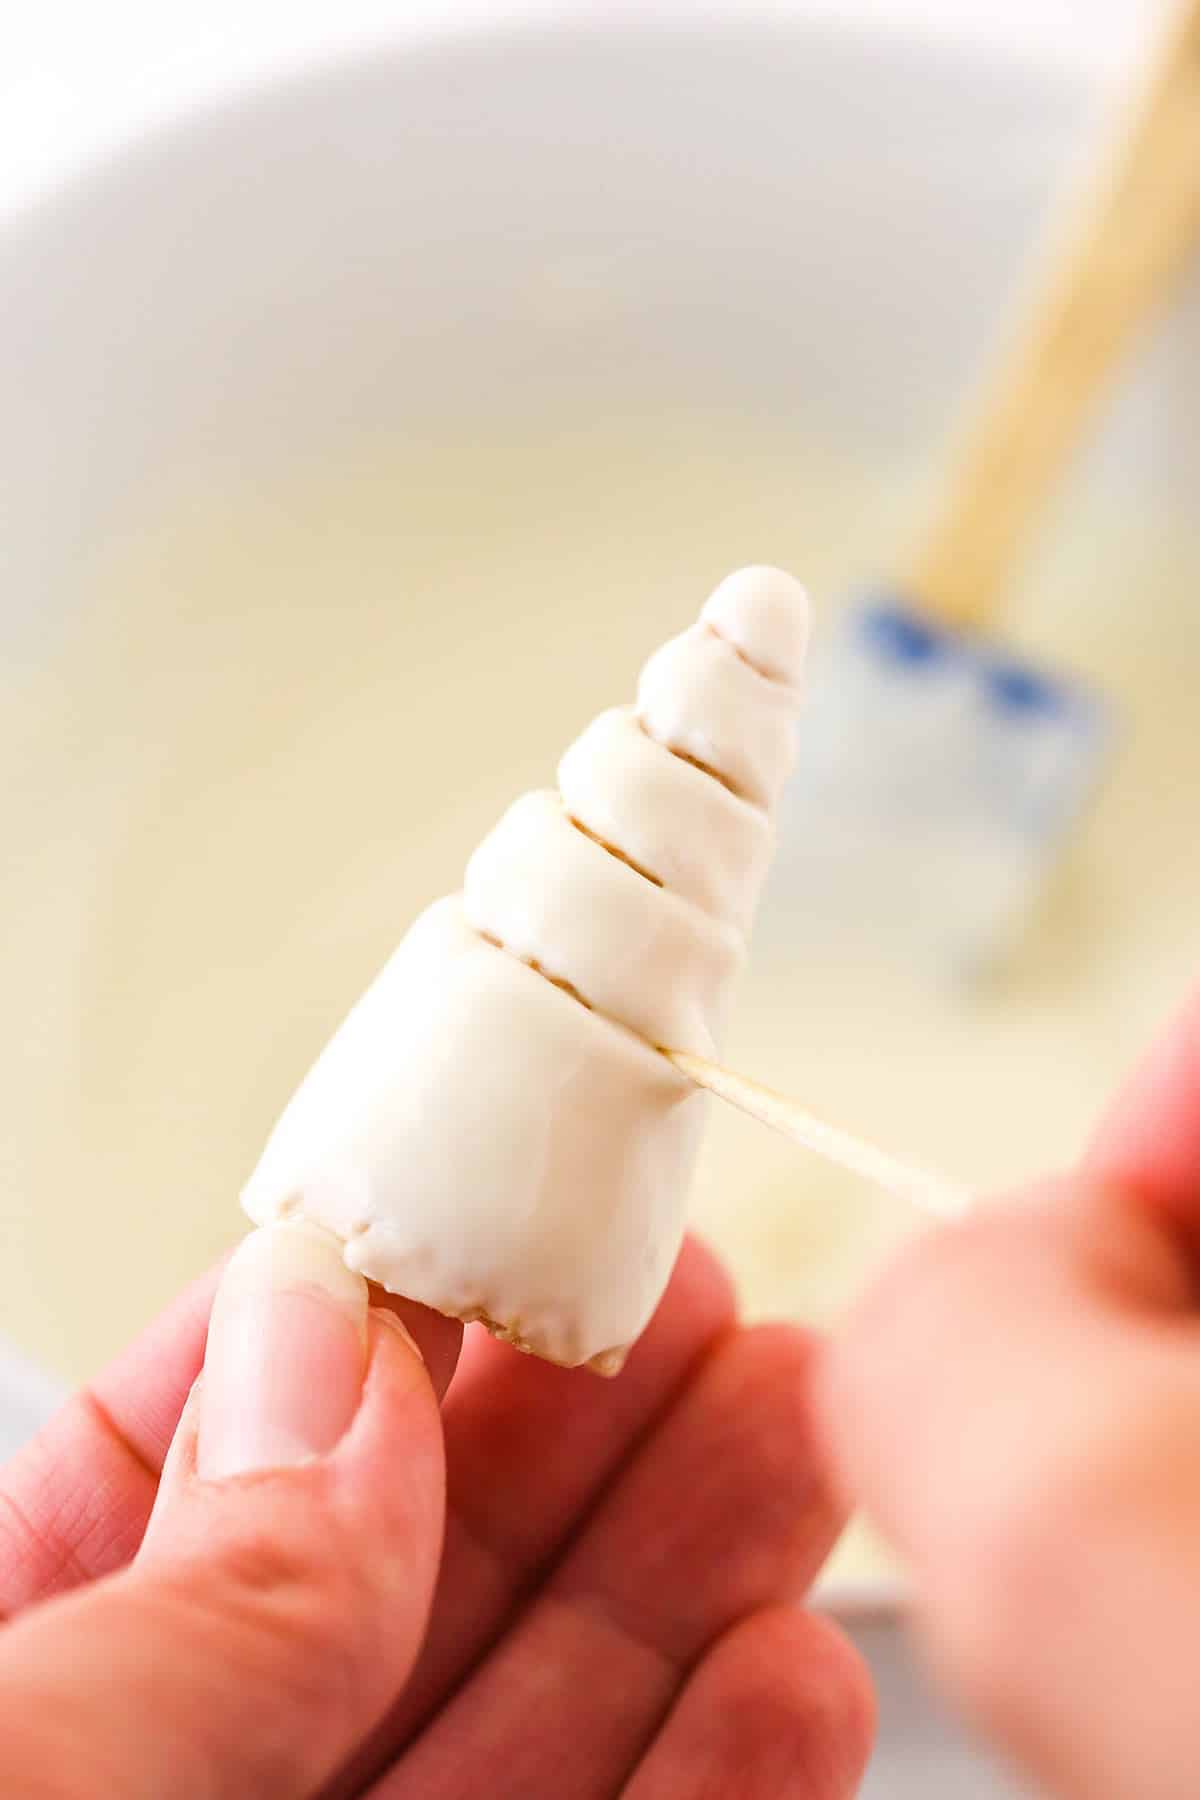
- Dip the horns. Use your fingers or a fork to gently lower one horn at a time into the melted chocolate. Use a toothpick to carefully create a spiral around the horn (this is optional). Set them on a parchment-lined baking sheet to cool. Make sure they’re standing upright.
- Add shine. Once fully dried, use a food paintbrush to brush silver luster dust on the horns. Set them aside in an airtight container until ready to use. They will last well for at least a week in an air-tight container.


Make the Unicorn Ears
- Snip them. You will only need one mini marshmallow for every unicorn. Cut each marshmallow in half, diagonally. Then cut one of the pointed ends off. Repeat this for every marshmallow until you have two ears for every cupcake.


- Paint them. Use a food paintbrush to add a little bit of pink luster dust in the center of every ear. Set them aside and store them in an airtight container until ready to use. These will also last for at least a week in an air tight container.


Make the Buttercream
- Cream the butter. Add the butter to the bowl of a stand mixer and beat until smooth and creamy
- Add Half the Sugar and Flavoring. Add half of the powdered sugar and continue mixing until well combined. After that, add the vanilla extract and heavy cream. Continue beating until well combined and smooth.
- Add Remaining Sugar and Adjust Consistency. Next, add the remaining powdered sugar and beat until smooth and well combined. Pour in more heavy cream to adjust the consistency, but it should be thick. Set it aside and store it in an airtight container until ready to use.
Frost the Cupcakes
- Prepare the bag. Snip the corner off a large piping back and fit it with an Ateco 809 piping tip (or a similarly large round one.) Transfer the buttercream to the piping bag.
- Pipe the frosting. Hold the piping bag perpendicularly and about 1/2″ above the top of the cupcake. Squeeze it and allow the frosting to spread. Keep the piping tip in place, slightly buried in the frosting. As the frosting spreads outward and reaches the edge, slowly lift the piping bag to let the dome get a little taller, then release the pressure and lift up. Repeat this for every cupcake.
- Add the horn. Place the horn where you released the pressure and lifted the piping bag to cover that less-than-perfect end. Then add two unicorn ears, one on each side.


Make the Flowers
- Color the frosting. Squeeze the remaining buttercream out of the piping bag and divide it between three bowls. Add different gel icing color to each one and mix until well combined.
- Create the swirl. Transfer each color to its own sandwich-sized ziplock bag and snip a corner off. Cut about an 8×12″ piece of plastic wrap and lay it on a flat surface. Vertically pipe thick lines of frosting (one for each color) side-by-side. Carefully roll the plastic wrap into a log, being careful not to mush the colors too much. Twist one end of the log to avoid it from coming out on that side. Snip off the other end and transfer the log to a large piping bag fitted with a Wilton 18 piping tip.


- Test it. Gently squeeze the piping bag until you get a swirled buttercream with three colors.
- Decorate it. Pipe rosettes and flowers along the sides and top of the unicorn as desired.


Make the Eyes
- Mix the buttercream. When you’re done with the rosettes and flowers, mix all the leftover buttercream in a bowl and add black gel color. Mix it until well combined. Snip the corner off a piping bag and fit it with a Wilton 2 piping tip. Transfer the black frosting inside. Pipe the unicorn eyes.

Tips for Success
These easy unicorn cupcakes are so cute. Use these tips to help recreate them and make them your own.
- Add a filling. Carve out the center of each cupcake and fill it with rainbow sprinkles for a fun surprise inside. Top the sprinkles with the piece of cupcake you carved out and then add the frosting as usual.
- Use a food-grade paintbrush. Since this brush is going to be touching your cupcakes, make sure it’s a food-grade one. This will prevent any plastics and chemicals from getting into contact with your food.
- Learn the technique. Watch my video on How to Frost Cupcakes so that you’re not guessing how to do it with the actual cupcakes.
- Keep it simple. The horns look great with the white chocolate coating and silver finish, but if you want to keep it simple, just add them to your cupcakes as-is. They will look a little more “natural” but still great.

Serving Suggestions
These are great for unicorn and rainbow-themed parties! Served with Mini Rainbow Cheesecakes, Rainbow Swirl Cake, Sprinkle Sugar Cookies and Homemade Funfetti Cupcakes, you’ll have the best snack table your guests have ever seen.
Can These Unicorn Theme Cupcakes Be Made in Advance?
Although these unicorn cupcakes are best assembled the same day, whether or not you can make them in advance depends on whether you used regular mini ice cream cones or Muddy Bites for the horns.
The mini ice cream cones will soften and crack within several hours of sitting on the frosting because they’ll absorb the moisture. If you use Muddy Bites, you can definitely assemble your cupcakes fully in advance as these won’t crack or lose their shape. Either way, the horns themselves can be made in advance and stored in an air tight container for at least a week. You just will want to wait to add them to your cupcakes.
The rest of the components for this recipe can be made in advance too. Make the ears and buttercream at least a week ahead as well. Store the ears in an air-tight container at room temperature. Store the buttercream in an air-tight container and keep it in the fridge for up to a month. Just bring it back to room temperature before using.
The vanilla cupcakes can be made in advance as well, but I would recommend making them the day before or the day of the event for them to be at their freshest.
How to Store
Store any leftover cupcakes in an airtight container for up to 3-4 days. They may keep for an extra day or two in the refrigerator, but bring them to room temperature before serving.
More Fun & Easy Cupcake Recipes
- Marble Cupcakes
- Yellow Cupcakes
- Fresh Strawberry Cupcakes
- Cookies and Cream Cupcakes
- Homemade Funfetti Cupcakes
Unicorn Cupcakes
- Prep Time: 4 hours
- Cook Time: 15 miuntes
- Total Time: 0 hours
- Yield: 12 cupcakes 1x
- Category: Dessert
- Method: Oven
- Cuisine: American
Description
With an ice cream cone horn and marshmallow ears, these easy unicorn cupcakes are super adorable. They’re so cute you won’t want to eat them!
Ingredients
For the Unicorn Cupcakes
- 12 mini ice cream cones*
- 5 oz melting white chocolate*
- Silver luster dust
- 12 mini marshmallows
- Pink luster dust
- Vanilla Cupcakes
For the Vanilla Buttercream
- 1 ½ cups (345g) unsalted butter, room temperature
- 6 cups (690g) powdered sugar
- 1 1/2 tsp vanilla extract
- 3–5 tbsp (45–75 ml) heavy cream
- Gel icing colors (I used pink, purple, and teal)
- Ateco tip 809
- Wilton tip 18
- Wilton tip 2
Instructions
Make the Horns:
- Use scissors to carefully snip off the bottom of the ice cream cones above the two main rings so they’re quite so tall/big. If you’re using Muddy Bites, you can skip this step. Set them aside.
- Melt the chocolate according to your package directions. Most melting chocolates, like the Ghirardelli ones or the Wilton ones melt really easily in the microwave.
- Gently lower one horn at a time into the melted chocolate. Use a toothpick to carefully create a spiral around the horn (this is optional). Set them on a parchment-lined baking sheet to cool. Make sure they’re standing upright.
- Once fully dried, use a food paintbrush to brush silver luster dust on the horns. Set them aside in an airtight container until ready to use. They will last well for at least a week in an air-tight container.
Make the Ears:
- Cut each marshmallow in half, diagonally. Then cut one of the pointed ends off.
- Use a food-grade paintbrush to add a little bit of pink luster dust in the center of each ear. They will last well for at least a week in an air-tight container.
Make the Buttercream:
- Add the butter and beat until smooth creamy.
- Add half of the powdered sugar and continue mixing until well combined.
- Add the vanilla extract and heavy cream. Continue beating until well combined and smooth.
- Add the remaining powdered sugar and beat until smooth and well combined. Add additional heavy cream to adjust the consistency.
To Frost the Cupcakes:
- Add the buttercream to a large piping bag fitted with the Ateco 809 piping tip (or a similarly large round one).
- Hold the piping bag perpendicularly and about 1/2″ above the top of the cupcake. Squeeze the piping bag and allow the frosting to spread. Keep the frosting tip in place and slightly buried in the frosting. As the frosting spreads outward and reaches the edge, slowly lift the piping bag to let the dome get a little taller, then release the pressure and lift up. Repeat this for every cupcake.
- Place the horn where you released the pressure and lifted the piping bag to cover that less-than-perfect end. Then add two unicorn ears, one on each side.
To Make the Flowers:
- Squeeze the remaining buttercream out of the piping bag and divide it between three bowls. Add different gel icing color to each one and mix until well combined.
- Transfer each color to its own sandwich-sized ziplock bag and snip a corner off. Cut about an 8×12″ piece of plastic wrap and lay it on a flat surface. Vertically pipe thick lines of frosting (one for each color) side-by-side. Carefully roll the plastic wrap into a log, being careful not to mush the colors too much. Twist one end of the log to avoid it from coming out on that side. Snip off the other end and transfer the log to a large piping bag fitted with a Wilton 18 piping tip.
- Gently squeeze the piping bag until you get a swirled buttercream with three colors. Pipe rosettes and flowers along the sides and top of the unicorn as desired.
Make the Eyes:
- When you’re done with the rosettes and flowers, mix all the leftover buttercream in a bowl and add black gel icing color. Stir it until well combined. Add to a piping bag fitted with the Wilton 2 tip. Pipe the unicorn eyes.
- Serve the cupcakes. Store any leftovers in an air-tight container for up to 3-4 days. For prep ahead advice, please refer to the blog post.
Notes
For the mini ice cream cones: There’s more detail about the options for those in the post, but I recommend either Muddy Bites or simple mini ice cream cones. Be sure to read the post above about the benefits to each.
Melting chocolate: I used Ghirardelli melting wafers, but almond bark or Wilton candy melts would also work.
Gel icing colors: I use both Wilton and AmeriColor and they both work well. The one color that I prefer to use Wilton for is purple. It’s a more true purple.


Hi lovely, can your vanilla cupcakes recipes be made into mini cuppies?
Thank you
Yes, just bake them for 8-10 minutes instead.