This post may contain affiliate sales links. Please read my disclosure policy.
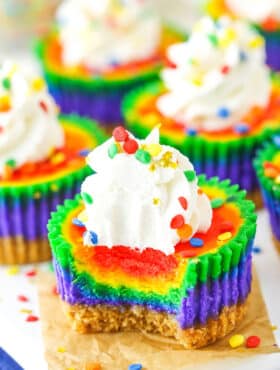
These Mini Rainbow Cheesecakes are so fun with colorful swirl layers! This fun cheesecake recipe is perfect for St. Patricks Day or a kid’s party! Rainbow cake meets cheesecake!

So the boys love books – Brooks especially. He flips through them all the time and even though I don’t think he understands them, he definitely has favorites. His current favorite is actually a book I got at Christmas time called, “A Very Merry Christmas Prayer.” Yes, I know it’s February, but he goes and grabs that book every night when I start reading something else. It’s so cute! How can I deny him?! And why would I? So we read that one, and then some others.
One that I also enjoy reading to them from is their Beginners Bible. I didn’t grow up reading/hearing bible stories, so it’s kind of fun to read through them now with the boys. For example, one story we all know well is of Noah and the ark. One thing I didn’t know is that at the end of the flood, when Noah and the animals reached dry land again, there was a rainbow and the rainbow became a sign from God that he’d never flood the Earth again. Something I never knew!
So as I made these Mini Rainbow Cheesecakes, I thought not only of my love for cheesecake, but of my love for God. So fun!

MINI RAINBOW CHEESECAKES
And hopefully by now you know a bit about my love for cheesecake as well. I’m a big fan and things are always cuter in mini form. I’ve got the classic Mini Cheesecakes, Mini Chocolate Cheesecakes and all kinds of other fun mini cheesecakes.
But after making Red, White and Blue Mini Cheesecakes for July 4th, I thought it’d be fun to make a rainbow one. 🙂 Not only is it a fun way to celebrate St. Patricks Day, it’s also perfect for any colorful celebration.
HOW TO MAKE MINI RAINBOW CHEESECAKES
These Mini Rainbow Cheesecakes are quite simple to make, though you will go through a number of dishes. 🙂 First step is to make the crust and press it into the bottom of some cupcake liners. You can chose to spray or not spray the liners first. I don’t find that they usually stick much, but they certainly stick even less if you spray them. The liners will even start to come off on their own, so if you want the liners to stay in place, maybe don’t spray them.
Bake the crusts, then next up is the filling. It’s the usual ingredients I use for a thick and creamy cheesecake, including a great cream cheese, sugar, a little flour, sour cream, vanilla and eggs. Once everything is all mixed together, divide the batter between six bowls. It should be a little less than half a cup per color. I’m a bit of a perfectionist, so I actually used my food scale to accurately measure each bowl and make sure they were all even. Not totally necessary, but certainly an option. 🙂
Add gel icing color to the bowls, making each one a different color. I used purple, blue, green, yellow, orange and red, but feel free to change it up to your preferred colors.


HOW TO LAYER RAINBOW COLORS
To layer the colors into the cupcake liners, start with the purple. You’ll add only about 2 teaspoons of each color to each cupcake liner. It doesn’t seem like much, but once all the colors are added, the liners will be full.
Divide the purple between all the mini cheesecakes, so you know it’s all been used and divided evenly, then add the next color and do the same thing. To create the layered look I have, add the blue right in the center of the purple batter. Repeat this process with each color until they are all done.
Bake the cheesecakes and then refrigerate them until they’re firm. I topped them off with a little whipped cream (not too much, since I didn’t want to color up the pretty colors) and some sprinkles – both rainbow ones and little gold stars.
These little Mini Rainbow Cheesecakes are SO cute and fun! Despite taking a bit of time to color everything, they are easy to make and great for sharing in their mini form. I hope you enjoy them!
TIPS WHEN MAKING MINI RAINBOW CHEESECAKES
– Be sure to use gel icing color, not food coloring. Food coloring is much thinner and will not give you as vibrant colors and will thin out the batter too much.
– You can spray the cupcake liners with non-stick spray, if you’d like. The liners will come off so easily, they’ll actually start to come off on their own.
– If you’d like more of a swirl look, use a toothpick to swirl the batter around once all the colors have been added.
– If you don’t like sour cream, or can’t find it, plain yogurt will work too.
– To replace the flour, use 1 1/2 tablespoons of cornstarch.
– I used these rainbow sprinkles similar to these and these gold star sprinkles.

You might also like these rainbow dessert recipes:
Rainbow Ice Cream Cake
Funfetti Cheesecake with Cake Bottom
No Bake Funfetti Cheesecake
Funfetti Millionaire Cake
Mini Rainbow Cheesecakes
- Prep Time: 1 hour
- Cook Time: 55 minutes
- Total Time: 1 hour 55 minutes
- Yield: 12 mini cheesecakes
- Category: Dessert
- Method: Oven
- Cuisine: American
Description
These Mini Rainbow Cheesecakes are so fun with colorful swirl layers! This fun cheesecake recipe is perfect for St. Patrick’s Day or a kid’s party! Rainbow cake meets cheesecake!
Ingredients
CRUST
- 3/4 cup (100g) graham cracker crumbs
- 2 tbsp (26g) sugar
- 3 tbsp (42g) butter, melted
FILLING
- 12 ounces (339g) cream cheese, room temperature
- 1/2 cup (104g) sugar
- 3 tbsp (24g) flour
- 1/2 cup (115g) sour cream, room temperature
- 1 1/2 tsp vanilla extract
- 2 large eggs, room temperature
- Purple gel icing color
- Blue gel icing color
- Green gel icing color
- Yellow gel icing color
- Orange gel icing color
- Red gel icing color
TOPPING
- 1/2 cup (120ml) heavy whipping cream, cold
- 5 tbsp (36g) powdered sugar
- 1/2 tsp vanilla extract
- Sprinkles
Instructions
To Make the Crust
- Preheat oven to 325°F (162°C). Add cupcake liners to a cupcake pan and spray with non-stick spray, if you’d like.
- Place graham crackers in a food processor and pulse until fine. You’ll need 3/4 cup.
- Combine the graham cracker crumbs, sugar and melted butter. Divide the mixture between the cupcake liners (about 1 1/2 tablespoons per cupcake liner) and press into the bottoms.
- Bake the crusts for 5 minutes then remove from oven. Allow to cool while you make the filling.
To Make the Filling
- Reduce oven to 300°F (148°C).
- In a large bowl, mix the cream cheese, sugar, and flour until combined (use low speed to keep less air from getting into the batter, which can cause cracks). Scrape down the sides of the bowl.
- Add the sour cream and vanilla extract. Beat on low speed until well combined.
- Add the eggs one at a time, beating slowly and scraping the sides of the bowl after each addition.
- Divide the batter evenly into six bowls. Use a food scale to measure equally, if desired. It should be a little less than 1/2 cup per bowl/color. Add the gel colors to the bowls, coloring one bowl with each color – purple, blue, green, yellow, orange and red.
- Layer the colored batter into the crusts, starting with about 2 teaspoons of purple batter in each cup. Once the purple batter is evenly distributed, add the blue batter in the center of the purple. Continue adding colors – next green, then yellow, orange and red. The cups should be mostly full.
- Bake the cheesecakes for 18-20 minutes, then turn off the oven and leave the door closed for another 10 minutes.
- Crack the oven door and allow cheesecakes to cool for 15-20 minutes, then put in the fridge to finish cooling.
- When cheesecakes are cooled, remove them from the pan and remove their wrappers, if desired.
To Decorate the Cheesecakes
- To make the whipped cream topping, add the cold heavy whipping cream, powdered sugar and vanilla extract to a large mixer bowl. Whip on high speed until stiff peaks form.
- Pipe the whipped cream onto the tops of the cheesecakes and add sprinkles.
- Refrigerate the cheesecakes in an airtight container until ready to serve. Cheesecakes are best for 2-3 days.
Nutrition
- Serving Size: 1 Mini Cheesecake
- Calories: 204
- Sugar: 16.2 g
- Sodium: 164.5 mg
- Fat: 11.6 g
- Carbohydrates: 20.4 g
- Protein: 4.6 g
- Cholesterol: 60.9 mg
Categories
Enjoy!
This post contains affiliate links.