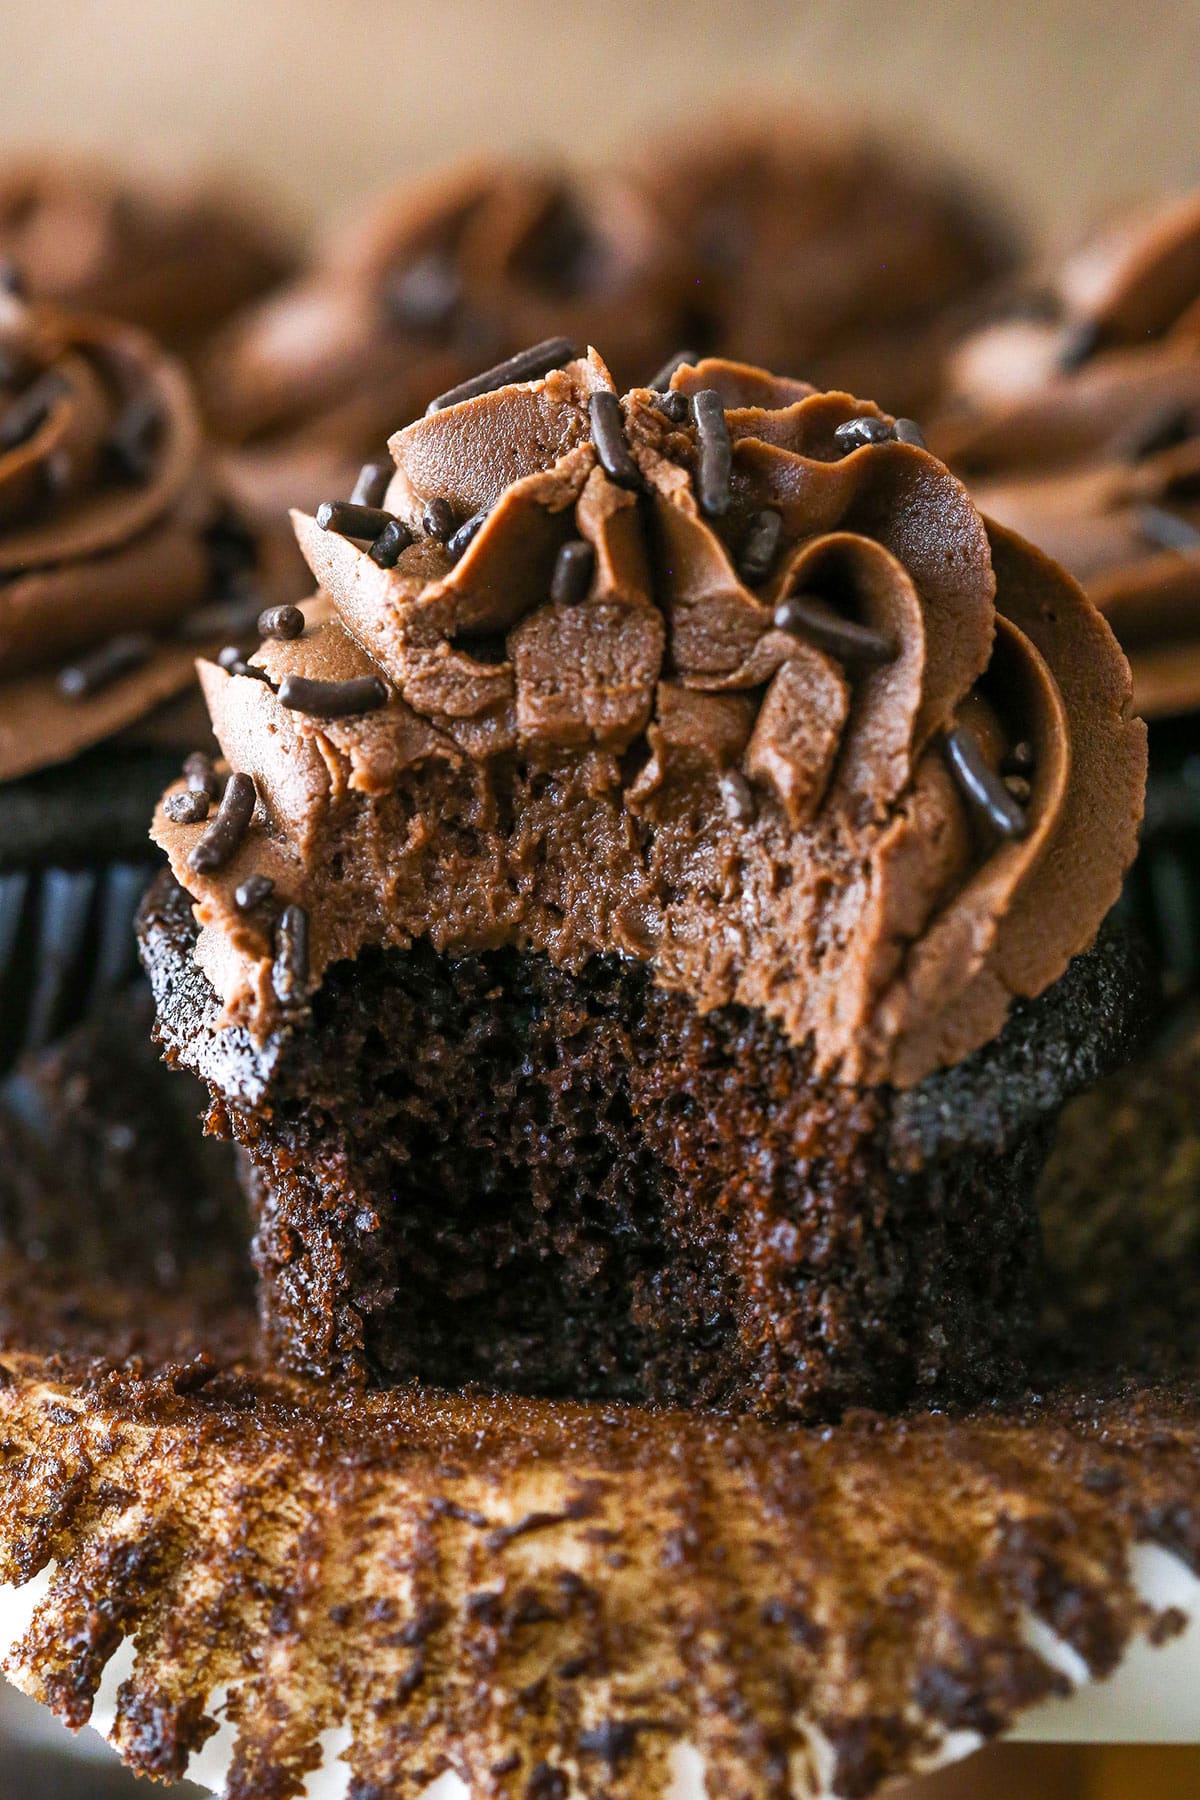
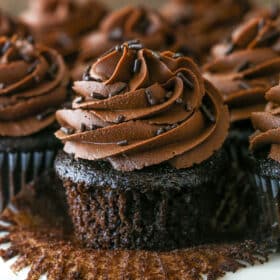
Made completely from scratch, these moist chocolate cupcakes are delicious and a crowd favorite! They are super moist, pack tons of chocolate flavor and are so easy to make! Topped with a rich chocolate buttercream, these are amazing!

The Best Homemade Chocolate Cupcakes
There are certain recipes that every baker needs in their repertoire and an amazing chocolate cupcake is one of them. These cupcakes are insanely moist and so easy to make. They are the perfect starting point for any number of flavor combinations. I have used this chocolate cupcake recipe countless times and not only does it never let me down, it is always a hit.
These chocolate cupcakes are amazing in their cupcake form, but I’ve also shared them as my favorite layered Moist Chocolate Cake, in 6-Inch Chocolate Cake form, and many other ways. It’s easily adaptable and these are so good that after being asked many times for a vanilla version, I created these Moist Vanilla Cupcakes. So if you’re looking for an amazing oil-based vanilla cupcake, those are the way to go.
You may think you already have the perfect chocolate cupcake, but trust me. If you haven’t had these, you haven’t had perfection yet. It’s time to make them.

Why You’ll Love This Chocolate Cupcake Recipe
So what sets these chocolate cupcakes apart from all the rest? You’ll see for yourself when you make them, but I’ll let you in on why I think they are so standout here.
- So moist and tender. These are perhaps the moistest cupcake you’ll ever have. No cracked, dry cupcakes here. Just super tender chocolate goodness straight out of the oven.
- Great to make ahead. These chocolate cupcakes are so moist that they do really well with making a day or two ahead.
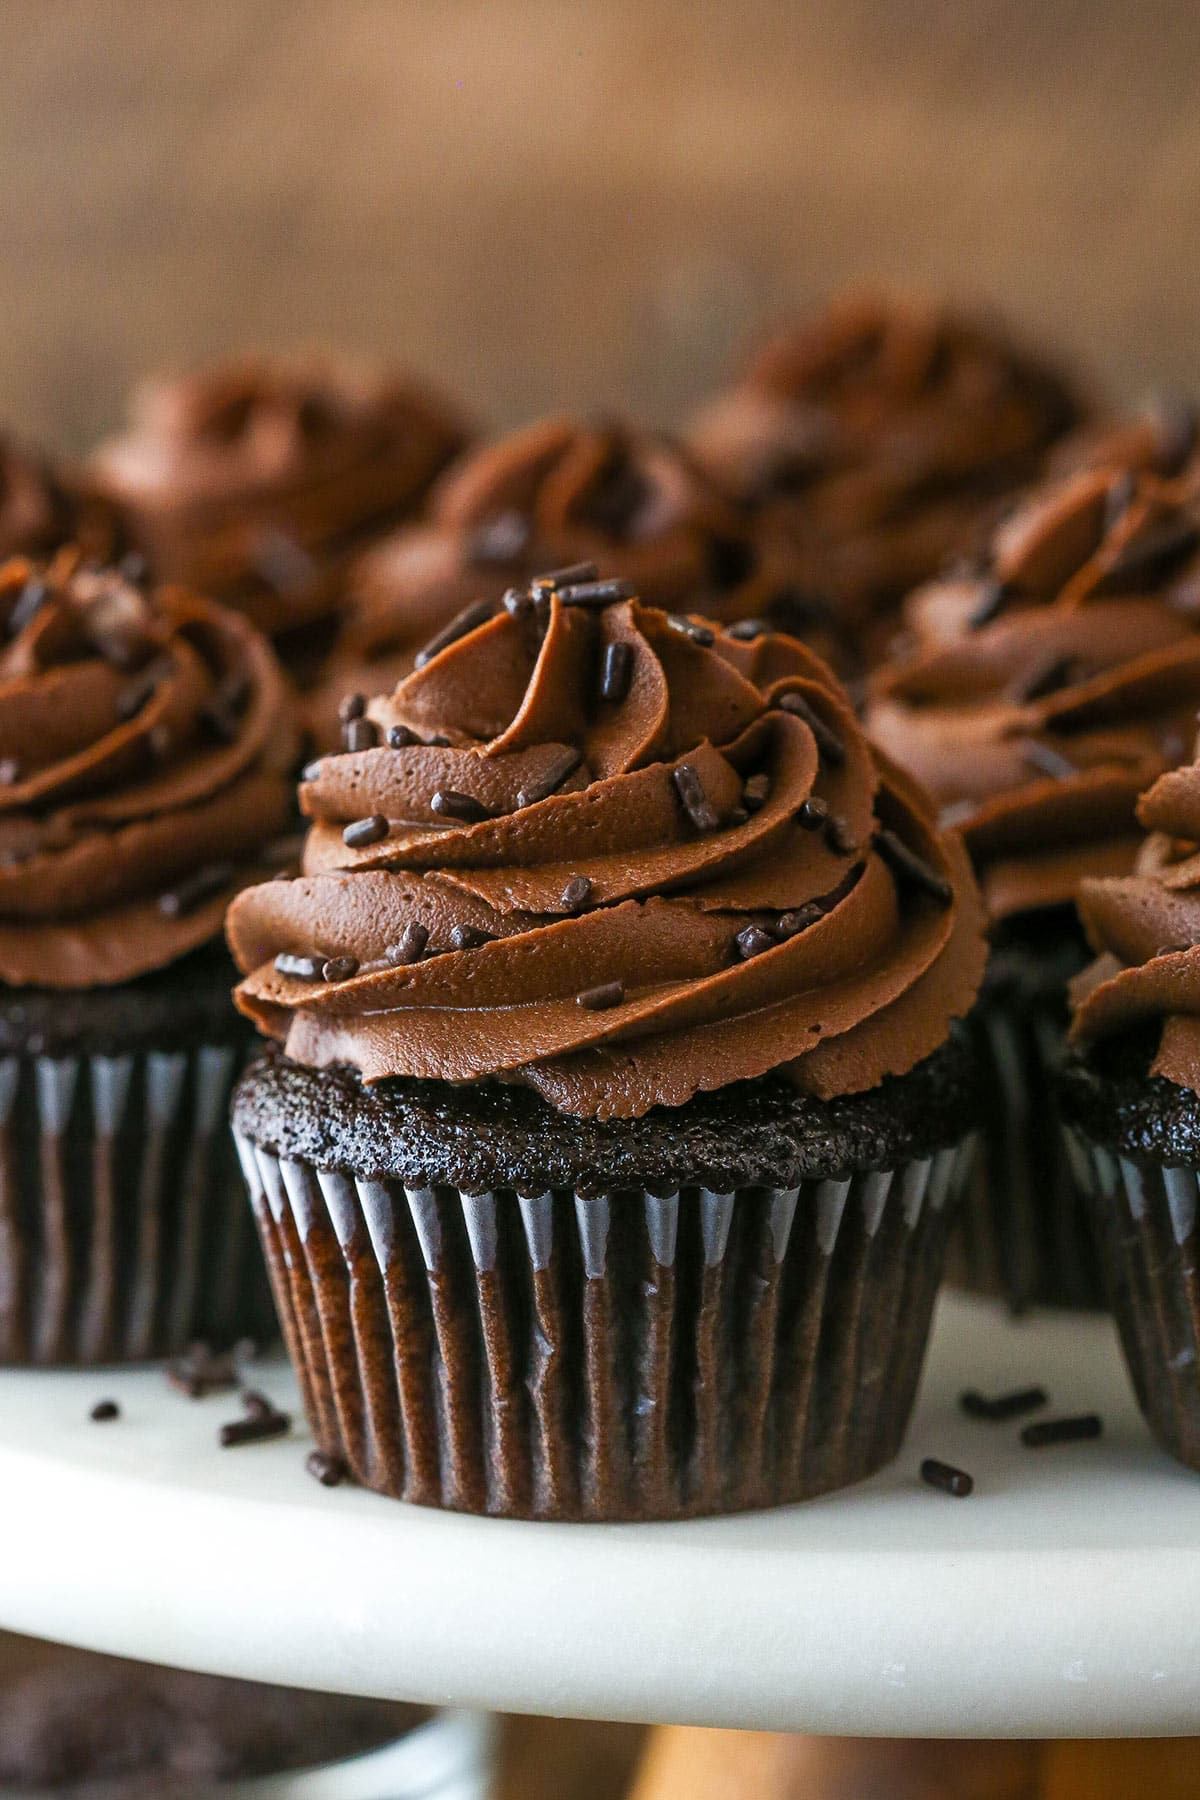
- Real chocolate frosting. I love that the frosting for these cupcakes uses real chocolate. The base of the frosting is made from semisweet chocolate chips that are melted and mixed into the butter. The real chocolate gives the frosting a fudge-y quality that makes it a chocolate lover’s dream.
- A wonderfully simple recipe. No fancy mixing methods or complicated steps here. This recipe comes together quickly and is accessible to all skill levels. All you need is a couple bowls and a whisk!
What You’ll Need
Time to grab your ingredients and get started. Here’s what you’ll need to make these chocolate cupcakes from scratch. Have a look at the recipe card below for exact measurements.

Chocolate cupcakes
- All-purpose flour – Be sure to measure this properly to get the right result. I always recommend a food scale, but the spoon and level method is fine as well. A quality 1:1 gluten-free flour should work also.
- Sugar – Regular granulated sugar is used in these.
- Unsweetened cocoa powder – Regular unsweetened cocoa is used in these cupcakes. You can used Dutch cocoa, but they don’t rise quite as high, so you’d need to fill them a little more and you’d probably get one or two less cupcakes.
- Baking soda – This leavening gives the cupcakes the most amazingly tender texture.
- Salt – This enhances the flavors already present in the cupcakes. Without it, your cupcakes would be a bit bland.
- Egg – Large size eggs, not medium or extra large.
- Milk – You can use regular milk (whole or 2%) or buttermilk. They all work! Buttermilk will make the cupcakes even more tender, but they don’t need it. They are so darn moist and tender even without it.
- Vegetable oil – The use of oil in this recipe makes these cupcakes extra moist. It also means we don’t need to cream any butter and therefore don’t need a mixer. Score!
- Vanilla extract
- Hot water – The hot water allows the cocoa to “bloom”, which brings out a richer chocolate flavor in the cake. Cooler water will work just fine but the cocoa flavor will not be as strong in the finished product. The water also adds moisture without adding more fat that would weigh the cupcakes down and make them more dense.
Chocolate frosting
- Unsalted butter – The butter must be at room temperature otherwise you run the risk of a lumpy frosting.
- Semi-sweet chocolate chips – I used semi-sweet chocolate. It’s my favorite to use in recipes like this. It lends a richer chocolate flavor than milk chocolate but isn’t too bitter.
- Unsweetened cocoa powder – Regular unsweetened cocoa is what I use, but feel free to use a darker version as well.
- Powdered sugar – For volume and consistency. Feel free to reduce the amount to your preference, if needed.
- Salt – You don’t have to add a touch of salt, but I do like the additional flavor it adds. Plus, it cuts down the sweetness a bit.
How to Make Chocolate Cupcakes from Scratch
Here’s a quick look at how to make these moist chocolate cupcakes. For more detailed instructions, scroll to the recipe card below.
For the cupcakes
- Prep. Preheat oven to 300°F and line a cupcake pan with liners.
- Combine the dry ingredients. Whisk the flour, sugar, cocoa powder, baking soda, and salt together.
- Combine the wet ingredients. Whisk together the egg, milk, vegetable oil, and vanilla extract.
- Put it all together. Mix the wet ingredients into the dry ingredients.


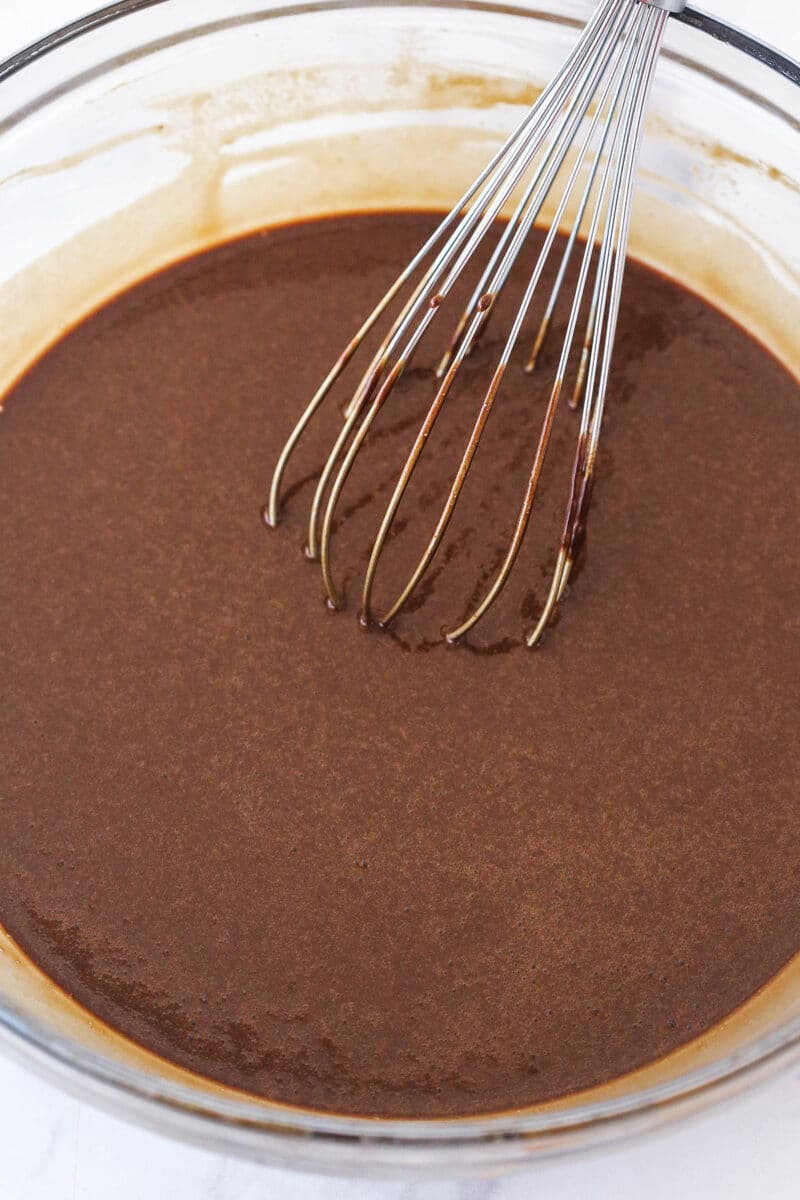
- Add hot water. Add the hot water to the batter. It will be very thin.
- Bake. Fill the cupcake liners halfway and bake for 18-23 minutes.
- Cool. Cool the cupcakes in the pan for a few minutes before transferring to a cooling rack.


For the frosting
- Make the base. Beat the butter until smooth.
- Add some chocolate. Mix in the melted chocolate followed by the cocoa powder.
- Pull it all together. Mix in half of the powdered sugar and 2 tablespoons of the heavy cream followed by the remaining powdered sugar and salt. Add more heavy cream if your frosting is too thick.
- Decorate the cupcakes. Pipe the frosting onto the cupcakes.
Tips for Baking Moist Chocolate Cupcakes
You are about to experience the best homemade chocolate cupcakes you’ve ever tasted. Just follow these simple tips and tricks and you’ll see what I mean.
- Don’t overmix. When mixing together the wet and dry ingredients, be careful not to overmix. This can cause the glutens in the flour to overdevelop, leaving you with a tough, dense cupcake.
- Use hot water. Trust me. While you can use cooler water in the batter for this recipe, I highly suggest using hot water. It allows the cocoa to bloom, bringing out its full, rich, fudgy flavor.
- Thin batter? Keep it that way. The cupcake batter should be very thin. They are loaded with moisture. Trust me. They will turn out just fine. Better than fine. Fluffy, moist, and delicious.
- Bake at a low temperature. 300 degrees F to be exact. It is necessary to bake at a low temperature here because it gives the thin cupcake batter time to fluff up and cook evenly all the way through.
- Let the cupcakes cool. Wait to frost the cupcakes until they have cooled completely. Otherwise, the frosting will slide right off!
Serving Suggestions
Looking to add a little extra flair? Here are some fun ways to serve these moist chocolate cupcakes that will take them from amazing to heavenly.
- Frosting. Change up the frosting on top for something a little different. Try my Strawberry Buttercream, Cream Cheese Frosting, regular Chocolate Buttercream, Vanilla Buttercream or Ermine Frosting.
- Ice cream. Serve these cupcakes with a scoop of vanilla ice cream. Want to make your own ice cream? Try my Oatmeal Chocolate Chip Cookie Ice Cream, Strawberry Ice Cream or Birthday Cake Remix Ice Cream.
- Sauce. I love drizzling a fruity sauce over these cupcakes or filling them. Try my Easy Strawberry Sauce or this Easy Raspberry Sauce. Not in a fruity mood? My Easy Homemade Hot Fudge Sauce, Chocolate Ganache or this Salted Caramel Sauce would work beautifully as well.
- Cookies. Wedge half an Oreo or chocolate chip cookie into the frosting.
- Sprinkles. Add a dash of crunch and a little extra sweetness with rainbow or chocolate.
How to Store Cupcakes
Allow the cupcakes to cool completely before arranging them in a single layer in an airtight container (you can use an airtight cupcake carrier if you have one). Close the container and store the cupcakes at room temperature for up to 24 hours. Past that, store them in the refrigerator. They should be good for up to 5 days.
Can I Freeze These?
You can! Once cooled, arrange these moist chocolate cupcakes (frosted or unfrosted) in a single layer in an airtight container. Close the container and store it in the freezer for up to 3 months. Allow the cupcakes to thaw in the refrigerator before frosting (if applicable) and serving.
More Chocolate Cupcake Recipes
I have done a lot of playing with chocolate cupcake recipes. This one is definitely my favorite and is used as the base of some of the ones below. But here are a variety of other chocolatey options.
- Moist Chocolate Cupcakes with Ganache Filling
- Baileys Chocolate Cupcakes
- Peanut Butter Chocolate Buckeye Cupcakes
- Raspberry Chocolate Cupcakes
- Chocolate Covered Strawberry Cupcakes
- Nutella Chocolate Cupcakes
- S’mores Cupcakes
- Snickers Cupcakes
- Mint Chocolate Chip Cupcakes
- Oreo Chocolate Cupcakes
Watch How to Make Moist Chocolate Cupcakes
Homemade Moist Chocolate Cupcakes
- Prep Time: 45 minutes
- Cook Time: 20 minutes
- Total Time: 1 hour 5 minutes
- Yield: 14–16 Cupcakes 1x
- Category: Dessert
- Method: Oven
- Cuisine: American
Description
Made completely from scratch, these moist chocolate cupcakes are delicious and a crowd favorite! They are super moist, pack tons of chocolate flavor and are so easy to make! Topped with a rich chocolate buttercream, these are amazing!
Ingredients
Chocolate cupcakes
- 1 cup (130g) all-purpose flour
- 1 cup (207g) sugar
- 6 tbsp (43g) unsweetened cocoa powder
- 1 tsp baking soda
- 1/2 tsp salt
- 1 large egg
- 1/2 cup (120ml) milk or buttermilk*
- 1/2 cup (120ml) vegetable oil
- 3/4 tsp vanilla extract
- 1/2 cup (120ml) hot water*
Chocolate buttercream
- 1 1/4 cups (280g) unsalted butter, room temperature
- 12 oz semi-sweet chocolate chips, melted
- 3 tbsp (22g) unsweetened cocoa powder
- 5 cups (575g) powdered sugar
- Pinch of salt
- 2–4 tbsp heavy cream
Instructions
For the cupcakes
- Preheat oven to 300°F (148°C) and prepare a cupcake pan with liners.
- Add the flour, sugar, cocoa powder, baking soda and salt to a large mixing bowl and combine. Set aside.
- Add the egg, milk, vegetable oil and vanilla extract to another medium sized bowl and whisk together to combine.
- Add the wet ingredients to the dry ingredients and mix until well combined.
- Add the water to the batter and mix until well combined. The batter will be very thin.
- Fill the cupcake liners about half way and bake for 18-23 minutes, or until a toothpick comes out with a few moist crumbs.
- Remove the cupcakes from oven and allow to cool for 2 minutes, then remove to a cooling rack to finish cooling.
For the buttercream
- To make the frosting, beat the butter in a large mixer bowl until smooth.
- Add the melted chocolate and mix until well combined and smooth.
- Add the cocoa powder and mix until well combined and smooth.
- Add about half of powdered sugar and 2 tablespoons of heavy cream and mix until well combined and smooth.
- Add remaining powdered sugar and salt and mix until well combined and smooth.
- Add remaining heavy cream as needed to get the right consistency of frosting.
- Pipe the frosting onto the cupcakes. I used Ateco tip 847.
- Store cupcakes at room temperature for up to 24 hours, then refrigerate. Cupcakes are best served at room temperature. Best eaten within 4-5 days.
Notes
- I have previously used Hershey’s Special Dark Cocoa powder for these cupcakes, but Hershey’s has changed it and it doesn’t work quite the same in these. They don’t rise as well. I recommend regular unsweetened cocoa powder, but you can technically use either.
- This recipe calls for hot water. You don’t have to use hot water – the cake will still bake fine – but the hot water allows the cocoa to “bloom”, which brings out a richer chocolate flavor in the cake.
- Milk and buttermilk both work great in these cupcakes. I don’t notice much difference between the two, other than that the buttermilk makes them even more tender (and they are already super tender).
Nutrition
- Serving Size: 1 Cupcake
- Calories: 520
- Sugar: 55.8 g
- Sodium: 168.3 mg
- Fat: 29.7 g
- Carbohydrates: 65.6 g
- Protein: 3.8 g
- Cholesterol: 54.8 mg


Kinda taste like hard boiled eggs and batter too watery
Hi,
I’m looking to use this recipe for a party I’m having soon, however, a guest is lactose intolerant. Can I sub the milk for a lactose free milk? If so, how might this impact the recipe and which type of milk would you recommend?
Thank you 🙂
I haven’t tried it myself, so it’s hard to say. I do believe there have been comments about people having success though.
Can I substitute one cup white sugar with light brown sugar ?
I haven’t tried it before, but I would think it’d be fine.
Maybe it would be better without the hot water. But the cupcakes were doughy. Threw them all out
Hello! I love your recipes and have been using them for years! Love you!! Just wanted to let you know the new design of the website is amazing! However the new scale fixture to make the recipe 2x to 3x isn’t working correctly. It changes the cups and grams but it’s not changing the ML for the wet ingredients. Just thought I’d let you know! Thanks 😊 not a complaint just a heads up! Keep being amazing!!!!
Thank you so much! I’m so glad you enjoy the recipes and like the new look! We are still in the process of working through things with the recipe card. We are actually switching to a new one and it is creating some growing/changing pains. Thanks for letting me know! Hopefully we can get it all resolved quickly.
I’ve tried a lot of online cupcake recipes over the years. Followed this one to a tee. Comes out perfect every time. Light fluffy, moist, and full of delicious chocolaty flavor.
Awesome! So glad you enjoyed them!
If the better melted when I put the melted chocolate chips in,what can I do to fix it?because it turned out so watery
For the buttercream? Dang, that must’ve been hot! I’d let it cool a bit and then check the consistency and add cream as needed.
Enjoyed baking it as it is easy …I keep note of perfect recipes by writing into my blog.
I love this recipe! I have made it multiple times. But wondering if I use cake flour instead if it might change it? Do you think it would?
The texture is a little different, but not dramatically so.
This is the best recipe by far! I am going to delete every other cupcake recipe that I have I have saved
I love this recipe so much
I’m so glad. 🙂
I love this recipe for the cupcakes!! can I use it for a mini cake? 🙂
I’m so glad! Yes, I have it as a 6 inch chocolate cake here, if you’d like to check it out. 🙂
I give the cupcakes 5 stars and the frosting 3 stars! I loved the cupcakes and they turned out perfectly and were super delicious. I unfortunately really disliked the frosting. It was just too sweet and even though I used Ghirardelli chocolate chips it just didn’t taste high quality. I actually only frosted half of the cupcakes with it and then decided to make a vanilla frosting instead. I did save the leftover frosting and froze it so maybe next time I’ll make some peanut butter frosting and do a chocolate peanut butter swirl to dilute the taste of the chocolate frosting. Will definitely make the cupcakes again!
I love this recipe and use it all the time. I get a lot of compliments on them every time! I have a question though. How would I adjust the cooking time to make mini cupcakes instead of regular size?
I’m so glad they’re a hit! It’s been a while since I’ve made minis, so I can’t remember exactly how long I baked them for. I’m thinking it was 10 minutes or so.
I love the taste of them but for some reason they took longer to bake and they deflated after they were cooked. I followed the recipe exactly as written, I only added an extra 1/4 tsp of vanilla cuz I love the flavor. And I made sure to only fill my tins half way, and yet they rose more like crème brûlée and then deflated as I set them on the rack to cool.
When they deflated, did they end up flat, sunken or with a dome on top?
Time to bake can vary by oven. But the deflating is hard to say, since it could be a number of things. Some options for deflating after removing them from the oven would be that they were underbaked, over mixed or maybe you added more baking soda than the recipe called for by accident, or it’s expired. I’m sorry that happened and hope this helps!
I made this recipe but didn’t want to do cupcakes so I tried an 8×8 square glass dish with parchment. I was guessing on the cook time; it seemed done after 35 minutes, a tester came out clean. However, after being out and cooling, the center sank. I made the chocolate ganache as icing and served it, although it looked weird! However, it tasted delicious. Can you give me help so that next time it doesn’t sink.
1
So glass dishes aren’t typically ideal for baking, so if you have a baking pan, that would be best. Glass pans can cause uneven baking and collapsing is not uncommon. So you could try just a different pan. It’s also possible that it was underbaked in the middle, which can certainly cause it to sink.
Do you have any tricks to get your buttercream so smooth? Mine came out with a lot of air bubbles/grainy. I did sift my powdered sugar. It was really smooth until I added the second half of the powdered sugar. I have this problem a lot with any buttercream that isn’t plain vanilla.
So being grainy is a little different than air bubbles. If it’s grainy, that’s likely the powdered sugar and it should be sifted. If it’s air-bubbles, that could be from mixing on too high of a speed. I stay more in the medium-low area, or even low, particularly if you want to avoid air bubbles. You can also let the buttercream sit on the mixer on a very low speed, just stirring, and that is supposed to help get rid of air bubbles.