There’s a reason I call this the best chocolate cake recipe: It’s so good, restaurants have asked me to make it! This moist, fluffy, one-bowl chocolate layer cake is going to be your go-to recipe once you try it. Finish this cake with from-scratch chocolate buttercream and homemade chocolate ganache.

After testing many chocolate cake recipes, this one is hands down the best I’ve ever tasted. This is the kind of chocolate cake everyone should have in their recipe collection. An easy, one-bowl cake with the perfect crumb that’s covered with homemade chocolate buttercream frosting. This moist cake is made completely from scratch and has incredible chocolate flavor.
If you’re familiar with my recipes, then you’ve probably seen several variations on chocolate cake, whether that’s hot chocolate cake, my chocolate Oreo cake, chocolate mousse cake, or otherwise. This is my original chocolate cake recipe, and it is still my favorite to this day! The main difference between this recipe and my others is that this one is the MOST tender and moist, it uses oil instead of butter, and it is baked at a lower temperature (which means it also takes a little longer to bake).
I literally cannot stop eating this cake whenever I make it.
I made this chocolate layer cake for my niece’s birthday last year. One of the moms asked my sister-in-law where she’d gotten the cake. After asking me about it, it turns out this mom has two restaurants in Atlanta, and was curious if I’d be interested in making cakes for her restaurant. Whaaaaaat?!?
Pretty neat, but I actually said no. However, this chocolate cake is THAT good! And who doesn’t want to be the one with a cake that’s so good you could bake for a restaurant? You know you do. 😉
So, What Makes This the BEST Homemade Chocolate Cake?
- It’s easy to make. First and foremost: There’s only one bowl!
- Baked at a lower temperature. While my easy chocolate cake recipe bakes at 350ºF, I bake this chocolate cake at 300ºF. This slower bake results in a more moist cake throughout, and a flatter top (less domes!).
- Oil-based. I make this chocolate cake recipe with oil for a more tender crumb. Other recipes, like my chocolate piñata cake, use butter instead of oil simply because some readers prefer the taste of butter! Butter-based cakes are also generally sturdier, so that cake holds up much better to being carved and filled like a piñata. 🙂 As far as great moisture in chocolate cakes goes, though, oil is the way to go.
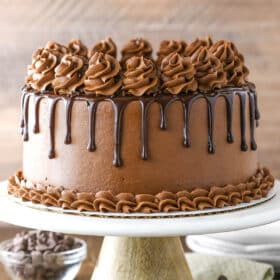
- Triple the chocolate. This cake has a rich chocolate flavor and fluffy crumb, covered with chocolate buttercream frosting, and decorated with a chocolate ganache drip. It’s a chocolate overload!
- Simple ingredients. The best chocolate cake doesn’t need fancy or even “secret” ingredients, just a few key ones in the right ratios that make it ultra-moist, full of flavor, and still ideal for stacking.
Ingredient Notes & Substitutions
Here’s a quick overview of the key ingredients needed to make the chocolate cake and frosting. The exact measurements for the ingredients can be found in the recipe card below.

- All-purpose flour – I say this for every cake recipe, but it’s very important to measure the flour correctly. Use a kitchen scale or the spoon-and-level method to avoid over measuring, which can lead to a dry cake.
- Natural unsweetened cocoa powder – Regular unsweetened cocoa is used in these cupcakes. You can use Dutch cocoa, but since it’s not acidic, it won’t react with baking soda, and the layers won’t rise quite as high. Stick with natural cocoa powder for best results.
- Baking soda – Make sure that you’re using baking soda, not baking powder, and check the expiration date. If your leavening is old or expired, your chocolate cake won’t rise properly.
- Buttermilk – Buttermilk makes this chocolate cake even more tender. If you don’t have buttermilk, just use regular milk. You can use whole or 2% and the cake is still just as wonderful. For some, it’s a little too tender with buttermilk.
- Vegetable oil – This cake is made with oil instead of butter. It makes SUCH a moist cake! And you don’t miss the butter.
- Hot water – Hot water helps bloom the cocoa powder for a more intense chocolate flavor in the cake. If you use room temperature water, your cake will still turn out fine. Just not quite as rich. If you’d like, you can also use hot coffee.
- Powdered sugar – I’m often asked about the amount of powdered sugar. There’s a decent amount, because I use a good bit of frosting. That said, you can reduce it. But then I’d reduce all the frosting ingredients by the same ratio and just make less frosting.
- Chocolate chips – Use high-quality chocolate chips or chop up a chocolate baking bar to make the chocolate ganache. It can be dark or semi-sweet chocolate.
- Heavy cream – You’ll combine the chocolate with heated heavy cream. When it melts, you’ll have ganache! Please don’t use milk or another low-fat alternative to heavy cream, or your ganache will be too thin.

How to Make Chocolate Cake From Scratch
One thing to note is that this cake has a very thin batter. And no, the baking temperature is NOT a typo! This best-ever moist chocolate cake uses a low-and-slow technique that bakes the cake at 300ºF for a bit longer than your typical chocolate cake recipes. This allows the chocolate cake to bake through slowly and evenly, avoiding high domes and overbaked edges. So, here’s how you make it:
Make the Cake
Prepare three 8-inch cake pans with parchment paper circles in the bottom, and grease the sides. Meanwhile, preheat the oven to 300°F (148°C).

Add all dry ingredients to a large bowl and whisk together.

Add eggs, buttermilk, and vegetable oil to the dry ingredients and mix well.

Add vanilla to boiling water, and then add it to the batter. Mix well.

Divide the batter evenly between your cake pans. Bake at 300ºF for 30-33 minutes, or until a toothpick comes out with a few crumbs.
Make the Chocolate Buttercream Frosting
Once baked, remove the chocolate cakes from the oven and allow them to cool for about 10 minutes. Then, remove them to cooling racks to cool completely. I usually make the chocolate frosting while the cakes cool. Here’s how:
- Beat the butter and sugar. Beat the butter in a stand mixer until smooth, then slowly add 4 cups (460g) of powdered sugar. Mix until creamy.
- Alternate adding the wet and dry ingredients. Next, mix in the vanilla and half of the water and milk. Add another 5 cups (575g) of powdered sugar, then the cocoa powder, mixing well after each addition. Lastly, add remaining water or milk until the frosting is the right consistency.
Frost the Cake
Once cakes are cool, remove cake domes from top with a large serrated knife, if needed. See my tips on how to level a cake and how to stack a cake.

Place the first cake layer on a cake plate. Spread ~1 cup of frosting on top. Add the second cake layer, then another cup of frosting on top in an even layer.

Frost the outside of the entire cake to finish things up. Feel free to use my tutorial for frosting a smooth cake if you need tips!
Decorate the Cake
Technically, you could just stop right here. By this point, you’ll have an amazing layer cake with chocolate buttercream frosting! But if you want to go a bit fancy, this chocolate ganache is an easy way to do it. To make chocolate ganache:

Heat the heavy whipping cream until it begins to simmer, then pour it over the chocolate chips.

Allow it to sit for 2-3 minutes, then whisk until smooth.
That’s it. Just two steps! Then you add the ganache to your cake. I like to use a squeeze bottle for drizzling around the edges. See my tips on making a chocolate drip cake.

Drizzle the chocolate ganache around the edge of the cake, then pour the remainder of the ganache on top of the cake and spread evenly.

Allow the ganache to firm up a bit. Pipe the remaining chocolate frosting around the top edge of the cake and pipe a border around the bottom. I used Ateco tip 844.
Add Sprinkles and Serve!
Add a few sprinkles to the cake, if desired, then serve. Sprinkles are totally optional, of course, but why not?

Different Pan Sizes
Made as-is, this chocolate cake recipe uses three 8-inch round pans for a three-layer cake. If you’d like to bake this cake in another pan size, it’s doable! The recipe and oven temperature stay the same (300ºF), but the baking times will vary depending on which pan size you’re using. Here are some quick conversions for you:
- Two 9-inch pans – Bake for 40-45 minutes
- 9×13-inch pan – 40-45 minutes
Can I Make This Cake Recipe Into Chocolate Cupcakes?
Definitely! Fill the cupcake liners about halfway and bake for 18-23 minutes, or until a toothpick comes out with a few moist crumbs. You’d get about 24 or so cupcakes if you use the full recipe. You can also check out my homemade moist chocolate cupcakes. It’s the same recipe, but cut in half to make about 12 cupcakes.

How to Store a Frosted Cake
- Room temperature – This cake can be kept at room temperature for a few hours, but should otherwise be refrigerated. Without the chocolate ganache, it could be at room temperature for up to 48 hours.
- Refrigerator – Beyond the room temperature instructions above, you can also store it in the fridge, but the frosting will firm up. So, you’ll want to remove the cake from the fridge before serving, so that it can come to room temperature again. The cake should be covered in the fridge, ideally in a cake carrier. It’s best if eaten within 4-5 days.
- Freezer – These cake layers freeze really well for up to 3 months. I like to wrap them in a layer of plastic wrap, freeze them, then add a layer of foil. Thaw them in the fridge before putting the cake together. I don’t typically freeze fully layered cakes, but that would probably be fine. You can also freeze individual slices. Flash freeze them, them wrap them in plastic wrap. Thaw in the fridge before eating.
More Chocolate Cake Recipes
This recipe is so simple and easy to make. In addition to being delicious, it has actually become the base for many other flavor combinations I’ve made into cakes, and it’s always a hit!

The Best Chocolate Cake Recipe
save this recipe
Enter your email & we’ll send it to your inbox. Plus get new recipes from us every week!
Ingredients
Chocolate Cake
- 2 cups (260g) all-purpose flour (measured correctly)
- 2 cups (414g) granulated sugar
- ¾ cup (85g) natural unsweetened cocoa powder
- 2 teaspoons baking soda
- 1 teaspoon salt
- 2 large eggs
- 1 cup (240ml) buttermilk
- 1 cup (240ml) vegetable oil
- 1 ½ teaspoons vanilla extract
- 1 cup (240ml) hot water
Chocolate Buttercream
- 2 ½ cups (560g) unsalted butter (room temperature)
- 9 cups (1035g) powdered sugar
- 2 teaspoons vanilla extract
- 1 cup (114g) natural unsweetened cocoa powder
- 4-5 tablespoons (60-75ml) water (or milk)
- 1 pinch salt
Chocolate Ganache
- 6 oz (1 cup | 169g) semi-sweet chocolate chips
- ½ cup heavy whipping cream
- Sprinkles
Instructions
Make the Cakes
- Prepare three 8-inch cake pans with parchment paper circles in the bottom, and grease the sides.
- Preheat oven to 300°F (148°C).
- Add all dry ingredients to a large bowl and whisk together.
- Add eggs, buttermilk and vegetable oil to the dry ingredients and mix well.
- Add vanilla to hot water and add to mixture. Mix well.
- Divide batter evenly between cakes pans and bake for 30-33 minutes, or until a toothpick comes out with a few crumbs.
- Remove cakes from oven and allow to cool for about 10 minutes, then remove to cooling racks to cool completely.
Make the Frosting
- Make frosting while cakes cool. Beat the butter in a large mixing bowl until smooth.
- Slowly add 4 cups (460g) of powdered sugar and mix until smooth.
- Add vanilla and half of the water or milk and mix until smooth.
- Add another 5 cups (575g) of powdered sugar and mix until smooth.
- Add cocoa and mix until smooth.
- Add remaining water or milk until the frosting is the right consistency.
Assemble the Cake
- Once cakes are cool, remove cake domes from top with a large serrated knife. See my tips on how to level a cake and how to stack a cake.
- Place first layer of cake on cake plate. Spread about 1 cup of frosting on top in an even layer.
- Add second layer of cake and add another cup of frosting on top in an even layer.
- Add final layer of cake on top and frost the outside of the cake. Feel free to use my tutorial for frosting a smooth cake.
Make the Chocolate Ganache
- To make the chocolate ganache, add the chocolate chips to a medium sized bowl (see my tips on making chocolate ganache).
- Heat the heavy whipping cream just until it begins to boil, then pour it over the chocolate chips. Allow it to sit for 2-3 minutes, then whisk until smooth.
Finish Cake
- Drizzle the chocolate ganache around the edge of the cake, then pour the remainder of the ganache on top of the cake and spread evenly. I like to use a squeeze bottle for drizzling around the edges. See my tips on making a chocolate drip cake.
- Allow the ganache to firm up a bit, then pipe the remainder of the frosting around the top edge of the cake and pipe a border around the bottom. I used Ateco tip 844.
- Add a few sprinkles to the cake, if desired, then serve. Cake is best when well covered for 3-4 days.
Video
Notes
Nutrition
The nutrition facts provided are calculated using a third-party tool and are estimates only. Actual nutritional content may vary based on the ingredients and brands you use, as well as portion sizes. For accurate results, please consult a registered dietitian or nutritionist.
This post contains affiliate links.


I have to say I was a skeptic, not on the taste but the cooking time. 30 minutes at 300 degrees, no way! But YES!! It totally cooked in that timeframe and perfectly. However I didnt have 3, 8″ pans only 2 so I split between the two and made mini cupcakes. If I split between 3 pans I would have had very thins cakes. They rose but then shrunk after cooling. The cake is extremely soft, moist, perfect texture and it taste good, it wasnt the best cake for me.
Are you sure you used baking SODA and not baking powder?
What brand of cocoa do you use?
Hersheys
Hiya, I’m making this cake, but 30 minutes in and it is super liquidy in the middle still. Do I just keep adding time?
That seems strange, but I’d guess more time would be needed.
HI! This recipe was delicious and moist, however, when I made it, the layers turned out extremely thin, about half of what it was supposed to be. Just curious about what happened. We live in the Dominican Republic, so it is very humid here. Could that have been the problem? Thanks!
Humidity could possibly have something to do with it. I’d also check that you used baking soda and not baking powder.
Thank you for this recipe. I baked this cake exactly as you directed for my son’s birthday, and we three who ate it agree it’s the BEST chocolate cake ever – moist, flavorful, and perfect in texture. I used your easy vanilla buttercream frosting instead of the chocolate buttercream icing, and I had just enough coverage for this cake, plus enough for the middle layers. You helped bring extra joy to my son’s birthday weekend – thanks again! I am putting this recipe in circulation in my personal cookbook as my only go-to chocolate cake recipe, even above and beyond those I’ve used for years from Martha and Betty.
So glad to hear that!
I finally did it! First and most importantly, this truly was the best chocolate cake I have ever tasted, and the chocolate buttercream frosting was heavenly. This is coming from someone who is not a fan of any frosting so I normally scrape it off. But THIS frosting…i couldn’t help but eat right along with the cake. Not only was it delicious, but it was the perfect complement to such a moist cake.
For the recipe, just a few things I learned the hard way in hopes that it will help someone else. First, I agree with the others who commented that it took longer to bake (closer to 45-50 minutes at 300). But that was not big deal, I just kept checking it with the toothpicks until it was done.
Second, this cake is SUPER MOIST like Lindsay says, so it’s a total pain to frost. I managed to get there eventually, but just trying to do the crumb coat made me want to throw the cake at the wall several times. Use a LOT of frosting and a light hand with the spatula when spreading. It mike look like a mess but you can always cover it with the next layer. Take your time and be patient.
Third, the Wilton #789 tip that Lindsay recommends for frosting the sides of the cake is an absolute MUST. I thought I could get away with using the angled spatula and turntable and boy was I wrong. Thankfully I had made two cakes (longer story involving the oven temp on the first cake), so I experimented with frosting the first cake (which I gave to my neighbors), saw the error of my ways, and ran out to purchase the suggested icing tip for frosting the second cake, which was for my husbands birthday. It was still a chore, because the cake is so moist, but without this frosting tip it was not only impossible, but horribly unattractive!
Fourth, the other tool I could not have done this without was the Ateco Decorating Comb, which Lindsay also recommended (for frosting a smooth cake). Regardless of how smooth you want your frosting to be, without this tool, I think it would be extremely difficult to frost THIS moist of a cake using this type of frosting.
The last tool I wish I would have purchased was the cake lifter. I probably wouldn’t use it for all cakes, but for this one, again because it is SO moist, it would have made things so much easier. Thankfully, I did purchase some of the cardboard rounds, so I was able to improvise with those and only managed to crack one layer (not bad!)
Please keep in mind that I am a total beginner here. So the more seasoned bakers may know some other tricks to avoid needing all the tools, but I felt like they were a tremendous help.
Lindsay – I hope you don’t mind my tips for any other beginners. I don’t want them to get frustrated and give up because this cake is amazing and so delicious. I wish I could upload a photo because it looks like something from a magazine! It came out beautiful and delicious. I posted it on my FB and I had more comments about how beautiful the cake was than “tell your hubby happy birthday” LOL! And most importantly, he loved it! We’ve been together 23 years and this was the first cake I ever made for him from scratch. He said it was well worth the wait!
Your tips are great and it’s great to hear that my tips were helpful ultimately. So glad you enjoyed the cake!
Hi – I have 9 inch cake pans – can you make any recommendations for possible changes in bake time?
If you’re using two layers, the time is probably similar, actually. If doing three layers, it’d be less but I’m not sure by how much.
Baked this cake this afternoon and just had to comment! I used hot coffee instead of hot water but otherwise followed this recipe exactly and it is SO THICK, RICH AND MOIST. I used 6” cake pans that are about 3” deep and filled half full. I ended up having to almost double the cook time before they were cooked through to the centre but it was worth it. They are so dense and delicious – almost the texture of a flourless chocolate torte or a brownie. I will definitely be using this recipe again!
One last question Lindsay…. I made this cake today, but I got confused reading the beginning of the post when you said you had changed the temp to 350 (you were talking about your other chocolate cake!). I realized my mistake about 15 minutes into the baking time and turned the oven down to 300 to finish it out. My husband’s birthday is tomorrow so I have time to re-do if you think the consistency will be off. Should I re-do or leave it? They seem to have come out ok and right around the time you said 30 minutes (not all pans were done at the same time because I think one had more batter than the others…oops). Please advise?
Sorry, I got to your question too late. How did it turn out?
No worries! I decided since I had enough ingredients to give the first one to my neighbors and make a second one (at the right temp!) for my hubby’s birthday, just in case! I gave the details below in another post with some tips I learned as a beginner and trying this recipe BUT it ended up coming out amazing. First cake (temperature oops) was tasty but did not hold up well to handling or frosting! Second cake was a bit of a challenge to frost because it is so moist but came out beautiful (like magazine beautiful) and was the most delicious cake that I (or my family) has ever eaten!!!!!! Thank you so much for your responses and for sharing this recipe in the first place.
i have 9 inch cake pans – can i use them and perhaps it will be baked for a slightly shorter time?
Yes.
Great! Thanks so much for taking the time to respond.
Hi Lindsay,
I’m getting ready to attempt this recipe for my husbands birthday and I had one question. This may sound dumb, but I notice that you use a hand mixer for a lot of your videos. Is there a reason, like is it better to use the hand mixer or can I use my Kitchen Aid mixer? Thanks so much!
I use my kitchen aid when baking but often use the hand one in videos because it’s easier to show. Both work just fine.
I have made so many chocolate cake recipes and this is literally the best. It has a lovely chocolate flavour without being heavy or dense. I could probably eat the whole cake in one sitting, its dangerous!
I’ve made it repeatedly and have shared the recipe with my friends who also agree it is the best. So thank you for sharing!
BEST CHOCOLATE CAKE RECIPE EVER! My mom who hates chocolate cakes is obsessed! Seriously so good and moist! I put caramel sauce as a filling between each layer and everyone loved it!
Truly appreciate the way you have made this delicious cake. I am not a baker but you described everything so nicely that really helped me to make it. Though it was not as beautiful as yours for my first try, i hope next time it would be better. Thanks for the lovely treat.
Also… what is shortening? I’m in UK. Thanks
I’m in the UK and I just use butter (so the weight of butter plus the weight of shortening as butter). I think you can use shortening if you live in a hotter climate to make it less likely to melt? Or something like that.