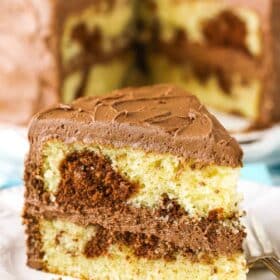
This layered marble cake is always a hit, and it’s SO easy to make! I’ll show you how to make an old-fashioned marble cake swirled with moist and fluffy chocolate and vanilla cake batter, frosted with creamy homemade chocolate frosting.

After so many requests for a marble cake, I’m excited to share today’s recipe! This moist, frosted marble cake took several rounds of testing. I even went to my Instagram stories to ask YOU what makes the best marble cake recipe. I have to say, the results are everything I wanted and more. The distinct swirls of fluffy chocolate and vanilla cake are made from the same batter, so this cake is quick and easy to put together. If you love this marble cake as much as I do, I suggest that you make these marble cupcakes next!

What Makes This Homemade Marble Cake So Good
- Two favorite cakes in one. The beauty of a marble cake is that I never have to choose between chocolate cake and vanilla cake!
- One batter, two flavors. Conveniently, you make the chocolate swirl from the same batter used to make the vanilla cake.
- Soft and moist. I can’t get enough of this marble cake’s rich, tender texture. Layered with creamy chocolate icing, it’s a dessert that tastes as good as it looks.

Cake Ingredients
Here is a quick overview of what you’ll need to make the perfect marble cake from scratch (be sure to scroll down to the recipe card below for specific amounts).
- All-purpose flour – Measure the flour using the spoon-and-level method or a kitchen scale. Scooping directly from the bag risks overmeasuring.
- Baking powder and salt – Check the expiration date! If your leavening has expired, buy a fresh package so the cake rises properly.
- Unsalted butter – Butter adds the flavor you really love in a vanilla cake, while oil adds the ever-important moisture.
- Vegetable oil – Use any neutral-flavored oil, like vegetable or canola oil.
- Sugar – I recommend granulated sugar.
- Eggs – Bring these to room temperature.
- Vanilla extract – You can also use equal parts vanilla paste.
- Buttermilk – I use powdered buttermilk. Regular milk works fine as a substitute.
- Bittersweet chocolate (60% cacao) – I strongly recommend sticking with bittersweet chocolate for this cake. I find it gives the best flavor and texture to the chocolate cake portion.
Homemade Chocolate Icing
- Butter – Soften the butter before you start.
- Shortening – Shortening stabilizes the frosting so it holds up better at room temperature.
- Powdered sugar – Also called icing sugar or confectioners’ sugar.
- Vanilla extract – Again, you can substitute vanilla paste if needed.
- Unsweetened cocoa powder – Make sure it’s unsweetened, or the frosting will be overly sweet.
- Water or milk – To thin out the frosting to the right consistency.
The Best Chocolate For Marble Cake
When testing my marble cake recipe, I found that the type of melted chocolate used made a big difference in the texture and flavor of the cake. Bittersweet chocolate that is 60% cocoa is best. The chocolate cake had great chocolate flavor, without being overpowering or bitter.
I came to this conclusion after testing both 100% chocolate and semi-sweet chocolate. The former made the chocolate cake dense and dry. The semi-sweet improved the texture, but lacked flavor. Bittersweet chocolate, the middle point between 100% cocoa and semi-sweet, was a clear winner!

How to Make Marble Cake
This marble cake recipe starts with a simple vanilla cake batter, some of which is set aside to become the chocolate batter. Here are the steps.
Prepare Two Cake Batters
- Prepare for baking. Line two 9-inch cake pans with circles of parchment paper and grease the sides.
- Mix the dry ingredients. Combine the flour, baking powder, and salt in a medium bowl.
- Beat the wet ingredients together. Cream the butter and oil with sugar in a separate bowl until the mixture is light and fluffy. Do not skimp on the creaming time! Next, add the eggs, two at a time, until smooth and combined.
- Combine. Mix the dry ingredients into the wet batter, alternating with the milk and vanilla. Scrape down the bowl and mix just until the ingredients are well incorporated. Do not overmix the batter.
- Divide the batter. Set aside 1 ¼ cups of batter (this will be the chocolate portion). Divide the remaining cake batter between your two prepared cake pans.
- Make the chocolate batter. Melt the chocolate in the microwave in increments. Then, add it to the batter that was set aside. Gently fold that together to combine. A little melted chocolate goes a long way here. It adds flavor while maintaining a uniform texture between the chocolate and vanilla cake batters. Too much chocolate messes with the texture, so less is more!
How to Marble a Cake
The key to a perfect marble cake is not to over-swirl the batter, or you won’t have that distinct vanilla and chocolate coloring in the cake.
- Marble the cake. Now, drop spoonfuls of chocolate batter on top of the vanilla batter in the pans. To marble the two batters together, use a knife or a toothpick to swirl through the cake once in one direction, then again in the opposite direction. That’s it!
- Bake. Bake this marble cake at 350ºF for 18-22 minutes, until a toothpick comes out clean. Cook the bakes in the pans for a couple of minutes before removing them to cool completely.

Assemble and Frost the Cake
The final step is covering your marble cake in homemade chocolate frosting. I have an in-depth tutorial on how to frost and cake with buttercream, but here’s a quick step-by-step:
- Make the frosting. Beat butter and shortening with powdered sugar, vanilla, and cocoa powder, adding water or milk as needed to get a smooth, spreadable consistency.
- Assemble the cake. First, level and torte the cake layers so they’re flat and even. Then, place the first layer on a plate or cake round. Spread 1 cup of frosting over the cake, and carefully place the second layer on top.
- Frost the cake. Use the remaining frosting to frost the top and sides of the cake.
You can make the chocolate frosting in advance and keep it in the fridge for 1 month, or in the freezer for up to 3 months. Just give it a good stir to get the consistency nice and smooth again before using. Alternatively, frost this cake with vanilla frosting or chocolate buttercream.

How to Store a Frosted Cake
- Store the cake covered. You can store this cake on the counter for 2-3 days, or in the fridge for up to 1 week. In either case, I recommend covering the cake with Saran Wrap or placing it in an airtight container to prevent it from drying out.
- Freeze. It’s easiest to freeze the marble cake layers before they’re frosted. Let the cakes come to room temperature, then wrap them in 3-4 layers of Saran Wrap and place them in an airtight freezer-safe container or Ziploc bag. Freeze for up to 3 months. Let the cakes thaw on the counter for a few hours or in the fridge overnight before assembling and frosting.
More Classic Cake Recipes
Easy Marble Cake Recipe
- Prep Time: 1 hour 30 minutes
- Cooling Time: 1 hour
- Cook Time: 22 minutes
- Total Time: 1 hour 52 minutes
- Yield: 12–14 slices 1x
- Category: Dessert
- Method: Oven
- Cuisine: American
Description
This classic marble cake is wonderfully moist and buttery, with swirls of vanilla and chocolate cake covered with creamy chocolate frosting.
Ingredients
MARBLE CAKE
- 2 1/4 cups (293g) all-purpose flour
- 2 1/2 tsp baking powder
- 1/2 tsp salt
- 1/2 cup (112g) unsalted butter, room temperature
- 1/2 cup vegetable oil
- 1 1/2 cups (310g) sugar
- 4 large eggs
- 1 tbsp vanilla extract
- 1 cup (240ml) buttermilk*
- 2.5 oz bittersweet chocolate (60% cacao), chopped**
CHOCOLATE FROSTING
- 1 1/4 cups (280g) butter
- 1 cup (189g) shortening
- 8 cups (920g) powdered sugar
- 2 tsp vanilla extract
- 1 cup (114g) natural unsweetened cocoa powder
- 6–8 tbsp (90-120ml) water/milk
Instructions
Make the Marble Cake
- Prepare two 9-inch cake pans with parchment paper circles in the bottom and grease the sides. Preheat oven to 350°F (176°C).
- Combine the flour, baking powder, and salt in a medium-sized bowl and set aside.
- Add the butter, vegetable oil, and sugar to a large mixer bowl and beat together until light in color and fluffy, about 3-4 minutes. Do not skimp on the creaming time.
- Add the eggs two at a time, mixing until well combined after each. Scrape down the sides of the bowl as needed to be sure all ingredients are well incorporated.
- Add half of the dry ingredients to the batter and mix until combined.
- Add the milk and vanilla extract and mix until well combined.
- Add the remaining dry ingredients and mix until well combined and smooth. Scrape down the sides of the bowl as needed to be sure all ingredients are well incorporated. Do not overmix the batter.
- Set aside 1 1/4 cups of batter, then divide the remaining batter between the two cake pans and set them aside.
- Melt the chopped chocolate, then add it to the batter that was set aside and gently fold together to combine.
- Drop spoonfuls of batter over the top of the vanilla batter that is already in the cake pans. Use a knife to swirl the chocolate and vanilla batters together, being careful not to overcombine them. I ran a knife in a swirl through the cake in one direction once, then the opposite direction once, and that was it.
- Bake for 18-22 minutes, or until a toothpick inserted comes out clean.
- Remove the cakes from the oven and allow to cool for about 2-3 minutes, then remove to cooling racks to cool completely.
Make the Frosting
- To make the frosting, beat the butter and shortening together until smooth.
- Add half of the powdered sugar and mix until smooth.
- Add the vanilla extract, cocoa powder, and 4-5 tablespoons of water or milk and mix until smooth.
- Slowly add the remaining powdered sugar and mix until smooth. Add additional water or milk, as needed to get the right consistency of frosting.
- To put the cake together, use a large serrated knife to remove the domes from the top of the cakes so that they’re flat. These cakes don’t have a large dome, but I like to make sure they’re completely flat.
- Place the first cake on a serving plate or a cardboard cake round.
- Spread about 1 cup of frosting evenly on top of the cake.
- Add the second layer of cake on top, then frost the outside of the cake.
Notes
- Store in an air-tight container. Cake is best when eaten within 3-4 days.
*I use powdered buttermilk. Regular milk would work fine as a substitute.
**I strongly recommend sticking with bittersweet chocolate for this cake. I find it gives the best flavor and texture to the chocolate cake portion.
NOTE: If you’d like to use a vanilla frosting on this cake, replace the cocoa powder with an equal amount of additional powdered sugar and increase the vanilla extract to 3 teaspoons (1 tablespoon).
Nutrition
- Serving Size: 1 Slice
- Calories: 786
- Sugar: 80.4 g
- Sodium: 285.7 mg
- Fat: 41.9 g
- Carbohydrates: 102.2 g
- Protein: 6.2 g
- Cholesterol: 72.8 mg


Hi want to try this but was wondering if you could substitute cocoa for the chocolate? Love the blog.
You could potentially try it, but cocoa powder is going to dry out that chocolate cake batter more and change the texture of it more (make it more dense).
Ah OK. Will just do the chocolate then.
Hi Lindsay,
When I use the Powdered Buttermilk, do I also add the water that goes with it, or JUST the powder? I so enjoy making your recipes! Thank you for all you send to us!
You will use the same amount of water as you’d use for milk. Then you add the powder with the dry ingredients. Mine is one tablespoon of powder for every 1/4 cup of milk/water. Does that make sense?
I’m so glad you enjoy the recipes! Thanks Bev!
Hi can you make this recipe in a 9×13 pan? Will it be tall enough?
Yes, it should be fine. I’d just bake it at 325 degrees F.
All your recipes are amazing, this cake was amazing with fudgefrosting chocolate Imbc, you are fantastic
So glad you enjoyed it! Thank you!
Would this recipe also work as cupcakes??
I would expect it to work fine as cupcakes.
I love this cake and am trying to make it into a sheet cake (half sheet). Do you know if one recipe is enough for a half sheet (1 inch sides) or how many cups it makes?
I think it should be enough. I’m not sure how many cups it makes, I’m sorry. Glad to hear you enjoy it!
I am planning on making this cake tomorrow, if I do not have powdered buttermilk, do I use regular milk or can I use liquid buttermilk?
You can definitely use regular buttermilk. If you don’t have any buttermilk at all, you can use regular milk, but the buttermilk does help make the cake more tender.
Hi Lindsay,
Please help me would like to make this in a square tin as a birthday cake.
Can I do it in 3 – 7 inch square tins or 2 – 9 inch square tins.
What do you recommend? Please let me know.
Thanks,
Mayanka
Either should be fine. It just depends on how tall you want the cake to be.
Hi! I am wanting to bake this recipe in 3 8in. pans. Would you recommend I do 1 full recipe and then halve it to have enough batter or would 1 full recipe be enough?
Thank you
I’m not sure I totally understand, but I think one full recipe would work.
This recipe looks great! Could this be used for cupcakes? If so, how should I go about dividing the batter? Thank you!
I’m sure it could be used for cupcakes, but I haven’t tried it to be able to advise. I’m guessing you’d need 3-4 tablespoons of batter per cupcake, so you could try to use a couple tablespoons of each layer.
Can a simple syrup be used in the cakes to keep moisture or will that make it over moist?
I don’t typically use that because I don’t feel my cakes need it, but you certainly could.
I’m only able to get 70% cacao or higher for the chocolate. Will that change the flavour of the recipe too much?
70% should be fine.
Hi Lindsay:
Would this work in 3 8 in pans instead of 2 9 in, or not enough batter?
Thanks!
Jan
You could do it. I just found the marble to look better with taller layers.
This is the best marble cake I have made! I have tried 3 other recipes with disappointing results. This was easy and I can’t stop eating it! The chocolate cake part is seamless, there is no difference in texture and it tastes very chocolatey which doesn’t happen much with marble. Thank you so much for this recipe! Any chance you have it figured out for a smaller batch, like 3 6″ pans?
Can i use this recipe to make cupcakes?
I would think it’d be fine.