Let’s talk about how to make a water bath for a cheesecake! They aren’t hard to set up and the extra step will give you a beautiful, creamy cheesecake free of cracks! Plus, I’ll share with you my tricks for no leaks!
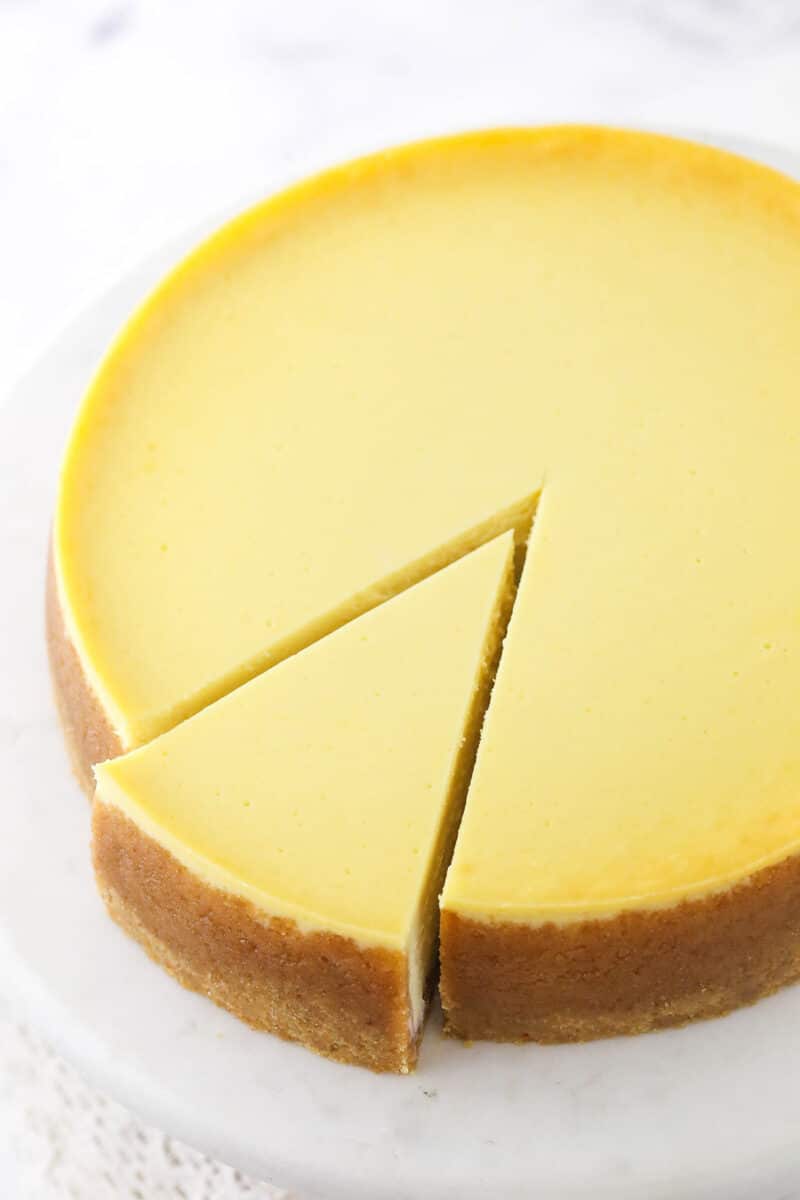
There’s no doubt that I’m a huge fan of cheesecake. The sheer number of cheesecake recipes on my site gives me away. I love the classics and I love unique twists. And with all the cheesecake baking I’ve done over the years, I’ve learned a lot and my number one tip for success is a water bath. If you want a beautiful cheesecake free of cracks, over-browned edges and a sunken middle, you need to use a water bath.
What is a Water Bath?
Cheesecake is basically a custard-based dessert and therefore needs to be treated differently. A water bath, also known as a bain marie, is our secret to the perfect cheesecake. It produces steam that wafts throughout the oven, helping to ensure that the cheesecake cooks evenly and stays nice and creamy. It also moderates the heat on the sides of the pan so that they edges don’t cook much faster than the center.
Why Use a Water Bath?
The benefits of a water bath are plenty. It gives you a cheesecake that:
- Is free of cracks.
- Doesn’t over cook or over brown on the edges.
- Doesn’t sink in the middle while cooking.
- Stays super smooth and creamy.
However, water baths can often be confusing, leak and generally be a pain. So I’m excited to share my methods with you today because they aren’t complicated, won’t leak and it is SO much better than not using a water bath. You spend so much time making a cheesecake – don’t skip this final step and end up with an underwhelming result.
What You’ll Need
I’m going to share a few ways of setting up a water bath. You have options! The first requires the least amount of equipment, but is most likely to leak. The other two will keep you leak-free and really depend on preference. Here’s what equipment you’ll need.
- Springform Pan: You’ll need a 9 inch springform pan for most recipes.
- Large Pan: “Large” is a little vague, but ultimately you need a pan larger than the springform pan that the water will actually go in. It can be a large roasting pan or a large cake pan (I use a 12 inch cake pan).
- Aluminum Foil: This is optional depending on the method you choose. I recommend to long, heavy duty foil.
- Slow Cooker Bags: These are optional depending on the method you choose, but can help prevent your water bath from leaking.
- Large Silicone Pan: This is also optional depending on the method you choose, but it is the easiest method and most likely to prevent leaking. You have to buy the pan, but if you bake a lot of cheesecakes, it will totally be worth it.
- Hot Water: To fill your larger pan.
How to Set Up A Water Bath
Setting up the water bath is a few step process. The wrapping of the pan happens after you bake the crust and adding the hot water happens just before you bake it.
- Make your crust: The first thing you need to do for any cheesecake is properly prep your pan and add your crust. I typically use a graham cracker crust or Oreo crust. I typically pre-bake my crust a bit.
- Prep your pan for the water bath: After you bake your crust, you can go ahead and prep your pan for a water bath using one of the 3 methods below. After prepping the springform pan, place your springform pan into the larger roasting pan or cake pan.
- Add cheesecake filling: Now you can make your cheesecake filling and add it to the crust.
- Add hot water: Bring your pan close to the oven so prevent moving a pan full of water all over the place, then add the hot water to the outer large pan.
- Bake cheesecake: Place your cheesecake and it’s water bath in the oven and bake as directed.
- Cool Cheesecake: When your cheesecake has baked, you can remove it from the water bath, but leave it in the springform pan. You can set the cheesecake on a cooling rack to cool to room temperature and then refrigerate it, or just place it straight in the fridge to cool completely. If you don’t want any condensation forming on top, let it cool to room temperature before refrigerating it.
Three Water Bath Methods
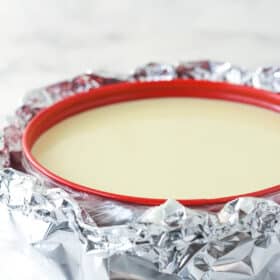
Method 1: Aluminum Foil
For this method, you’ll use aluminum foil around the outside of your springform pan. I’d recommend two or three layers to try to prevent leaking. You also don’t want to crinkle the foil too much at the bottom. It can cause little cracks to form in the foil, which can cause leaking. Leave it a touch looser around the bottom.

Set your foil-wrapped pan in your larger pan and fill the larger pan with hot water that comes about half way up the side of the springform pan. The water can boil a touch during baking, so you don’t want it to come up too high or the water could “jump” over the foil. Finally, bake your cheesecake according to your recipe.
Method 2: Slow Cooker Bags
I have been using this method for a long time. It was my original method for a leak-proof water bath and I’ve been doing this for years. Slow cooker bags can hold up to the heat and won’t form little holes or cracks, like aluminum foil. For this method, first wrap your springform pan in the slow cooker bag. The bag will be a little big, so tie a knot with the excess.


Wrap a layer of foil around the outside of the slow cooker bag, then place the pan in the larger pan. Fill the larger pan with hot water that comes about half way up the side of the springform pan, then bake your cheesecake.
Method 3: Silicone Pan
This is my most recent method. After getting a lot of questions about using a silicone pan in place of the slow cooker bag and foil, I decided to try it. I totally fell in love with this method! No need for wrapping and unwrapping, and no need to worry about leaking. Another plus is that the silicone pan is reusable so you won’t have to buy foil and bags over and over.
So for this method, just set your springform pan in the silicone pan. Place that into the larger pan that will hold the water, then add your hot water and bake. Just keep in mind that the water should only be about halfway up the sides of the silicone pan. You don’t want it to come up too high. The water could boil a touch while baking and you don’t want it to “jump” over the sides of the silicone pan and get into your crust.


Compare: Cheesecake Baked With and Without a Water Bath
I’ve told you what happens when you bake a cheesecake without a water bath, and showed you how to set one up. Now let’s look at the final result with and without a water bath. Results could vary a bit between recipes (I used my Classic Vanilla Cheesecake), but this is generally what the difference looks like.
Cheesecake Baked with Water Bath


Cheesecake Baked Without Water Bath


Can I Just Put A Pan Of Water On The Rack Below?
I get this question quite a lot, so I tested it. While your results may vary depending on the recipe, I found that the result was kind of in the middle. It still browned a little more than when you use a water bath and still fell a bit, which you can see in the sides, but otherwise it did well. It didn’t fall in the center and it didn’t crack. So if you’re really averse to using a water bath and don’t mind the slight imperfections, this would certainly be an option.


When do I NOT Need a Water Bath?
If you’re using a recipe that doesn’t call for one, then that should be fine. Mini cheesecakes also don’t require a water bath, nor do 9×13 cheesecakes. Their smaller and thinner size means they bake more evenly without having to use a water bath. And of course a no-bake cheesecake doesn’t need one either.
Pro Tips For a Great Cheesecake
- Don’t over or under bake your cheesecake. Check out my post on how to tell when your cheesecake is done baking.
- Add the water to your water bath pan with the pan near the oven. Trying to carry a heavy pan full of water and a cheesecake without it splashing around is not easy.
- Cool it slowly. All of my cheesecake recipes call for a two step cooling method that allows the cheesecake to bake fully while not over baking. It also helps to avoid cracking.
- Let your cheesecake chill and firm up before removing it from the springform pan. When you’re ready, check out my tutorial and video for how to remove a cheesecake from the springform pan.
- When you’re ready to store your cheesecake, check out my post on storing it, freezing it, etc.
- If you want to bake a cheesecake in a size other than a 9 inch pan, check out my guide to adjusting cheesecake sizes.
Now that you know how to do a cheesecake water bath, here are some amazing cheesecake recipes to try:
- Strawberry Cheesecake
- Best Oreo Cheesecake
- New York Style Cheesecake
- Dark Chocolate Cheesecake
- Turtle Cheesecake
- Cinnamon Roll Cheesecake
- Amaretto Cheesecake
- S’mores Cheesecake
- Mint Oreo Cheesecake
- Apple Cinnamon Cheesecake
- German Chocolate Cheesecake
- Red Velvet Cheesecake
- Caramel Apple Cheesecake
- Pumpkin Cheesecake
How to Bake Cheesecake in a Water Bath
- Prep Time: 45 minutes
- Cooling Time: 4 hours
- Cook Time: 2 hours 15 minutes
- Total Time: 7 hours
- Yield: 12–14 slices 1x
- Category: Dessert
- Method: Oven
- Cuisine: American
Description
Let’s talk about how to make a water bath for a cheesecake! They aren’t hard to set up and the extra step will give you a beautiful, creamy cheesecake free of cracks! Plus, I’ll share with you my tricks for no leaks!
Ingredients
- Springform pan
- Aluminum foil, optional depending on method
- Slow cooker bags, optional depending on method
- Large silicone pan, optional depending on method
- Large pan (Like a roasting pan or a 12 inch cake pan)
Instructions
- Make your crust: The first thing you need to do for any cheesecake is properly prep your pan and add your crust. I typically use a graham cracker crust or Oreo crust. I typically pre-bake my crust a bit.
- Prep your pan for the water bath: After you bake your crust, you can go ahead and prep your pan for a water bath using one of the 3 methods discussed above. You can either: 1. Wrap your pan in two or three layers of aluminum foil, 2. Wrap you pan in a slow cooker bag and one layer of foil, or 3. Place your springform pan in a slightly larger silicone pan. Place your springform pan into the larger roasting pan or cake pan.
- Add cheesecake filling: Now you can make your cheesecake filling and add it to the crust.
- Add hot water: Bring your pan close to the oven so prevent moving a pan full of water all over the place, then add the hot water to the outer large pan.
- Bake cheesecake: Place your cheesecake and it’s water bath in the oven and bake as directed.
- Cool Cheesecake: When your cheesecake has baked, you can remove it from the water bath, but leave it in the springform pan. You can set the cheesecake on a cooling rack to cool to room temperature and then refrigerate it, or just place it straight in the fridge to cool completely. If you don’t want any condensation forming on top, let it cool to room temperature before refrigerating it.


Has anyone ever used the slow cooker liner more than once? Was curious to see if that was even a possibility.
I have been baking cheesecakes in water baths for thirty years and have never had one leak! That being said, I used your slow cooker bag trick last time and my mind was blown!
I’m glad it was helpful!
Your tips have allowed me to reliably make a perfectly cooked, crack-free, beautiful and delicious cheesecake every single time. I use the roasting bag and heavy duty foil combo and it’s never failed me. Thank you!
Awesome! I’m so glad it’s been helpful!
The silicone pan to preventing leakage was a game changer for me. No more nail biting hoping after all of my work, I would not end up with a soggy crust. Thank you Lindsay for this awesome tip.
Awesome! I’m so glad it was helpful!
Leaky cheesecakes can be annoying. I found using heavy foil and wrapping it three ply works well. But I have also noticed the some foil seems to have pin holes that still let in water. So inspect, inspect, inspect. Then if you still get wet. Remove the first two layers and inspect the last layer. Cool cake and then put the cake in the freezer for awhile to firm up. Then proceed. It has worked fine for me over the years. The silicon pan really sounds interesting and a very good tip.
Could you provide a link to the 3 pans you use for the water bath?
They are all linked in the “what you’ll need” section. 🙂
Thank you so much for these tips! I actually used both heavy duty foil AND a turkey oven bag around my pan in the water bath. Worked like a charm! Because of these tips, I get a crack free cheesecake every time.
Awesome! So glad it’s helpful!
I actually put my 9 inch springform inside a 10 inch cake pan, then put it in a roasting pan with hot water….that seems to be the best way so far!
I was going to try this myself, glad to hear that it worked out for someone else! 🙂
I purchased a 10″ silicone pan to use as you suggested for using to bake my cheesecakes when needing a water bath and it worked perfectly. I have made 3 cheesecakes so far and not one single crack or leak. Thank you. I have been following you on the Six Sisters web site for a long time and enjoy it immensely.
I’m glad you found it helpful! I’m familiar with the Six Sister website, but not how you’d find me there. How have you been following me from there?
Sorry, it was the Life, Love Sugar site that I found this.
I tried your Oreo cheesecake and read all about the water bath and did the slow cooker bag/aluminum foil method because I couldn’t get the silicone pan soon enough. From user error (didn’t get wide enough aluminum foil and attempted to make shift two sheets together, didn’t work ;)), I had a leak from the water bath. Do you have recommendations on how to fix the soggy crust from that? My cheesecake itself turned out perfectly. The crust is just soggy :/
I try your recipe and work very well.
Now I need to cook 2 at the same time, how much time I need to add to letting get cooked both cakes?
I haven’t ever baked two at a time, so I’m not really sure.
Is there any reason why I can’t put the springform into a 10” cake pan rather than a silicone one? Then I figure I can put the 10” into the 12” pan
I haven’t tried it, but I suppose that’d be fine, if your pan will fit.
I have made this cheesecake multiple years per my son’s request for his birthday. I have tried various methods for the water bath and have had moisture seep in. Tried the silicone wrap this time….simple and no moisture!!! Yay! But my cheesecake cracked this time. It will cover with the ganache so not a big deal. Just curious as to any idea why?
Thanks for a delicious cheesecake recipe!
I’m glad the silicon pan helped! As for the crack, those shouldn’t happen with a water bath, so it sounds like the cheesecake was over baked.
With the silicone pan method, do you recommend a 10” silicone pan if using a 9” spring pan?
The one I have is a 10 inch and works well. You could try another size, but I wouldn’t go too big or it won’t fit in another pan for the water bath.
Follow-up question: I am using a NordicWare 9-inch spring-form pan, and as you undoubtedly know, those pans have an “extended rim” at the bottom. Any idea if this pan will fit into a 10-inch silicone pan as you describe? Thanks.
I think I may have the same pan. It’s also Nordic Ware with the extended rim. It does fit in the 10 inch silicone pan I use. It was tight squeeze at first, but now it’s perfect.