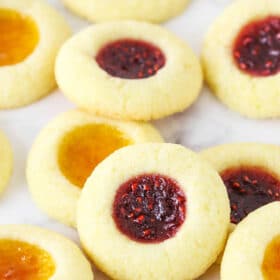
These classic thumbprint cookies are soft, chewy sugar cookies filled with a dollop of your favorite jam! This easy cookie recipe needs just 7 ingredients. They’re perfect for Christmas cookie trays and cookie exchanges.

These jam-filled cookies look so pretty on a cookie platter, you won’t believe how easy they are to make! Thumbprint cookies, named after the “thumbprint” filled with jam in the middle, are classic Christmas cookies. My favorite jam thumbprint cookie recipe has a sweet, chewy sugar cookie dough that won’t overspread, filled with apricot jam and raspberry jam. You can fill your thumbprints with any jam you’d like, or another filling, like chocolate, caramel, or frosting.
Classic Jam Thumbprint Cookies
Thumbprint cookies always make an appearance on my Christmas cookie platters, and they’re perfect for gifting and exchanging. Here’s why you’ll make these cookies again and again:
- Simple ingredients. I rarely need to run to the grocery store when making these, since most of the ingredients are in the pantry already.
- Easy to make. Mix the cookie dough in one bowl, indent each cookie, fill, and bake! Thumbprint cookies are great for holiday baking, and it’s a fun activity to do with kids.
- Endless possibilities. Fill your thumbprint cookies with jam, or switch it up and make chocolate thumbprint cookies, turtle thumbprint cookies, or these festive peppermint thumbprint cookies. Once you have the dough, you can fill it however you’d like!

Ingredients Needed
These are the ingredients you’ll need to make these classic jam thumbprint cookies from scratch. Scroll to the printable recipe for the full measurements and step-by-step instructions.
- Unsalted Butter – Bring your butter to room temperature before starting on your dough. This way, it’s easier to mix. You can soften the butter quickly by microwaving it for 5-10 seconds.
- Sugar – Granulated sugar, or you can make a version of brown sugar cookies and use brown sugar instead.
- Egg Yolks – You won’t be needing any egg whites for this recipe. The yolks contribute to a chewier cookie.
- Vanilla Extract – Use pure vanilla, or an equal amount of vanilla paste.
- All-Purpose Flour – Make sure to measure the flour correctly, using a kitchen scale or the spoon and level method. Spoon the flour from the bag into the measuring cup, and level it off. This avoids overmeasuring, which can lead to dry, crumbly cookies.
- Jam – I use apricot and raspberry. You can use any type of jam or fruit preserve you’d like. Try strawberry, blackberry, grape jelly, or marmalade.

How to Make Thumbprint Cookies
Technically, you don’t have to use your thumb to make the well in the center of the cookie. I use the back of a measuring spoon!
- Prepare to bake. Preheat the oven to 350°F while you line the baking sheets with parchment paper or silicone baking mats.
- Combine the wet ingredients. Next, cream the butter and sugar together until they’re light in color and fluffy. Then, add the egg yolks one at a time, mixing well after adding each yolk. Add the vanilla extract and mix until well combined.
- Add the dry ingredients. Now, add the flour and salt and mix until the dough comes together. Do not over-mix.
- Form the cookies. Scoop the dough into balls about 1 ½ tablespoons in size, and gently roll them smooth. If you’d like, you can roll the cookie dough in granulated sugar for a crunchy coating. Set the dough balls on the baking sheet.
- Indent the cookies. Use the handle of a wooden spoon, your finger, or the bottom of a measuring spoon to gently press a well in the center of each cookie. Do this immediately after rolling the dough, as it helps to prevent the cookies from cracking.
- Fill the thumbprints. Next, fill the centers with jam. I used roughly ½ teaspoon per cookie.
- Bake. Bake the thumbprint cookies at 350ºF for 10-13 minutes or until the edges JUST begin to brown. Overbaking leads to dry cookies! Allow the cookies to rest on the baking sheet for 5-10 minutes, then move them to a wire rack to cool completely.
A Note on Different Fillings
When I fill these thumbprint cookies with jam, I do it before baking. However, fillings like chocolate or frosting, for example, must be added to the cookies after they’re baked. Otherwise, the filling will melt right out of the cookie! In this case, press the thumbprints before you bake them (as directed), and add the filling once the cookies have cooled.

Tips for the Best Thumbprint Cookies
- Use a food scale. For the best results, I always recommend using a food scale to measure your dry ingredients. Flour especially. This cookie dough is already fairly thick to avoid spreading, so over-measuring the flour leads to dry, firm cookies.
- Press the cookies right after rolling. As soon as you form the cookie dough balls (and roll them in sugar, if you choose to do that step), press the centers down. As the cookie dough sits, the edges start to dry out, so waiting to press your cookies can lead to cracking.
- Use a medium-colored baking sheet. Try to use a medium-colored baking sheet for this recipe. Lighter colored baking sheets cause cookies to spread more, and darker baking sheets cause them to spread less and brown more on the bottom. A medium-colored sheet is just right!
- Avoid chilling the dough. There’s no need to refrigerate this cookie dough. You can if you’d like to, but I found that the cookies actually did more spreading after being refrigerated, so keep that in mind.
How to Store these Cookies
- Store the cookies airtight. I recommend keeping these jam thumbprint cookies in an airtight container or resealable bag. On the counter, they’ll last for about 3 days. If you store them in the fridge, they’ll stay good for up to a week.
- Freeze. If you want to store these thumbprint cookies long-term, you can keep them in the freezer for up to 3 months. Thaw the cookies at room temperature before serving.
More Easy Christmas Cookie Recipes
Jam Thumbprint Cookies
- Prep Time: 10 minutes
- Cook Time: 10 minutes
- Total Time: 25 minutes
- Yield: 25–30 cookies 1x
- Category: Dessert
- Method: Oven
- Cuisine: American
Description
These classic thumbprint cookies are soft and chewy, filled with your favorite jam or preserves. This easy cookie recipe is perfect for Christmas baking!
Ingredients
- 1 cup (224g) unsalted butter, room temperature
- 1/2 cup (104g) sugar (plus 3-4 tablespoons for rolling)
- 2 large egg yolks
- 1 teaspoon vanilla extract
- 2 cups (260g) all purpose flour
- 1/4 teaspoon salt
- 1/2 cup jam, any flavor
Instructions
- Preheat oven to 350°F (180°C). Line baking sheets with parchment paper or silicone baking mats. Set aside.
- Cream the butter and sugar together in a large mixer bowl on medium speed until light in color and fluffy. You should be able to see the change in color happen and know it’s ready.
- Add the egg yolks one at a time and mix until well combined after each.
- Add the vanilla extract and mix until well combined.
- Add the flour and salt and mix until the dough is just well combined. Do not over mix.
- Create 1 1/2 tablespoon sized balls of cookie dough. Gently roll into a ball, then roll in additional sugar (if using), then set the balls on the baking sheet.
- Use the end of a spatula, your thumb or the bottom of a measuring spoon to press the centers of the cookies down. Do this immediately after rolling them to help prevent the cookies from cracking.
- Fill the centers with jam. I used roughly 1/2 teaspoon per cookie.
- Bake cookies for 10-13 minutes or until the edges JUST begin to brown. You don’t want to overbake them and have dry cookies.
- Allow cookies to cool on the baking sheet for 5-10 minutes, then move to a cooling rack to finishing cooling.
Nutrition
- Serving Size: 1 cookie
- Calories: 91
- Sugar: 4.1 g
- Sodium: 18 mg
- Fat: 5.6 g
- Carbohydrates: 10.1 g
- Protein: 1 g
- Cholesterol: 24.5 mg
Categories:
Christmas, Cookies, Fall and Holiday Favorites, Holidays, Recipes, Recipes with video, Sweets and Treats, Thanksgiving,


Amazing recipe that was really easy to follow and was delicious! Made these and loved the perfectly soft cookie texture paired with the fruit jam!
So glad you enjoyed them!
I’ve wanted to make these forever. Can I use homemade fridge Jam or do I need store bought?
I would think homemade should be fine.
So easy and tender. I was pleased to find such a tasty sugar dough with no fridge time. I used homemade jams with different consistencies and all of them were great. If it is thick enough to stick to the spoom youll be fine.
So yummy!!! Question – how should I store these? Counter or fridge?
They are fine at room temperature.
I’m hosting a girlfriends Christmas on Saturday and we decided to each make cookies while we watch movies. However, to help with crowd control and hosting, if I make the dough an hour ahead of time and store it in the fridge, would it be okay? Or should I prep and bake right away?
You may only need to store in the fridge for about half an hour and then let it sit out to come back to room temperature so it’s easier to work with.
Any advice for dough that seems too sticky? Cookies ended up pretty flat – but tasted delicious!
Hmm, sounds like maybe a measurement was off a bit. Often flour is over measured, but you may have under measured it. I’d also make sure you used large eggs for the yolks and not extra large. I accidentally bought extra large eggs recently and didn’t notice immediately. 🙂 Glad they still tasted great!
I don’t see the measurements for the dry ingredients . Can you help me out please?
1 cup unsalted butter, room temperature
1/2 cup (104g) sugar (plus 3-4 tbsp for rolling)
2 large egg yolks
1 tsp vanilla extract
2 cups (260g) all purpose flour
1/4 tsp salt
1/2 cup jam, any flavor
This recipe has become a favorite in our house. My family loves it.
My son asked for jam cookies. I made these cookies for him and he loves it. Now everyone loves it. It doesn’t last long in our house… And best of all, it’s so easy. Next on my list is the Sugar Cookies…….Thank you so much, all the way from Cape Town, South Africa
My family adores these! I had a real problem with the dough sticking to my hands while rolling the balls. Any tips for this?
I’m so glad you enjoyed them! As for rolling them, you could try putting a touch of flour on your hands when you roll them. I’ve also read before that wetting your hands a little bit can help.
Thank you. That’s very helpful!
So easy, so delicious! I’m looking forward to trying your other recipes, now, too!
Wonderful! Glad you enjoyed them!
Perfect recipe. I used a size 40 ice cream scoop to make uniform sized cookies. Recipe made 24 cookies with that size scoop. I also flattened the dough ball slightly when placed on cookie sheet.
This is a delicious cookie recipe and I love that there is only 1/2 cup of sugar.
So glad you enjoyed them!
These are my go-to butter cookies. I have made them several times using strawberry, raspberry and also Nutella filling. Very easy to make and such a nice cookie that stays soft in Tupperware (for a few days until they are all gobbled up!) 😀
So glad to hear that!
My cookies turned out super crumbly (fell apart when touched after cooled) – do you have any thoughts on what might have gone wrong? I measured the flour using a scale and made sure the butter was room temperature. Thanks!
This may seem like a silly question, but are you sure you added the egg? That’s what binds everything together and for them to be that crumbly, it would seem there either wasn’t an egg or that far too much flour was added.
I haven’t made jam thumbprints for a long time and am so glad I tried these! They spread just the perfect amount, didn’t crack due to your tip about making the indentation as soon as they’re rolled and are absolutely delicious. I used sparkling sugar on some, sugar in the raw on others along with 2 types of jam, raspberry and apricot. They look like beautiful little jewels and will compliment my Christmas cookie tray nicely. Thank you for a wonderful recipe that I know I’ll be making year after year!! *****
That’s wonderful to hear!
Absolutely delicious and super easy! so hard to not eat all of them fresh from the oven!
So glad to hear that!
These cookies remind me of baking with grandma on Christmas Eve! They are delicious, buttery, melt in your mouth amazing!
Mine didn’t turn out picture perfect but they make up for that in flavor.
I baked them for about 15 minutes and they’re divine,,, I will definitely be making these again very soon cause I have a feeling they won’t last long.
I’m so glad to hear you enjoyed them!
Any tips on how to make them more uniform ? 🙂
Yumm!!!! Thank you for sharing the recipe. 🙂