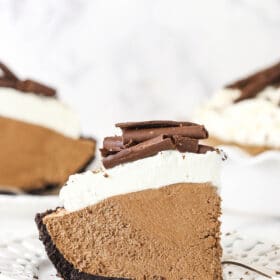
This French silk pie recipe is an irresistible dessert with dreamy chocolate pie filling and fluffy whipped cream layered in a crunchy Oreo crust. Topped with chocolate curls, it’s perfect for chocolate lovers!
If you love chocolate pie recipes like this one, check out my old-fashioned chocolate chess pie and s’mores chocolate pie next.

Why You’ll Love This French Silk Pie Recipe
I’m so excited to share this French silk pie with you! If you’ve never tried this special kind of chocolate pie before, you’re in for a real treat. The texture is light and mousse-like, while the flavor is rich, chocolatey, and buttery. Paired with a crisp Oreo cookie crust, it’s truly one of the best chocolate desserts. Here’s why:
- Easy to make. French silk pie starts with a pudding-like base, but don’t let that intimidate you. It’s very easy, and I’ll walk you through the quick steps with helpful pointers along the way.
- (Almost) no baking. Aside from partaking the pie crust, this French silk pie doesn’t require any oven time. If you use a ready-made Oreo crust, you can call it a no-bake dessert!
- Rich and silky. There’s something impressive and luxurious about this classic pie, and I just know you’ll be blown away by its silky texture and buttery flavor. It’s the perfect pie for a special occasion.
Why Is It Called French Silk Pie?
French silk pie is a variation of chocolate pie that originated in 1951 when an American, Betty Cooper, made it for the 3rd annual Pillsbury Bake Off competition. She called it “French Silk” after its ultra-decadent and silky chocolate filling. The pie came in second place, but the name stuck, and the recipe went on to become a popular no-bake dessert.
Originally, French silk pie was made with raw eggs whipped with butter, sugar, and melted chocolate. My recipe skips the raw eggs and cooks them into a creamy custard instead.

Ingredient Notes
With a name like “French silk”, this chocolate pie might sound fancy, but it’s actually very easy to make without any complicated ingredients. The secret lies in the quality. Here is a quick overview of what you’ll need, along with some notes. Scroll to the printable recipe card for the full list with amounts.
- Oreo Pie Crust – Traditional French silk pie has a chocolate cookie crust. I use my favorite Oreo cookie crust recipe. It’s quick and easy, and you only need Oreos (filling and all) and butter to make it. Grind the Oreo cookies into crumbs using your food processor or use the good old rolling pin/Ziploc bag method.
- Chocolate Bars – You’ll want to use high-quality melting chocolate for the right consistency. Lindt, Guittard, and Ghirardelli all have great options for semisweet and unsweetened chocolate bars. Bars melt more smoothly than chocolate chips.
- Eggs – To make the custard base.
- Sugar – This can be granulated sugar or light brown sugar.
- Vanilla Extract – Make sure to use real vanilla extract or equal parts vanilla paste.
- Butter – Bring the butter to room temperature before you start.
- Whipped Cream – I make homemade whipped cream from heavy whipping cream combined with powdered sugar and vanilla to use in the filling as well as the topping. I highly recommend full-fat heavy cream for an ultra-rich, silky, and stable whipped cream.
- Shaved Chocolate – Shaved chocolate curls for garnish.

How to Make French Silk Pie
French silk pie isn’t difficult to make, but it does take a bit of attention to cook the eggs and make the custard. It’s nothing you can’t handle, especially since you’ll follow the detailed steps below. Scroll to the recipe card after the post for the printable recipe instructions.
- Make the crust. Grind the Oreos into crumbs, then combine them with the melted butter and press the mixture firmly into a pie pan. Afterward, parbake the crust at 350ºF for 8-10 minutes, and let it cool.
- Melt the chocolate. Follow the instructions on your packaging, but typically you’ll chop up the chocolate bars and heat the pieces in 15-20 second increments, stirring well between each, until melted and smooth. Set the melted chocolate aside to cool a bit.
- Cook the eggs. Meanwhile, combine the eggs with 3/4 cup of sugar and cook on medium-low heat until the mixture reaches 160ºF. Whisk constantly so that the eggs don’t overcook or scramble.
- Add the melted chocolate. Now, whisk the melted chocolate and vanilla extract into the eggs. Immediately pour the mixture into a bowl to stop the eggs from cooking further. Let it cool for 20 minutes or until it’s just warmer than room temperature.
- Combine. When the chocolate mixture has cooled, beat butter with the remaining sugar and salt in a separate bowl. Slowly stir the chocolate mixture into the butter mixture, and then beat on high speed until light and fluffy, about 4 minutes. Set aside.
- Make the whipped cream. Next, whip the heavy whipping cream and powdered sugar in a cold bowl until stiff peaks form. Afterward, fold the whipped cream into the chocolate filling.
- Fill the crust and refrigerate. Finally, pour the filling into the prepared Oreo pie crust and place the pie in the fridge to chill for 5-6 hours or until firm. This is a great pie to make ahead and refrigerate overnight before a party!
- Add the topping. Fast forward to when it’s time to serve, and you’ll make a fresh batch of whipped cream following the same method as above. Pile the whipped cream onto the chilled pie and sprinkle over the chocolate curls, and enjoy.

Tips for Success
- Use good-quality ingredients. I recommend using semisweet chocolate bars for the filling. Chopped chocolate melts better than chocolate chips, and semisweet chocolate gives the best flavor.
- Make your own chocolate curls. Chocolate curls are super easy to make. I even have a tutorial on how to make chocolate curls that you can refer to if you need guidance.
- Different toppings. Instead of chocolate curls, you can garnish your pie with chocolate shavings or mini chocolate chips.
- Don’t rush the cooling. Let the egg and chocolate mixture cool down before you add it to the butter mixture so that the filling doesn’t curdle.
- Make it ahead. You can easily make this pie up to 2 days ahead and keep it chilled in the fridge. In this case, leave off the whipped topping and chocolate garnish until you’re ready to serve.

How to Store
- Refrigerate. Keep your finished French silk pie covered in the fridge for up to 3 days. The whipped topping tends to get weepy with time, so don’t wait too long to enjoy those leftovers.
- Freeze. French silk pie freezes well for up to 3 months. After preparing and refrigerating the pie, skip the whipped cream topping and cover the pie tightly with plastic wrap or aluminum foil. Thaw the pie in the fridge and add the toppings when you’re ready to serve.
More Chocolate Desserts
French Silk Pie
- Prep Time: 1 hour 15 minutes
- Cook Time: 20 minutes
- Total Time: 1 hour 35 minutes
- Yield: 8 servings 1x
- Category: Dessert
- Method: Stove
- Cuisine: American
Description
This French silk pie recipe has a creamy mousse-like chocolate pie filling and fluffy whipped cream topping set in a crunchy Oreo crust.
Ingredients
Crust
- 24 Oreos (2 cups | 268g Oreo crumbs)
- 4 tbsp (56g) butter, melted
Filling
- 8 oz semi sweet chocolate
- 4 large eggs
- 1 1/4 cups (259g) sugar, divided
- 2 tsp vanilla extract
- 1 cup (224g) butter, room temperature
- 1/4 tsp salt
- 1 cup (240ml) heavy whipping cream
- 3 tbsp (22g) powdered sugar
Topping
- 1 cup (240ml) heavy whipping cream
- 1/4 cup (29g) powdered sugar
- 1 tsp vanilla extract
- Chocolate curls
Instructions
For the crust:
- Preheat oven to 350 degrees F. Grease a 9 inch pie pan with non-stick spray.
Add the Oreos to a food processor or blender and grind into fine crumbs. You do not need to remove the filling from the Oreos. - Add the Oreo crumbs to a bowl and combine with the melted butter.
- Pour the mixture into your pie pan and press into an even layer on the bottom and up the sides.
- Bake crust for 8-10 minutes, then set aside to cool.
To make the filing:
- Melt the chocolate according to the package instructions. Set aside.
-
In a saucepan, whisk together the eggs and 3/4 cup (155g) of sugar. Cook on medium-low heat, whisking constantly, until the mixture reaches 160°F.
-
Remove the pan from heat and stir in the melted chocolate and vanilla extract. Whisk together until well combined. Poor the mixture into another bowl to cool until just warmer than room temperature, about 20 minutes, stirring occasionally.
-
When the chocolate mixture has cooled, add the butter, remaining 1/2 cup (104g) of sugar and salt to a large mixing bowl and beat until light and fluffy, about 2 to 3 minutes.
-
Add the cooled chocolate mixture to the butter mixture a little bit at a time until it’s all added and well combined.
-
Beat the chocolate and butter mixture on high speed for 4 minutes, or until light and fluffy. Set aside.
-
Add the heavy whipping cream and powdered sugar to a large mixer bowl and whip on high speed until stiff peaks form.
-
Fold a little less than half of the whipped cream into the chocolate mixture, then add the remaining whipped cream and fold together until well combined.
-
Pour the filling into the prepared crust and smooth evenly. It’ll be tall. Chill until firm, 5-6 hours.
To make the topping:
- Add the heavy whipping cream, powdered sugar and vanilla extract to a large mixer bowl and whip on high speed until stiff peaks form.
-
Spread the whipped cream on top of the pie and garnish with chocolate curls.
- Refrigerate until ready to serve. Pie is best if eaten with 4-5 days.
Nutrition
- Serving Size: 1 slice
- Calories: 707
- Sugar: 56.9 g
- Sodium: 139 mg
- Fat: 51 g
- Carbohydrates: 60.6 g
- Protein: 6.5 g
- Cholesterol: 203.2 mg


Amazing! Best French Silk Pie I’ve ever made!
I’m so glad you enjoyed it!
This pie is absolutely amazing! My grandma and I both love Marie C’s Chocolate Satin pie and I made this one for our family Christmas, we both agreed it was SO much better than store bought! Thank you for the amazing recipe!!
Awesome! I’m so glad to hear that!
Made this pie for a family reunion we’re hosting and was looking for a pie that I could freeze in advance that wasn’t a fruit pie. Pulled the test pie out of the freezer last weekend. I made the whipping cream for the top once the chocolate was thawed. Thawed overnight in the refrigerator. The first piece did have some sugar that hadn’t dissolved. The second day, the pie was smooth and creamy and every bite was amazing! I did put this in a regular pie crust to keep the richness down just a bit. Very pleased with the results and will be making this again! Especially when looking for desserts i can make ahead and freeze!
Awesome! I’m so glad to hear that! Thanks for sharing!
I really want to make this for our week early Thanksgiving. But after reading instructions over and over, especially steps 4 and 5, it sounds like there are two different chocolate mixtures???
I love this type of pie so much but is the 1495 calorie for one piece of pie ?????
I went and checked the calculator we use and someone had added 24 packs of Oreos to the ingredients, instead of 24 Oreos, LOL. I fixed it and the calories are half of that now. Thanks for pointing it out!
I say this every time, but I have never made a recipe from the site that didn’t turn out delicious! And that’s saying something!!! I made the chocolate cream pie and the French silk pie for a birthday party and they were both a hit!
I’m so glad you enjoyed them both!
Hi, I’m interring trying this recipe. By any chance do u know if it tastes like Coco’s double chocolate silk pie?? I’m trying to replicate that for a very special occasion, thank you!
I’m not familiar with Coco’s double chocolate silk pie, so I can’t say. I’m sorry!
Yum! I used a chocolate shortbread crust because I don’t like oreos, but that’s just me. The filling was spot on, perfectly smooth and fluffy. Love it, thanks!
I’m so glad you enjoyed it!
I had to read the instructions 4 times to understand. 4. says- When chocolate mixture has cooled, add the butter, remaining 1/2 cup sugar….( then later it says to a large bowl) Might I suggest you change it to read – In a large bowl add the butter etc.
I made this last night and the flavor is amazing! One question, have you tried using powdered sugar when whipping the butter instead of granulated sugar. Even after several minutes, it was still a bit grainy.
So glad you enjoyed it! I haven’t tried powdered sugar.
I thought it was grainy at first too and I was worried, but after it cooled for the whole time, it was just perfect.
The recipe directions were a little bit hard to follow. I added to much butter because of it. But thankfully it still turned out great. Thanks
P. S you might revamp the steps and be a bit clearer in the Directions
I have made this pie for about 40 years now! It is my favorite pie! It is like chocolate mousse. But we like the regular pie crust the best! Thanks for sharing you version!
I made this a few weeks ago for my brother’s birthday. He loves the Marie Calendar’s Chocolate Satin Pie (which he calls Chocolate Satan Pie). I got the highest of compliments from him. “It’s even better than Satan Pie”.
I was surprised at how easy this was to make (and not that much more expensive than a store bought one). It’s definitely a keeper!