This post may contain affiliate sales links. Please read my disclosure policy.
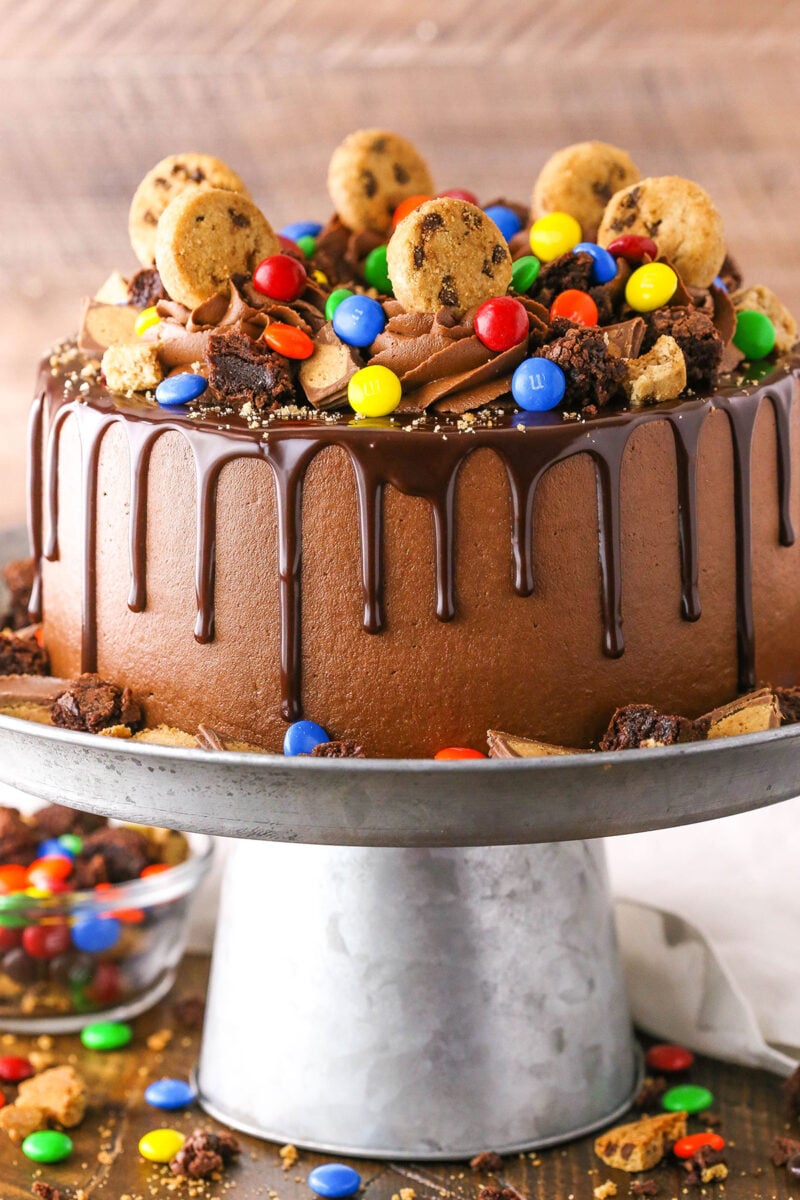
This Chocolate Piñata Cake is a moist chocolate cake frosted with classic chocolate buttercream and filled to the brim with awesome goodies – Reese’s, M&Ms and chocolate chip cookies! If you’re looking for a fun-filled cake (literally!), then this cake is exactly what you need!

Table of Contents
Chocolate Piñata Cake
So this cake initially popped into my head as I started thinking about Father’s Day. When I think of my father, I tend to think of edible things – usually sweets. I’m fully his daughter in that way. He tends to be big into Chocolate Chip Cookie Cakes, but I have a feeling that if I made him a chocolate cake filled with his favorite candy – in his case that’d be Hershey’s Chocolate Nuggets and Twizzlers – he’d be just as happy. And if I topped it with movie theater popcorn covered in salt, he might just die, LOL!
The point of the story is that this cake is perfect for anyone in your life that loves both cake and candy. You can fill this cake with pretty much anything. Candy, cookies, SPRINKLES! So many options to make this Chocolate Piñata Cake have the best surprise inside ever!
And even though it may look complicated, this cake is SO easy to put together! You’re just cutting out some parts of the cake layers and then filling them with candy. If you’ve successfully made a layer cake, then you can successfully make this layer cake.


How To Make A Piñata Cake
So let’s talk about building this bad boy. I decided to make it a three layer cake, because I feel like three layers is perfect. You get some extra filling, but you don’t end up with too many layers or thin cake layers that become harder to work with. Plus, no baking two cakes and torting them. Just bake three layers – straight up. However. If you prefer the idea of four cake layers, you can totally do it that way too.
Assuming you’ve gone with three layers of cake, you’re going to want to cut a hole all the way through one of the layers. I used a 3 inch biscuit cutter, but a round cookie cutter or even a knife will do the job.
You’ll also want to cut into the other two layers, but not all the way through. I went about half way into the cake with my cutter so I knew I had the right size and shape hole, then used a spoon to just scoop it out. Very quick and simple.


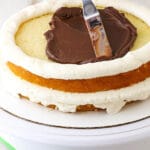
To build the cake, you’ll start with one of the layers that’s only cut through partially. Add a layer of frosting around the outer ring of cake, then add the second layer, which is the one with the hole cut all the way through. Add another layer of frosting around the outer edge, then spread a little frosting around the inside of the hole.
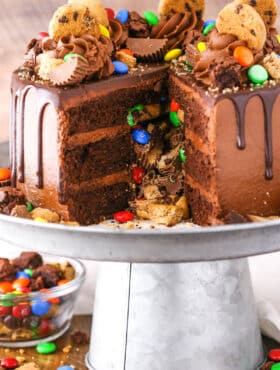
This next part is the fun part – filling the hole! Add all the awesome candies/cookies/etc, filling it so that’s just a little more full than the top of the hole. The top layer has a little bit cut out of it as well, so that extra bit at the top of the hole will fill that in.
From there, it’s just like any other cake. Frost the outside and decorate as you wish. I continued with the candy and cookies theme on the outside of the cake and added a chocolate drip and more candies.
You guys, this is such a fun cake! The cake is so moist and tender on it’s own, but it just about gets overshadowed by how fun the inside is. It’s definitely a party in a cake and it’s just waiting to be shared!

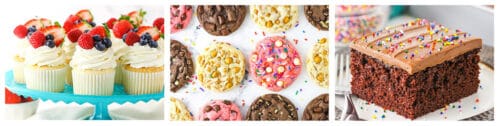
Recipes you might also like
Best Moist Chocolate Cake
Drunken Chocolate Truffle Cake
Chocolate Mousse Cake
Flourless Chocolate Cake
Chocolate Piñata Cake
- Prep Time: 1 hour 45 minutes
- Cook Time: 20 minutes
- Total Time: 2 hours, 5 minutes
- Yield: 12-14 slices
- Category: Dessert
- Method: Oven
- Cuisine: American
Description
This Chocolate Piñata Cake is a moist chocolate cake frosted with classic chocolate buttercream and filled to the brim with awesome goodies – Reese’s, M&Ms and chocolate chip cookies! If you’re looking for a fun-filled cake (literally!), then this cake is exactly what you need!
Ingredients
Chocolate Cake
- 1 1/2 cups (195g) all purpose flour
- 3/4 cup (85g) natural unsweetened cocoa
- 1 tsp baking soda
- 1/2 tsp salt
- 1/2 cup (112g) unsalted butter, room temperature
- 1/2 cup (120ml) vegetable oil
- 1 1/2 cups (310g) sugar
- 1 1/2 tsp vanilla extract
- 4 large eggs
- 1 1/4 cups (300ml) milk
Chocolate Buttercream
- 1 1/4 cups (280g) unsalted butter, room temperature
- 1 1/4 cups (237g) shortening
- 3/4 tsp salt
- 9 cups (1035g) powdered sugar
- 2 tsp vanilla extract
- 4–5 tbsp (60-75ml) water or milk
- 1 cup (114g) natural unsweetened cocoa powder
Chocolate Ganache
- 6 oz (1 cup | 169g) semi sweet chocolate chips
- 1/2 cup heavy whipping cream
Additional
- Mini reeses
- Mini chocolate chip cookies
- M&MS
Instructions
- Preheat oven to 350°F (176°C) and prepare three 8 inch cake pans with non-stick baking spray and parchment paper in the bottom.
- Combine the flour, cocoa, baking soda and salt in a medium sized bowl and set aside.
- Add the butter, oil, sugar and vanilla extract to and large mixer bowl and beat together until light in color and fluffy, about 3-4 minutes. Do not skimp on the creaming time.
- Add the eggs one at a time, mixing until mostly combined after each. Scrape down the sides of the bowl as needed to be sure all ingredients are well incorporated.
- Add half of the dry ingredients to the batter and mix until mostly combined.
- Slowly add the milk and mix until well combined. The batter will look curdled, but that’s ok.
- Add the remaining dry ingredients and mix until well combined and smooth. Scrape down the sides of the bowl as needed to be sure all ingredients are well incorporated. Do not over mix the batter.
- Divide the batter evenly between the prepared cake pans and bake for 19-21 minutes, or until a toothpick comes out with a few moist crumbs.
- Remove cakes from the oven and allow to cool for 2-3 minutes, then remove to a cooling rack to finish cooling.
- To make the frosting, beat together the butter, shortening and salt until smooth.
- Slowly add 4 cups (460g) of powdered sugar and mix until smooth.
- Add the vanilla extract and half of the water or milk and mix until smooth.
- Add the other 5 cups (575g) of powdered sugar and mix until smooth.
- Add the cocoa and mix until smooth.
- Add the remaining water or milk until the frosting is the right consistency.
- To build the cake, you’ll need something to be able to cut through the cake layers with. I used a 3 inch biscuit cutter, but a round cookie cutter, something similar, or a sharp knife would be fine too. Use your cutter to cut a hole all the way through one of the cake layers. You can the hole to be in the center of the cake.
- For the other two cake layers, cut a hole only about half way through the cake layer and then use a spoon to carefully remove the cake within the marking.
- Place one of the cake layers with only a partial hole onto a cake plate or cardboard cake circle and spread about 1/2 cup of frosting around the top of the cake, on the outside of the hole.
- Place the next cake layer on top – the one with the full hole removed – then add another layer of frosting.
- Spread a thin layer of frosting around the side of the hole of the cake, then fill the cake with your choice of candies and treats. You should fill the hole so that everything sticks up above the sides of the hole just a bit. The next layer of cake has a partial hole, so that extra filling/treats will fill in that space.
- Add the final layer of cake on top, then frost the outside of the cake. Feel free to use my tutorial for frosting a smooth cake.
- To make the ganache topping, add the chocolate chips to a medium sized bowl (see my tips for making chocolate ganache).
- Add the heavy whipping cream to a microwave-safe measuring cup and microwave until it just begins to boil.
- Pour the hot cream mixture over the chocolate chips and let it sit for 2-3 minutes, then whisk until smooth.
- Drizzle the chocolate ganache around the edges of the cake, then fill in the center/top of the cake. See my tips on making a chocolate drip cake.
- Use the remaining frosting to pipe swirls around the edge of the cake, then top the cake with additional candies.
Nutrition
- Serving Size: 1 slice
- Calories: 976
- Sugar: 92.9 g
- Sodium: 129.4 mg
- Fat: 59.9 g
- Carbohydrates: 111.3 g
- Protein: 8.9 g
- Cholesterol: 127.1 mg
Categories
This post contains affiliate links.


Can you make ahead of time and freeze? If the answer is yes, then do you cut the holes before freezing?
That should be fine. Just wrap the layers well before freezing and thaw them in the fridge before using. I’d cut the holes after you thaw the cakes.
Oh my goodness I made this cake yesterday for my son’s birthday and I have to say it is hands down the BEST chocolate cake recipe I’ve ever made! (And I’ve tried so many!) It came out of the pans perfectly, I didn’t lose a crumb. The cake was very moist and tender, and the frosting was delicious and easy to pipe. The chocolate ganache drip complemented it perfectly, and the piñata surprise inside just threw it over the top. This will definitely be my new go-to chocolate cake. Thank you for a fantastic recipe – this made my 6 year old’s birthday just perfect!
Awesome! I’m so glad to hear you enjoyed it!
Hi I made your gorgious piñata cake today which is delicious I would like to know if I can freeze the cake. Thankyou. Ruth
Are you wanting to freeze it fully decorated? I don’t typically recommend freezing full cakes. And if this is fully decorated with candy and stuff inside, the condensation could cause the candy coating and stuff to bleed and such. So I don’t know that I would recommend that.
Hi again I didn’t fill with your sweets and thing just butter cream I wasn’t sure how long it would keep as we will not eat it that quick. Thank you so much.
I did four layers and personalized top of cake with chocolate sexy man for daughters bday.
Would I have to make adjustments to this recipe for high altitude? I live at about 5,300 ft.
Possibly. I don’t know much about high altitude baking. Sorry!
Hi! I don’t have 3 tins so do you think it would be ok to measure 3 equal parts and bake the 3 layers separately? More time consuming I know.
It’s not really ideal, but you could try it. Sometimes things bake slightly differently the longer they sit before baking them.
Hi..Can i use only butter for thé frosting please??thank you
Yes, just replace the shortening with the same amount of butter.
Thank you !!!!
Hi! I would love to try this recipe. Can I cover this cake with fondant? Thank you so much! ❤
I don’t really work with fondant, but I’d think it’d be ok.
I’m going to try this recipe this weekend! I already know my nephew will love it! 🙂
Hi Lindsay! I was wondering what piping tip you used for the swirls on top?
It was either Ateco 844 or 847
HI! How many days in advance can I make this cake? Thanks!
I typically make cakes the day before I serve them. You could stretch it out to two days if you really wanted to.
Do you keep it in the refrigerator?
It should be fine at room temperature for about 24 hours and then after that you want to refrigerate it.
Please make a video
Yes please make a video!
Wow! so, so beauty and rich!…Asombrosamente divertida y exquisita!…felicitaciones!!!…