This Candy Corn Cookie Cake is perfect for a Halloween party or for baking with your kids. It’s easy to make, festive and full of rich chocolate and chewy candy corn!

Why You’ll Love This Candy Corn Cookie Cake
Candy corn is one of the many fun flavors of fall that I look forward to every year. It’s tasty and festive and this cookie cake is full of them! Here are a few more reasons to love this cookie cake.
- Rich chocolate cookie cake. The cookie cake itself is made of a moist, chewy and chocolatey cookie. It’s also filled with chocolate chips!
- Easy to make. If you’re looking for a fun treat to make with the kids or just a quick sugar fix, this is the cookie cake for you! It’s made with basic pantry ingredients and ready in less than an hour.
- Festive. This cookie cake literally screams Halloween. There’s a fantastic contrast between the almost black cookie and the classic colors of candy corn. It’s the perfect cake for Halloween gatherings!
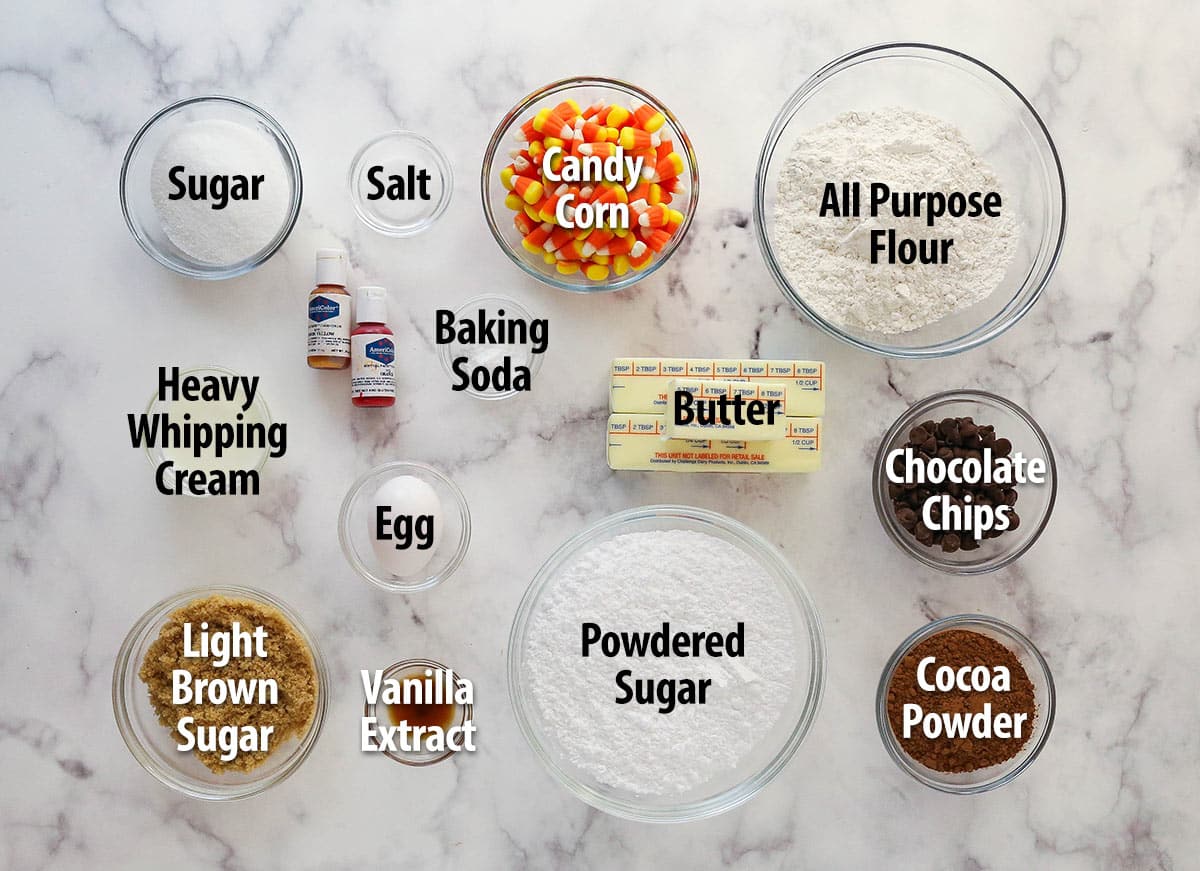
What You’ll Need
You’ll likely have most of what you need to make this cake on hand. Check out these ingredient tips before heading to the store. Full ingredient amounts can be found in the recipe card at the bottom of the post.
Chocolate Cookie Cake
- All-purpose flour. Make sure to measure the flour properly. Adding too much flour will make your cookie cake dry and dense.
- Cocoa powder. To flavor the cookie cake, use natural unsweetened cocoa powder. If you’d like a richer, darker cake, you can also use Dutch process cocoa powder.
- Baking soda. For leavening and and a tender texture.
- Unsalted butter and salt. I like to control the amount of salt when I’m baking. For this recipe I used room temperature, unsalted butter and added salt. If you don’t have unsalted butter, leave out the extra salt.
- Light brown sugar. For sweetness and added moisture. You’ll want to pack the light brown sugar when you measure it.
- Sugar
- Egg. Make sure to use a large egg, not medium or extra large.
- Vanilla extract
- Chocolate chips. I used semi-sweet chocolate but milk chocolate chips or even chocolate chunks would also be fine.
- Candy corn. Use any brand or color combination of candy corn you like best.
Vanilla Buttercream and Toppings
- Unsalted butter. Use room temperature butter to make the buttercream. It will be much easier to blend together.
- Powdered sugar. To sweeten, thicken and add volume to the buttercream.
- Vanilla extract
- Heavy whipping cream. Helps to thin the buttercream to the right consistency. Also adds a little creaminess.
- Gel icing color. I made a two-tone frosting for this cookie cake. For this, you’ll need yellow and orange gel icing color.
How to Make Candy Corn Chocolate Cookie Cake
I bet you’re excited to get started! Read through these step-by-step directions and photos for a quick overview of the recipe. More comprehensive directions can be found in the recipe card below.
Make the Chocolate Cookie Cake
- Prep. Preheat the oven to 350°F. Place parchment paper on the bottom of the cake pan and spray the sides with baking spray.
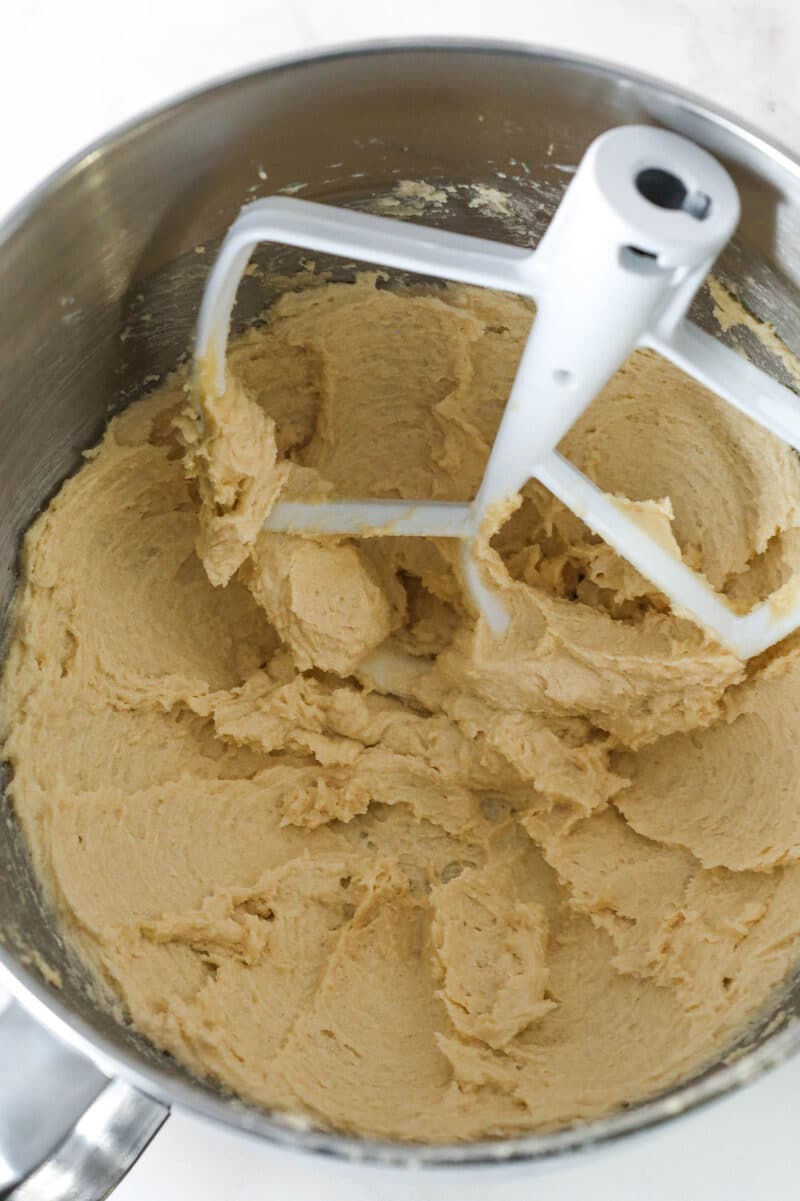
- Mix wet ingredients. Add the butter and sugars to a mixing bowl and cream for about 2-3 minutes. Add the egg and vanilla extract.
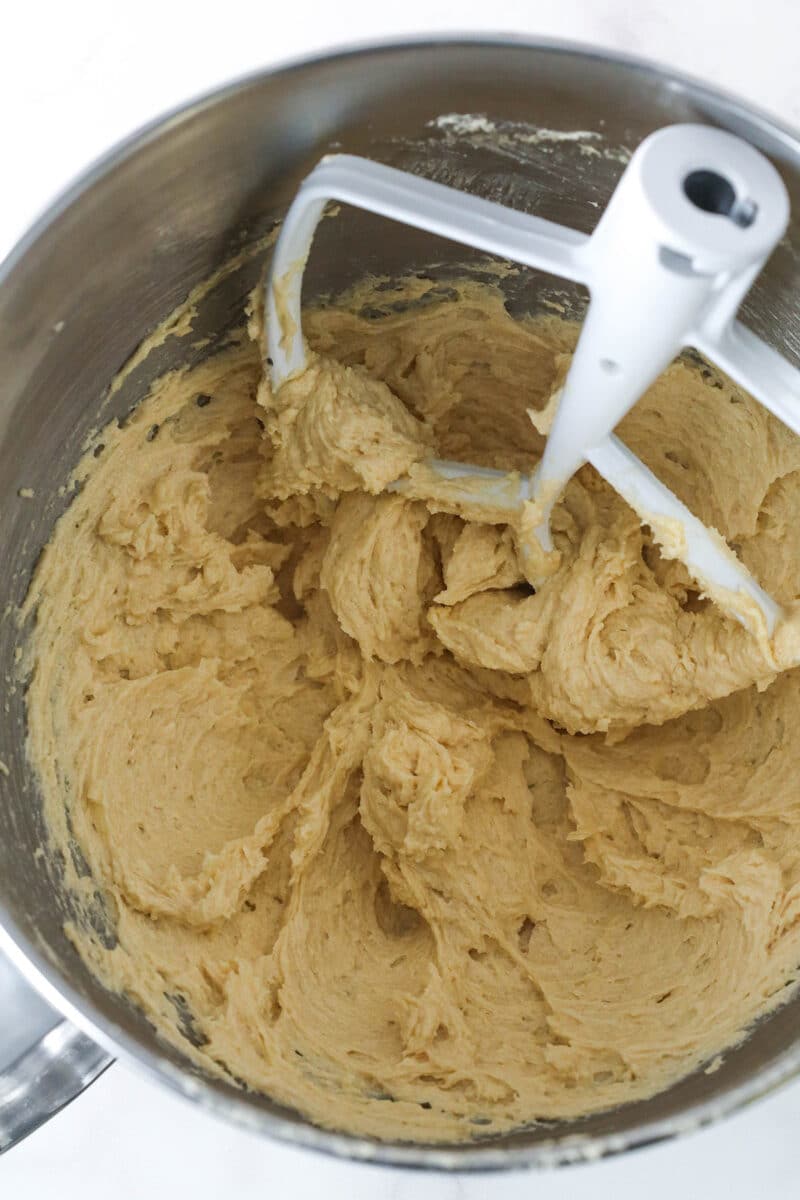
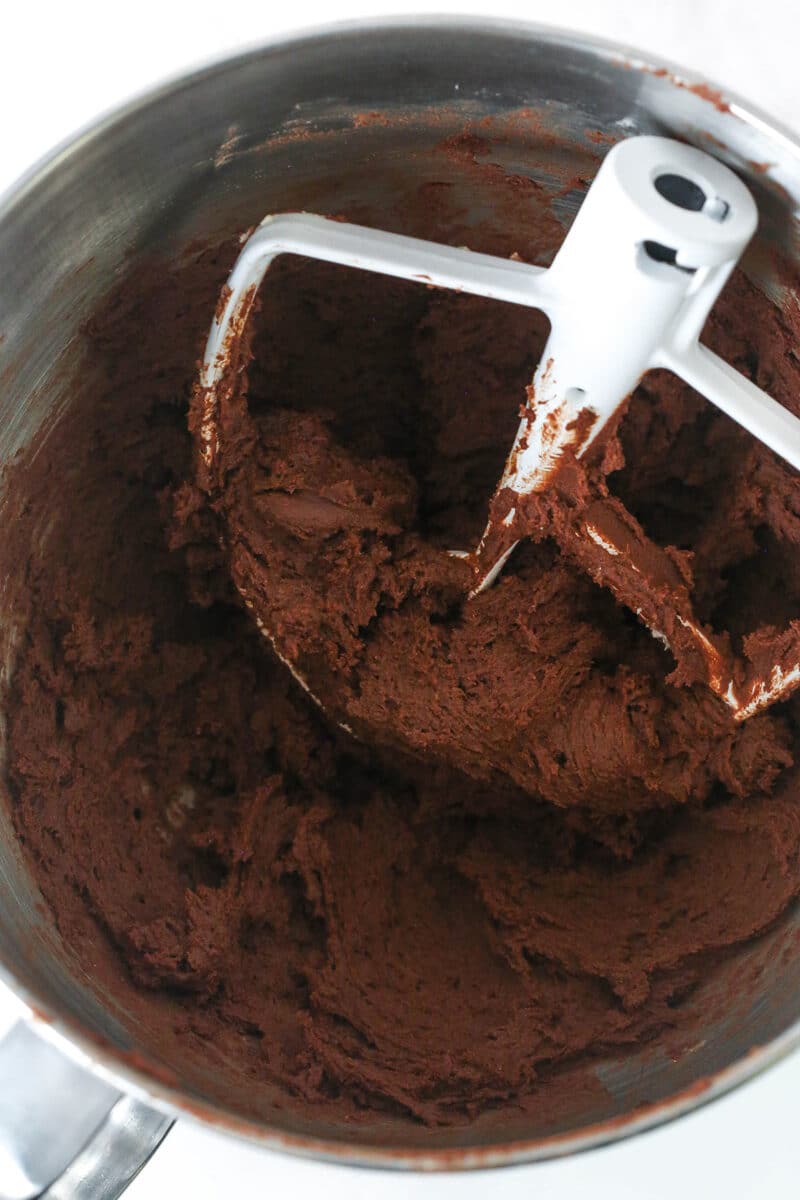
- Finish dough. Add the flour, cocoa powder, baking soda and salt and beat just until combined.
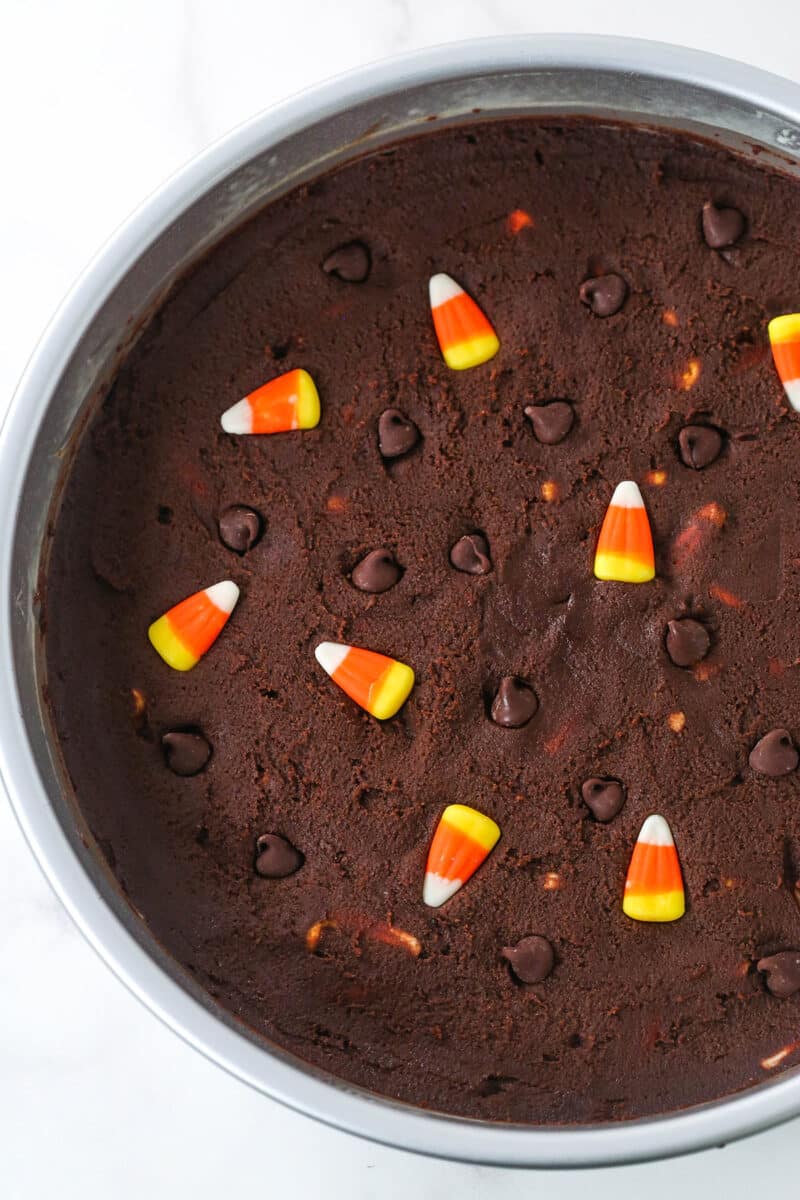
- Fold in mix-ins. Fold the chocolate chips and candy corn into the thick dough.
- Bake. Spread the dough in the prepared cake pan and press a few more chocolate chips and candy corn into the top of the cookie cake. Bake for 18-20 minutes.
- Cool. Remove from oven and allow to cool completely in the cake pan. Once entirely cool, transfer the cake to a serving plate.
Make the Vanilla Buttercream and Finish the Cake
- Make the frosting. Beat the butter until smooth. Slowly mix in about half of the powdered sugar then mix in the vanilla extract and a tablespoon of heavy cream. Add the rest of the powdered sugar. Mix until smooth and well combined. If needed, add some additional heavy cream to get the right consistency.
- Color buttercream. Divide the buttercream into two bowls. Color one orange and the other yellow.
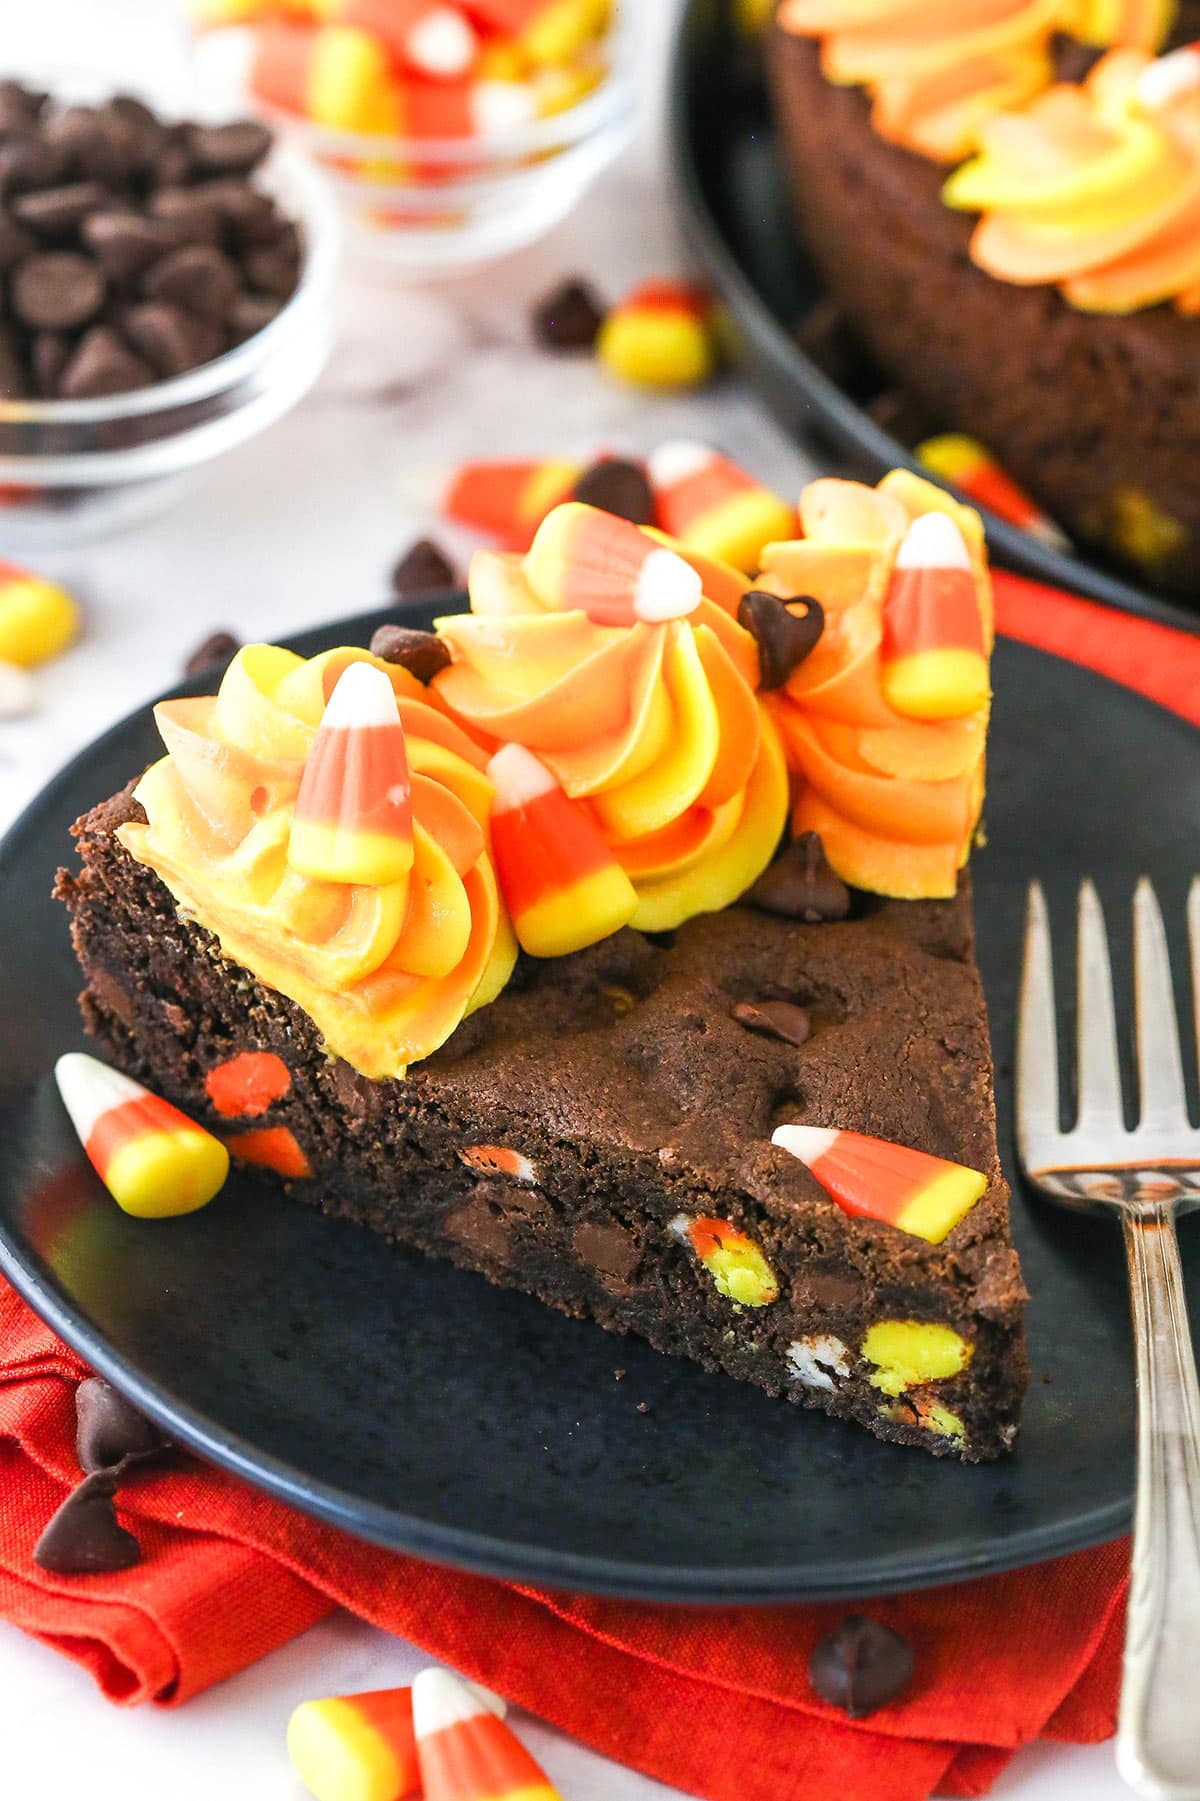
- Prepare two-toned frosting. Lay a piece of clear wrap out on the counter. Put each color of frosting in a Ziplock bag and trim off one corner of the bag. Pipe each frosting color in a thick line side-by-side on the clear wrap. Fold the clear wrap over the frosting, forming a long plastic-wrapped log of frosting. Twist both ends closed and trim off one end so that the frosting is right at the edge.
- Finish cake. Put the open end of the log into a piping bag fitted with a piping tip. Pipe swirls of frosting around the edge of the cake and decorate with additional candy corn and chocolate chips.

Tips for Success
- Measure flour carefully. Too much flour will result in a dry cookie cake. To measure accurately, I recommend using a food scale, but you can also use the spoon and level method if you don’t have one. Read more about measuring flour accurately here.
- Don’t skimp on creaming time. When creaming together the butter and sugars, do so until the mixture has significantly lightened in color and become fluffy. This process incorporates air into the dough which helps prevent an overly dense cookie cake.
- Don’t over-mix. When adding the dry ingredients and the mix-ins into the dough, mix just until everything is incorporated. Over-mixing can cause the glutens in the flour to overdevelop resulting in a tough, dense cookie cake.
- Don’t over bake. It should still look a little undone in the center and be a little jiggly. As it cools, it’ll continue to firm up, ensuring a soft and chewy cookie with the perfect texture.
- Cool completely before removing from pan. When the cookie cake is done baking, you’ll want to let it cool COMPLETELY in the pan. Removing it from the pan while it’s hot or warm will result in a broken cookie.
- Make a different size. This recipe works well in a 9 or 10-inch cake pan. A 10-inch cake would just be a little thinner and bake for slightly less time.
Storage Information
- Refrigerate. Store cookie cake in an airtight container. Because of the buttercream, it should be refrigerated after about 48 hours and is best eaten within 3-4 days. Serve at room temperature.
- Make ahead. It holds up well for 3-4 days, so you could certainly make it a day or two ahead.
- Freezer. If freezing the full cookie, I’d leave off the frosting and add it just before serving. Wrap it well in a double layer of plastic wrap (you could also add a layer of aluminum foil, for extra protection) and freeze. Thaw it in the fridge when you’re ready to enjoy and add your toppings just before serving. If freezing slices, wrap each slice individually, or place them in an air-tight container and freeze. Again, thaw in the fridge before using. Cookie cake should freeze well for up to 3 months.
More Halloween Recipes
- Halloween Monster Cookies
- Spooky Halloween Marble Cake
- Candy Corn Icebox Cake
- Easy Mummy Rice Krispie Treats
- Mini Candy Corn Cheesecakes
- Bat Oreo Cookie Balls
Candy Corn Cookie Cake
- Prep Time: 30 minutes
- Cook Time: 18 minutes
- Total Time: 48 minutes
- Yield: 8–10 slices 1x
- Category: Dessert
- Method: Oven
- Cuisine: American
Description
This Candy Corn Cookie Cake is perfect for a Halloween party or for baking with your kids. It’s easy to make, festive, and full of rich chocolate and chewy candy corn!
Ingredients
Chocolate Cookie Cake
- 1 1/4 cups (163g) all-purpose flour (measured correctly)
- 1/2 cup (57g) natural unsweetened cocoa powder
- 1 tsp baking soda
- ½ tsp salt
- 3/4 cup (168g) unsalted butter, room temperature
- 1/2 cup (112g) packed light brown sugar
- 1/2 cup (104g) sugar
- 1 large egg
- 1 tsp vanilla extract
- 1/2 cup (85g) semi-sweet chocolate chips
- 1 cup candy corn
Vanilla Buttercream and Toppings
- 1/2 cup (112g) unsalted butter, room temperature
- 2 cups (230g) powdered sugar
- 1/2 tsp vanilla extract
- 1–2 tbsp heavy whipping cream
- Yellow gel icing color (3 drops)
- Orange gel icing color (4 drops)
- Additional candy corn, optional
- Additional chocolate chips, optional
Instructions
Make Chocolate Cookie Cake
- Preheat oven to 350°F (180°C) and line the bottom of a 9-inch cake pan with parchment paper and grease the sides.
- In a medium sized bowl, combine the flour, cocoa powder, baking soda and salt. Set aside.
- Add the butter and sugars to a large mixer bowl and beat together until light in color and fluffy in texture, about 2-3 minutes. Do not skimp on the creaming time.
- Add the egg and vanilla extract and mix until well combined.
- Add the dry ingredients to the butter mixture and beat just until combined. Use your spatula to gently finish combining everything to keep from over mixing the cookie dough.
- Fold in the chocolate chips and candy corn. The cookie dough will be thick.
- Spread the dough evenly into the prepared cake pan. Press a few more chocolate chips and candy corn into the top of the cookie cake, if desired.
- Bake for 18-20 minutes or until it looks baked, but still wiggles a little when you jiggle it.
- Remove from oven and allow to cool completely in the cake pan, then transfer to a serving plate.
Make Vanilla Buttercream and Finish the Cake
- To make the buttercream, add the butter to a large mixer bowl and beat until well combined and smooth.
- Add about half of the powdered sugar and mix until well combined and smooth.
- Add the vanilla extract and a tablespoon of cream and mix until well combined and smooth.
- Add the rest of the powdered sugar and mix until smooth. Add more cream to get the right consistency.
- Divide the buttercream evenly between two bowls. Color one with orange gel icing color and the other with yellow gel icing color.
- To make the two-toned frosting, add each color of frosting to a Ziplock bag. Lay a piece of clear wrap out on the counter. Trim the corner off of each Ziplock bag. Pipe a thick row of each color of frosting side-by-side onto the clear wrap.
- Fold the clear wrap over into a long log. Twist both ends closed and trim off one end so that the frosting is right at the edge.
- Put the log into a piping bag with the open end of the log going into the piping tip. I used piping tip Ateco 844. Pipe swirls of frosting around the outer edge of the cake. Decorate with additional candy corn and chocolate chips, if desired.
- Store cookie cake in an airtight container at room temperature for up to 48 hours, in the fridge for 3-4 days or in the freezer for up to 3 months. Cookie cake is best if eaten within 3-4 days.
Notes
- Cocoa Powder: I used regular unsweetened cocoa powder, but you could use Dutch process for a darker Halloween look.
- Storage: Store cookie cake in an airtight container. Because of the buttercream, it should be refrigerated after about 48 hours and is best eaten within 3-4 days. Serve at room temperature.
-
To Freeze: If freezing the full cookie, I’d leave off the frosting and add it just before serving. Wrap it well in a double layer of plastic wrap (you could also add a layer of aluminum foil, for extra protection) and freeze. Thaw it in the fridge when you’re ready to enjoy and add your toppings just before serving. If freezing slices, wrap each slice individually, or place them in an air-tight container and freeze. Again, thaw in the fridge before using. Cookie cake should freeze well for up to 3 months.
-
- Make Ahead: It holds up well for 3-4 days, so you could certainly make it a day or two ahead.
Nutrition
- Serving Size: 1 Slice
- Calories: 388
- Sugar: 36.5 g
- Sodium: 189.1 mg
- Fat: 21.7 g
- Carbohydrates: 49.4 g
- Protein: 3.7 g
- Cholesterol: 48.5 mg
Enjoy!


I am confused with the comments about the icing. It was mentioned in the comments that you used butter & shortening to make the icing and an adjustment had been made to the recipe, however, I do not see an adjustment. Please clarify.
It looks like a delicious treat!
Thank you
If you look at the ingredients for the buttercream, it uses half a cup of butter and no shortening. Is there somewhere that you see shortening still?
To remove any cookie cake from a pan, grease the sides and bottom of the pan. Place 2 parchment strip– 2″ wide and long enough to sitfla on pa and come up the sides ar least 2 ” higher than top of pan. Put the strips perpendicular and then put in the parchment circle. When cookie is cool, run a knife aroundc the entire edge of the pan. Use the strips to lift the cookie out of the pan.
That would definitely work too!
Amazing recipe!! Perfect portions. Easy to make. Delicious! Will make again and again! Thank you!
Awesome! So glad you enjoyed it!
I’m on my second round the first cookie came apart when I tried to remove from pan, I cooked 20 min, and cooled completely, but it tastes amazing! What could I have done wrong?
Doesn’t necessarily sound like you did anything wrong, it can just be tricky to get them out of the pan. I typically place a cooling rack on top of the cake pan and turn it over to fill the cake out, then immediately put another cooling rack on top of the cake (which is actually the bottom) and flip it back over so it’s right side up. You could also try refrigerating it or freezing it for a few minutes so it’s firm to remove it and then just let it come back to room temp.
Can I use a springform pan?
Sure!
I know it’s a year later, but I just made this for a Halloween party this past weekend. WOW is all I have to say, so rich and yummy. I made the cake into bite size pieces, topped with a squeeze of icing and candy corn or candy pumpkin. So good. The icing was the best chocolate icing I’ve made.
This looks FANTASTIC! For the icing, your instructions say to beat the butter and shortening, but there is no shortening listed in the ingredients. How much? What kind?
Sorry about that. I updated the recipe. It should be 1/4 cup butter and 1/4 cup shortening. Thanks Margy!
Just finished making the cookie part and it looks fabulous! One question though, the directions for the frosting say to add the shortening and butter together, but there is no shortening amount on the ingredient list. Do I add it and how much please? I’ll let you know how the finished product turns out! Thanks a lot!
I’m glad the cookie turned out! Sorry for the confusion on the frosting, it’s been updated. It should be 1/4 cup of butter and 1/4 cup of shortening.
Thanks for your response Lindsay!
I am loving the look and taste of this cookie/cake! I baked mine for exactly 19 minutes. It looked very moist in the middle with edges slightly crusty. By morning the density was perfect. I was tempted to put it back in the oven initially. Glad I didn’t. Thanks so much for that hint and the awesome recipe!
Just a question… The directions for the icing say to beat the shortening and butter until smooth, but shortening is not listed in the ingredients. What should the direction be?
I’ve updated the instructions. It should be 1/4 cup butter and 1/4 cup shortening.
I made this for my birthday “cake” a few days ago, and this recipe is TO DIE FOR! The only substitution I made was I used M&M’s instead of candy corn. But this cookie cake was seriously Ah-mazing! I had to send the leftovers home with family or I could have eaten the whole thing. Everyone loved this cookie cake!! Make it! Now!! You won’t be disappointed! Thanks for this recipe Lindsay!
Thanks Kelly! I’m so glad you liked it!
This looks like a lovely baking project. 🙂 However, I feel the need to point out that the ‘Halloween Sadist’ who hands out poisoned or otherwise harmfully-tampered-with candy on Halloween is a myth, and has been for as long as the idea has existed. It started in the late period of the Industrial Revolution, when people started being afraid of pre-packaged foods like hard candies because they could no longer actually see and take into account all the ingredients that went into those foods – but all chemical analyses of such candies proved there were no poisonous substances in them. There have been exactly two instances of children dying from poisoning on Halloween – both were actually poisoned by their own families. One was 5-year-old Kevin Toston, in 1970, who ingested heroin from his uncle’s stash, and his family tried to protect the uncle from the authorities by claiming the fatal overdose was caused by Halloween candy. The second case, in 1974, was the death of Timothy O’Bryan, whose father murdered him to collect on insurance money by planting cyanide-laced Pixie Stix in his Halloween candies.