These Mini Candy Corn Cheesecakes are easy to make and such a fun Halloween dessert! If you’re looking for Halloween party food ideas, these are perfect for sharing.
For more fun Halloween recipes, check out my Candy Corn Icebox Cake, Dirt Cake and Candy Corn Chocolate Chip Cookie Cake!

An Adorable Halloween Party Food Idea
So tomorrow is the first day of October and I have been waiting to share some fun Halloween treats with you for a while now. I’m so glad it’s finally (almost) October! I wouldn’t say that I’m normally big on Halloween, but with kids in the picture now I feel like my enjoyment of certain holidays has come back in full force.
We actually decorated for fall and Halloween about a week ago and already have the twins’ costumes. Despite my hope that the boys would not fall in love with the baby shark song, they have. We even have a book that sings various baby shark songs and it’s always guaranteed to get them to bust a move.
So when we walked into the costume store and saw baby shark costumes that actually play the song, we couldn’t resist. When we put the costume on Ashton and hit the button for the song, he immediately started dancing. It was totally adorable and hilarious and we were sold. So they will be cute little yellow baby sharks on October 31.


Halloween Mini Candy Corn Cheesecakes
Just like our Halloween-decorated house, these candy corn cheesecakes are super fun and a perfectly festive treat for Halloween! Despite taking a little bit of time to layer all the different colors together, they are actually very easy to make. You’ve got three main components:
- Oreo cookie crust
- Vanilla filling that’s colored in yellow, orange and white
- Whipped cream topping
To get started, you’ll want to add cupcake liners to your pan. Spray the liners with some nonstick spray to help keep them from sticking. Then, you’ll make my Easy Oreo Cookie Crust and divide it between the mini cheesecakes. Bake the crusts for about five minutes and then set them aside.
To make the cheesecake filling, you’ll use the same ingredients you’d find in my Classic Mini Cheesecakes filling:
- Cream Cheese
- Sugar
- Flour – for a little texture
- Sour cream – for a little flavor
- Vanilla extract
- Eggs
Combine the cream cheese, sugar and flour to start, mixing on low speed so that you don’t incorporate too much air into the batter. The air bubbles can rise during baking and cause cracks.
From there, you’ll add the sour cream and vanilla extract and finally, the eggs.

How to Layer a Colored Cheesecake Filling
Once you’ve got your filling made, you’ll want to divide it evenly between three bowls. I’m a big fan of using my food scale for most things, and it makes this part easy too because you can just weight the filling as you divide it and know it’s all even.
You’ll leave one bowl as-is for the white, then add some gel coloring for the yellow and orange fillings. I like to use gel icing colors because it requires much less coloring to achieve a vibrant shade.
To layer the colors, first add one tablespoon of yellow into each crust and spread it evenly. Next, you’ll add a tablespoon of orange. I generally start by adding the filling around the outer edge first to get nice lines on the edge, and then add in the center to create the full layer of color. You can’t really spread the layer easily without moving the layer below around, so you kind of want to drop bits of the color around to create a full layer of color.
Finish off each mini cheesecake with a layer of white on top, then bake them and let them cool.

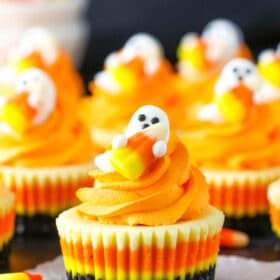
Add a Little Ghost for the Perfect Halloween Dessert
Finish off your cheesecakes with a swirl of whipped cream and a cute little ghost, who happens to be holding a little candy corn – perfect!
These Mini Candy Corn Cheesecakes are just so fun and adorable! The perfect dessert for a Halloween party or just to get your family excited about Halloween! Not to mention that they are thick, creamy and delicious! I hope you enjoy them!
More Great Halloween Food Ideas:
- Candy Corn Icebox Cake
- Dirt Cake
- Halloween Pumpkin Cheesecake Bars
- Spiderweb Chocolate Cake
- Spiderweb Chocolate Tart
- Candy Corn Chocolate Chip Cookie Cake
- Candy Corn Poke Cake
- Candy Corn Fudge
Watch How To Make Them
Mini Candy Corn Cheesecakes
- Prep Time: 1 hour 15 minutes
- Cook Time: 35 minutes
- Total Time: 1 hour 50 minutes
- Yield: 12 mini cheesecakes 1x
- Category: Dessert
- Method: Oven
- Cuisine: American
Description
These Mini Candy Corn Cheesecakes are easy to make and such a fun Halloween dessert! If you’re looking for Halloween party food ideas, these are perfect for sharing.
Ingredients
CRUST
- 1 1/2 cups (201g) Oreo crumbs
- 2 tbsp (41g) butter, melted
FILLING
- 12 ounces (339g) cream cheese, room temperature
- 1/2 cup (104g) sugar
- 2 tbsp (16g) all purpose flour
- 1/2 cup (115g) sour cream
- 1 1/2 tsp vanilla extract
- 2 large eggs
- Yellow gel icing color
- Orange gel icing color
TOPPING
- 1/2 cup (120ml) heavy whipping cream, cold
- 5 tbsp (36g) powdered sugar
- 1/2 tsp vanilla extract
- Orange gel icing color
- Ghost toppers
Instructions
1. Preheat oven to 325°F (162°C). Add cupcake liners to a cupcake pan and spray with non stick baking spray.
2. Combine the Oreo crumbs and melted butter. Divide the mixture between the cupcake liners (about 2 tablespoons per cup) and press into the bottoms.
3. Bake the crusts for 5 minutes then remove from oven. Allow to cool while you make the filling.
4. To make the filling, reduce oven to 300°F (148°C). In a large bowl, mix the cream cheese, sugar, and flour until combined (Use low speed to keep less air from getting into the batter, which can cause cracks). Scrape down the sides of the bowl.
5. Add the sour cream and vanilla extract. Beat on low speed until well combined.
6. Add the eggs one at a time, beating slowly and scraping the sides of the bowl after each addition.
7. Divide the batter evenly into three bowls. Leave one as is, then color one orange and the other yellow.
8. Layer the colored batter into the crusts, starting with a tablespoon of yellow batter in each cup, then a tablespoon of orange, then a tablespoon of white. The cups should be mostly full.
9. Bake the cheesecakes for about 15 minutes, then turn off the oven and leave the door closed for another 10 minutes.
10. Crack the oven door and allow cheesecakes to cool for 15-20 minutes, then put in the fridge to finish cooling.
11. When cheesecakes are cooled, remove them from the pan.
12. To make the whipped cream topping, add the heavy whipping cream, powdered sugar and vanilla extract to a large mixer bowl. Whip on high speed until stiff peaks form. Color the whipped cream with a little orange gel icing color.
13. Pipe the whipped cream onto the tops of the cheesecakes and add topper, if using.
14. Refrigerate the cheesecakes in an airtight container until ready to serve. Cheesecakes are best for 2-3 days.
Nutrition
- Serving Size: 1 mini cheesecake
- Calories: 281
- Sugar: 17.5 g
- Sodium: 152.6 mg
- Fat: 19.4 g
- Carbohydrates: 22.9 g
- Protein: 4.5 g
- Cholesterol: 79.3 mg


Hi… are these mini cheesecakes or standard cupcake size?? If they are standard sz can & how would I adapt the recipe to make mini ones?? Thank you!
Standard size muffin/cupcake pan (mini because they aren’t a full-size cheesecake). I haven’t ever made mini cheesecakes that small, so it’s hard to say. The recipe would make quite a few and you’d definitely want to reduce the baking time.
If I wanted to just make this as a regular cheesecake, how long do I bake it, & do I need to use a water bath?
You’d basically follow the same process and baking method as my regular vanilla cheesecake. That would be doubling this mini cheesecake recipe for a full 9 inch cheesecake. I hope that helps!