Throw out the typical cheesecake rules with this Burnt Basque Cheesecake! It’s easy to make and has the most glorious souffle-like texture with a gorgeous caramelized top. Rich, creamy, light, and airy all at the same time, it’s got rustic charm that never gets old.

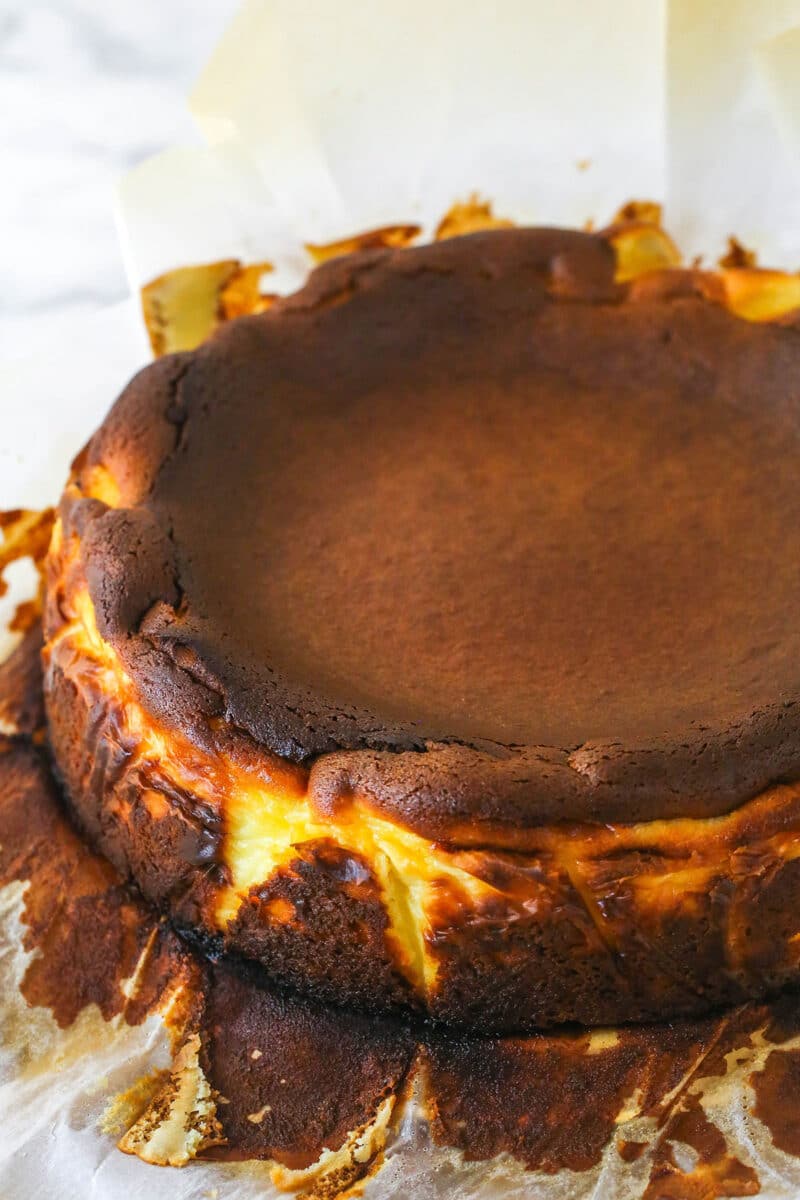
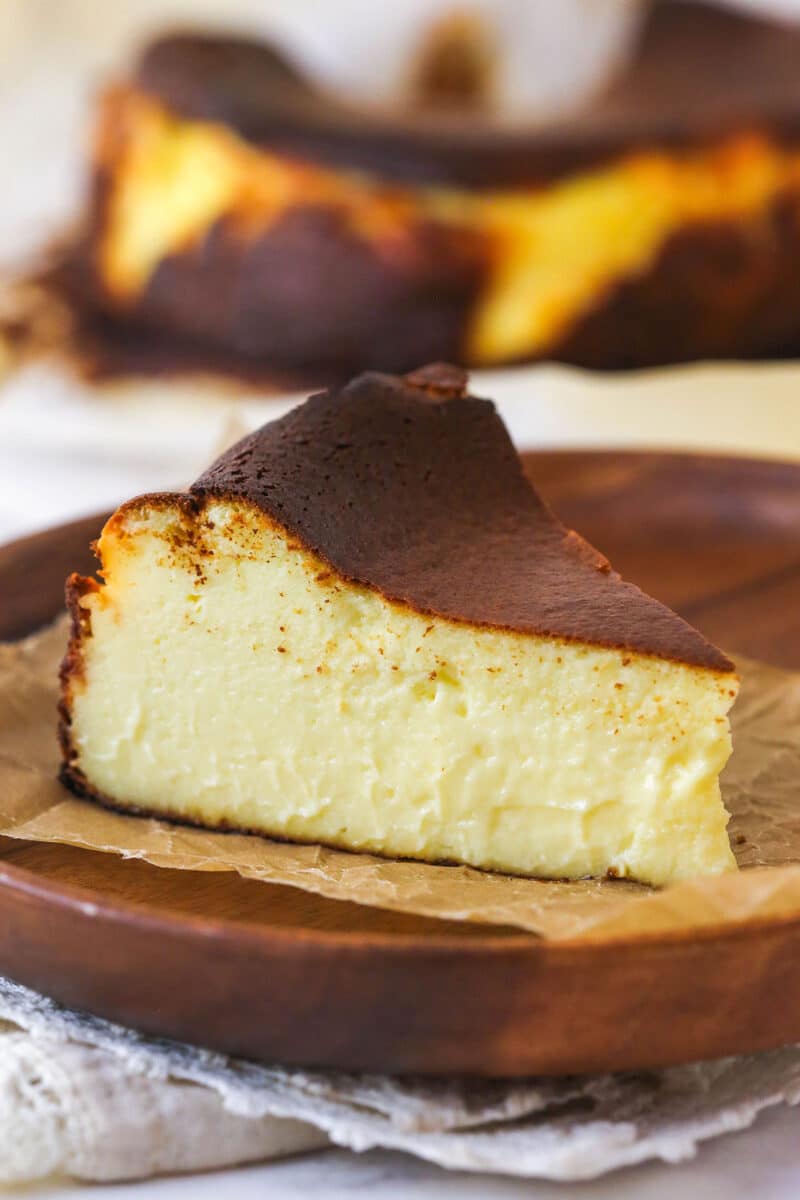
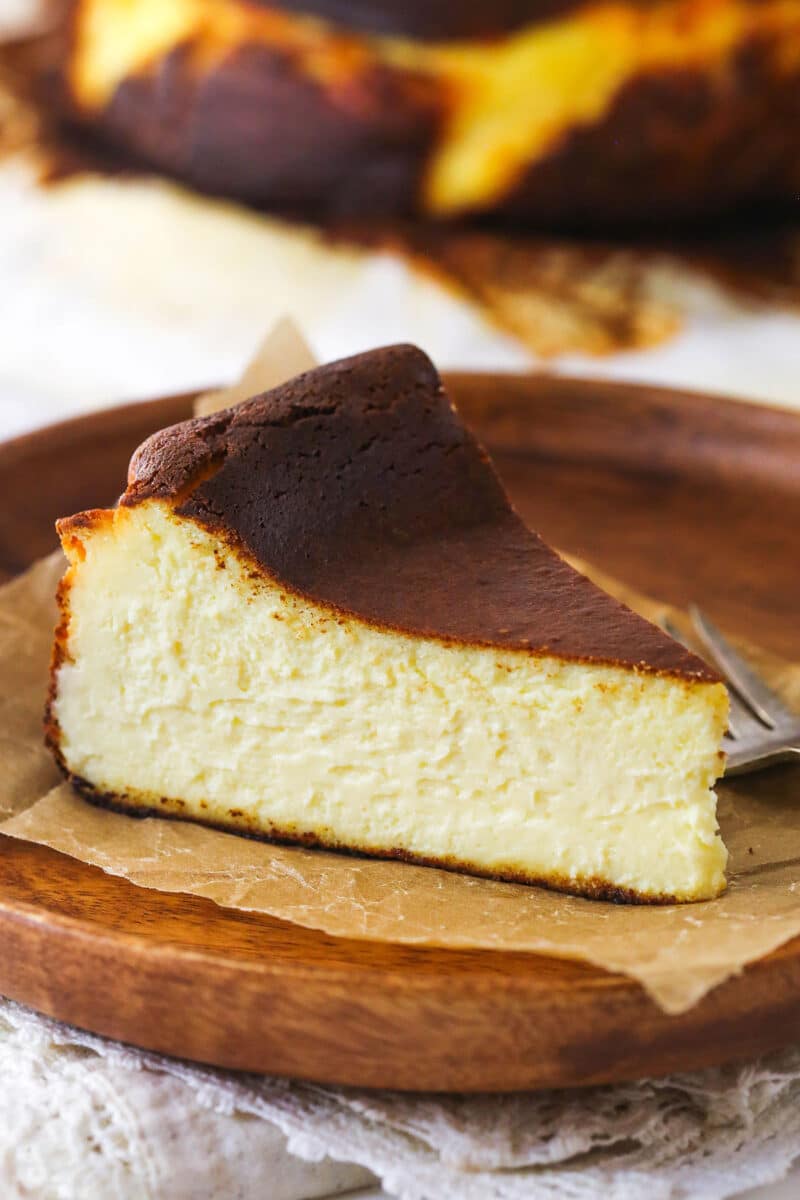
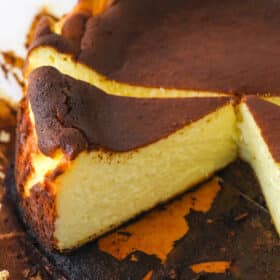
Originating from San Sebastian in the Basque region of Spain, burnt Basque cheesecake is something special. It’s become quite popular in recent years, perhaps because it is much less finicky than more traditional cheesecakes. It’s made without a crust (and without a water bath), and the result, although less conventionally “pretty” than other cheesecakes, is uniquely delightful. The insides are light and fluffy, while the top of the cheesecake is golden brown with caramelization. The juxtaposition of the delicate, almost souffle-like flavor and texture with the richer “burnt” top is to die for. Give ‘er a go, and let me know how you like it! If you want to do a side-by-side comparison with The Best Cheesecake Recipe, that could be fun!
An Easy Cheesecake With Few Rules
This really is the PERFECT cheesecake, and I’ll tell you why. But don’t take my word for it. It’s one of those things you have to try for yourself.
- Souffle-like texture. Unlike traditional cheesecake, this basque cheesecake is light, fluffy and creamy – very souffle-like. It’s truly an experience.
- Short ingredients (and instructions) list. You only need five ingredients and a few simple steps to make the magic happen. It doesn’t get much better.
- Hard to mess up. With no pesky water bath, no crust, and an attitude that screams “embrace the flaws,” this dessert is much harder to mess up than more traditional cheesecakes. In fact, if you mess it up, you probably did it right.
- Visual appeal. Sure, a classic New York Cheesecake might look more “put together” with its clean lines and creamy color, but this Basque Cheesecake has its own visual appeal. With a deeply caramelized, sunken top, its got this rustic, approachable, yet sophisticated look that’s sure to turn heads.
Why Is This Called “Burnt” Cheesecake?
Basque cheesecake is often called “burnt” because it kind of appears that way, at least when compared to more traditional cheesecakes. It’s got a deep, golden brown top that appears burnt. It’s not actually burnt, though. It’s just baked at a relatively high temperature, so the sugars in the batter caramelize (sort of like creme brulee!), giving the dessert its signature color and flavor. It also adds some caramel notes to the flavor of the cheesecake.

Ingredient Notes
I love that this recipe only requires five ingredients. And you probably already have them in your kitchen! Check out the recipe card below for precise measurements.
- Cream cheese – Your favorite brick-style cream cheese will do. Just make sure it’s full fat and that you allow it to soften at room temperature before using.
- Sugar – Basque cheesecakes are known for not being too sweet. That said, I tested it with less sugar and because of the short ingredient list and not many other things that add flavor, I felt it started to lack flavor with less. But feel free to reduce it, if you’d like.
- All-purpose flour – To help the cheesecake set maintain its lovely texture. It also contributes to a creamier texture.
- Eggs – Be sure to use large eggs. I played with the amount of eggs to use and found 7 to be just right. The eggs and cream both contribute to the rise and light texture of the cheesecake, but the eggs add more flavor.
- Heavy whipping cream – The heavy cream (along with the eggs*) adds to the airy, creamy texture of the cheesecake. Do NOT try to use a lower-fat dairy product.
*The eggs and the cream work together to create the perfect, airy, yet rich texture. You can play with the amounts of each, but I prefer a bit more egg. There’s just more flavor in there.

Prepping Your Pan
Without a crust, this cheesecake needs something else to keep the batter from leaking out of your pan, sticking and just make it easier to remove from the pan after baking. That’s where parchment paper comes in. There’s no real right or wrong way to do it, but it does need to extend about an inch or two over the pan’s rim. Otherwise, you risk the batter overflowing in the oven. You might need to use two sheets of parchment to achieve this all around the pan. You’ll likely need to create some folds in the parchment paper to get it to fit in the pan and stay put, but that adds to the cheesecake’s rustic charm. If you’re having too much trouble getting the paper to go into corners and such, crumple it up first, then add it to the pan.
How to Make a Burnt Basque Cheesecake
This cheesecake really is SO easy to make! Here’s a quick little step-by-step. Be sure to scroll to the recipe card below for a more thorough set of instructions:
- Prep. Preheat oven to 400°F and press parchment paper into a 9-inch springform pan, leaving an inch or two overhang.
- Make the batter. Beat together the cream cheese, sugar, and flour on medium-high speed until very smooth. Increase the speed to high and add beat in the eggs, one at a time, followed by the heavy cram.


- Bake. Pour the batter into the prepared pan and bake for about 40-50 minutes. The cheesecake should be deeply golden brown and set but REALLY jiggly.
- Cool. Cool at room temperature.

Don’t Get Lumps
This is a quick tip, but I really don’t like a lumpy batter. Be sure to add your flour in the beginning, as this recipe states. I’ve seen some that add it later and you totally end up with lumpy batter. No fun.
How To Tell When It’s Done
Knowing when it’s done baking can be one of the trickiest parts of making cheesecake. For this particular cheesecake, the dark color on top is certainly a clue. But you also want to know the inside is done. I’m a big fan of the jiggle test, but it looks a little different for this cheesecake. Because it rises so tall and is so light, it will jiggle much more than a traditional cheesecake. The edges will be set, but the whole thing will be VERY jiggly, but it shouldn’t be sloshy in the middle. That would indicate that it needs longer to bake. When you jiggle the pan, the cheesecake should move around a bit, but bounce back into place.
Don’t open the oven. For all this talk of keeping an eye on the cheesecake to ensure proper doneness, do as much of this as you can without opening the oven. Letting the heat out will disrupt the baking process and could cause the cheesecake to fall.

Best Temperature to Serve Basque Cheesecake
This cheesecake is traditionally served at room temperature before refrigerating. Refrigeration takes away the light, souffle-like texture and makes the cheesecake denser (see side-by-side photos below). It’s fine (and still delicious), but try it at room temperature first. That’s when it’s best and you’ll understand why it’s become so popular!
And while I really appreciate the simple flavor of this cheesecake, you can add to it if you’d like. Here are a few tasty options:
- Add a little whipped cream. This classic Homemade Whipped Cream or my Stabilized Mascarpone Whipped Cream would be amazing.
- Try something fruity. There’s nothing quite like cheesecake paired with a fruity sauce, and my Strawberry Sauce or this Raspberry Sauce are SO good. I love how they lighten things up a bit while adding another flavor dimension.
- Make things extra rich. Looking to double down on the richness of this dessert? Consider a drizzle of my Hot Fudge Sauce or this Salted Caramel Sauce over the top of your slice of Basque cheesecake.
How to Store Your Cheesecake
- Refrigerator. Once fully cooled, seal the cheesecake in an airtight cake carrier or wrap it in a double layer of plastic wrap. Otherwise, slice the cake and arrange the slices in a single layer in an airtight container. You can store leftovers in the fridge for 4-5 days.
- Freezer. Once cool, pop the cheesecake in the freezer for an hour or so to firm up. Then, wrap it in a double layer of plastic wrap. You can also spread individual slices out on a sheet pan, pop them in the freezer to firm up and wrap each in a double layer of plastic wrap. Either way, you can store the leftovers in the freezer for up to three months. Thaw in the fridge before enjoying.
More Cheesecake Recipes To Try
Hungry for more? Here are a few of my other favorite cheesecake recipes. Let me know what you think!
Burnt Basque Cheesecake
- Prep Time: 25 minutes
- Cook Time: 40 minutes
- Total Time: 1 hour 5 minutes
- Yield: 12–14 slices 1x
- Category: Cheesecake
- Method: Baking
- Cuisine: Spanish
Description
Throw out the typical cheesecake rules with this Burnt Basque Cheesecake! It’s easy to make and has the most glorious souffle-like texture with a gorgeous caramelized top. Rich, creamy, light, and airy all at the same time, it’s got rustic charm that never gets old.
Ingredients
- 2 pounds (four 8 oz packages) cream cheese, room temperature
- 2 cups (414g) sugar
- 3 tablespoons (24g) all-purpose flour
- 7 large eggs, room temperature
- 1 1/4 cups (300ml) heavy whipping cream
Instructions
- Preheat oven to 400°F. Press parchment paper into a 9-inch springform pan, leaving an inch or two over hang. I used one piece, but you could use two and overlap them to be sure you have a high over hang. You will need to pleat and fold the parchment paper to get it to fit correctly. Don’t worry if it doesn’t stay perfectly yet, the cheesecake filling will keep it in place and the folded sides give it that signature rustic look.
- Add the cream cheese, sugar and flour to a large mixer bowl and beat on medium-low speed, scraping down sides of the bowl a few times, until very smooth and no lumps remain.
- Increase the speed to medium and add the eggs one at a time, mixing until each egg is well incorporated before adding the next.
- Add the heavy whipping cream and mix on medium-low speed until combined and smooth.
- Pour the batter into the prepared pan. Bake cheesecake until deeply golden brown (but not actually burnt) and set, but REALLY jiggly (but not sloshy in the center), about 40-50 minutes. The time can really vary depending on the oven, so keep an eye on the color of the cheesecake and check the jiggle.
- Remove the cheesecake from the oven and allow to cool to room temperature.
- To experience the full soufflé-like texture of this cheesecake, enjoy it at room temperature before chilling. You can also refrigerate it and serve chilled. It will still be very creamy and light, but a little more dense than before being refrigerated.
Nutrition
- Serving Size: 1 slice
- Calories: 416
- Sugar: 31.4 g
- Sodium: 242.2 mg
- Fat: 28.6 g
- Carbohydrates: 33.9 g
- Protein: 7.6 g
- Cholesterol: 170.6 mg


I have a friend who cannot have gluten. Can make this with almond flour or oat flour?
I haven’t tried those, so I’m not sure. Probably would be fine. You can also use a gluten free 1:1 flour, or cornstarch in half the amount.
Love how you tie the recipe into the culture — food is such a big part of identity. At Foodhub, we notice how much people value that when ordering from local, independent kitchens.
I absolutely love this recipe! Could I make it in my air fryer using the bake function?
I haven’t made a cheesecake in the air-fryer, so I’m not sure. Sorry!
Outstanding recipe!