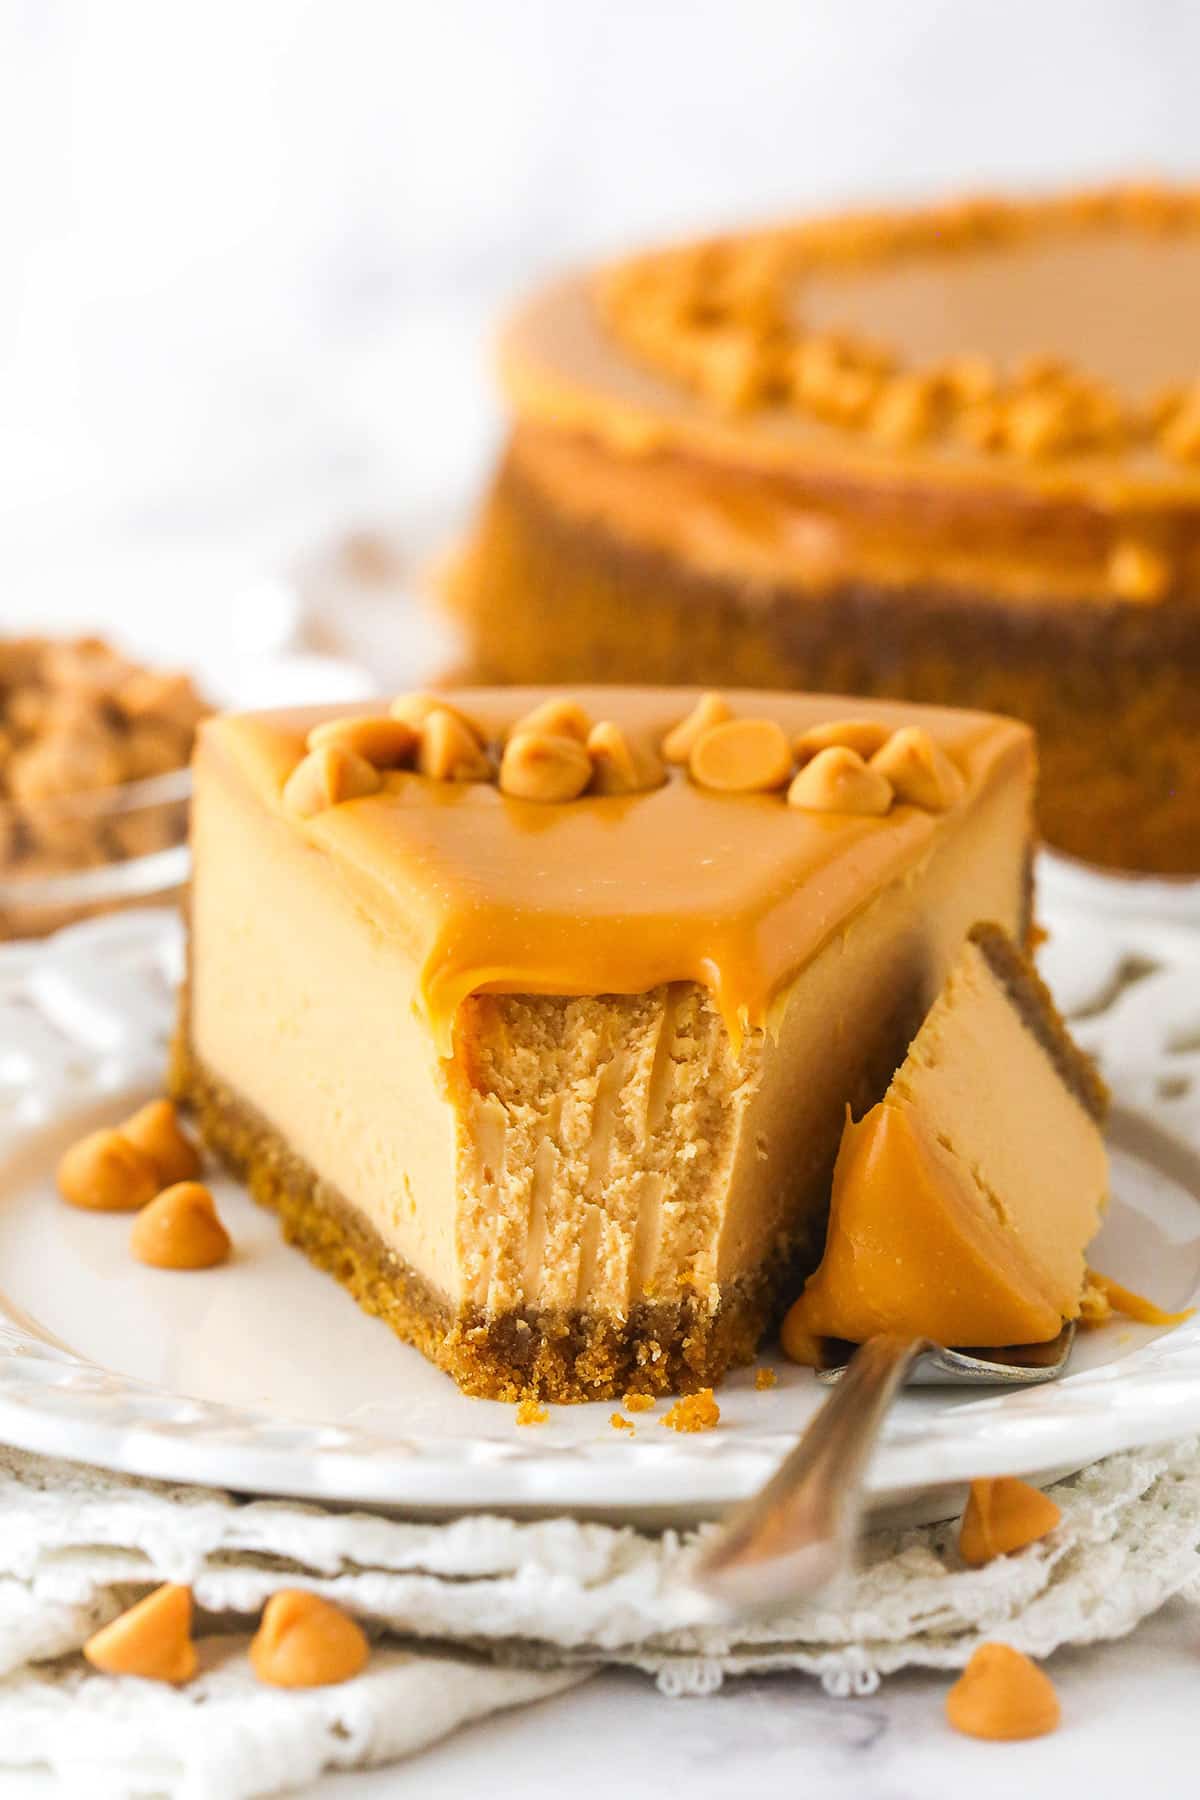
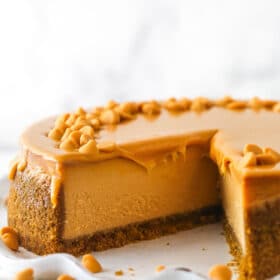
With butterscotch chips, butterscotch pudding, and butterscotch ganache, every bite of this Loaded Butterscotch Cheesecake explodes with creamy, rich butterscotch flavor. One of my all-time favorite cheesecakes!

Why You’ll Love This Butterscotch Cheesecake Recipe
I am totally in love with this cheesecake. Similar to my butterscotch pie, it has the most amazing butterscotch flavor and is so worth the time and effort that goes into it.
- Incredible butterscotch flavor. This doesn’t just have a slight butterscotch flavor, it’s full on and so good. It would be tough to get a good butterscotch flavor just from adding butterscotch sauce, so this cheesecake uses two things – butterscotch chips and butterscotch pudding mix. You could use just one or the other, but the flavor gets a little lost. You really want to use both.
- Smooth, creamy texture. Like my other cheesecake recipes, this one utilizes a slow cooling method and water bath which results in the smoothest, creamiest texture possible.
- Stores well. One reason this butterscotch cheesecake is among my favorite desserts is that it stores beautifully for 4-5 days. That means I can easily make it a day in advance and still enjoy leftovers for a few days later.

Ingredients and Substitutions
Here’s an overview of what you’ll need for each part of this recipe. Be prepared for lots of butterscotch! Scroll down to the recipe card below for exact measurements.
Crust
- Graham cracker crumbs – While you can buy crumbs at the grocery store now, I prefer to make my own by crushing about 15 sheets of graham crackers. I think the ones you make yourself taste better too.
- Brown sugar – The sugar helps to sweeten the crust a bit. While I usually use granulated sugar, the richness of brown sugar pairs nicely with the butterscotch flavors in this recipe.
- Unsalted butter – Melted butter helps bind the crumbs together to form the crust. You can use salted butter as well.
Filling
- Cream cheese – You want full-fat brick-style cream cheese when making a cheesecake. Low fat or the kind in a container will result in a too-soft cheesecake filling. Bring the cream cheese to room temperature for a smooth consistency.
- Light brown sugar – Brown sugar sweetens the filling and the molasses flavor complements the butterscotch nicely.
- All-purpose flour – Flour helps to prevent cracking and create a creamy texture. You can also use cornstarch in half the amount for a gluten free option.
- Vanilla extract
- Sour cream – Sour cream adds the classic tangy flavor to the cheesecake and also helps to break up the richness of the cream cheese.
- Heavy whipping cream – Heavy whipping cream is combined with the butterscotch chips to create a smooth mixture that can be easily mixed into the filling.
- Butterscotch chips – Adding melted butterscotch chips to the cheesecake really ensures the flavor is in every bite of the cheesecake.
- Butterscotch pudding mix – You can use either instant or cook and serve pudding. You do not need to make the pudding. You will add the dry mix to the filling. Note that your filling will be thicker with instant pudding and thinner with the cook and serve, since the instant one begins thickening more quickly.
- Large eggs – Not medium or extra large. Eggs should be at room temperature. To do that more quickly, set them in a bowl of warm water.
Topping
- Butterscotch chips – Melted butterscotch chips create a ganache to top the cheesecake, adding even more butterscotch flavor.
- Heavy whipping cream – Turns the butterscotch chips into a pourable ganache.

How To Make Butterscotch Cheesecake
This butterscotch cheesecake takes some time, but it’s a simple process. Don’t rush through it! Be sure to check the recipe card below for printable instructions.
Make the Crust
- Prep. Preheat the oven to 325F. Line the springform pan with parchment paper and grease the sides.
- Make the crust. Combine the crust ingredients. Press evenly into the bottom and up the sides of the springform pan.
- Bake. Bake for 8-10 minutes, then set aside to cool.
- Prep for the water bath. Once cool, cover the outside of the pan with aluminum foil. Set aside.


Make the Filling
- Reduce oven temp. Reduce the oven temperature to 300F.
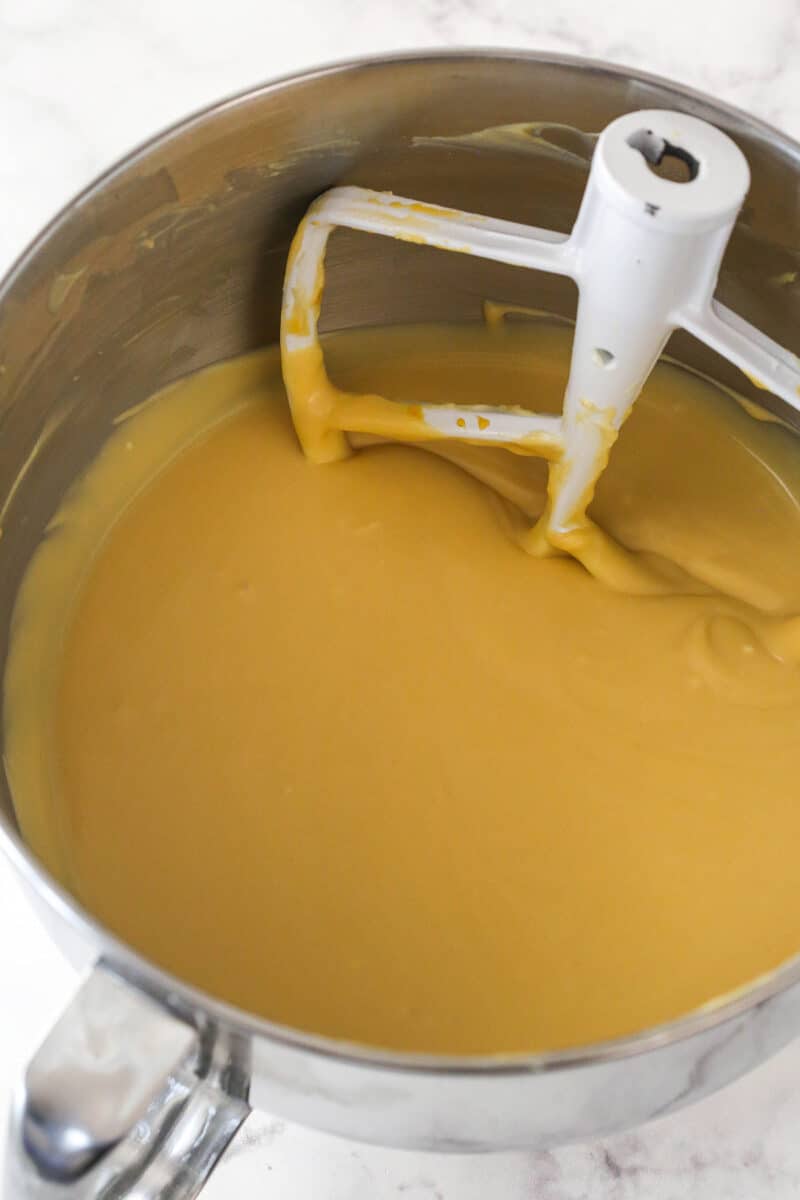
- Blend the filling. Blend the cream cheese, sugar, and flour until combined. Add in the vanilla extract and sour cream, beating on low until combined.
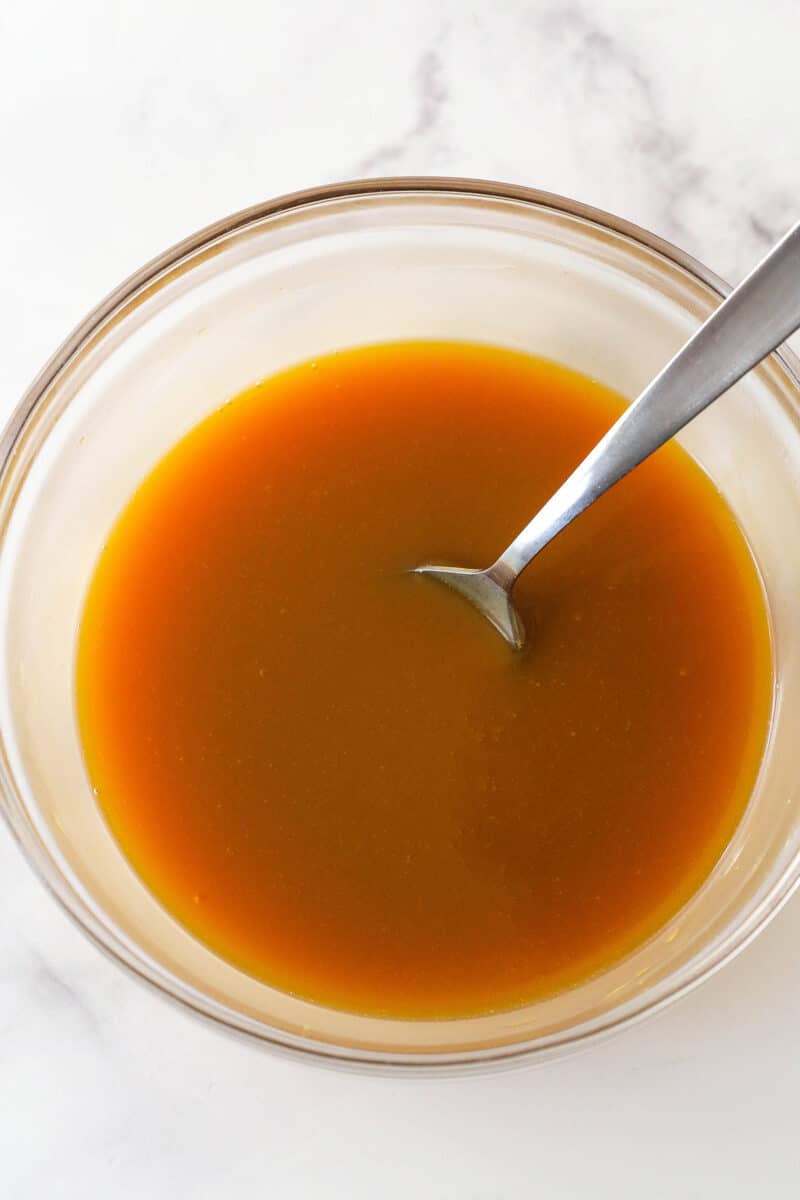
- Make the butterscotch mixture. Heat the heavy cream and butterscotch chips in a microwave-safe bowl in 15-30-second increments, until melted.

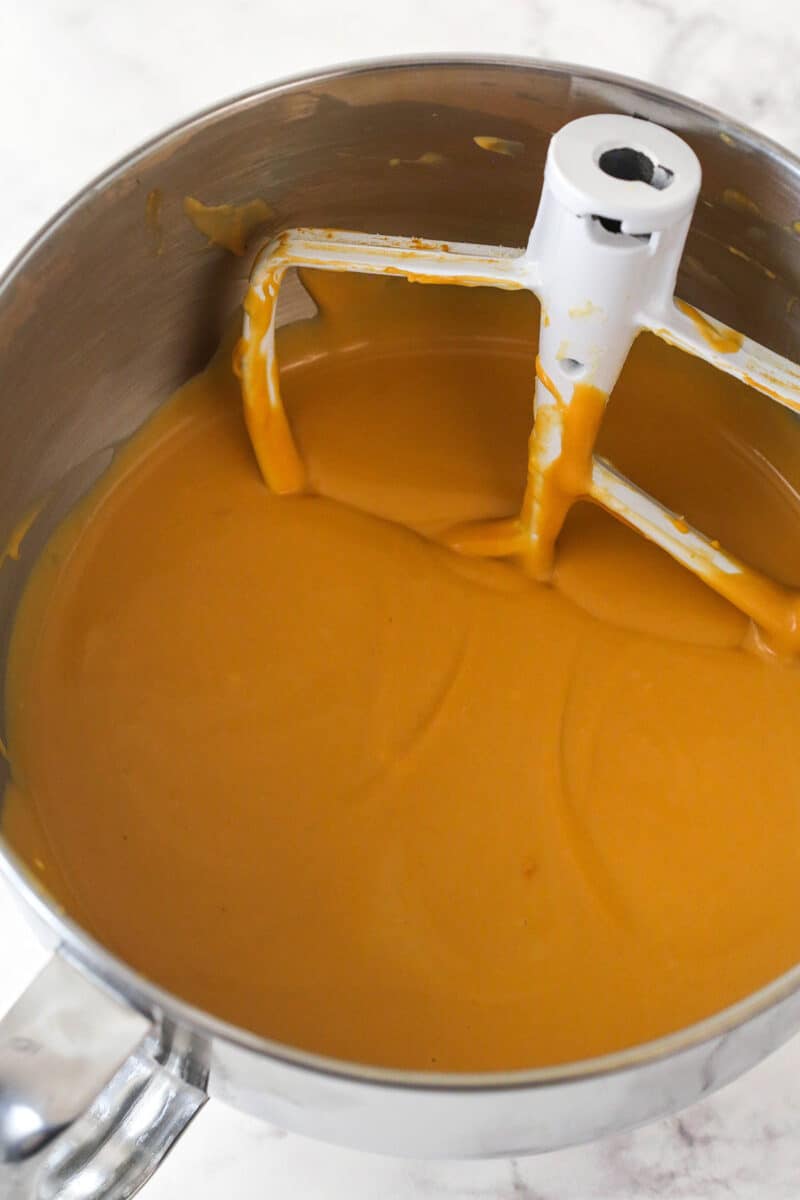
- Add melted butterscotch mixture to filling. Add the mixture to the cheesecake filling in two parts, mixing well to combine after each.
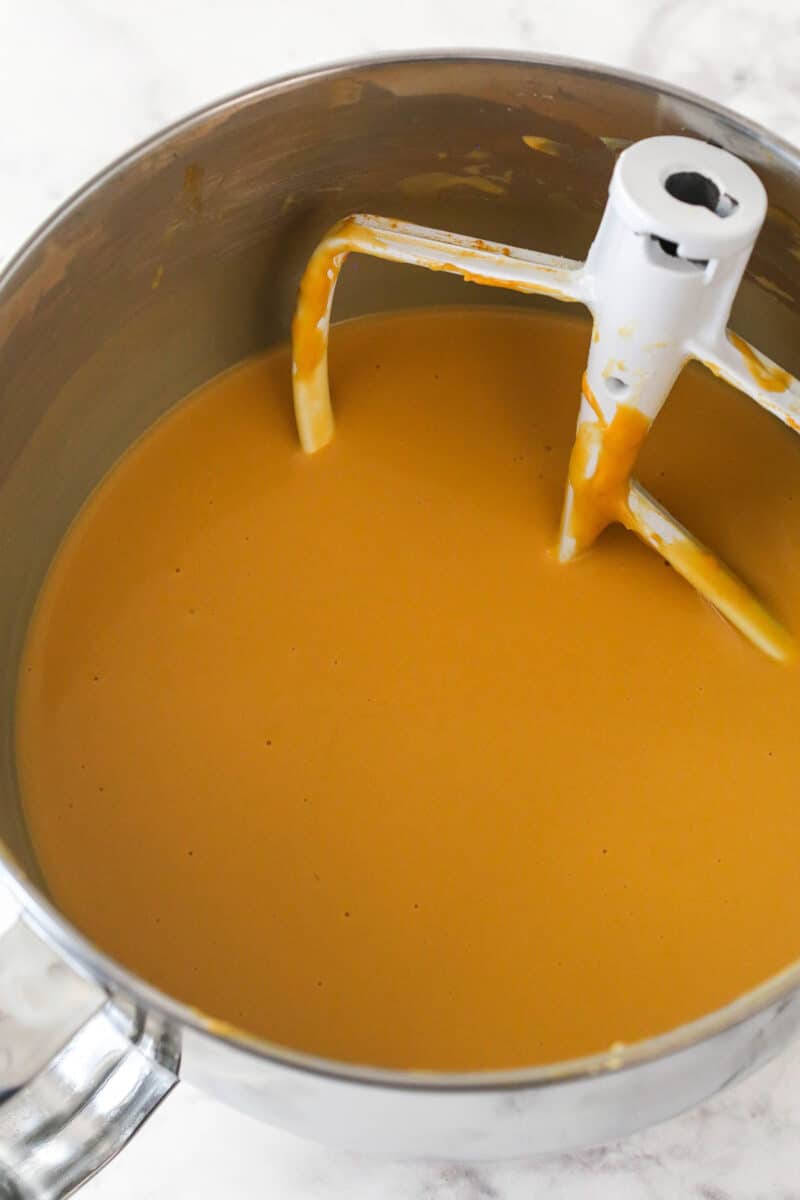
- Add the pudding. Mix in the dry pudding mix. Scrape down the sides of the bowl as needed.
- Add the eggs. Mix in the eggs one at a time.
- Transfer to pan & prepare the water bath. Pour the filling into the crust then place the springform pan inside another pan. Fill the outside pan halfway with warm water.
- Bake. Bake for 1 hour and 30-35 minutes, until the center is set but still jiggly.
- Slowly cool. Turn off the oven and leave the cheesecake inside for 30 minutes then crack the door and allow it to cool in the oven for 10 more minutes. Remove and set on a cool rack until it reaches room temperature then chill in the fridge for at least 5-6 hours.

Finish it off
- Transfer to a serving plate. Remove the cheesecake from the springform pan and transfer to a serving plate.
- Make the butterscotch ganache. Microwave the heavy cream until it begins to pour then pour over the butterscotch chips. Allow to sit for 2-3 minutes until whisk. Allow to cool for about 5 minutes then pour over the cheesecake and spread evenly. Top with additional butterscotch chips if desired.
- Refrigerate. Cover and refrigerate until ready to serve.

Tips for The Best Cheesecake
- Mix on low speed. When mixing the cream cheese, be sure to use low speed. This helps prevent extra air from getting into the batter, which can cause cracks.
- Cool slowly. One of my biggest tips for this butterscotch cheesecake is to let it cool slowly, first in the oven with the door closed and then with the door open. This cooling process is key to finishing the cooking process and preventing cracks.
- Use room temperature ingredients. Room temperature cream cheese and eggs help produce a lump-free filling and aid in not having to stir too much, which can incorporate too much air into the batter.
- Scrape down the sides of the bowl. Take a second to scrape down the sides of the bowl as you mix your ingredients. This helps to ensure that everything is evenly incorporated and there are no random lumps of cream cheese.
- Chill overnight. When possible, I like to make my cheesecake a night in advance. 5-6 hours of chill time usually does the trick but letting it chill overnight really ensures that the cheesecake has enough time to fully chill.
Do I Really Need The Water Bath?
Yes, a water bath is key to baking the perfect cheesecake, including this butterscotch cheesecake. The steam it creates helps keep the cheesecake moist and prevents it from cracking, falling in the middle and browning too much. Without it, you won’t get the same smooth, creamy texture. You can find all my tips on water baths here.
How Do I Know When My Cheesecake Is Done?
The best way to check if the cheesecake is done is the jiggle test. Gently shake the cheesecake in the oven (with gloves). The outer 2-3 inches should be relatively stable but the center should be jiggly – not sloshy but jiggly. If it’s still liquid-y, it needs to keep baking.
You can also check out my guide on how to tell when your cheesecake is done baking.
Proper Storage
Keep the butterscotch cheesecake well covered or in a cake carrier in the fridge. It is best if eaten within 4-5 days.
More Butterscotch Recipes To Try
- Ultimate Butterscotch Cake
- Pumpkin Butterscotch Chip Cookies
- White Chocolate Butterscotch Tart
- Salted Butterscotch Cookies
- Caramel Macchiato Tiramisu
Watch How to Make Butterscotch Cheesecake
Loaded Butterscotch Cheesecake
- Prep Time: 1 hour
- Cooling Time: 5 hours
- Cook Time: 2 hours 10 minutes
- Total Time: 8 hours 10 minutes
- Yield: 12–14 Slices 1x
- Category: Dessert
- Method: Oven
- Cuisine: American
Description
With butterscotch chips, butterscotch pudding, and butterscotch ganache, every bite of this Loaded Butterscotch Cheesecake explodes with creamy, rich butterscotch flavor. One of my all-time favorite cheesecakes!
Ingredients
Crust
- 1 3/4 cups (235g) graham cracker crumbs
- ¼ cup (56g) packed light brown sugar
- 7 tbsp (98g) unsalted butter, melted
Filling
- 24 oz (678g) cream cheese, room temperature
- 3/4 cup (168g) packed light brown sugar
- 3 tbsp (24g) all-purpose flour
- 1 tsp vanilla extract
- 1/2 cup (112g) sour cream
- 1/2 cup (120ml) heavy whipping cream
- 1 cup (169g) butterscotch chips
- 3.4 oz package dry Butterscotch pudding mix
- 4 large eggs, room temperature
Topping
- 1 cup (169g) butterscotch chips
- 4 1/2 tbsp (68ml) heavy whipping cream
- Additional butterscotch chips, for decorating
Instructions
Make the Crust
- Preheat oven to 325°F (163°C). Line a 9-inch (23cm) springform pan with parchment paper in the bottom and grease the sides.
- Combine the crust ingredients in a small bowl. Press the mixture into the bottom and up the sides of the springform pan.
- Bake the crust for 8-10 minutes, then set aside to cool.
- Cover the outsides of the pan with aluminum foil so that water from the water bath cannot get in (or see how I prepare my pan for a water bath). Set prepared pan aside.
Make the Filling
- Reduce oven temperature to 300°F (148°C)
- In a large mixer bowl, blend the cream cheese, sugar and flour with an electric mixer until combined (Use low speed to keep less air from getting into the batter, which can cause cracks). Scrape down the sides of the bowl.
- Add the vanilla extract and sour cream. Beat on low speed until well combined. Set aside.
- Add the heavy cream and butterscotch chips to a medium sized microwave-safe bowl. Heat in 15-30 second increments, stirring well between each until the butterscotch chips are melted.
- Add the butterscotch chip mixture to cheesecake filling in two parts and mix until well combined after each, scraping bowl the sides of the bowl as needed.
- Add the dry pudding mix and mix until well combined, scraping bowl the sides of the bowl as needed.
- Add the eggs one at a time, mixing until combined after each addition and scraping the sides of the bowl after each addition.
- Pour the filling into the crust. Place the springform pan inside another larger pan. Fill the outside pan with enough warm water to go about halfway up the sides of the springform pan. The water should not go above the top edge of the aluminum foil on the springform pan.
- Bake for 1 hour and 30-35 minutes. The center should be set, but still jiggly (See how to tell when your cheesecake is done baking).
- Turn off heat and leave cheesecake in oven with door closed for 30 minutes.
- Crack oven door and leave the cheesecake in the oven for another 10 minutes. This cooling process helps the cheesecake cool slowly to prevent cracks.
- Remove cheesecake from oven and set on a cooling rack until it reaches room temperature, then chill until cold and firm, 5-6 hours or overnight.
Finish it off
- Once cold and firm, remove cheesecake from springform pan and place on serving plate.
- To make the butterscotch topping, put the butterscotch chips in a heat proof bowl.
- Microwave the heavy whipping cream until it just begins to boil, then pour it over the butterscotch chips. Allow it to sit for 2-3 minutes, then whisk until smooth.
- Allow the ganache to cool a bit (about 5 minutes, until thickened but still pourable and spreadable), then pour the topping onto the top of the cheesecake and spread evenly. Top cheesecake with additional butterscotch chips, if desired.
- Refrigerate well-covered or in a cake carrier until ready to serve. Cheesecake is best if eaten within 4-5 days.
Notes
- Graham Crackers: You’ll need about 15 full sheet graham crackers for the crumbs. You can also use vanilla wafer crumbs.
- Flour: For a gluten free alternative, try cornstarch. You’ll need half the amount.
- Cream cheese: You’ll need brick-style, full-fat cream cheese. Avoid tubs, low-fat and whipped varieties of cream cheese.
- Pudding Mix: You can use instant or cook n’ serve. Just keep in mind that instant pudding will thicken more quickly, so your filling will be thicker when mixing.
- Refrigerator storage: Seal any leftover cheesecake in an airtight cake carrier or wrap it in plastic wrap. You can use toothpicks to create some space between the plastic and the topping. If you’ve already sliced it, just arrange the slices in a single layer in an airtight container. This cheesecake tastes best if eaten within 4-5 days.
- Freezer: Allow your cheesecake to firm up in the freezer for a couple of hours before wrapping it in a double layer of plastic wrap. You can also freeze slices arranged in a single layer in an airtight container. Store it in the freezer for up to 3 months and thaw it in the fridge before serving.
Nutrition
- Serving Size: 1 Slice
- Calories: 288
- Sugar: 28.5 g
- Sodium: 372.5 mg
- Fat: 13.8 g
- Carbohydrates: 34.9 g
- Protein: 6.9 g
- Cholesterol: 87.8 mg


This looks delicious! My son-in-law in law loves butterscotch and I am thinking of trying to make your Funfetti Millionaire Cake in a butterscotch version. If I reduce the eggs to 3 in this cheesecake with your butterscotch cake do you think it would work? Any other changes you can think of? Thanks!
What a fun idea! Yes, I’d reduce the eggs to 3. I hope it turns out great!
Is there a way to convert this recipe into cheesecake bars? I’d love to take them to an events.
Sure! For this amount of batter, I’d bake in a 9×13 pan. I’d reduce the eggs from 4 to 3. You can see something similar in this easy cheesecake recipe. It’ll be similar in terms of method. Perhaps a little longer bake time. You could also turn them into mini cheesecakes and follow something like my mini cheesecake recipe. Again, it’ll be a similar method (the recipe is cut in half in the mini recipe), with a little longer bake time.
Lindsay, I don’t think my prior comment saved. I wanted to know if any experience or recommendations on changing a cheesecake receipt such as this to individual cakes or in a muffin tin or ramikins. I am looking at doing this for my husband’s birthday and I figure that way we can freeze some since he will be the primary one eating it. Also wanted your thoughts on adding maybe white chocolate such as in a drizzle or chips in the cake, or if that would not work with this. Thank you.
Sorry for delay. You can make it into mini cheesecakes. I usually cut the recipe in half for about 12-14 minis. You’d follow the same process as my mini cheesecakes, with maybe a few more minutes of baking time.
Can this Cheesecake be frozen for future eating?
Yes, it can.
Also, besides having to leave out the butterscotch chips because I have none, I also plan to make this crustless, and make it in a Bundt pan lined with parchment paper that is well oiled. I’ve never made a cheesecake before I hope this comes out good.
To get the full butterscotch flavor, you really do need the butterscotch chips. I highly recommend getting those first. I also don’t recommend baking a cheesecake in a bundt pan. A cake pan, springform pan, pie pan, 9×13 pan – all those are better options. I would think it’d be very difficult to remove cheesecake from a bundt pan.