Moist and fluffy white chocolate cake is layered with silky white chocolate ganache and creamy white chocolate frosting in this pearly masterpiece! Whether you need a small wedding cake or just adore white chocolate, this stunning White Chocolate Layer Cake is heavenly!

Heavenly White Chocolate Drip Cake
When given the choice between white, milk or dark chocolate, I’ll reach for white chocolate pretty much every time. As a kid, the Easter bunny would even leave me white chocolate bunnies. Yes, it’s a thing! If you enjoy white chocolate as much as I do—or even just a little bit—you’ve gotta try a slice of this cake.
Each component is laced with that sweet, rich, and buttery flavor you know and love. The cake layers themselves are made with buttermilk to keep them ultra-tender and enhance the white chocolate flavor. Since there’s only so much white chocolate you can shove into a cake without ruining its texture, the frosting and the ganache are where the flavor really flourishes.
The final result is a dazzling dessert that’s full of white chocolate goodness, but not to the point where it becomes overwhelming. This simple and sophisticated layer cake is luxurious enough to convince your loved ones you ordered it from the fanciest bakery in town!

Is White Chocolate Really Chocolate?
Well, not technically, but it still counts as chocolate in our hearts. Instead of using actual cocoa, it’s made with the natural oil found in cocoa beans, commonly known as cocoa butter. This antioxidant-rich oil is combined with sugar, a specific type of milk powder and sometimes vanilla to produce white chocolate.
Since cakes already contain their own sugar, oil and vanilla, white chocolate is a difficult flavor to feature. It can easily get hidden and it’s hard to add too much without negatively affecting the texture of the crumb. No one wants a dense and oily piece of cake, so it took a lot of trial and error to get this recipe perfect. In addition to incorporating buttermilk, I used a mixture of oil and butter rather than making this a fully oil-based cake.
This helped the texture come out much more soft and fluffy! The other thing I did was reduce the amount of baking powder and supplement it with baking soda. Not only does baking soda make for a lighter textured cake, but it also changes the flavor profile a bit. In this case, it gives the white chocolate space to shine through.

What You’ll Need
This tried and true treat turns basic ingredients into a gourmet work of art. You’ll find the specific amounts for each item included in the recipe card near the bottom of this post.
For the White Chocolate Cake Layers
- Chopped White Chocolate: It’s important to note that white chocolate baking bars, such as Bakers or Ghirardelli, melt much smoother and thinner and are better for using in your cake. You’re more likely to get clumping with white chocolate chips.
- Buttermilk: Using a buttermilk substitute is often fine, but I don’t recommend doing so for this cake. Stick with real buttermilk for the best results.
- All-Purpose Flour
- Baking Powder & Baking Soda: The combination of the two gives the best texture and flavor.
- Salt
- Unsalted Butter: Make sure you bring this to room temperature before you use it.
- Vegetable Oil
- Sugar
- Large Eggs
- Vanilla Extract
For the White Chocolate Buttercream Frosting
- White Chocolate: You’ll want to use those baking bars for the frosting as well.
- Unsalted Butter: Brought to room temperature.
- Powdered Sugar
- Salt: A dash of salt helps balance out the sweetness of the white chocolate.
- Heavy Whipping Cream
For the White Chocolate Ganache Filling
- White Chocolate: Ganache is a lot more forgiving with white chocolate chips, but you can definitely stick with the baking bars if you’d like.
- Heavy Whipping Cream
For the White Chocolate Ganache Drip
- White Chocolate
- Heavy Whipping Cream

How to Make White Chocolate Layer Cake
With everything going on in this cake, it does require a decent amount of prep time. But don’t let that deter you! Everything is super easy, and the steps can be split up at your convenience.
Make the Cake Layers
- Prep for Baking: Prepare three 8-inch cake pans with parchment paper circles in the bottom and grease the sides. Preheat the oven to 350°F.
- Combine White Chocolate & Buttermilk: Add the white chocolate and 1/4 cup of the buttermilk to a medium-sized bowl that’s safe to microwave. Heat the mixture in 20-second increments, stirring well between each one, until it’s melted and smooth. Set the bowl aside.
- Combine Dry Ingredients: Combine the flour, baking powder, baking soda and salt in a medium-sized bowl and set the mixture aside.
- Cream Butter, Oil & Sugar: Add the butter, oil and sugar to a large mixing bowl and beat them together until the mixture is light in color and fluffy, about 2-3 minutes. Do not skimp on the creaming time.
- Add Eggs: Add the eggs one at a time, mixing until mostly combined after each addition. Scrape down the sides of the bowl as needed to be sure all of the ingredients are well incorporated.
- Start Adding Dry Ingredients: Add half of the dry ingredients to the batter and mix until mostly combined.
- Add Buttermilk & Vanilla Extract: Slowly add the remaining cup of buttermilk and vanilla extract, mixing until well combined.
- Finish Adding Dry Ingredients: Add the remaining dry ingredients and mix until well combined and smooth. Scrape down the sides of the bowl as needed, taking care not to over-mix the batter.
- Add White Chocolate Mixture: Slowly add the melted white chocolate mixture and gently fold it into the cake batter.
- Bake: Divide the batter evenly between the cake pans and bake the cake layers for 25-30 minutes, or until a toothpick inserted into the center of the cake comes out with a few loose crumbs.
- Let Cool: Remove the cakes from the oven and allow them to cool in the pans for 2-3 minutes, then transfer them to cooling racks and let them cool completely.
Make the Buttercream
- Melt White Chocolate: Once the cakes have fully cooled, make the buttercream. Add the white chocolate to a bowl and heat it in 10-20 second increments, stirring well between each one, until it’s melted and smooth. Set the mixture aside.
- Beat Butter: Add the butter to a large mixer bowl and beat it until it’s smooth and creamy.
- Start Adding Powdered Sugar: Slowly add half of the powdered sugar and mix until well combined and smooth.
- Add White Chocolate: Slowly add the white chocolate in 5-6 batches, mixing between each portion until well combined. This keeps the white chocolate from clumping up.
- Add Heavy Cream & Salt: Add the salt and 4-5 tablespoons of heavy cream, mixing until well combined and smooth.
- Finish Adding Powdered Sugar: Slowly add the remaining powdered sugar and mix until well combined and smooth. Add additional cream or milk as needed to get the right consistency.
Make the Ganache Filling
- Prep White Chocolate: Add the white chocolate chips to a medium-sized bowl.
- Microwave Cream: Add the heavy whipping cream to a microwave-safe measuring cup and nuke it until it just begins to boil.
- Pour Over Chocolate & Combine: Pour the hot cream over the white chocolate chips and let it sit for 2-3 minutes, then whisk until smooth. If the chocolate doesn’t melt too well, pop the mixture back into the microwave for about 10 seconds, then whisk until smooth.
Build the Cake
- Level Cake Layers: Use a large serrated knife to remove the domes from the tops of the cakes so that they’re flat. See my tutorial for leveling a cake for additional help.
- Layer Cake, Frosting & Ganache: Place the first layer of cake onto a cardboard cake circle or a serving platter. Spread about half a cup of buttercream into an even layer on top of the cake, then use the frosting to create a dam around the outer edge. Spread about half of the white chocolate ganache into an even layer inside of the dam, then level out the dam and ganache so that it’s all an even layer.
- Continue Layering: Add another layer of cake on top of the ganache, then repeat the process of adding frosting and ganache. Add the final layer of cake on top.
- Frost Exterior: Use an offset spatula to frost the top and outside of the cake. Refer to my tutorial for frosting a smooth cake if needed.
Decorate
- Prep White Chocolate: Add the white chocolate chips to a medium-sized bowl.
- Heat Cream: Add the heavy whipping cream to a microwave-safe measuring cup and microwave until it just begins to boil.
- Combine: Pour the hot cream over the white chocolate chips and let it sit for 2-3 minutes, then whisk until smooth. Pop it back into the microwave for about 10 seconds and whisk it again if necessary.
- Add to Cake: Drizzle the white chocolate ganache around the edges of the cake, then fill in the center/top of the cake. See my tips for making a chocolate drip cake.
- Add Finishing Touches: Use the remaining buttercream to pipe swirls around the outer edge of the cake. Top each swirl with a white chocolate truffle if you’d like.
- Enjoy! Keep the cake in the fridge until you’re ready to cut and serve it.

Can I Make It in Advance?
Absolutely! It’s very helpful to make the cake layers a day ahead of time. That way, you’ll just have to whip up the frosting and the ganaches, then put it all together. Simply wrap each cooled cake layer tightly in plastic wrap and store them in a cool, dry place until you’re ready to assemble the cake (up to 2 days). You also store them in a cake carrier.
Tips for Success
Check out the handy tips below to set yourself up for white chocolate cake perfection.
- Don’t Over-Mix the Batter: Over-mixing your batter will make the cake layers come out more dense. Be sure to fold in the melted white chocolate mixture slowly and gently to prevent this.
- Add the White Chocolate to the Frosting in Batches: It’s best to add the melted white chocolate to the buttercream in small increments so it doesn’t clump up. I like to pour in 1/5-1/6 of it at a time.
- Consistency is Key: Not sure how to determine the proper buttercream consistency for frosting a smooth cake? My guide to getting the right frosting consistency will tell you everything you need to know.
- Stacking Support: If you’re new to making cakes with multiple layers, I recommend getting familiar with filling and stacking a layer cake. You’ll be a pro in no time!

How to Store Extras
Keep extra white chocolate cake in an airtight container in the fridge for up to 4 days. I prefer storing mine in a cake carrier to preserve the decorations.
Does This Freeze Well?
I don’t typically recommend freezing freezing fully frosted cakes, but you could certainly freeze the cake layer prior to building the cake. Place each cooled and plastic-wrapped layer of cake into a heavy-duty storage bag. Remove as much air from the bags as you can and seal them. Freeze the cake layers for up to 3 months, thawing them out overnight before you build the cake.
Print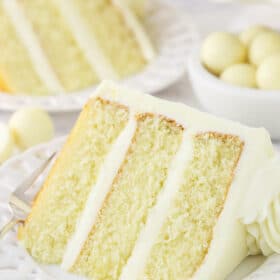
White Chocolate Layer Cake
- Prep Time: 2 hours
- Cook Time: 25 minutes
- Total Time: 2 hours 25 minutes
- Yield: 12 1x
- Category: Dessert
- Method: Oven
- Cuisine: American
Description
Moist and fluffy white chocolate cake is layered with silky white chocolate ganache and creamy white chocolate frosting in this pearly masterpiece! Whether you need a small wedding cake or just adore white chocolate, this stunning White Chocolate Layer Cake is a heaven-send.
Ingredients
For the White Chocolate Cake Layers
- 8 oz white chocolate, chopped (see note)
- 1 1/4 cups (300ml) buttermilk, divided
- 2 1/2 cups (325g) all-purpose flour
- 1 3/4 tsp baking powder
- 1/2 tsp baking soda
- 1/2 tsp salt
- 1/2 cup (112g) unsalted butter, room temperature
- 1/2 cup (120ml) vegetable oil
- 1 1/4 cups (259g) sugar
- 4 large eggs
- 1 tsp vanilla extract
For the White Chocolate Buttercream Frosting
- 18 oz white chocolate, chopped (see note)
- 1 3/4 cups (392g) unsalted butter, room temperature
- 7 cups (805g) powdered sugar
- 6–8 tbsp (90-120ml) heavy cream
- 1/4 tsp salt
For the White Chocolate Ganache Filling
- 9 oz (1 1/2 cups) white chocolate chips (see note)
- 6 tbsp (90ml) heavy cream
For the White Chocolate Ganache Drip
- 6 oz (1 cup) white chocolate chips (see note)
- 3 tbsp (45ml) heavy cream
Instructions
Make the Cake Layers
- Prepare three 8-inch cake pans with parchment paper circles in the bottom and grease the sides. Preheat oven to 350°F (176°C).
- Add the white chocolate and ¼ cup of buttermilk to a medium sized bowl. Heat in 20 second increments, stirring well between each, until melted and smooth. Set aside.
- Combine the flour, baking powder, baking soda and salt in a medium sized bowl and set aside.
- Add the butter, oil and sugar to a large mixing bowl and beat together until light in color and fluffy, about 2-3 minutes. Do not skimp on the creaming time.
- Add the eggs one at a time, mixing until mostly combined after each. Scrape down the sides of the bowl as needed to be sure all ingredients are well incorporated.
- Add half of the dry ingredients to the batter and mix until mostly combined.
- Slowly add the remaining cup of buttermilk and vanilla extract mix until well combined.
- Add the remaining dry ingredients and mix until well combined and smooth. Scrape down the sides of the bowl as needed to be sure all ingredients are well incorporated. Do not over mix the batter.
- Slowly add the melted white chocolate mixture and gently fold it into the cake batter.
- Divide the batter evenly between the cake pans and bake for 25-30 minutes, or until a toothpick comes out with a few crumbs.
- Remove the cakes from the oven and allow to cool for about 2-3 minutes, then remove to cooling racks to cool completely.
Make the Buttercream
- When the cakes have cooled, make the buttercream. Add the white chocolate to a bowl and heat in 10-20 second increments, stirring well between each, until melted and smooth. Set aside.
- Add the butter to a large mixer bowl and beat until smooth and creamy.
- Slowly add half of the powdered sugar and mix until well combined and smooth.
- Slowly add the white chocolate in 5-6 batches, mixing between each addition of it until well combined. It’s good to add smaller amounts at a time so that the white chocolate doesn’t clump.
- Add 4-5 tablespoons of heavy cream and the salt and mix until well combined and smooth.
- Slowly add the remaining powdered sugar and mix until well combined and smooth. Add additional water or milk, as needed to get the right consistency of frosting.
Make the Ganache Filling
- To make the ganache, add the white chocolate chips to a medium sized bowl.
- Add the heavy whipping cream to a microwave-safe measuring cup and microwave until it just begins to boil.
- Pour the hot cream mixture over the white chocolate chips and let it sit for 2-3 minutes, then whisk until smooth. If it doesn’t melt really well, pop it back in the microwave for about 10 seconds, then whisk until smooth.
Build the Cake
- To put the cake together, use a large serrated knife to remove the domes from the top of the cakes so that they’re flat. See my tutorial for leveling and torting a cake for additional help.
- Place the first layer of cake on a cardboard cake circle or a serving platter.
- Spread about 1/2 a cup of buttercream into an even layer on top of the cake layer, then use the frosting to create a dam around the outer edge of the cake. See my tutorial on how to build a cake for more guidance. Spread about half of the white chocolate ganache into an even layer inside of the dam, then level out the dam and ganache so that it’s all an even layer.
- Add another layer of cake on top of the ganache, then repeat the process of adding frosting and ganache.
- Add the final layer of cake on top, then frost the outside of the cake with the remaining vanilla buttercream. Refer to my tutorial for frosting a smooth cake, if needed.
Decorate
- To make the ganache, add the white chocolate chips to a medium-sized bowl.
- Add the heavy whipping cream to a microwave-safe measuring cup and microwave until it just begins to boil.
- Pour the hot cream mixture over the white chocolate chips and let it sit for 2-3 minutes, then whisk until smooth. If it doesn’t melt really well, pop it back in the microwave for about 10 seconds, then whisk until smooth.
- Drizzle the white chocolate ganache around the edges of the cake, then fill in the center/top of the cake. See my tips on making a chocolate drip cake.
- To finish off the cake, use the remaining buttercream to pipe swirls around the outer edge of the cake. Top each swirl with a white chocolate truffle if you’d like.
- Keep the cake in the fridge until you’re ready to cut and serve it.
Notes
- White chocolate baking bars, such as Bakers or Ghirardelli, melt smoother and thinner and are much better for using in the cake and buttercream. You’re more likely to get clumping from white chocolate chips. For the ganache in the filling and drip, either white chocolate chips or baking bars will work.
- To Store: Keep the cake in an airtight container in the fridge and enjoy it within 3-4 days.
- To Freeze the Cake Layers: Place each cooled and plastic-wrapped layer of cake into a heavy-duty storage bag. Remove the air from the bags and seal them. Freeze the cake layers for up to 3 months, thawing them out overnight before you build the cake.
Nutrition
- Serving Size:
- Calories: 1427
- Sugar: 148.1 g
- Sodium: 346 mg
- Fat: 80.7 g
- Carbohydrates: 170.2 g
- Protein: 11.9 g
- Cholesterol: 187.2 mg
More Luscious Layer Cakes to Try
Want to impress your friends with more show-stopping cakes? I know just the recipes.


Would this work with GF flour, do you think?
It should be fine with a 1:1 gluten free flour.
Will this recipe work in a 9×13 quarter sheet cake?
I haven’t tried it, so I’m not totally sure. You could certainly try it. Sometimes I try baking a layer cake that I change to a 9×13 at 325 degrees (it helps it not be as dense at that size).
Thank you! I will try it and let you know. Cant wait to try the cake!!
I made a white chocolate peppermint cake for a work party which are now well wrapped and in my freezer. The layers aren’t as high as I thought they’d be so I want to try again using this recipe. As for the buttermilk….I can never find full fat buttermilk in any of the supermarkets near me, only reduced fat. Will that be sufficient or am I better off making myself using whole milk? While I haven’t made the cake yet, of course it gets a 5 star rating! I’ve used enough of your recipes to know it is going to be fantastic!
Hmm, I don’t always think homemade options work quite as well. I might just use the reduced fat. I hope you enjoy it! I’m so glad you’ve enjoyed the things you’ve tried!
Hi I have made two of this recipe and both times they did not rise very disappointed what could I be doing wrong.
What kind and brand of white chocolate are you using? That could possibly have an effect. Also be sure you aren’t over creaming the butter and sugar or over mixing after adding the dry ingredients.
Hi Lindsay. Can this recipe be converted into bigger batches? 1 1/2 or even doubled?
I would expect that to be fine, as long as things are able to be halved correctly. And doubling it should certainly be OK.
Hi. Would it be ok to add some almond flavoring to the cake batter?
You could, it just may overpower the white chocolate flavor.
hi I made this cake for a birthday party and it turned out a big hit. I made the cake 2 days before hand and kept it in a cake container and then decorated it the day of the party.
I decorated it with white choc malteses and strawberries. Definetly recommend this recipe
Awesome! I’m so glad you enjoyed it!
Is this white chocolate sponge OK for carving into a shape?
I really don’t do much carving, so I’m not exactly sure what you’d be looking for. I would think it’d be ok.
Hi I am going to attempt to make the lemon marscapone cake with the white chocolate drip ganache – do you have any tips for doing this right? Many thanks
I have a tutorial on adding a chocolate drip to your cake and the tips would be the same for the white chocolate drip. I hope it helps!
The cake is awesome, but I had trouble with the frosting. I did not get a smooth texture, it was grainy, I could not get it smooth on the cake so I ended up taking the frosting off. I think it was from the chocolate. I don’t have this with the regular BC Frosting. I think there was too much white chocolate for the frosting, and too strong of taste. I used block white chocolate.
I tested this recipe A lOT, including the white chocolate used. It may very well be the brand of white chocolate you used or that you scorched it when you melted it (which leads to graininess). When done correctly, the buttercream turns out perfectly. I’ve used it on other recipes as well.
Thank you for your reply. I used Ghirardelli’s block choc that your recommended. I will try this recipe again. Maybe my butter was too soft?
If I reduce the amount of white choc, like half the amount will that effect the other ingredients.
Hmmm, perhaps the white chocolate got scorched? Was it smooth and creamy before you added it to the white chocolate? If not, then it may have been scorched and could be the reason for the grainy buttercream. It was was creamy, then the issue may be that you have chunks of white chocolate that hardened in the buttercream as you mixed it. If so, then you can try letting it cool a touch more before you add it to the buttercream and be sure to add it in smaller bits at a time so that it incorporates evenly without too much of it cooling and forming those little chunks. The only other reason I can think of for grainy buttercream would be that your powdered sugar needs to be sifted.
Hello. Can I use less white chocolate in the recipe?