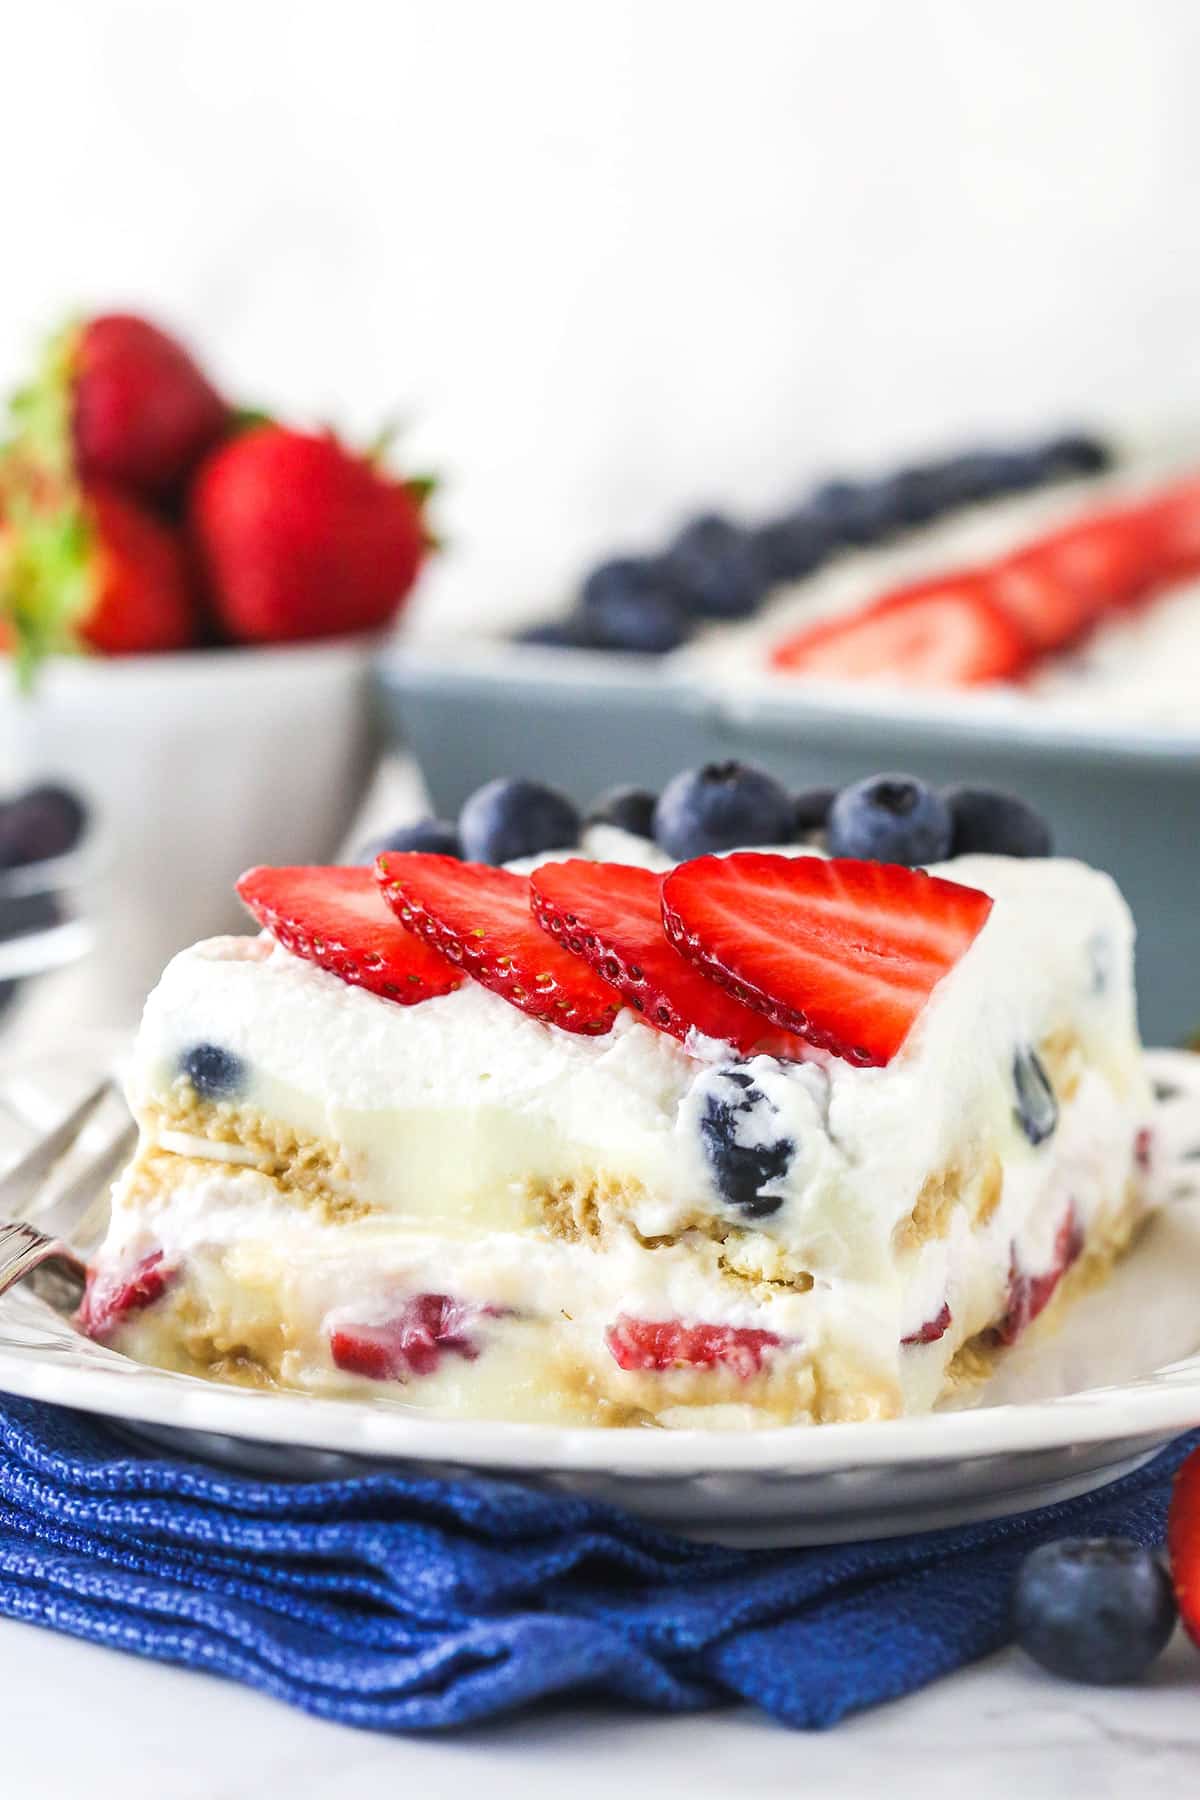
This easy Mixed Berry Icebox Cake transforms six simple ingredients into a super refreshing no-bake dessert! Golden Oreo cookies are layered with juicy berries, cheesecake pudding and whipped cream! It’s delicious and perfect for summer!
The Best No Bake Berry Icebox Cake
I’m always looking for cool, easy treats to enjoy during the summertime – especially ones that don’t require any cooking or baking. This fruity icebox cake is one of my favorites! Fresh berries combine with sweet golden Oreo cookies and creamy cheesecake pudding in a simple, refreshing dessert that will have everyone coming back for seconds.
When I first created this masterpiece for Memorial Day some time ago, my relatives were skeptical. They weren’t familiar with icebox cakes and the combination seemed odd. However, the skeptics ended up becoming the cake’s biggest fans. They asked me for the recipe and have been making it themselves ever since! You truly have to try it!

What Is Icebox Cake?
Before electric refrigerators were a thing, people would chill their food in non-mechanical vessels known as iceboxes. When these containers were invented and mass-produced, Southern bakers began creating all sorts of treats that weren’t previously possible in warmer climates. Thus, the icebox cake was born.
Icebox cakes consist of three signature layers – wafer cookies, fresh fruit and a creamy filling. Even though iceboxes are a thing of the past, this classic dessert has maintained its popularity. And it’s easy to see why!
Ingredients and Substitutions
Before we dive into the step-by-step instructions, let’s go over our ingredients one by one. Scroll down to the recipe card for the full amounts.
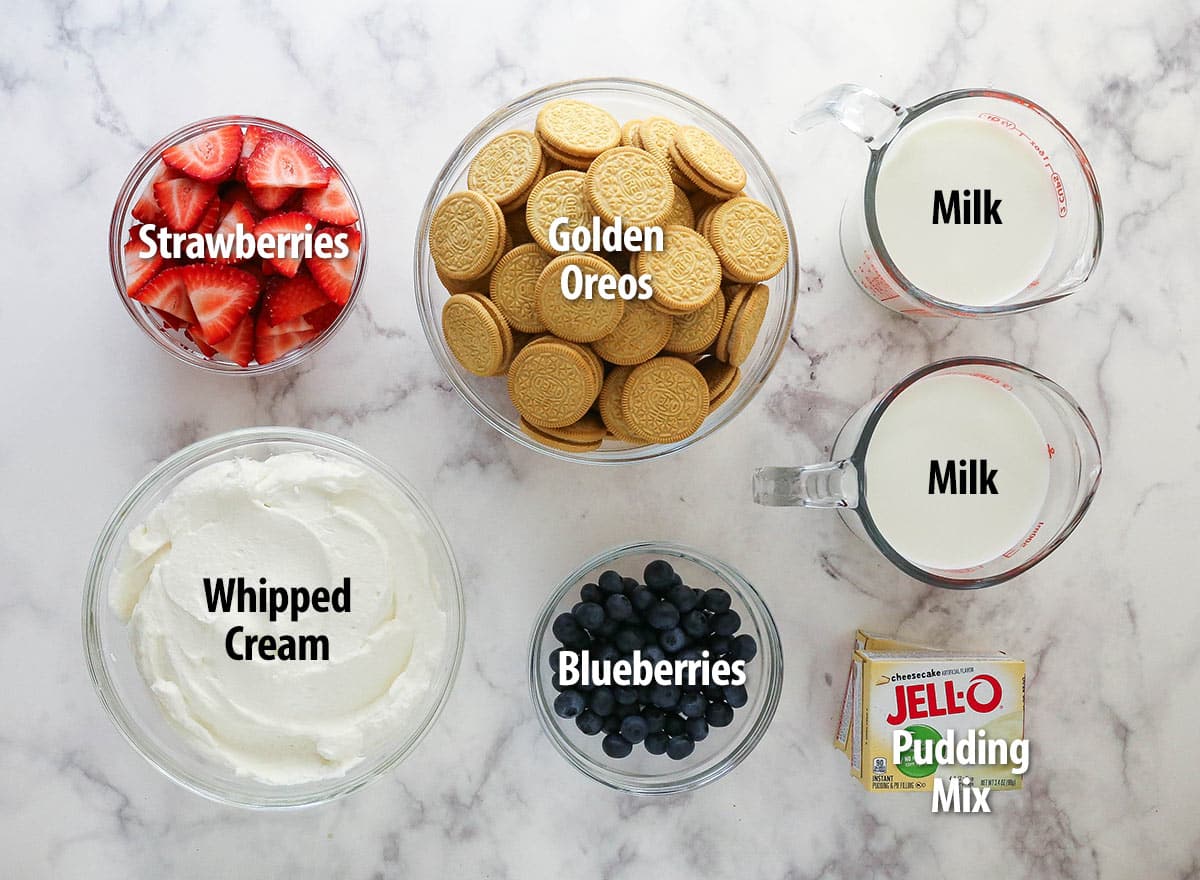
- Cheesecake-Flavored Pudding: I personally love the flavor this adds, but if you are having trouble finding it, feel free to use vanilla pudding, white chocolate pudding or another flavor like lemon.
- Milk: I’d recommend 2% or whole milk. Most of this will be used to make the pudding, but you’ll need an extra half cup to dip the Oreos into to help them soften up.
- Golden Oreos: You could use regular Oreos, if you’d like a chocolate flair. I personally like the Golden Oreos because they don’t over power the berries.
- Strawberries: Rinsed, dried and sliced.
- Blueberries: Rinsed and dried.
- Whipped Cream: I used Homemade Whipped Cream, but you can also use Cool Whip.
How to Make Mixed Berry Icebox Cake
When I’m preparing this cake on a hot summer day, I’ll use the microwave to make my pudding so I don’t have to fuss with the stove. After that, the only appliance involved is the freezer.
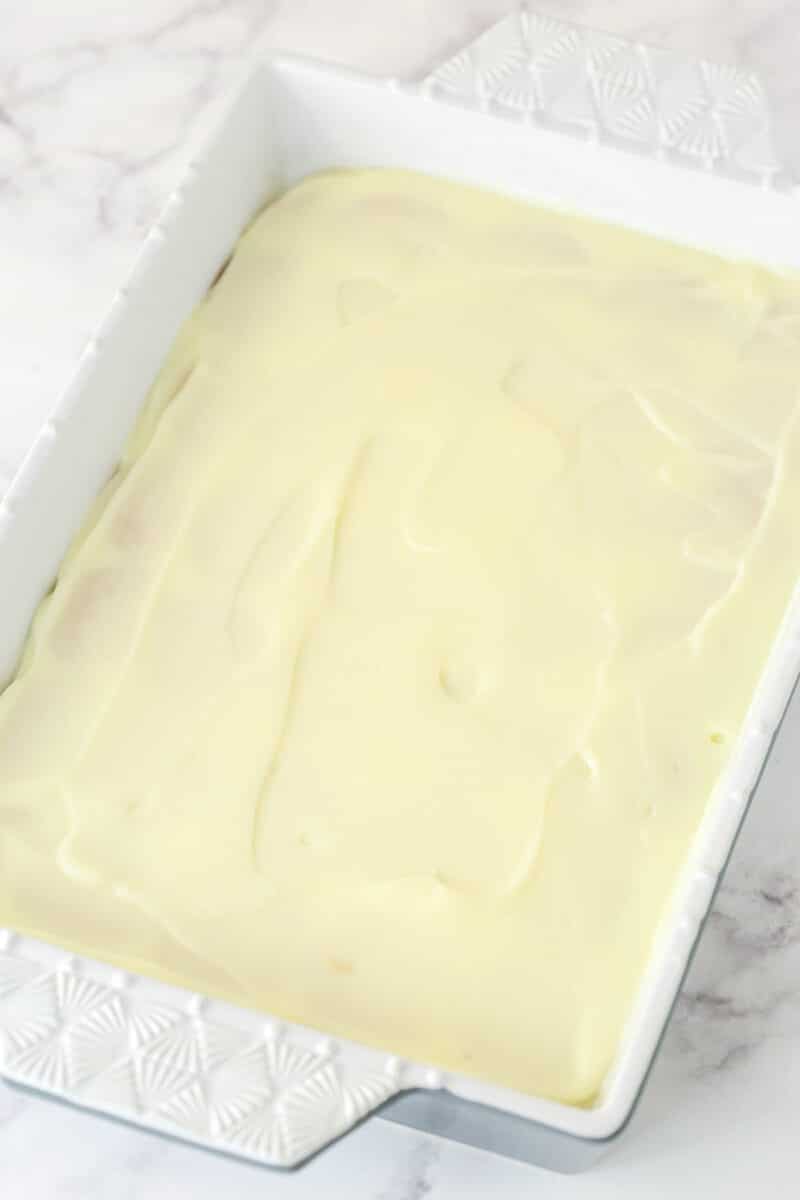
- Make Pudding: Make both cheesecake-flavored puddings according to the package directions, using 4 cups of the milk (2 cups per package). Set the prepared pudding aside.
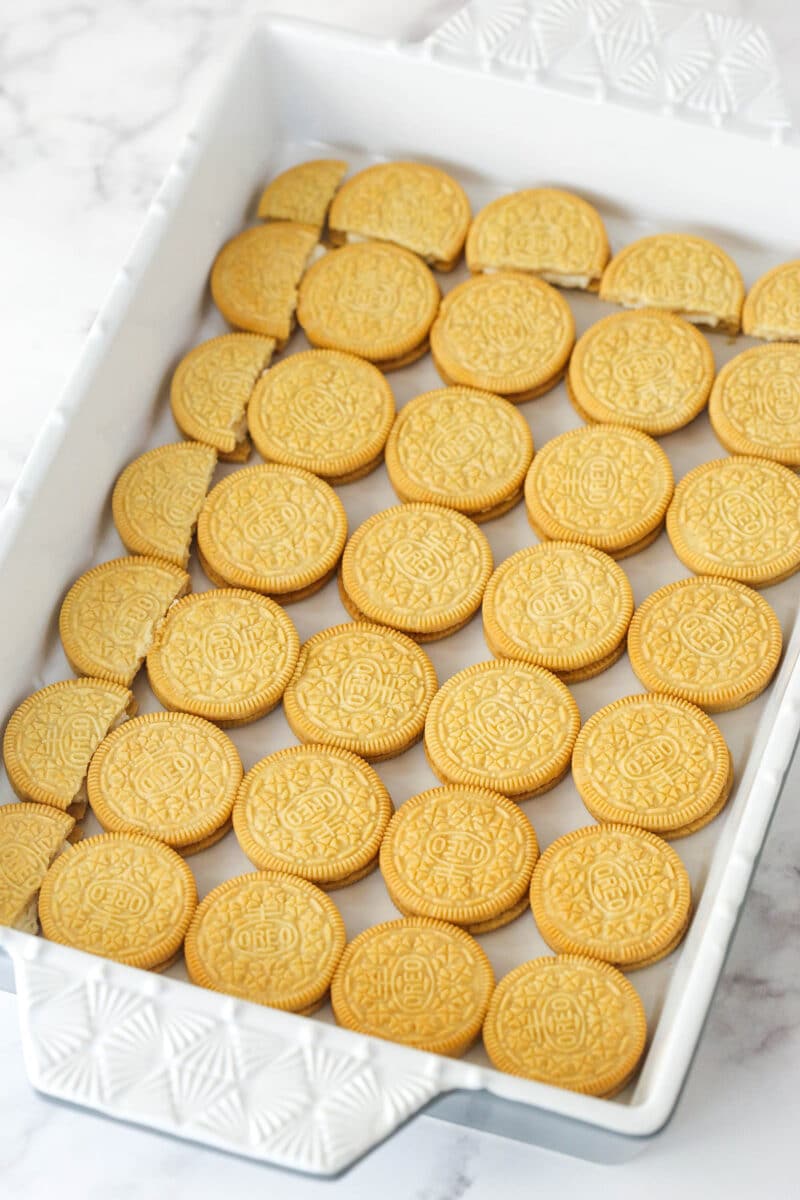
- Prepare First Oreo Layer: Pour the remaining half cup of milk into a small bowl. Give the Golden Oreos a quick dip into the milk, then place them into the bottom of a 9×13-inch pan, forming a single layer.
- Add Filling: Spread half of the cheesecake pudding on top of the Oreos.
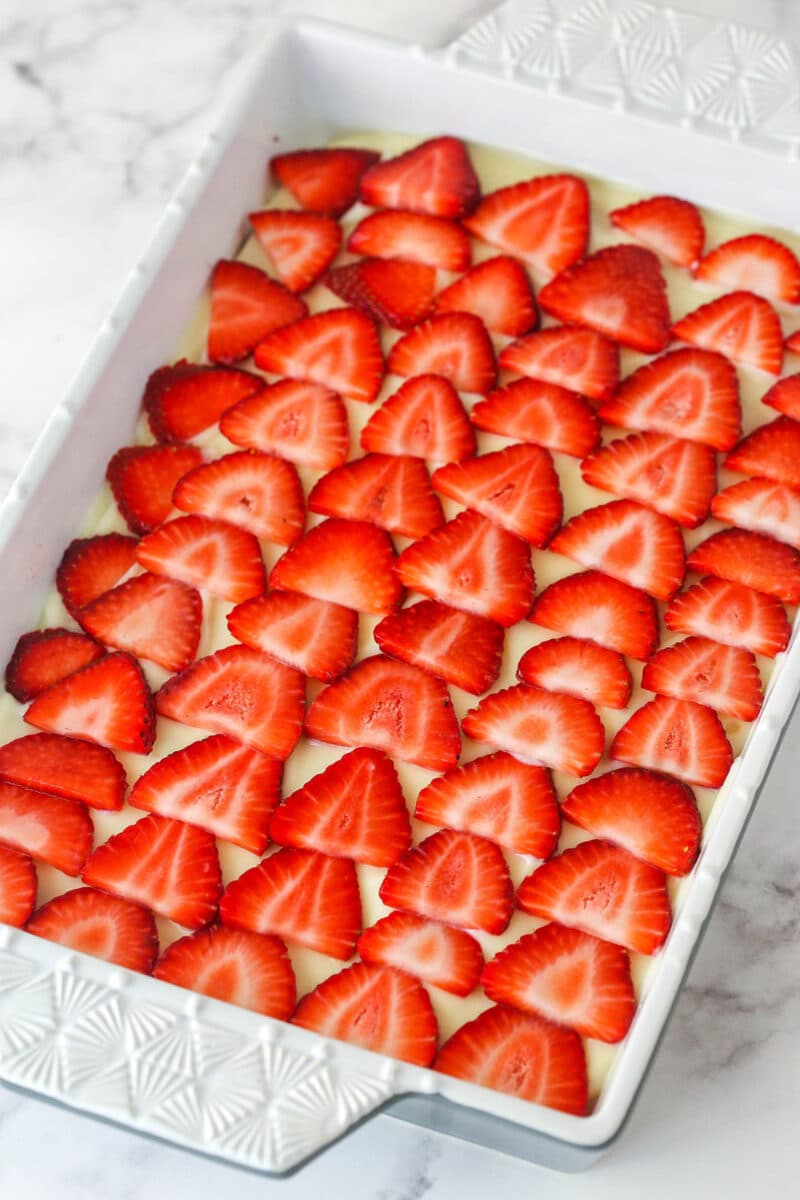
- Add Strawberries: Add a single layer of strawberry slices on top of the cheesecake pudding.
- Top With Cool Whip: Spread half of the whipped cream/Cool Whip on top of the strawberries.
- Prepare Second Oreo Layer: Dip the remaining Oreos into the milk quickly, then place them on top of the Cool Whip in a single layer.
- Add Filling: Top the Oreo layer with the remaining cheesecake pudding.
- Add Blueberries: Add a layer of blueberries.
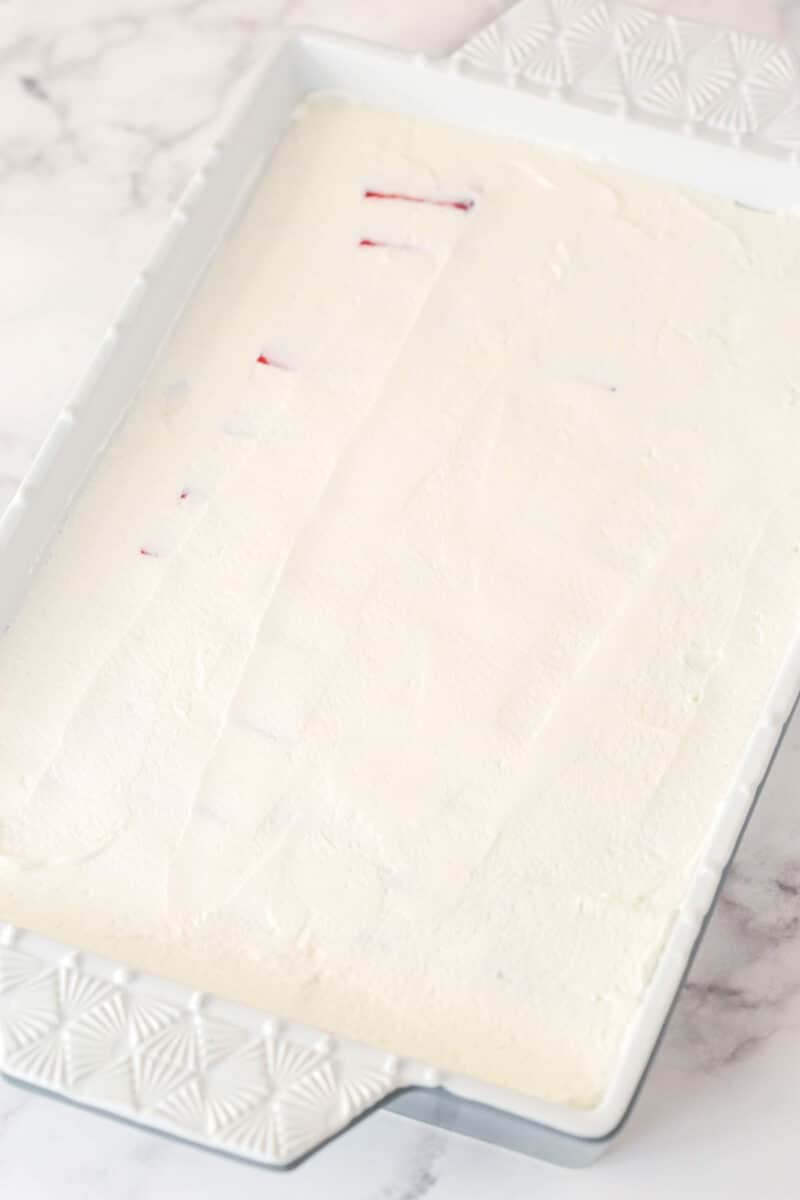
- Top With Cool Whip: Top the blueberry layer with the remaining whipped cream/Cool Whip.
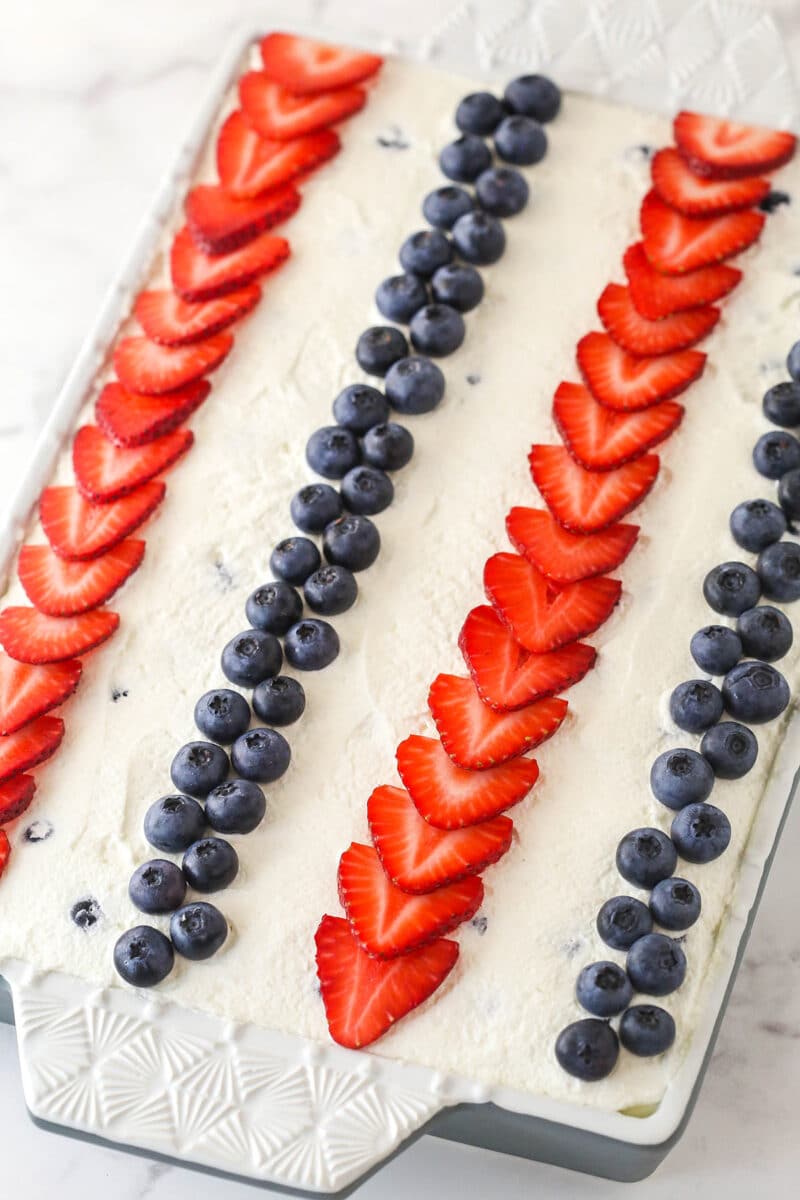
- Add Berries: Arrange the remaining blueberries and strawberry slices on top of the cake in any pattern of your choice.
- Chill: Refrigerate the cake overnight or for at least 3-4 hours. Once it has fully chilled, cut it into slices and enjoy!

Tips for Success
Take a second to review these tips before you start making your icebox cake.
- Use Fresh Fruit: Frozen fruit tends to be a little soft, mushy or soggy once thawed. Definitely stick with fresh fruit for this dessert.
- Dip the Oreos Quickly: Only dip the Oreos into the milk for a moment. If they soak up too much liquid, they’ll become soggy rather than soft.
- Chill for 2 Hours Minimum: The filling of this icebox cake doesn’t really need to firm up, but the Oreos do need a little time to soften and become easier to slice and eat. I’d recommend at least 2 hours. Three hours would be even better.

Storage Instructions
Keep this cake in an airtight container in the fridge for up to 2-3 days. The fruit in the icebox cake will begin to release their juices over time, so the sooner you serve and eat it, the better.
More Great Icebox Cakes
- Strawberry Shortcake Icebox Cake
- Raspberry Almond Icebox Cake
- Banana Pudding Icebox Cake
- Reese’s Peanut Butter Icebox Cake
- Cannoli Icebox Cake
- Mint Oreo Icebox Cake
Watch The Video

Mixed Berry Icebox Cake
- Prep Time: 20 minutes
- Chill time: 2 hours
- Cook Time: 0 minutes
- Total Time: 2 hours 20 minutes
- Yield: 18 1x
- Category: Dessert
- Method: No Bake
- Cuisine: American
Description
This easy Mixed Berry Icebox Cake transforms six simple ingredients into a super refreshing no-bake dessert! Golden Oreo cookies are layered with juicy berries, cheesecake pudding and whipped cream! It’s delicious and perfect for summer!
Ingredients
- 2 (3.4 oz) packages cheesecake flavored pudding
- 4 1/2 cups (1080 ml) milk, divided
- 2 (15.25 oz) boxes Golden Oreos
- 1 lb package strawberries, washed and sliced
- 1 pint blueberries, plus more for decorating
- 12 oz Cool Whip, or 1 1/2 recipes of Homemade Whipped Cream
Instructions
- Make both cheesecake flavored puddings according to directions on package, using 4 cups of the milk (2 cups of milk per package of pudding). Set aside.
- Put remaining 1/2 cup milk into a small bowl. Dip Oreos in milk quickly and then place into the bottom of a 9×13 pan, making a single layer.
- Spread half of the cheesecake pudding on top of the Oreos.
- Add a single layer of strawberry slices on top of the cheesecake pudding, reserving some for decorating on top later.
- Spread half of the whipped cream/Cool Whip on top of the strawberries.
- Dip remaining Oreos in milk quickly and place on top of the whipped cream/Cool Whip, in a single layer.
- Top Oreos with remaining cheesecake pudding.
- Add a layer of blueberries, reserving some for decorating on top later.
- Top with remaining whipped cream/Cool Whip.
- Decorate with the remaining strawberry slices and blueberries.
- Refrigerate for about 2-3 hours, then serve. The icebox cake doesn’t really need to firm up, but the Oreos need a little time to soften so they are easy to slice.
Notes
- Makes 16-20 slices.
- To Store: Keep in an airtight container in the fridge for up to 2-3 days. The fruit in the icebox cake will begin to release their juices over time, so the sooner you serve and eat it, the better.
Nutrition
- Serving Size: 1 Slice
- Calories: 151
- Sugar: 18.7 g
- Sodium: 209.8 mg
- Fat: 5.5 g
- Carbohydrates: 23.7 g
- Protein: 2.5 g
- Cholesterol: 1.1 mg
Categories:
Cakes and Cupcakes, Easter, Holidays, July 4th, No Bake Desserts, Recipes, Recipes with video, Sweets and Treats,


This recipe is super easy to make and an awesome summer dessert. It’s light and not too sweet. If you prefer a little more sweetness, you can always use double stuffed golden Oreos.
I’m so glad you enjoyed it!
This looks delicious and beautiful.
I do have a suggest if that is ok we didn’t do this but we thought that the Cooke’s would be better if they were crushed like a crust but we thought it was really good the way it was too!!! Thank you so much for your recipes!!!
My Granma and I are going to make this to day she couldn’t find the cheesecake pudding so she got vanilla pudding instead. I love all of your recipes they always turn out amazing ✨ thank you so much
Thank you! Glad you enjoy them! I hope you enjoyed this one too!
I do have a suggest if that is ok we didn’t do this but we thought that the Cooke’s would be better if they were crushed like a crust but we thought it was really good the way it was too!!! Thank you so much for your recipes!!!
This recipe was a hit for our Memorial Day cookout 2022. I am never able to make it look as pretty as the pictures but it was so delicious! I will make it again! Oh I had to make a couple substitutions.. our store was out of Golden Oreos so I used the Keebler Vienna Fingers.
And I was not able to find cheesecake flavored pudding. So I bought a box of no bake cheesecake mix. It all worked great!
I’m so glad you enjoyed it!
I made this last year for 4th of July. It was delicious and got rave reviews form friends and family. A friend asked for the recipe and also got rave reviews. Friend just called as she wants to make again and couldn’t find her recipe.
I’m glad it’s been such a hit!
Hi! This looks great for an upcoming 4th of July get together. Do you think I could make it dairy free? Maybe pudding mixed into almond milk and some sort of whio cream substitute?
Thanks!
I made this icebox cake for a Father’s Day get-together, and it received glowing reviews with lots of “mmmm”s. Thanks for a great recipe!
I think I just found this years 4th of July dessert. Yay. Can’t wait to make it. 🧨🇺🇸
Awesome! I hope you enjoy it! It’s always a big hit for us!
How far ahead do you think this could be made? I’m wondering if making it a Friday afternoon and eat it Saturday night? I don’t want the Oreos to get super mushy!
That would be totally fine. I often make it a day ahead.
I just made this for our 4th of July get together tomorrow. Do you also put the fruit on top the day before or wait until the last minute? I feel like if I do it now the juices from the berries will mix with the Cool Whip on top and make the colors swirl more. I’m planning to do the top berries tomorrow but I’m curious what you did.
I’m so sorry for the delay in being able to respond. I hope it turned out well! I would probably say you could wait until the day you serve it, just to be safe. But I do believe I’ve added the fruit the day before as well and it’s been fine.
Will the cookies be soggy? Especially because they are being dipped in milk?
They will soften, but they shouldn’t be soggy.