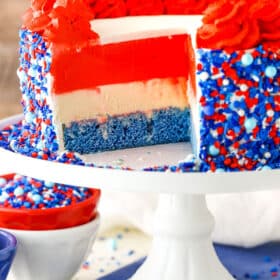
This Red White and Blue Cake is a festive, patriotic ice cream cake, perfect for the Fourth of July! With blue vanilla cake on the bottom and white and red ice cream layers on top, it’s a stunning, scrumptious dessert!

Celebrate Independence Day with an Ice Cream Cake!
The Fourth of July is the most summery of holidays. Usually, it entails sunny weather, being outside (often by the water, for us), good friends, and all the red, white and blue you can muster! Whether it’s what you’re wearing or what you’re eating, you’ve got to have a red, white and blue something.
This ice cream cake should definitely be that something. From the festive sprinkles to the layers of color inside, this cake screams the Fourth of July. It’s also pretty easy to put together and can be made ahead, leaving you more time to enjoy the day.
Why You’ll Love This Red, White and Blue Ice Cream Cake
- Gorgeous: If you want to create a professional-looking dessert that will wow your guests, this will do it!
- Easy to Make: If you can bake a simple cake, and spread ice cream on top, you can do this! My easy step-by-step tutorial takes all the guesswork out of creating an ice cream cake.
- Make Ahead: I get it, sometimes spending the day in the kitchen doesn’t exactly scream holiday, does it? But you still want to have a special homemade dessert! That’s where this cake comes in. You can make it ahead of time, and enjoy it the day of.

The Ingredients You’ll Need
Let’s talk about ingredients for a minute. When I make ice cream cakes, I like to make the cake from scratch. But don’t let that intimidate you – you only need a few basic ingredients to get started! And a couple of cartons of store-bought vanilla ice cream make this recipe even easier.
Blue Cake Layer
- Butter: I use salted butter. Make sure you have it at room temperature for the best cake texture.
- Sugar: Regular granulated sugar, or you could use raw sugar, brown sugar, etc.
- Sour Cream: Sour cream adds moisture and tenderness to the cake crumb.
- Vanilla: Pure vanilla extract. Vanilla bean paste can be used for a stronger vanilla taste.
- Egg Whites: Just the whites – save the yolks for another use, like making lemon curd!
- Flour: All-purpose flour is fine, nothing fancy.
- Baking Powder: Make sure to use baking powder, not baking soda. Baking soda will not give the cake the proper rise.
- Milk: I usually use whole milk in this recipe. However, you could substitute low-fat milk if you prefer.
- Water
- Food Coloring: To get that bright blue color, use blue gel icing color.
Ice Cream Layers
- Vanilla Ice Cream: You will need two containers of your favorite vanilla ice cream. One will make the white layer, and one will make the red layer. Let them sit out at room temperature for a while to soften up before using them.
- Food Coloring: Red gel icing color gives the red layer its festive look.
Whipped Cream
- Cream: Heavy whipping cream is what you need for this, cold out of the fridge. Substitutes like half and half will not work for whipping.
- Powdered Sugar: Powdered sugar is finer than regular sugar, which makes it easy to dissolve in whipped cream.
- Vanilla: Pure vanilla extract.
- Food Coloring: More red gel icing color is used to tint some of the whipped cream, for piping around the top of the ice cream cake.
- Sprinkles: Red, white and blue, of course!

What Is Gel Icing Color?
For some of us, “food coloring” conjures up images of those teeny-tiny bottles that squeeze out drops of liquid food coloring.
Gel icing color is a little bit different, because it is made with corn syrup, which gives it a gel texture instead of a watery texture. It also has a much stronger color to it, so you don’t need to use as much to create a bold, vibrant shade!

How to Make a Red, White and Blue Cake
For the easiest assembly, you’ll create each layer separately, and then freeze them before putting them together. The (printable!) recipe card at the bottom of the post will give you all of the steps in detail, but here are the basic steps.
- Bake the Cake Layer. This is a plain vanilla cake, and it’s simple to pull together. You will cream the butter and sugar, and then alternate adding wet and dry ingredients until everything is mixed. Bake for about 20 minutes, until a toothpick inserted comes out with a few moist crumbs. After that, cool the cake down, and carefully cut off the top to make a flat surface.
- Soften the Ice Cream. Let the ice cream soften for about 20 minutes, and then put it into a big bowl. Stir it really well with a rubber spatula until it’s a soft-serve consistency. It makes it much easier to spread! Divide the ice cream in half, and set half of it in the freezer while you work with the other half.
- Make the White Vanilla Layer. Line an 8-inch cake pan with clear plastic wrap, which you’ll use to lift the cake out of the pan later. Lower the blue layer of cake into the cake pan, and then top it with the white vanilla ice cream. Place the cake pan in the freezer to freeze completely.
- Make the Red Vanilla Layer. To make the red layer, grab the other half of the ice cream, and line another 8-inch cake pan with clear plastic wrap. Stir some red gel icing color into the ice cream to make it red, and then spread it evenly into the pan. Place this in the freezer to freeze completely, also.
- Put the Cake Together. Once the ice cream in both cake pans is frozen, use the plastic wrap to lift the blue and white layers out and place them on a serving platter or cardboard cake circle. Lift out the red ice cream, and place it on top of the white ice cream. Set the cake in the freezer while you make the whipped cream.
- Frost with Whipped Cream. Beat the whipped cream ingredients to make fluffy whipped cream, and separate a small amount for the red piped portion. Use the rest to frost the cake, and then put it back in the freezer for about 15 minutes, while you tint the rest with red food coloring. After about 10 – 15 minutes, take the cake back out, and pipe the red whipped cream around the top.
- Add Sprinkles. Gently press sprinkles all around the sides of the cake to finish it off. Freeze until you’re ready to serve, and enjoy!

Tips for Success
As you get started making this recipe, make sure to keep these helpful tips in mind. This cake is a beauty, but having all the info makes it even better.
- Ice Cream Amounts: I only used about one and three-quarters of the ice cream, to make the ice cream layers the same height as the blue cake layer. However, if you want to use all the ice cream, you definitely can! The layers just won’t be all the same height, which is fine.
- Red Whipped Cream: The red whipped cream does run a little bit, so if you are making this more than a day ahead, you might consider adding the red whipped cream the day you’re serving it.
- Sprinkles: I made my own sprinkle mix, but Sweetapolita has some great options. (Use code LIFELOVESUGAR15 for 15% off your order!)
- Add Chocolate: I can hear some of you out there thinking, “Looks good, but needs more chocolate.” No problem! Add a white chocolate drizzle over the top, or use cookies & cream ice cream for the white layer – or both! (Alternatively, check out this Copycat Dairy Queen Ice Cream Cake and my classic Ice Cream Cake recipe for allll the chocolatey goodness.)

How to Store This Red, White and Blue Cake
Given that this ice cream cake is frozen, you can easily prepare it a couple of days ahead if you like. I love a dessert that you can prep ahead! To store it successfully, place it in a large airtight cake stand or other container, to keep odors out and protect the frosting and sprinkles.

Red, White and Blue Cake
- Prep Time: 2 hours 5 minutes
- Cook Time: 20 minutes
- Total Time: 2 hours 25 minutes
- Yield: 12–14 slices 1x
- Category: Dessert
- Method: Oven
- Cuisine: American
Description
This Red, White and Blue Cake is perfect for the Fourth of July! With blue vanilla cake on the bottom and white and red ice cream layers on top, it’s a delicious and patriotic ice cream cake with a gorgeous presentation.
Ingredients
Blue Cake Layer
- 1/4 cup (56g) salted butter, room temperature
- 1/2 cup (104g) sugar
- 1/4 cup (58g) sour cream
- 1 tsp vanilla extract
- 2 large egg whites
- 3/4 cups (98g) all purpose flour
- 1 1/4 tsp baking powder
- 1/4 cup (60ml) milk
- 1 tbsp (15ml) water
- Blue gel icing color
Ice Cream
- Two 1.5 quart containers vanilla ice cream
- Red gel icing color
Whipped Cream
- 2 cups (480ml) heavy whipping cream, cold
- 1 cup (115g) powdered sugar
- 1 1/2 tsp vanilla extract
- Red gel icing color
- Sprinkles
Instructions
1. Preheat oven to 350°F (176°C). Prepare an 8 inch cake pan with a circle of parchment paper in the bottom and grease the sides.
2. To make the cake batter, beat the sugar and butter together until light in color and fluffy, 3-4 minutes. Don’t skimp on the creaming.
3. Add the sour cream and vanilla extract and mix until well incorporated.
4. Add the egg whites and mix until well combined.
5. Combine the flour and baking powder in a separate bowl, then add half of the dry ingredients to batter and mix until well combined.
6. Add the milk and water and mix until well combined.
7. Add the remaining dry ingredients and mix until well combined.
8. Spread the cake batter evenly into the bottom of the prepared pan.
9. Bake for 18-20 minutes, or until a toothpick inserted comes out with a few crumbs. Set the cake aside to cool.
10. When the cake has cooled, lined two 8 inch cake pans with clear wrap that covers the bottom and sides of the pans.
11. Remove the dome from the top of the blue cake layer, then place it in the bottom of one of the cake pans.
12. Soften the cartons of ice cream. I let mine sit out for about 15-20 minutes, then added all but about a quarter of the ice cream to a large bowl. Use a rubber spatula to stir it well until it all comes together to a consistency similar to soft serve ice cream. Add half of the ice cream to another bowl and set it in the freezer for a few minutes while you work with the other half.
13. Add the white vanilla ice cream to the top of the blue cake layer and spread into an even layer. Set the cake/ice cream in the freezer to freeze completely.
14. Remove the remaining half of the vanilla ice cream from the freezer and color it with red gel icing color.
15. Add the ice cream to the other prepared cake pan and spread into an even layer. Freeze until firm.
16. Once both ice cream layers are firm, remove the blue cake layer/white ice cream from its pan and place on a cardboard cake circle or serving platter. Keep in mind that it will need to fit in your freezer.
17. Remove the red layer from it’s pan and set on top of the white ice cream layer. Place cake back in the freezer.
18. To make the whipped cream, add the heavy whipping cream, powdered sugar and vanilla extract to a large mixer bowl. Whip on high speed until stiff peaks form.
19. Frost the outside of the cake with the whipped cream, leaving about 1/3 of a cup or so leftover.
20. Place the cake in the freezer for about 10-15 minutes so it stays firm. Color the remaining whipped cream with the red gel icing color.
21. Press your sprinkles onto the sides of the cake, then pipe swirls of the red whipped cream around the top edge. Freeze cake until ready to serve.
Notes
I only used about one and three quarters of the ice cream so that the ice cream layers would be the same height as the blue cake layer. If you want to use all the ice cream, you definitely can. The layers just won’t be all the same height, which is fine.
The red whipped cream does run a little bit, so if you are making this more than a day ahead, you might consider adding the red whipped cream the day you’re serving it.
I made my own sprinkle mix, but Sweetapolita has some great options. Use code LIFELOVESUGAR15 for 15% off your order.
Nutrition
- Serving Size: 1 slice
- Calories: 468
- Sugar: 34.4 g
- Sodium: 105 mg
- Fat: 31.2 g
- Carbohydrates: 41.8 g
- Protein: 5.8 g
- Cholesterol: 133.4 mg
More Fourth of July Desserts
This post contains affiliate links.


Hi I just stumbled across your blog recently and love it! I was wondering what brand and color name did you use for the blue? I love that shade. I want to make your exactly like yours. Thank you
I believe I used Wilton brand gel icing color.
Hi Lindsey, just wanted to say you’re literally my favorite person on Pinterest, I can spend hours on your blog, and because of that,I found out you had a book out,so naturally I ordered it. I LOVE it. I’ve made one of your cakes for my hubby’s bday( Reese’s cake) and I’m about to make the strawberry cheesecake cake for Father’s day! Your cakes are so good. Can’t wait to make more things especially from your book ! Anyways I was wondering if is there chocolate cake I could make that’s dense enough to make like giant Oreo cookie looking, ( cake) ? I’d probably use your cream cheese frosting for the middle. Thanks in advance!
Thanks Kaya! I’m so glad you’ve enjoyed everything, including the book! For a more dense chocolate cake, I’d try out the cake part of this recipe.
Oh my! This looks so bright and beautiful! Will my teeth turn red after a bite, or is your camera picking up all that red? 😉
Thanks Maria! Our teeth didn’t turn red, but you never know! 😉
This looks amazing!! Can’t wait to make it!
Thanks Tina!