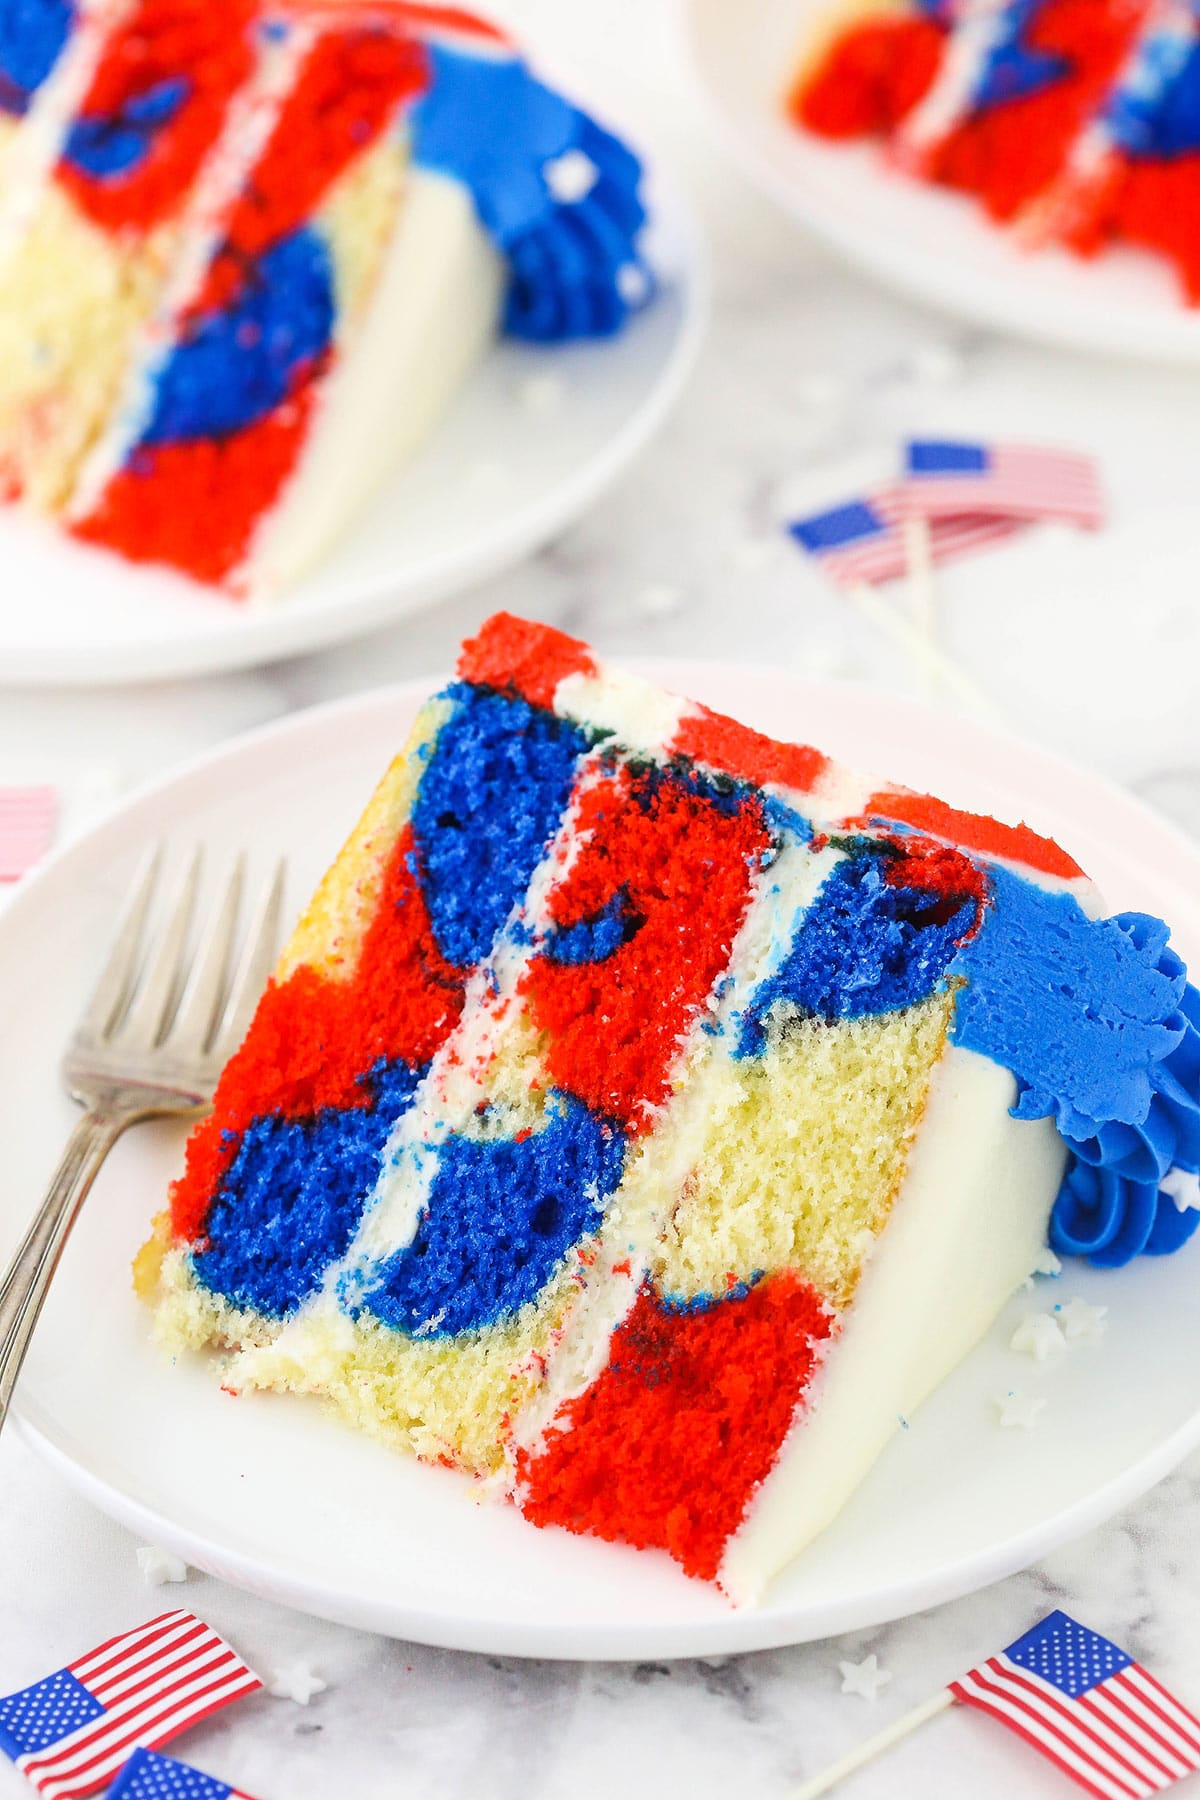
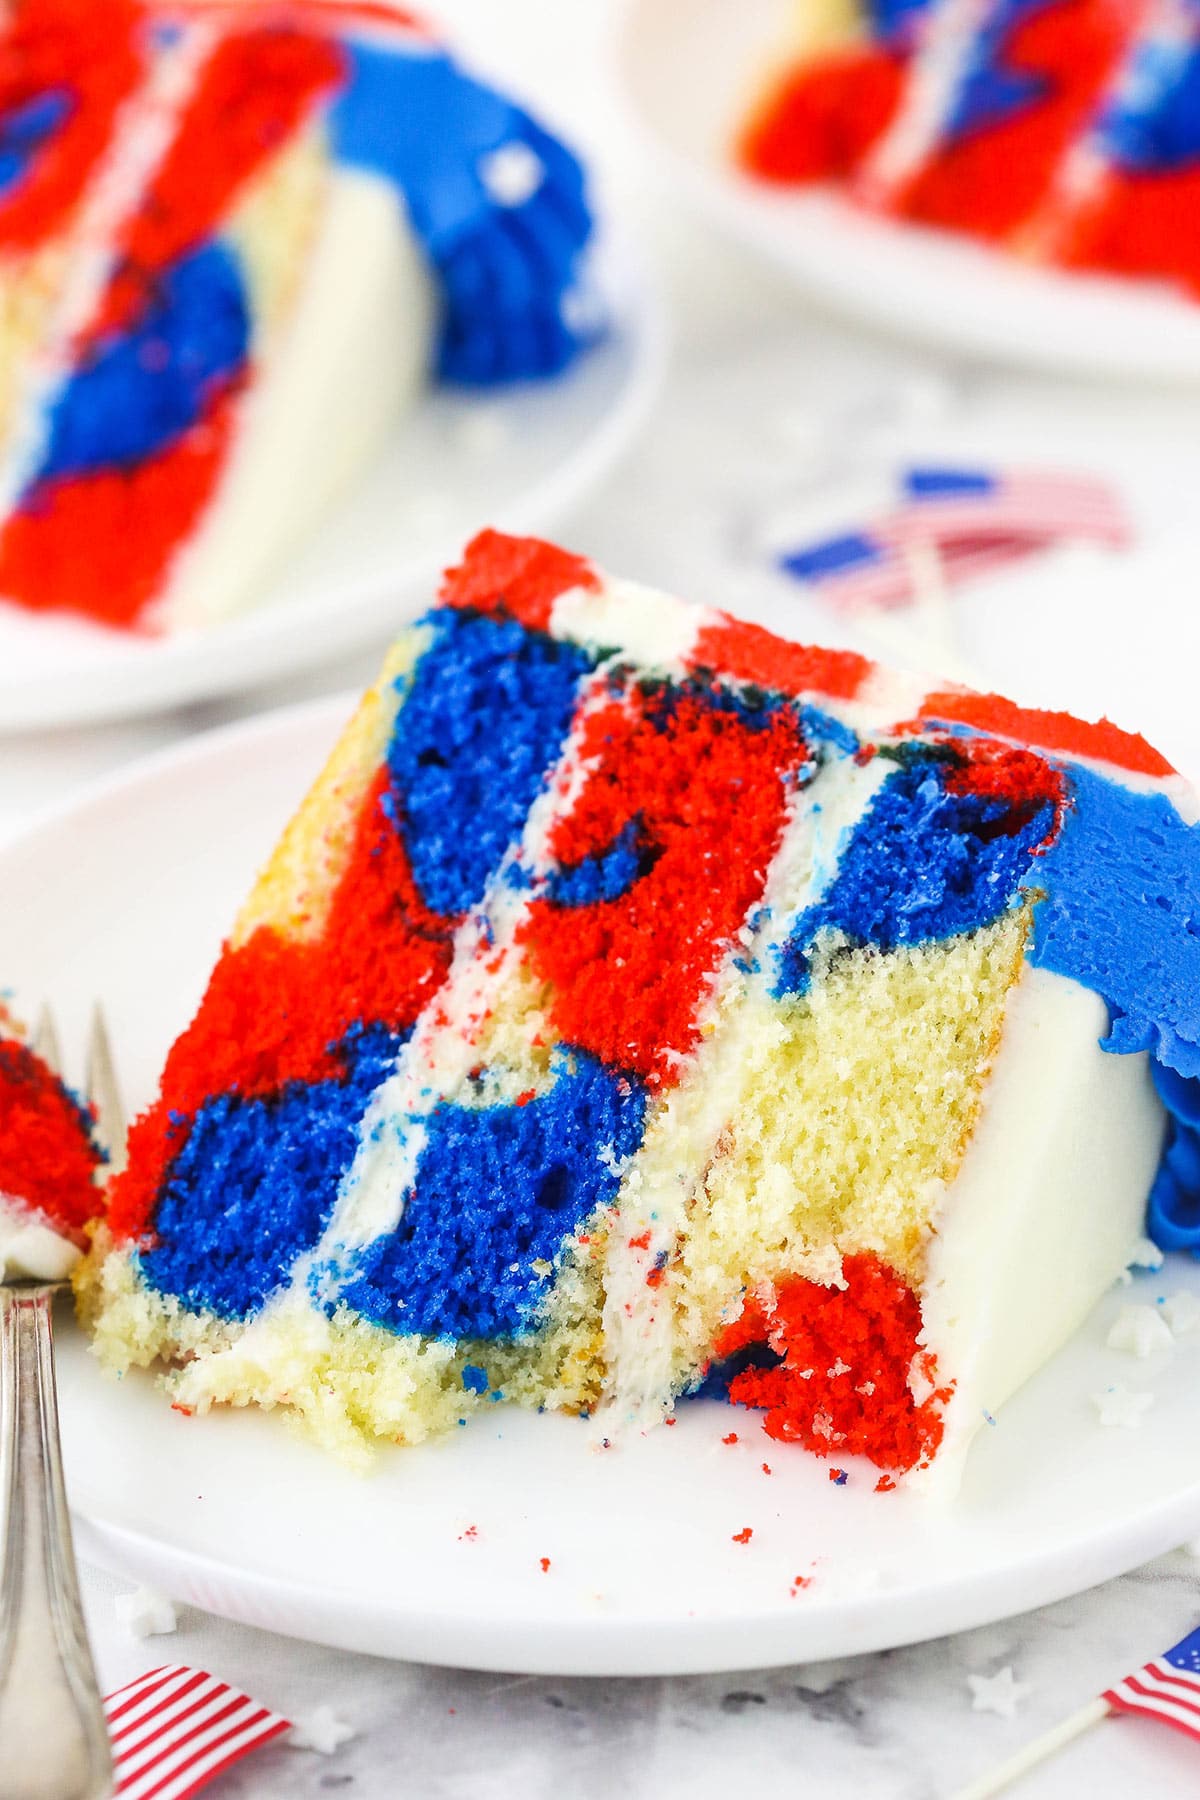
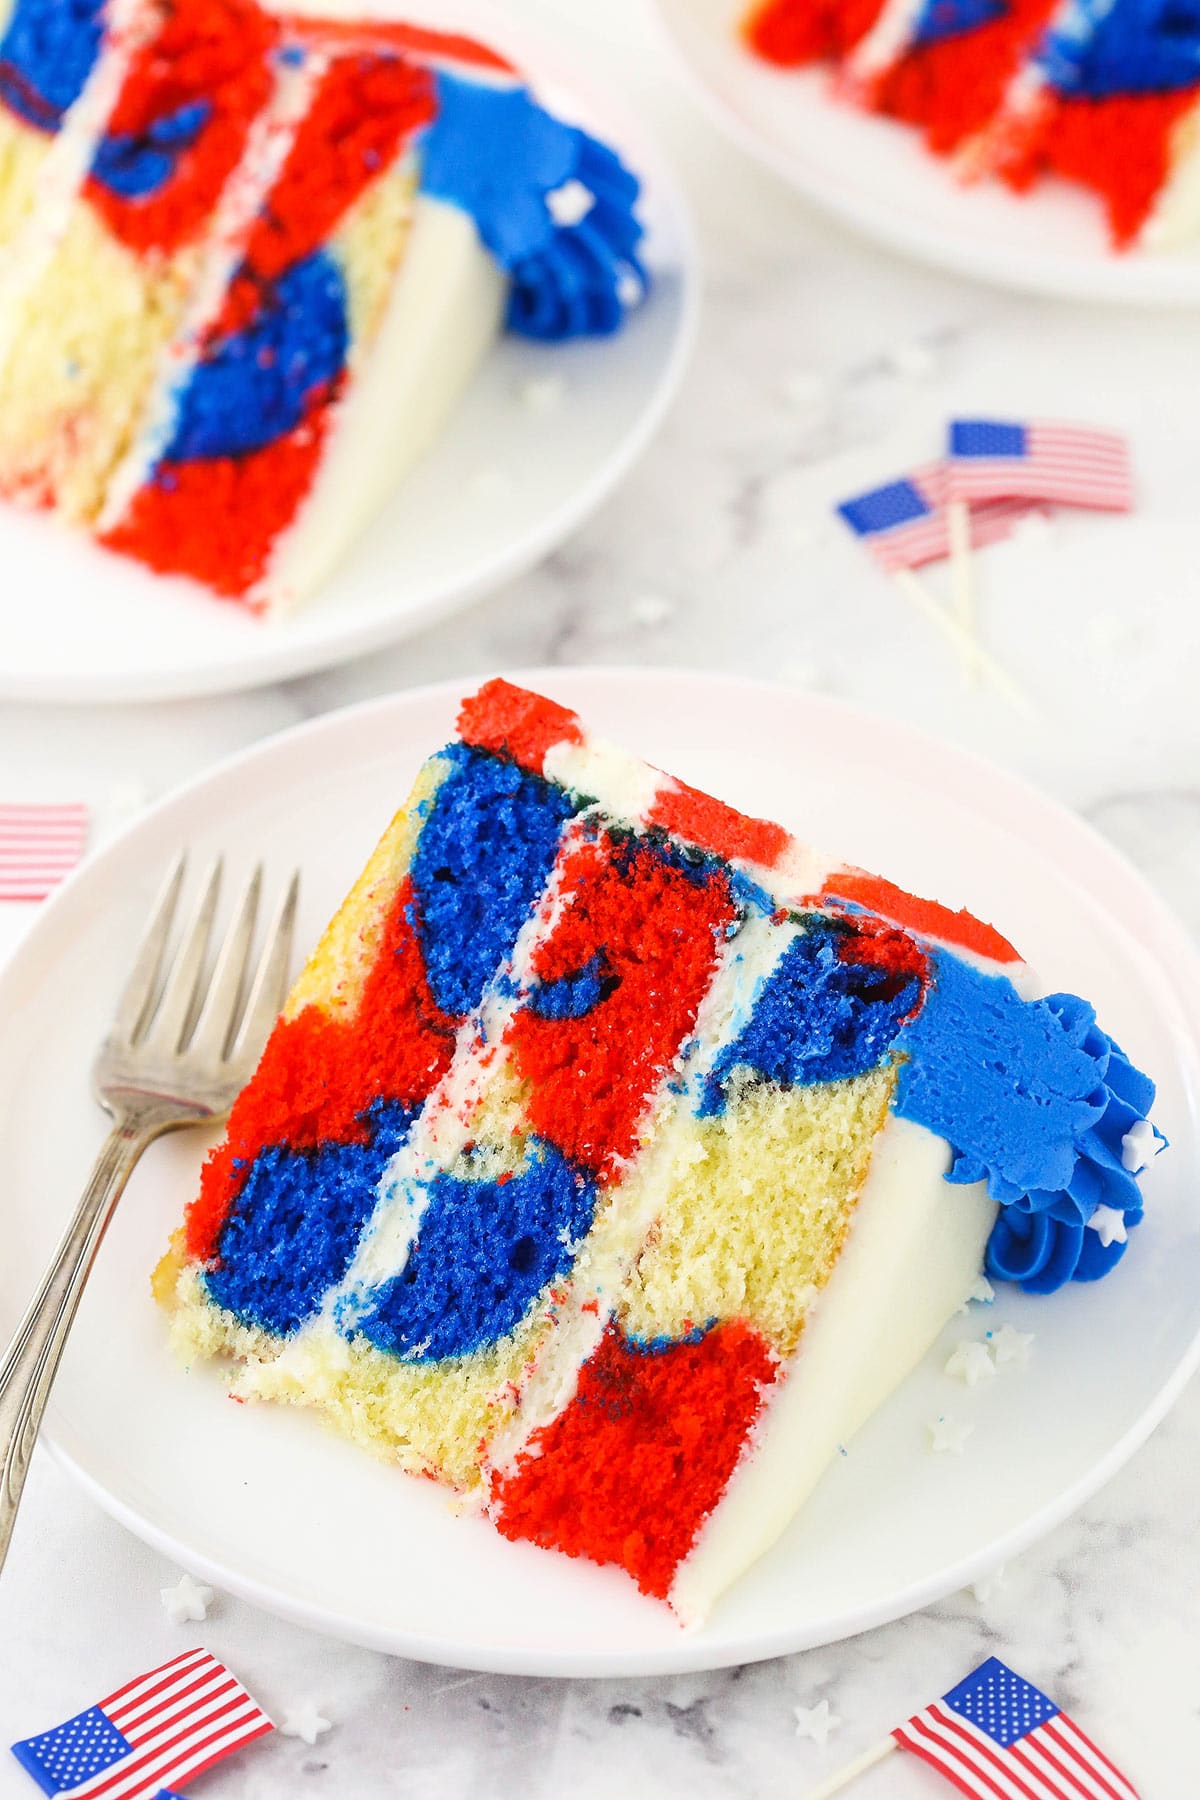
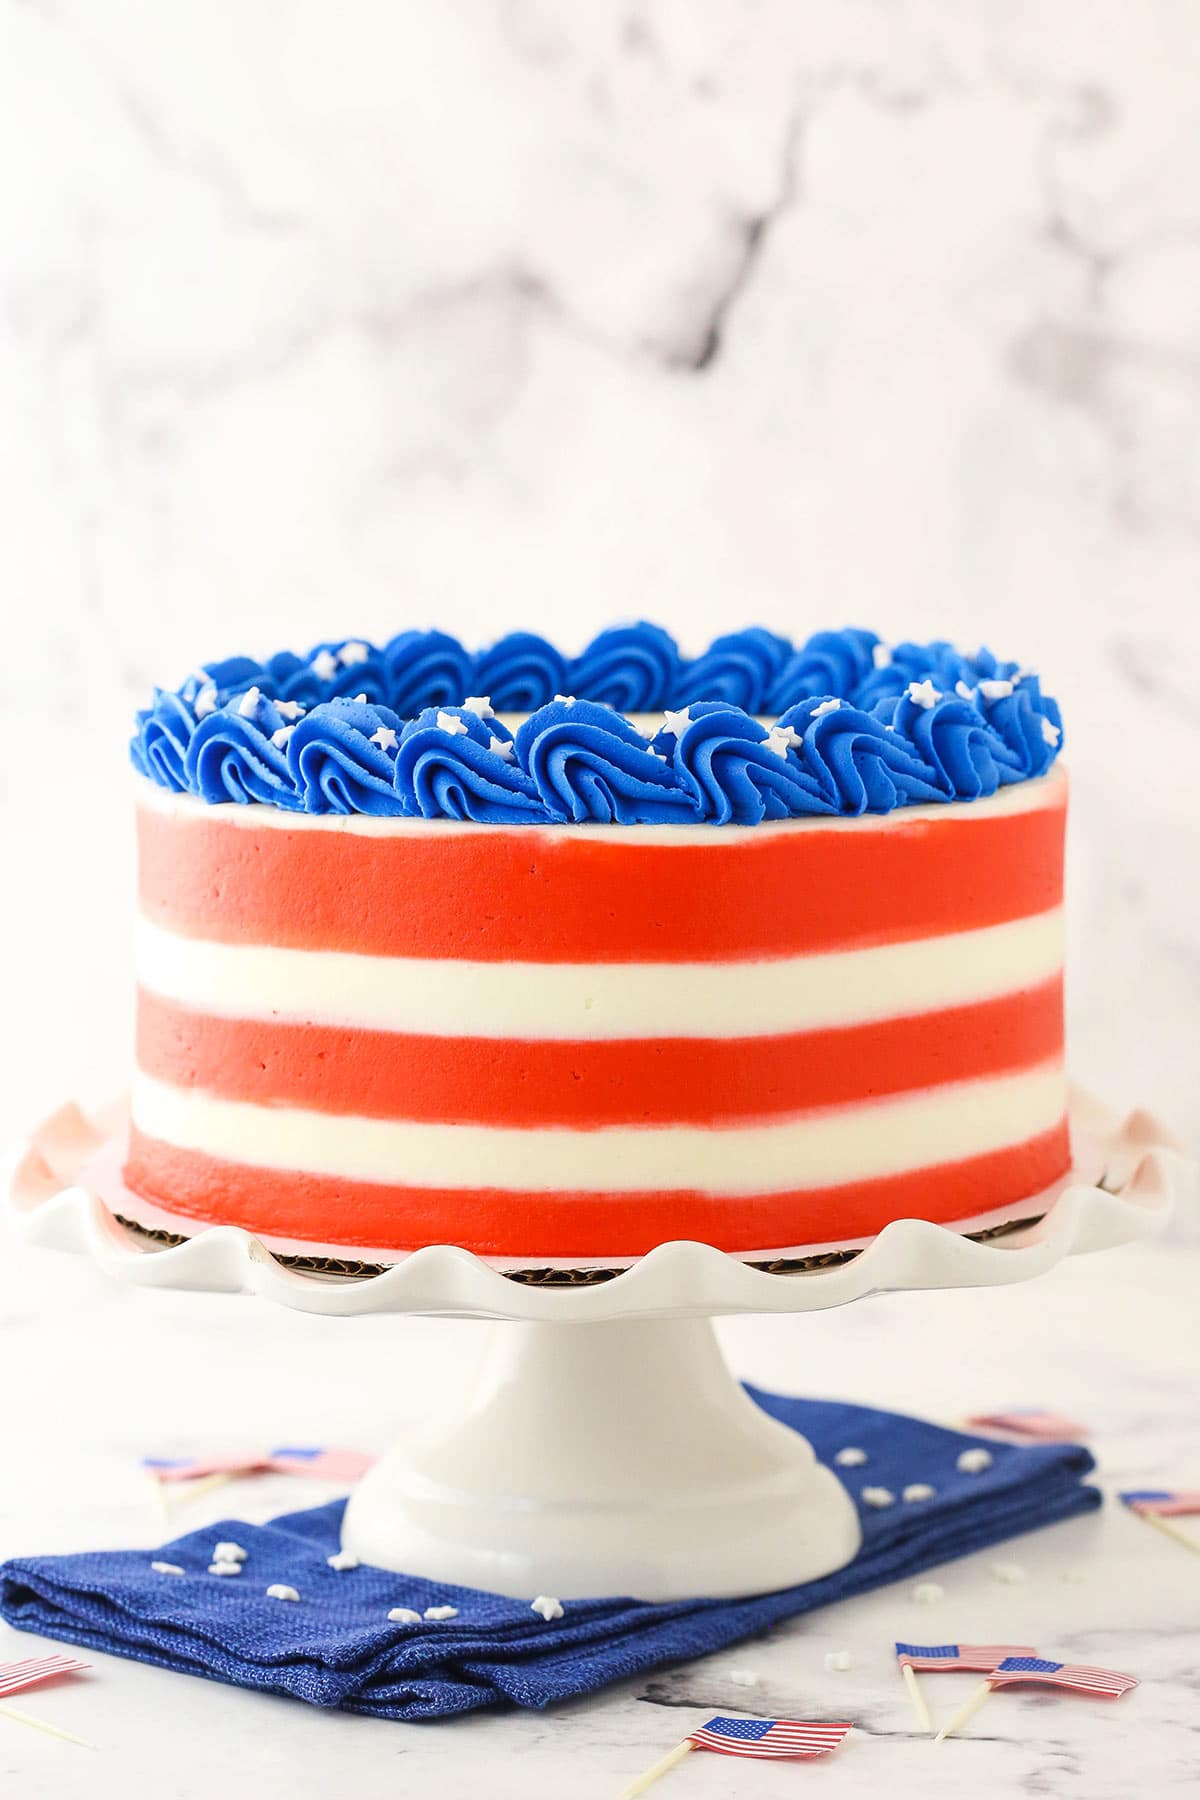
This light and fluffy 4th of July Layer Cake is stunningly patriotic inside and out! Three layers of red, white and blue marble cake are covered in a velvety buttercream frosting designed to resemble the American flag.
Patriotic Layer Cake With American Flag Frosting
I always have so much fun enjoying food, fun and fireworks with friends and family on the 4th of July. And no July 4th meal is complete without plenty of American flags and red, white and blue. This cake embodies all of that and more!
The exterior looks like an American flag in layer cake form – and once you start slicing it up, a beautiful rainbow of red, white and blue will be revealed. I can’t imagine a more appropriate way to celebrate our country’s freedom! It’s a patriotic treat through and through.
Once the appearance of the cake reels you in, the taste will make you stay for a second helping. The cake layers are moist and fluffy while the frosting is smooth and creamy. It’s the perfect match! Both components use high-quality vanilla extract for a classic flavor that no one can resist.

What You’ll Need
Even though the cake and the frosting are both multicolored, you don’t need a ton of ingredients to prepare this 4th of July dessert. The quantities for each item are included in the recipe card toward the end of this post.
For the Red White & Blue Marble Cake
- All-Purpose Flour: Use a food scale or the spoon and level method of filling your measuring cup to ensure an accurate measurement.
- Baking Powder & Baking Soda: The combination of both gives this cake its light and fluffy texture.
- Salt
- Unsalted Butter: Let this come to room temperature.
- Vegetable Oil: For extra moisture.
- Sugar
- Vanilla Extract: A high-quality extract is preferable as it will give your cake the best flavor.
- Large Eggs
- Buttermilk: This helps make the cake even more tender. I like to use powdered buttermilk.
- Blue & Red Gel Icing Colors: Don’t use liquid-based food colorings. You need a lot more of it to get the same rich colors, and it’ll thin out the cake batter and buttercream too much.
For the American Flag Frosting
- Unsalted Butter: Room temperature.
- Powdered Sugar: For volume and the correct consistency.
- Vanilla Extract
- Water: Or cream.
- Salt: Added to taste.
- Blue & Red Gel Icing Colors
Can I Make It Gluten-Free?
Yes, this recipe ought to work just as well with 1:1 gluten-free flour in place of the all-purpose flour. You should still spoon the flour into the measuring cup little by little or use a food scale to ensure accuracy. It’s also important to double-check the packaging of your baking powder and powdered sugar to make sure they’re certified as gluten-free.
How to Make July 4th Marble Cake
This cake does require a slight time commitment, but it’s very easy to make nonetheless. If you’ve prepared a layer cake from scratch in the past, you’ll find the process to be quite familiar.
Make the Cake Layers
- Prep for Baking: Prepare three 8-inch cake pans with parchment paper circles in the bottom and grease the sides. Preheat the oven to 350°F.
- Combine Dry Ingredients: Combine the flour, baking powder, baking soda and salt in a medium-sized bowl. Set the dry ingredient mixture aside.
- Cream Butter, Oil, Sugar & Vanilla: Add the butter, vegetable oil, sugar and vanilla extract to a large mixer bowl. Beat them together until the mixture is light in color and fluffy, about 2-3 minutes. Do not skimp on the creaming time.
- Add Eggs to Wet Ingredient Mixture: Add the eggs two at a time, mixing until well combined after each addition. Scrape down the sides of the bowl as needed to make sure all of the ingredients are well incorporated.
- Start Adding Dry Ingredients: Add half of the dry ingredients to the wet ingredients and mix until the batter is well combined.
- Add Buttermilk: Add the buttermilk and mix until the batter is well combined.
- Finish Adding Dry Ingredients: Add the remaining dry ingredients and mix until the batter is well combined and smooth. Scrape down the sides of the bowl as needed. Do not over-mix the batter.
- Add Food Coloring: Divide the batter into three separate bowls and set one of them aside to be kept white. Add red gel food coloring to one of the remaining bowls until the batter reaches your desired shade. Color the other one with blue, gently stirring and adding a little bit of coloring gel at a time until you’re happy with the shade.
- Fill Cake Pans: Drop heaping spoonfuls of batter into one of your prepared cake pans, alternating between red, white and blue. Once the pan starts to fill up, gently shake it from side to side to spread the batter out evenly. Repeat this process with the other two cake pans. Try to add the same amount of batter to each pan so that they all bake evenly.
- Bake: Bake the cake layers for 20-25 minutes, or until a toothpick inserted into the center comes out clean.
- Let Cool: Remove your cakes from the oven and allow them to cool in the pans for about 2-3 minutes, then transfer them to cooling racks to cool completely.
Prepare the Buttercream
- Beat Butter: Beat the butter until it’s nice and smooth.
- Add Half of Powdered Sugar: Slowly add half of the powdered sugar and mix until smooth.
- Add Vanilla: Add the vanilla extract, salt and 4-5 tablespoons of water or cream. Mix until smooth.
- Add Remaining Powdered Sugar: Slowly add the remaining powdered sugar and mix until the frosting is smooth. Add additional water or cream as needed to get the right consistency of frosting.
Assemble the Cake
- Trim Cake Layers: Use a large serrated knife to remove the domes from the top of the cakes so that they’re flat. These cakes don’t have a large dome, but I like to make sure they’re completely flat.
- Layer With Buttercream: Place the first cake layer onto a serving plate or a cardboard cake round. Spread about 1 cup of frosting evenly on top of the cake. Add the second layer of cake and another cup of frosting. Top that with the last layer of cake. Spread about 1 cup of frosting evenly on top of the cake.
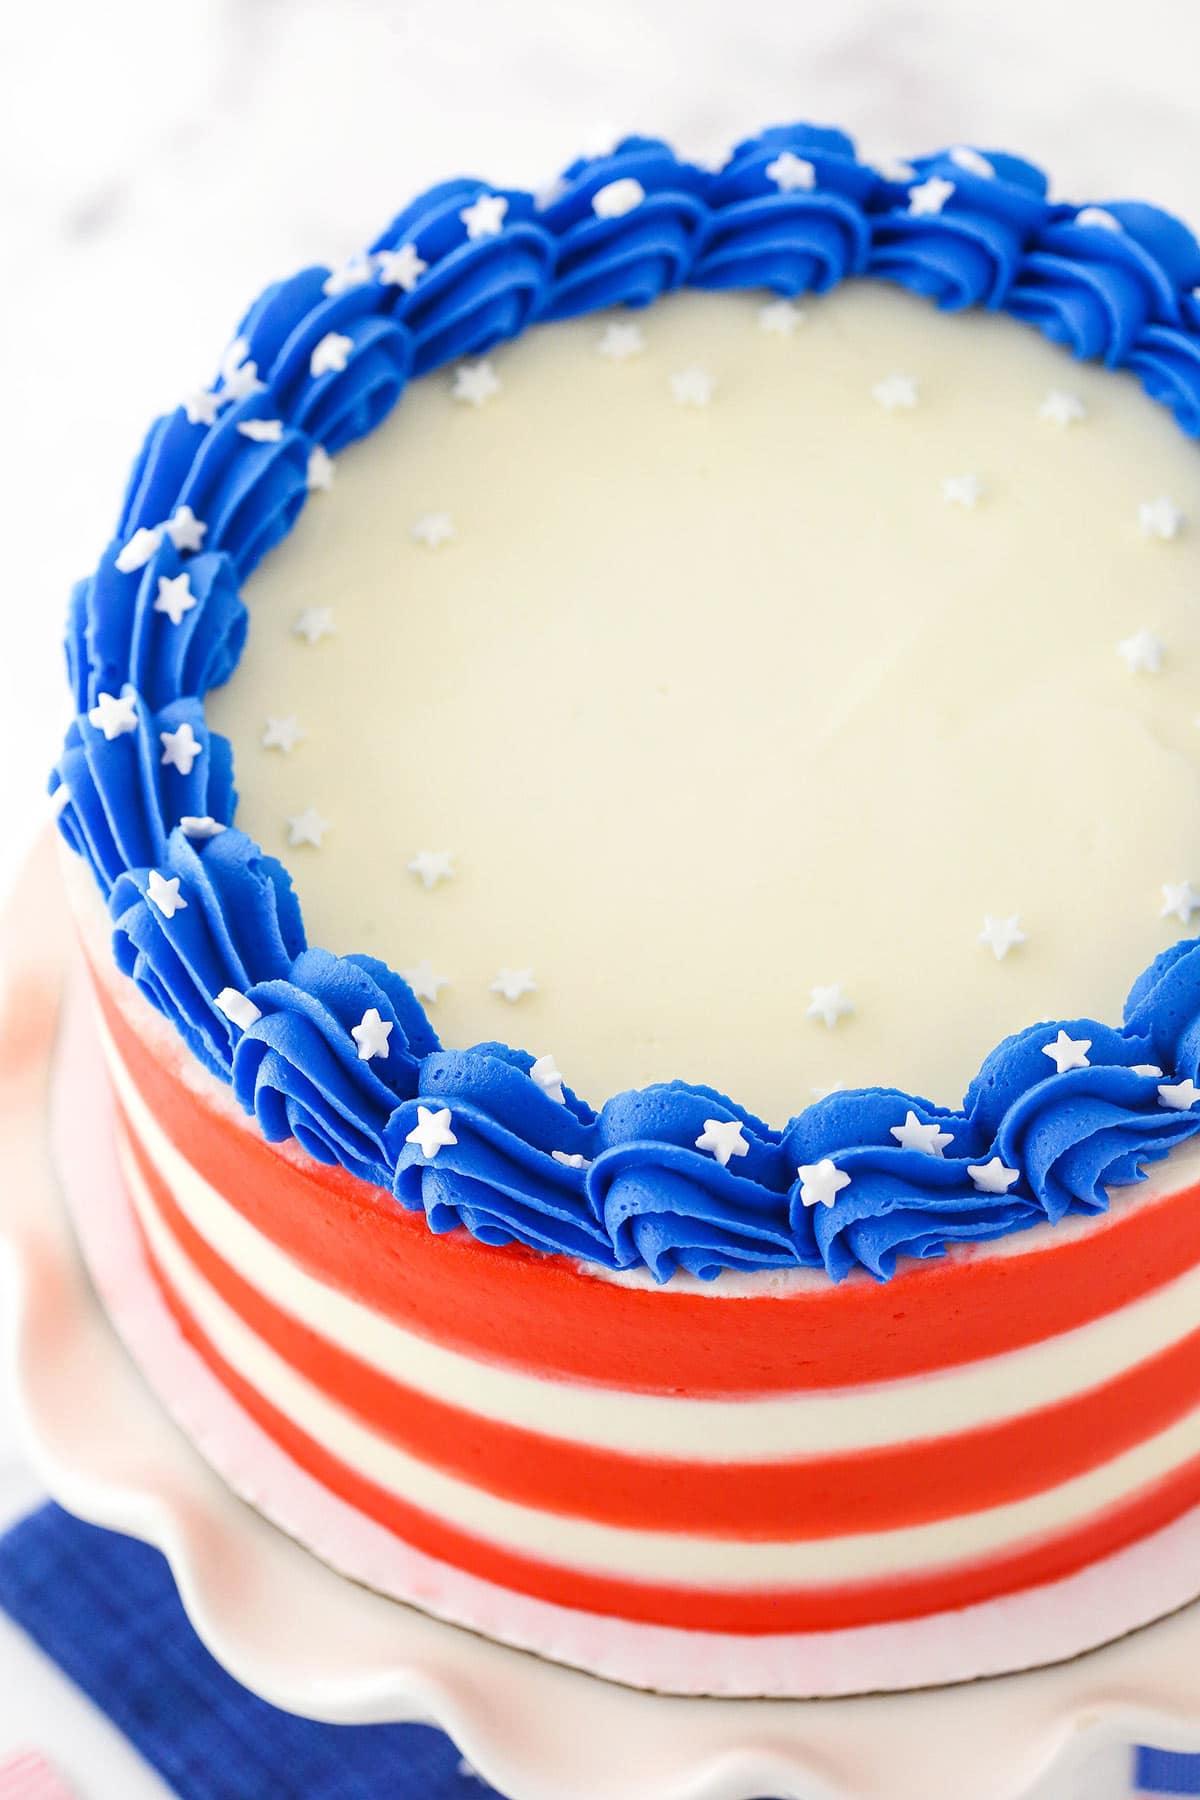
- Color Remaining Frosting: Set aside about one cup of the remaining frosting and color it blue. Divide the rest of the buttercream in half. Leave one half white and color the other one red.
- Decorate Sides: To create the colored stripes on the sides of the cake, you can either add the frosting with an offset spatula or use a piping bag with a large round piping tip. Add alternating stripes of red and white buttercream in even, straight lines around the cake. Run an icing smoother around the outside of the cake to smooth it all out – try to do this as few times as possible to keep the stripes from bleeding into each other. Smooth out the top of the cake again if needed and finish off the corners.
- Decorate Top: Use the blue buttercream to pipe a border around the top of the cake (I used Ateco tip 847). Finish it off with some white star sprinkles if you’d like.
- Slice & Serve: Enjoy!
Tips for Success
Want a few more words of advice? Let’s make sure your 4th of July marble cake comes out flawless.
- Avoid Over-Mixing the Batter: Since you’re going to be mixing food coloring into two-thirds of the cake batter, it’s especially important to avoid over-mixing it. Over-mixed batter will bake up into a less fluffy, not-as-tender cake. Stir in the food coloring as gently as possible.
- Use a Food Scale to Divide the Batter Evenly: If you have a food scale, weigh out the sections of batter before you color them to ensure that the cakes have an even distribution of red, white and blue. You can also do this for the red and white frosting if desired.
- That Icing Smoother Will Really Come in Handy: I highly recommend using an icing smoother to decorate this cake. Once the stripes are added, it’s easy much easier to smooth the sides and fill in any gaps between the stripes.
Variation Ideas
This cake is a wonderful dessert for not just the 4th of July, but any patriotic occasion. Here are some easy ways to switch it up!
- Simplify the Décor: If you want to spend a little less time on the decorating process, you can still create a gorgeous cake. Try leaving the frosting white and coating the edges of the cake with festive sprinkles like I did for this Patriotic Ice Cream Cake!
- Make It a Single Layer Cake: Feel free to bake all of your cake batter in a 9×13-inch pan instead of making multiple layers if preferred. Reduce the oven temperature to 325°F and frost the cooled cake with an American flag design.
- Alternative Finishing Touches: I actually took my sprinkles from a mix, but there are tons of star-shaped options out there. These silver metallic stars add a lovely sparkle – and these red, white and blue stars couldn’t be more on theme! You could even skip the stars altogether and sprinkle red or blue sanding sugar over the cake instead.
Storage Instructions
Extra 4th of July marble cake should be kept in an airtight container at room temperature. Transfer it to the fridge after 24 hours. Enjoy your leftover cake within 3-4 days. If it’s in the fridge, let the slices come to room temperature before you serve them.
Can I Freeze This?
Yes! To freeze the layers before assembly, you will first have to let them cool completely. Wrap each cooled cake in a tight layer of plastic wrap followed by a layer of heavy-duty foil, then freeze them for up to 3 months. Unwrap and thaw out the cake layers before you continue with the recipe.
Print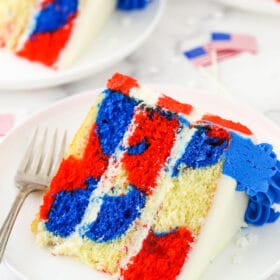
July 4th Marble Cake
- Prep Time: 1 hour 45 minutes
- Cook Time: 20 minutes
- Total Time: 2 hours 5 minutes
- Yield: 14 1x
- Category: Dessert
- Method: Oven
- Cuisine: American
Description
This light and fluffy 4th of July Layer Cake is stunningly patriotic inside and out! Three layers of red, white and blue marble cake are covered in a velvety buttercream frosting designed to resemble the American flag.
Ingredients
For the Red White & Blue Marble Cake
- 2 1/4 cups (293g) all-purpose flour
- 2 1/2 tsp baking powder
- 1/4 tsp baking soda
- 1/2 tsp salt
- 1/2 cup (112g) unsalted butter, room temperature
- 1/2 cup vegetable oil
- 1 1/2 cups (310g) sugar
- 1 tbsp vanilla extract
- 4 large eggs
- 1 cup (240ml) buttermilk
- Blue gel icing color
- Red gel icing color
For the American Flag Frosting
- 2 3/4 cups (g) unsalted butter, room temperature
- 11 cups (1265g) powdered sugar
- 1 tbsp vanilla extract
- 6–8 tbsp (90-120ml) water or cream
- Salt, to taste
- Blue gel icing color
- Red gel icing color
Instructions
Make the Cake Layers
- Prepare three 8-inch cake pans with parchment paper circles in the bottom and grease the sides. Preheat oven to 350°F (176°C).
- Combine the flour, baking powder, baking soda and salt in a medium-sized bowl and set aside.
- Add the butter, vegetable oil, sugar and vanilla extract to a large mixer bowl and beat together until light in color and fluffy, about 2-3 minutes. Do not skimp on the creaming time.
- Add the eggs two at a time, mixing until well combined after each. Scrape down the sides of the bowl as needed to be sure all ingredients are well incorporated.
- Add half of the dry ingredients to the batter and mix until combined. Add the buttermilk and mix until well combined. Add the remaining dry ingredients and mix until well combined and smooth. Scrape down the sides of the bowl as needed to be sure all ingredients are well incorporated. Do not over mix the batter.
- Divide the batter into three separate bowls. If you have a food scale, I like to weigh the batter and then divide it evenly. Set one bowl aside. For the other two bowls, add red gel icing color to one and blue gel icing color to the other. Gently stir to combine each until it reaches the right brightness/color.
- Drop alternating heaping spoonfuls of each batter into the cake pans and gently shake the pan side to side to spread it evenly. Repeat until you’ve used all the cake batter between the three pans. Try to add the same amount of batter to each pan so that they bake evenly.
- Bake for 20-25 minutes, or until a toothpick inserted comes out clean.
- Remove the cakes from the oven and allow to cool for about 2-3 minutes, then transfer to cooling racks to cool completely.
Prepare the Frosting
- Beat the butter until smooth.
- Slowly add half of the powdered sugar and mix until smooth.
- Add the vanilla extract, 4-5 tablespoons of water or cream and salt and mix until smooth.
- Slowly add the remaining powdered sugar and mix until smooth. Add additional water or cream, as needed to get the right consistency of frosting.
Assemble the Cake
- Use a large serrated knife to remove the domes from the top of the cakes so that they’re flat. These cakes don’t have a large dome, but I like to make sure they’re completely flat.
- Place the first cake on a serving plate or a cardboard cake round. Spread about 1 cup of frosting evenly on top of the cake. Add the second layer of cake and another cup of frosting. Top the cake with the remaining layer. Spread about 1 cup of frosting evenly on top of the cake.
- Remove about one cup of the remaining frosting and color it blue. Set aside. Divide the remaining buttercream in half and leave one half white and color the other half red.
- To add the colored stripes on the sides of the cake, you can add the frosting with an offset spatula or use a piping bag with a large round piping tip. Add alternating stripes of red and white buttercream in even straight lines around the cake. Run an icing smoother around the outside of the cake to smooth it all out. Try to do it as few times as possible to keep the layers from bleeding into each other. Smooth out the top of the cake again, if needed, and finish off the corners.
- Use the blue buttercream to pipe a border around the top of the cake. I used Ateco tip 847. Finish it off with some white or silver stars, if desired.
Notes
- Makes 12-14 slices.
- I strongly recommend utilizing an icing smoother to decorate this cake.
- To Freeze: Wrap each cooled cake in a tight layer of plastic wrap followed by a layer of heavy-duty foil, then freeze for up to 3 months. Unwrap and thaw before continuing with the recipe.
- To Store: Store cake in an airtight container. It should be fine at room temperature for about 24 hours, then can be refrigerated. Serve at room temperature. Cake is best eaten within 3-4 days.
Nutrition
- Serving Size:
- Calories: 1006
- Sugar: 114.8 g
- Sodium: 204.3 mg
- Fat: 52.7 g
- Carbohydrates: 132.9 g
- Protein: 4.9 g
- Cholesterol: 168.4 mg
More Red White and Blue Dessert Ideas
Need more festive desserts for the 4th of July or memorial day? Look no further!


I just made the cakes tonight. They rose only about an inch. Much too short to stripe the icing. Baking powder and soda are good. I didn’t over mix but am wondering if stirring in the food coloring could cause them not to rise as normal.
My layers are usually about an inch or so. It sounds like they may be right. Once stacked with frosting, the cake is usually around 3 1/2 inches tall, and I was able to add the stripes just fine. I hope it worked out ok!
And yes, over-stirring can cause them to not rise normally, but I still think they sound like they were fine.
I making this cake for a 4th of July / Birthday celebration. What brand of Gel Color did you use for the cake and frosting? How many drops of gel color did you use for the deep red and bright blue? Thank you!
I use Americolor or Wilton. I’m not sure how many drops it was, sorry.
Thank you! I’ll post a picture of my cake.
How much buttermilk powder would you use if your substituting powder for the actual milk?
It should say on the container of powdered buttermilk. The one I use is usually 4 tablespoons of powder for 1 cup of milk.
Do you have a video for the red white and blue. Cake
I don’t, I’m sorry.
My birthday is on the forth of july. So it is like a special treat to make!
Hi, I plan to make this cake for the holiday but want to use the single layer version using a Pyrex 9×13. My question is, should I prepare my pan the same way or should I just grease the bottom(or entire pan)? Thanking you in advance.
You should just be able to grease the pan. You don’t really need the parchment paper.
I just made this and my cakes barely rose. I have what looks like 3 red, white and blue pancakes. I also checked my baking powder and it’s good. I used my 8×2″ round pans. What could have went wrong?
Hmm. Did you also check the baking soda? One possibility even if they’re both still good is that you may have over measured them. Did they rise and then fall? Or just never rise to begin with?