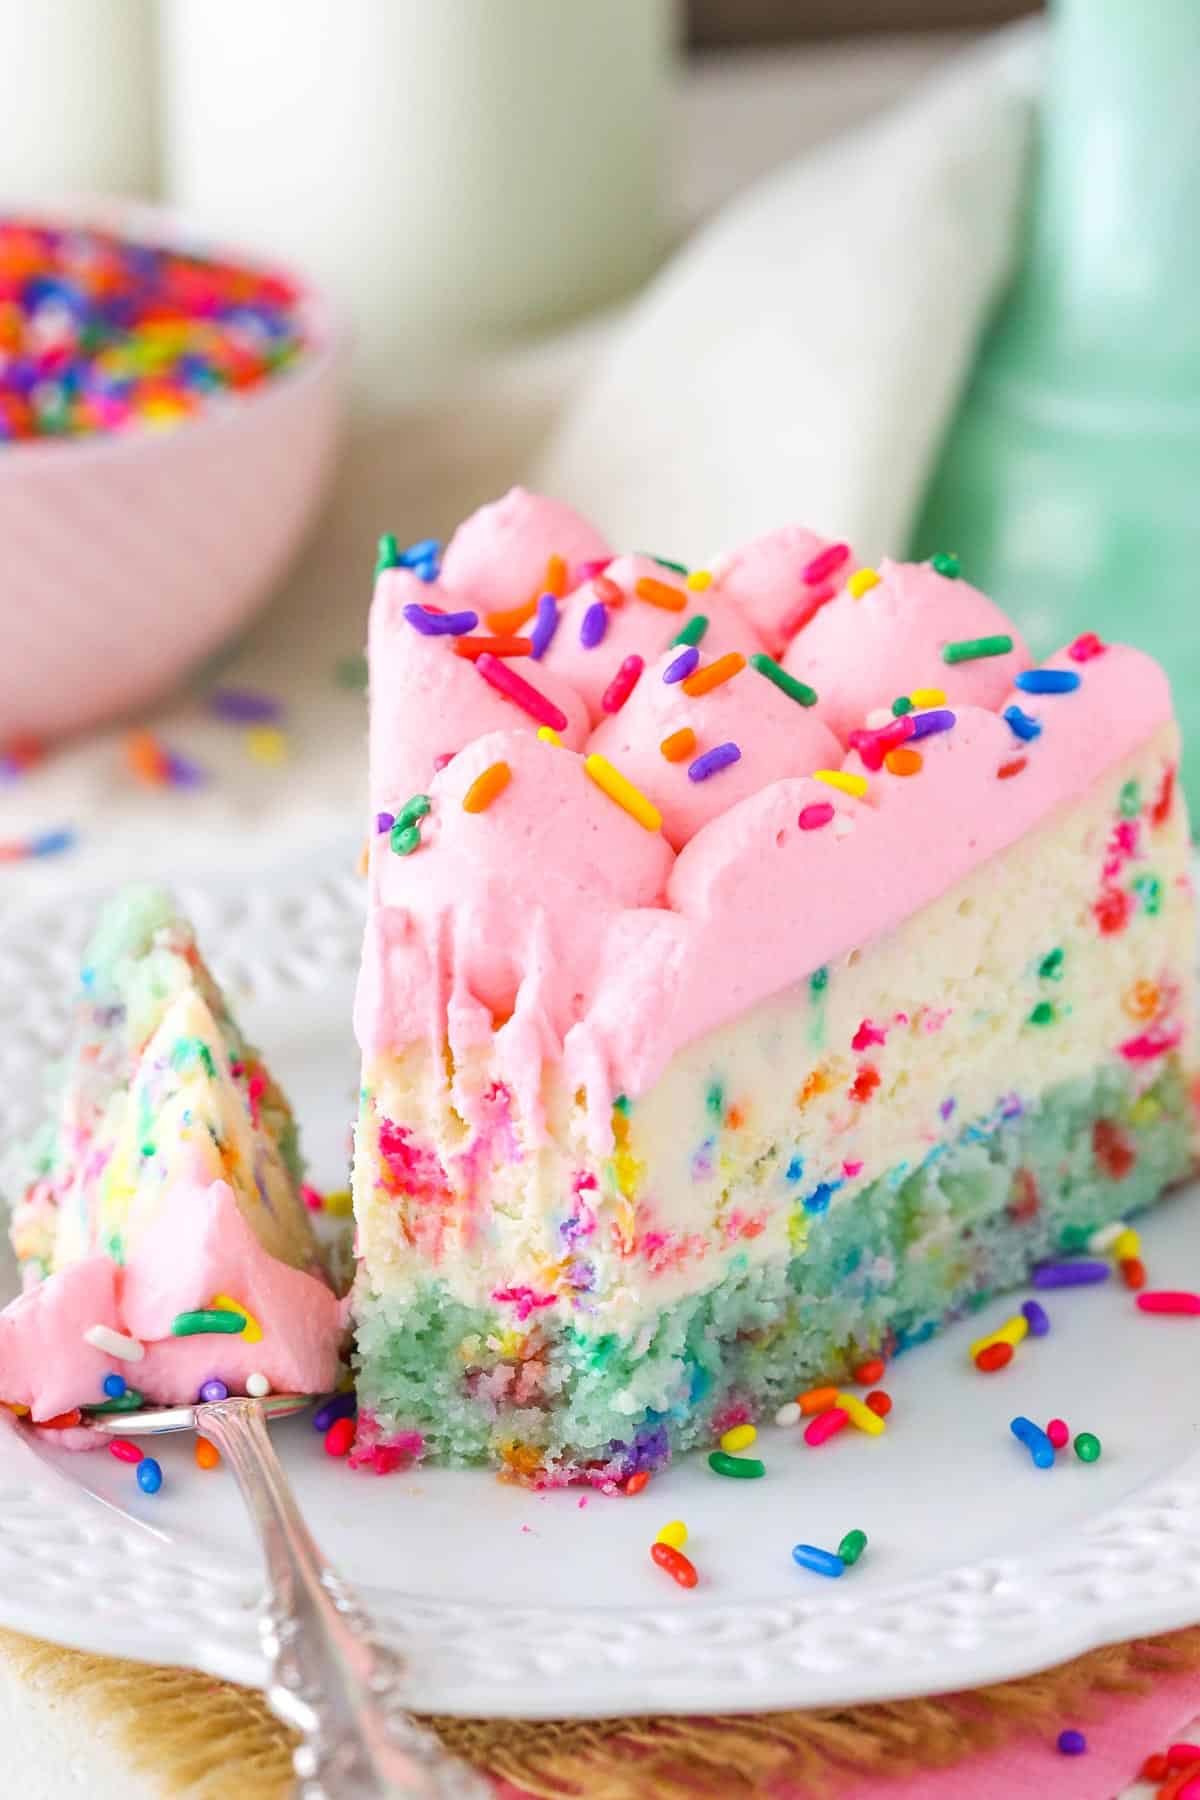
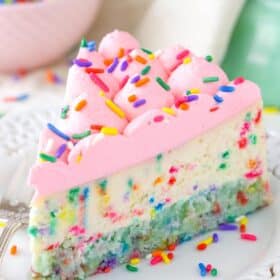
This Funfetti Cheesecake recipe is thick, creamy and delicious! And to make it even better, it’s got a homemade cake bottom instead of your average cheesecake crust. It’s a super fun recipe and perfect for celebrating any family occasion!
If you’re interested in a more traditional cheesecake, take a look at this Classic Cheesecake Recipe or this Easy No-Bake Cheesecake Recipe that makes a perfect, smooth & creamy cheesecake that sets up in the refrigerator!
Easy Homemade Funfetti Cheesecake
But today is all about the sprinkles! Sally is definitely a sprinkle lover so today we are all celebrating with fun sprinkle-filled recipes. My contribution is this delicious cheesecake.
This recipe is loosely based on my Boston Cream Pie Cheesecake. That one also has a cake bottom, which is such a fun combo. No need to worry, the cake doesn’t dry out when you bake it a second time with the cheesecake. It stays moist and perfect!
How To Make This Easy Cheesecake Recipe
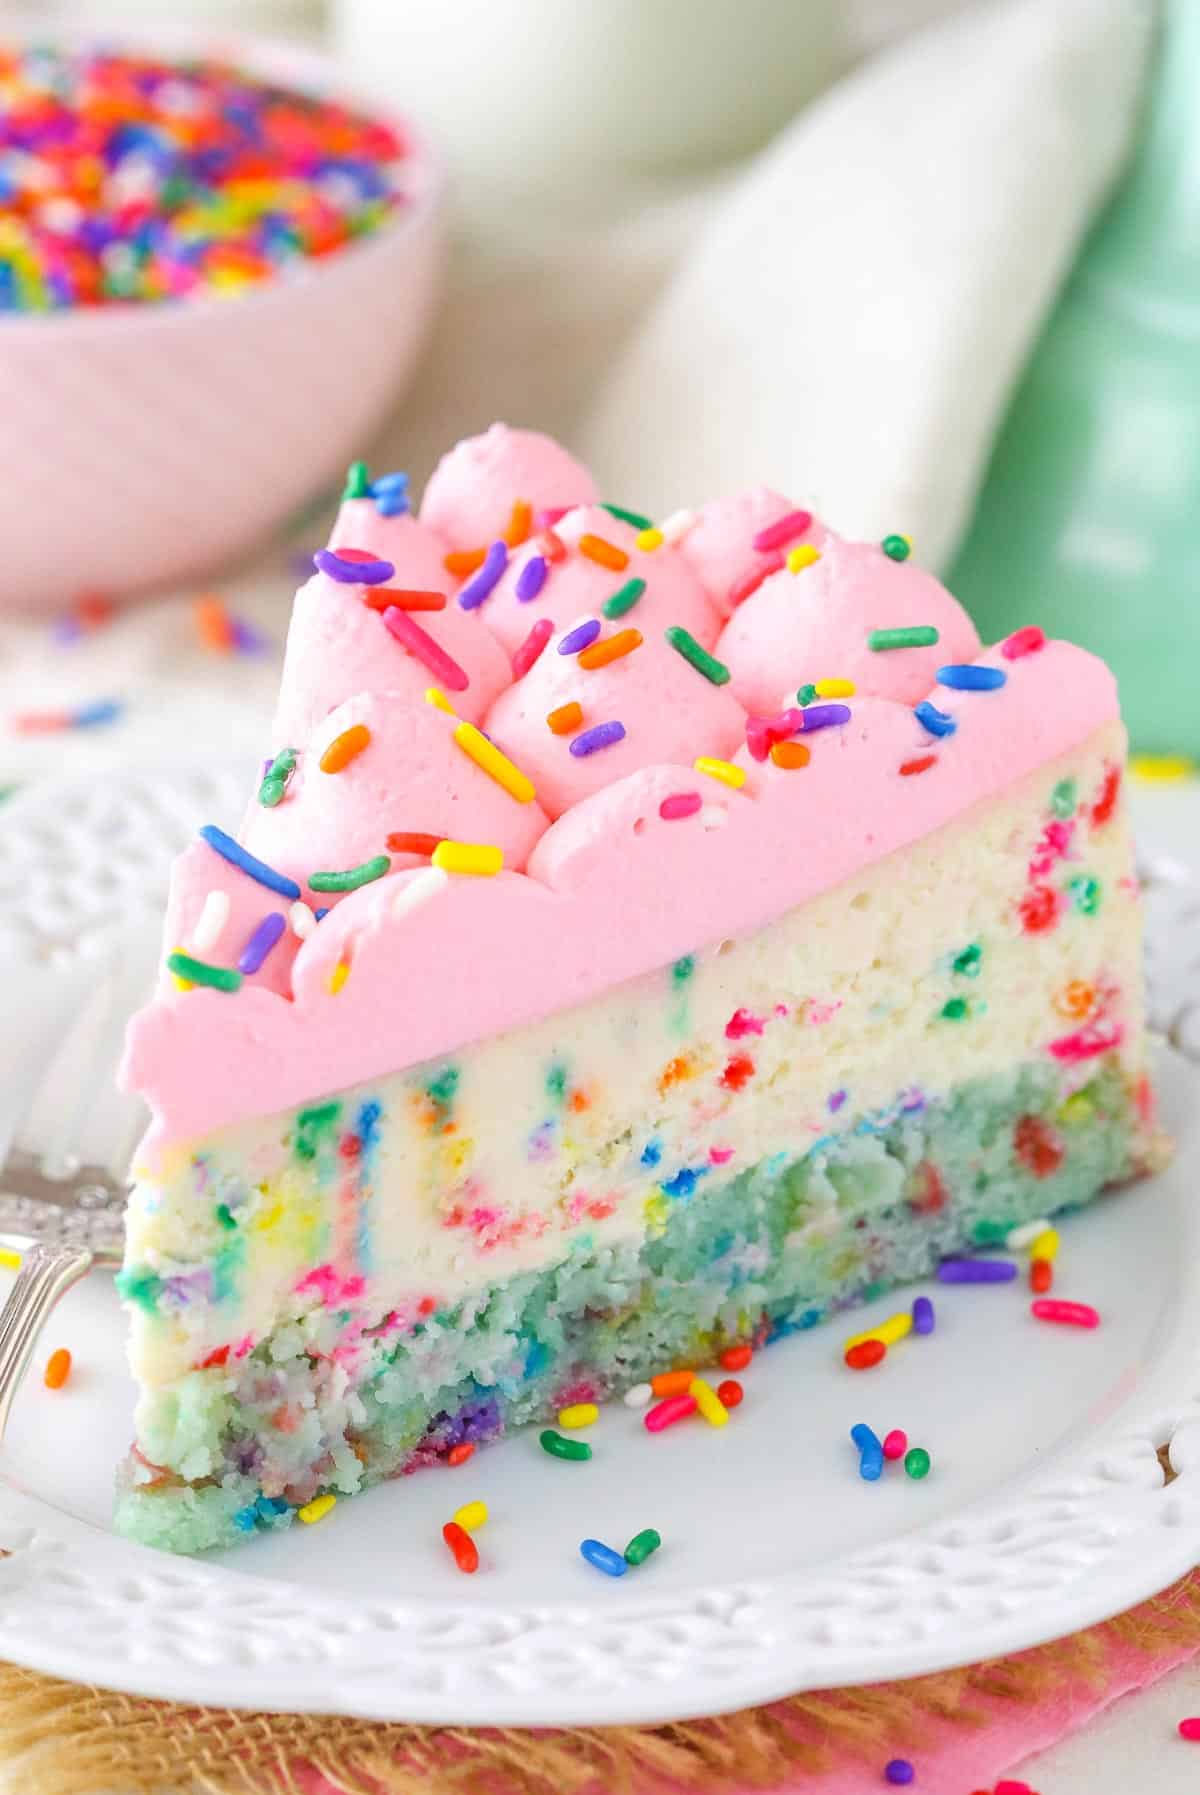
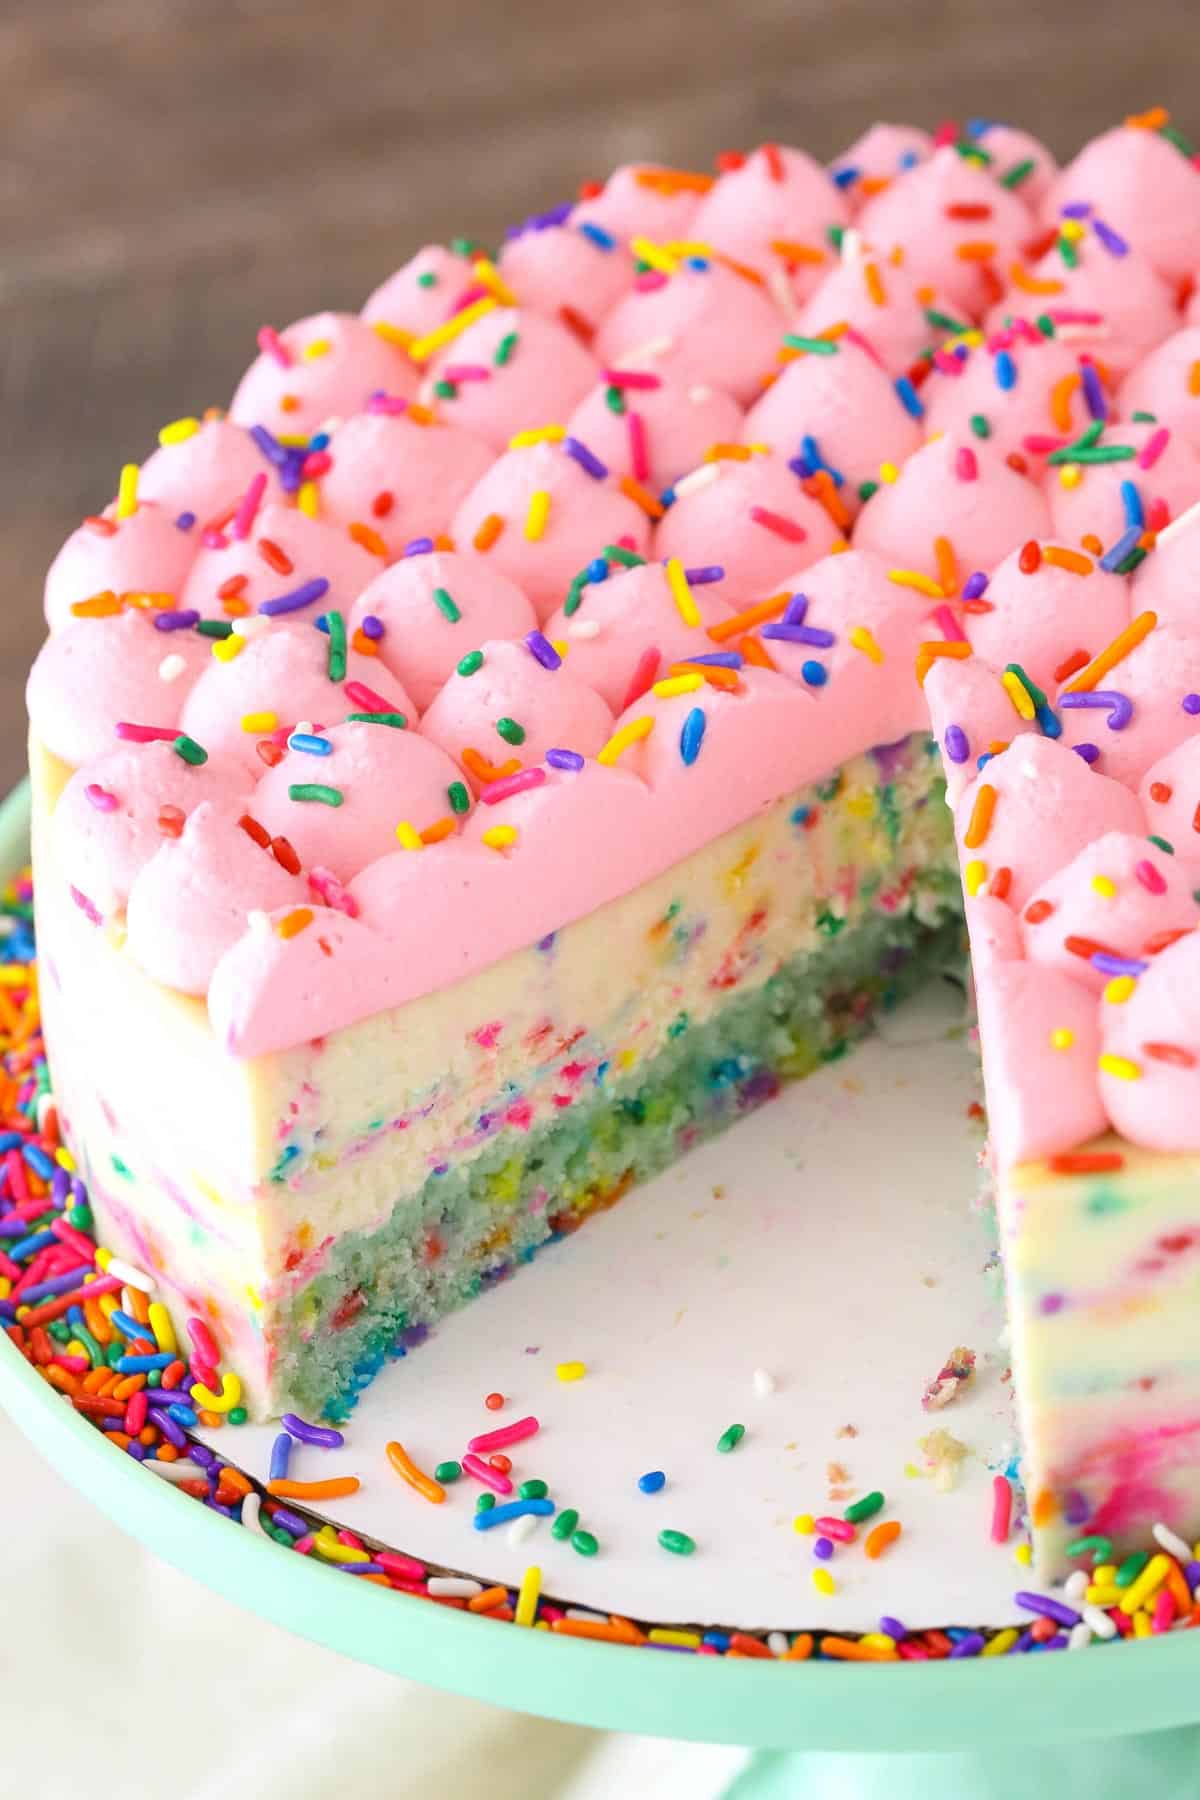
To make this cheesecake, the first thing you’ll do is make the cake bottom. I dyed mine a shade of teal and added sprinkles, of course! You’ll want to use the same springform pan that you’ll use later to bake the cheesecake.
Once the cake is baked and cooled, it’s time to make the cheesecake. I find the cheesecake bakes best if you wash the sides of the springform pan and re-spray it with baking spray after baking the cake layer and before adding the cheesecake filling.
The filling of self is pretty straightforward. Fill it with sprinkles and then bake in a water bath. I know water baths aren’t the most fun, but they really do lend the best cheesecakes. Without it, cheesecakes tend to be dry, crack and sink in the middle.
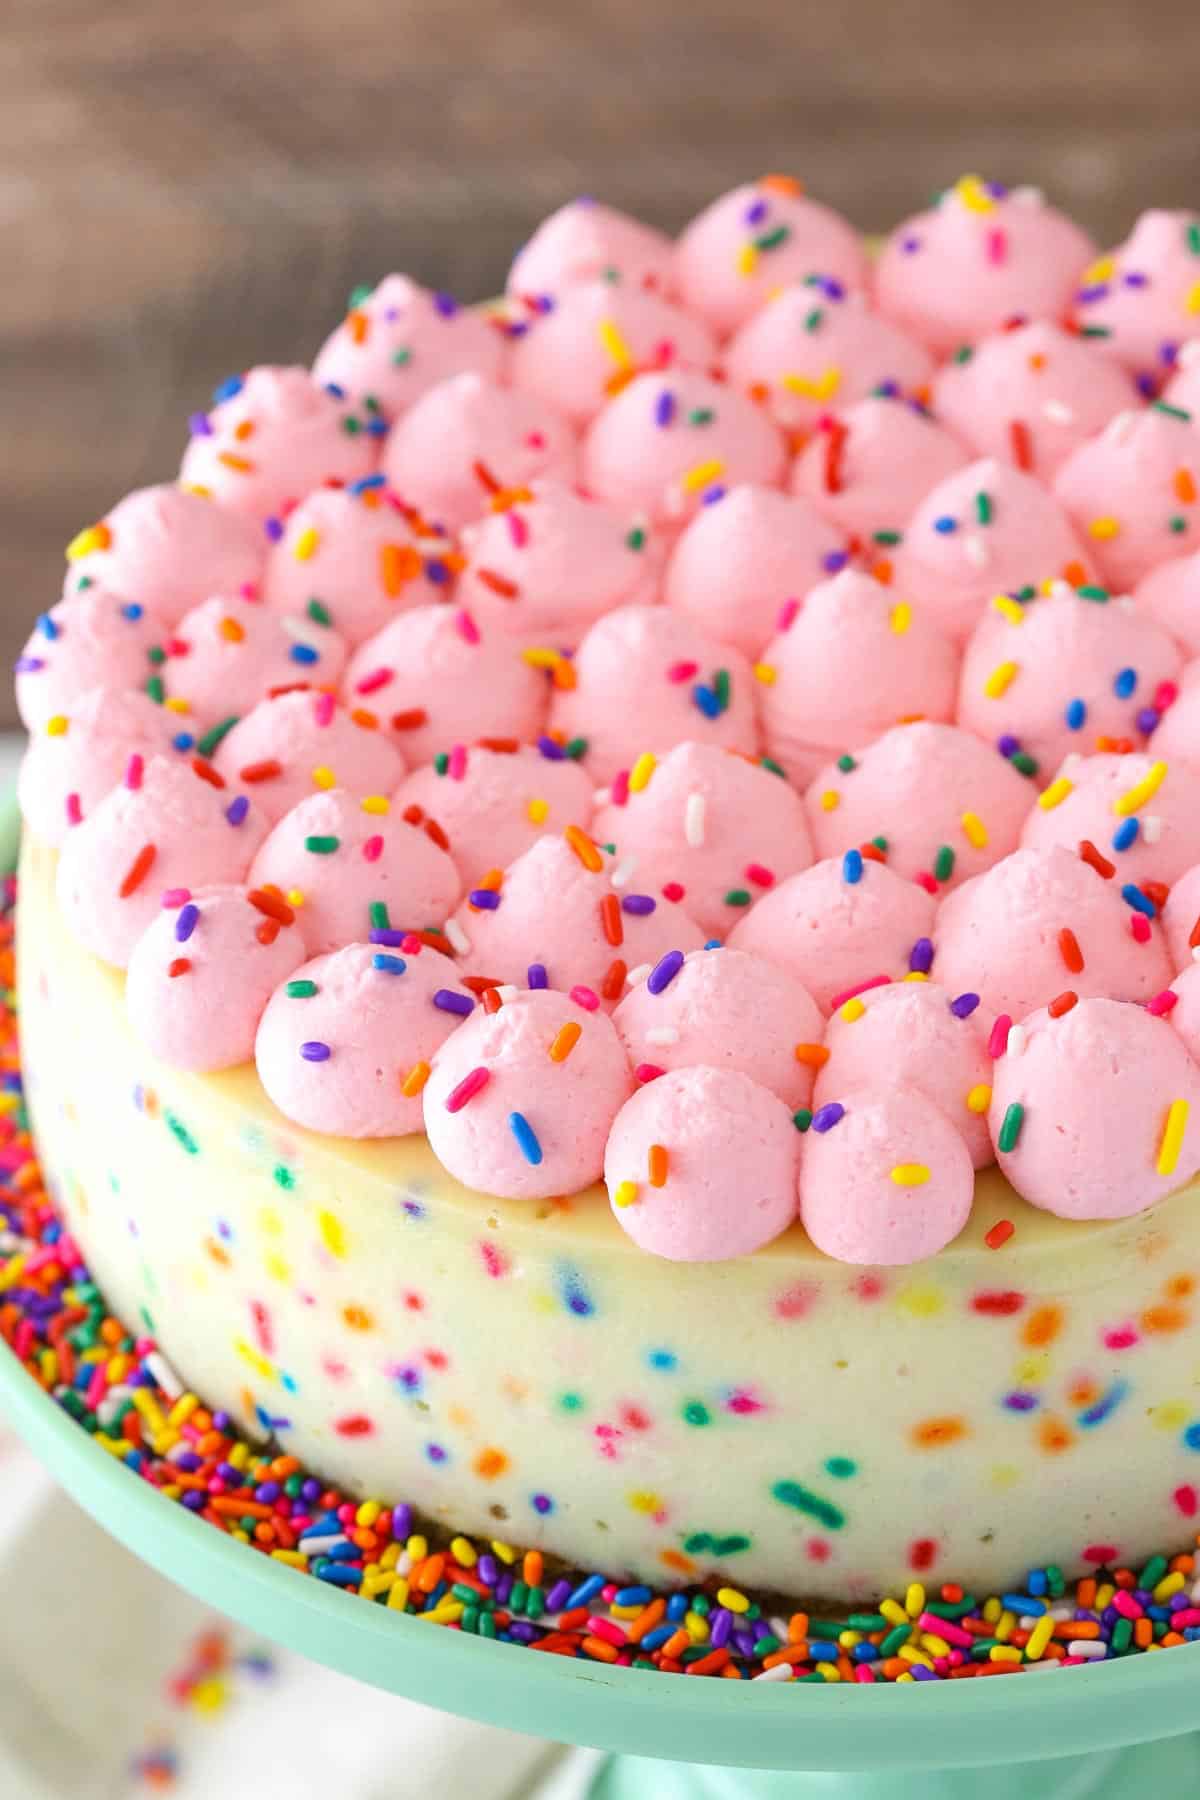
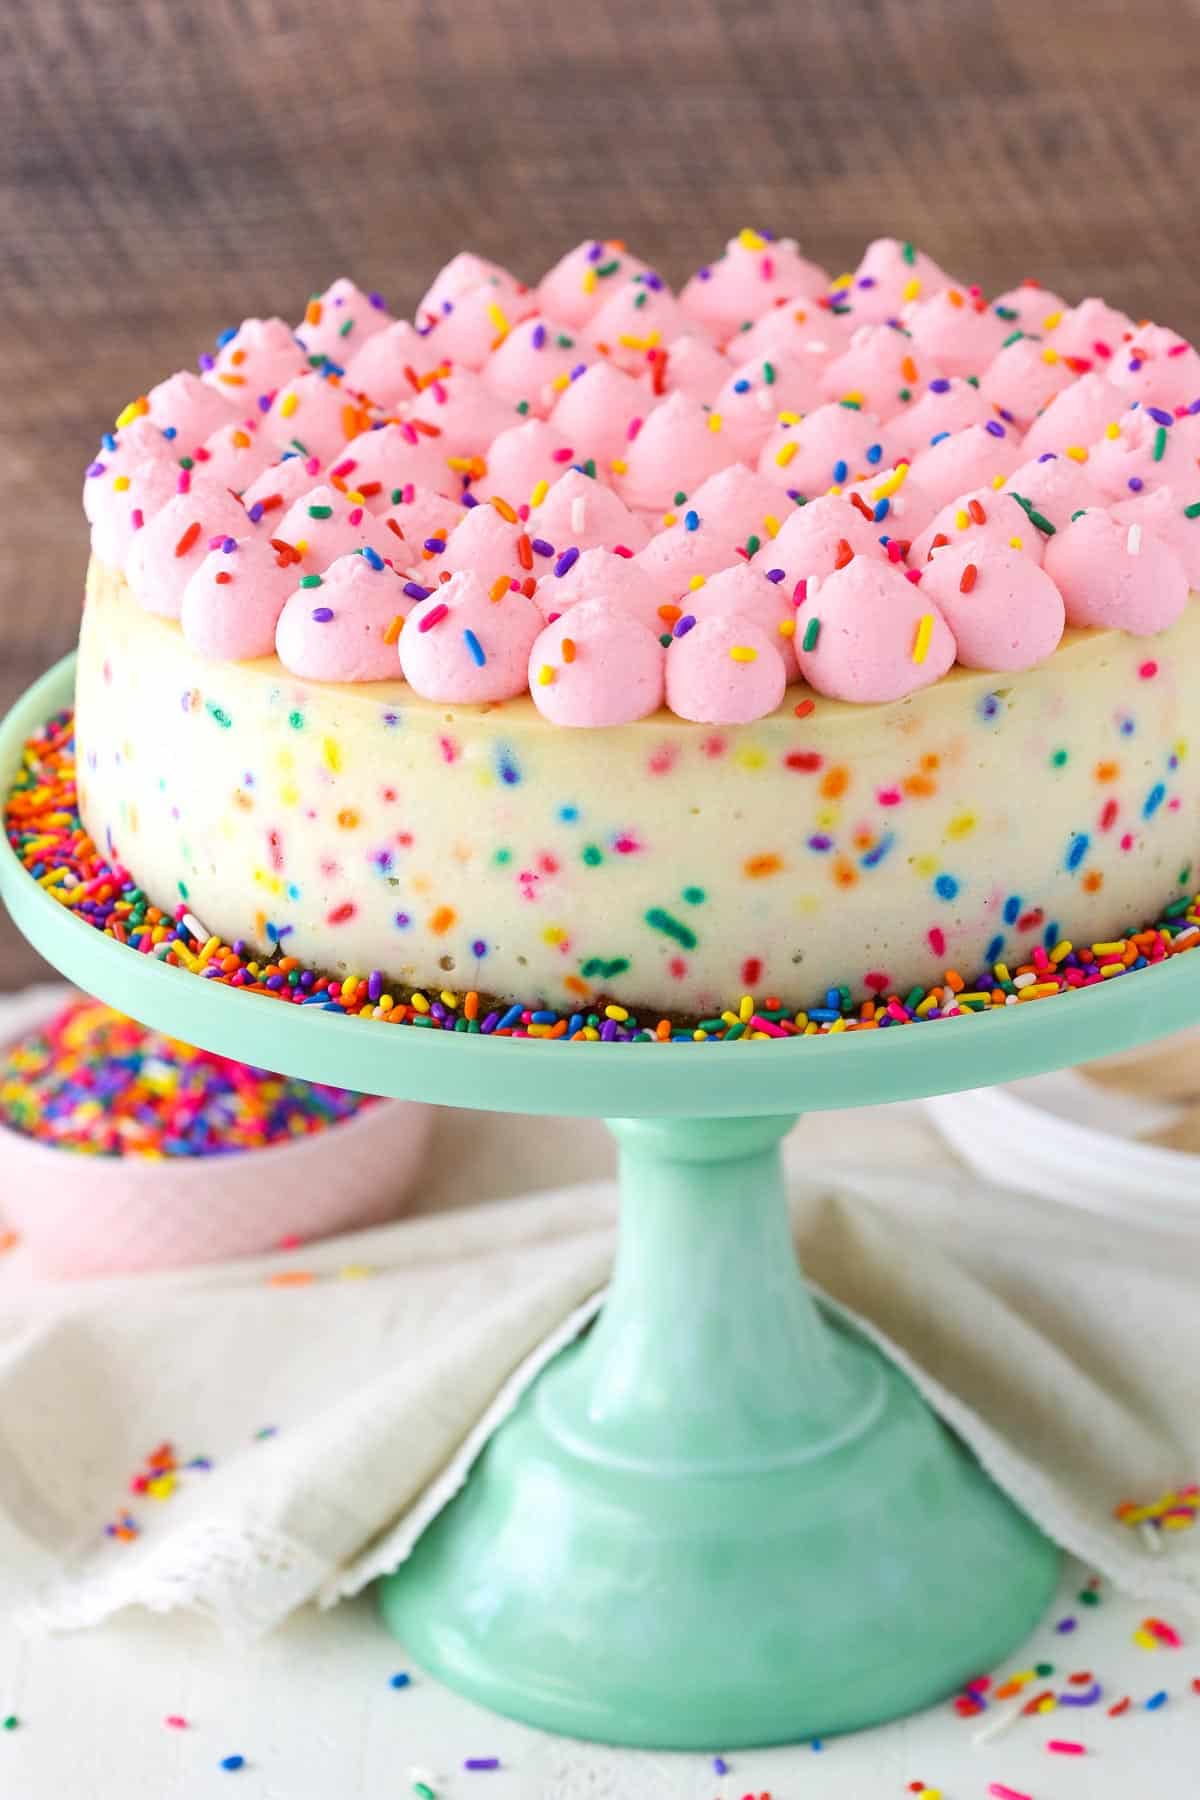
To finish off the cheesecake, I added some fun pink whipped cream on top and more sprinkles. I just thought the mix of teal and pink would be super fun! I love how it turned out, and it’s quite tasty! The smooth and creamy cheesecake with the moist cake is heavenly. I hope you enjoy it as much as we did!
More Funfetti Dessert Recipes
- No Bake Funfetti Cheesecake
- Ultimate Layered Cookie Cake
- Funfetti Popcorn Marshmallow Treat Cupcakes
- Funfetti Birthday Cake Icebox Cake
Funfetti Cheesecake with Cake Bottom
- Prep Time: 45 minutes
- Cook Time: 1 hour 30 minutes, plus
- Total Time: 0 hours
- Yield: 12–14 Slices 1x
- Category: Dessert
- Method: Oven
- Cuisine: American
Description
This Funfetti Cheesecake recipe is thick, creamy and delicious! And to make it even better, it’s got a homemade cake bottom instead of your average cheesecake crust. It’s a super fun recipe and perfect for celebrating any family occasion!
Ingredients
VANILLA CAKE
- 1/4 cup (56g) salted butter, room temperature
- 1/2 cup (104g) sugar
- 1/4 cup (58g) sour cream, room temperature
- 1 tsp vanilla extract
- 2 large egg whites, room temperature
- 3/4 cups (98g) all purpose flour
- 1 1/4 tsp baking powder
- 1/4 cup (60ml) milk, room temperature
- 1 tbsp (15ml) water, room temperature
- 2 tbsp sprinkles
- Teal gel icing color, optional
CHEESECAKE FILLING
- 24 ounces (678g) cream cheese, room temperature
- 1 cup (207g) sugar
- 3 tbsp (24g) all purpose flour
- 1 cup (230g) sour cream, room temperature
- 1 tbsp vanilla extract
- 3 large eggs, room temperature
- 5 tbsp sprinkles
WHIPPED CREAM TOPPING
- 1 1/4 cups (300ml) heavy whipping cream, cold
- 3/4 cup (86g) powdered sugar
- 1 tsp vanilla extract
- Pink and Peach gel icing color
- Sprinkles
Instructions
1. Preheat oven to 350°F (176°C). Prepare a 9 inch springform pan with a circle of parchment paper in the bottom and grease the sides.
2. To make the cake batter, beat the sugar and butter together until light in color and fluffy, 3-4 minutes. Don’t skimp on the creaming.
3. Add the sour cream and vanilla extract and mix until well incorporated.
4. Add the egg whites and mix until well combined.
5. Combine flour and baking powder in a separate bowl, then add half of the dry ingredients to batter and mix until well incorporated.
6. Add the milk and water and mix until well incorporated.
7. Add the remaining dry ingredients and mix until well incorporated and smooth.
8. Stir in the sprinkles and color the batter, if desired.
9. Spread the cake batter evenly into the bottom of the prepared pan.
10. Bake for 18-20 minutes, or until a toothpick inserted comes out with a few crumbs. Set the cake aside to cool.
TO MAKE THE CHEESECAKE FILLING:
11. Add the cream cheese, sugar and flour to a large mixer bowl and beat on low speed until completely combined and smooth. Be sure to use low speed to reduce the amount of air added to the batter, which can cause cracks. Scrape down the sides of the bowl.
12. Add the sour cream and vanilla extract mix on low speed until well combined.
13. Add the eggs one at a time, mixing slowly to combine after each addition. Scrape down the sides of the bowl as needed to make sure everything is well combined.
14. Stir in the sprinkles.
15. When the cake layer has cooled, reduce the oven temperature to 300°F (148°C). Remove the sides of the springform pan and clean it off, the respray it with non-stick spray. You want to be sure it’s well done so that they cheesecake doesn’t stick to the sides after baking.
16. Reset the springform pan edges around the cake and add the cream cheese filling to the pan.
17. Prepare the pan for a water bath by wrapping the outside of the pan with aluminum foil, then place the springform pan inside another larger pan. Fill the outside pan with enough warm water to go about halfway up the sides of the springform pan. The water should not go above the top edge of the aluminum foil on the springform pan. Check out my water bath tutorial if you need more help.
18. Bake for 1 hour. The center should be set, but still jiggly.
19. Turn off the oven and leave the door closed for 30 minutes. The cheesecake will continue to cook, but slowly begin to cool as well.
20. Crack the door of the oven for 30 minutes to allow the cheesecake to continue to cool slowly. This process helps prevent cracking.
21. Remove the cheesecake from the oven and water bath wrapping and refrigerate until firm, 5-6 hours or overnight. Once completely cool and firm, remove from the springform pan.
TO FINISH OFF THE CHEESECAKE:
22. Add the heavy whipping cream, powdered sugar and vanilla extract to a large mixer bowl and whip on high speed until stiff peaks form.
23. Add the icing color to get the shade of pink you want.
24. Pipe the whipped cream on top of the cheesecake. I used a large round tip, Ateco 808.
25. Add a few more sprinkles on top of the cheesecake, then refrigerate until ready to serve. Cheesecake is best for 3-4 days.
Nutrition
- Serving Size: 1 Slice
- Calories: 405
- Sugar: 33.8 g
- Sodium: 247.1 mg
- Fat: 24.3 g
- Carbohydrates: 44.3 g
- Protein: 9.1 g
- Cholesterol: 106.7 mg
Enjoy!
This post contains affiliate links.


This cheesecake looked beautiful so I thought I would try to make it for a birthday party coming up. I’m not the best at baking so decided to try it out ahead of time to make sure I could pull it off. It turned out great but my cheesecake layer seemed more yellow than yours. Any ideas on what I might have done to make this happen? Thank you so much for this beautiful recipe.
It likely would be a difference in the brands of ingredients. Maybe your cream cheese has a slightly more yellow color to it, or your eggs? I’m glad it turned out well!