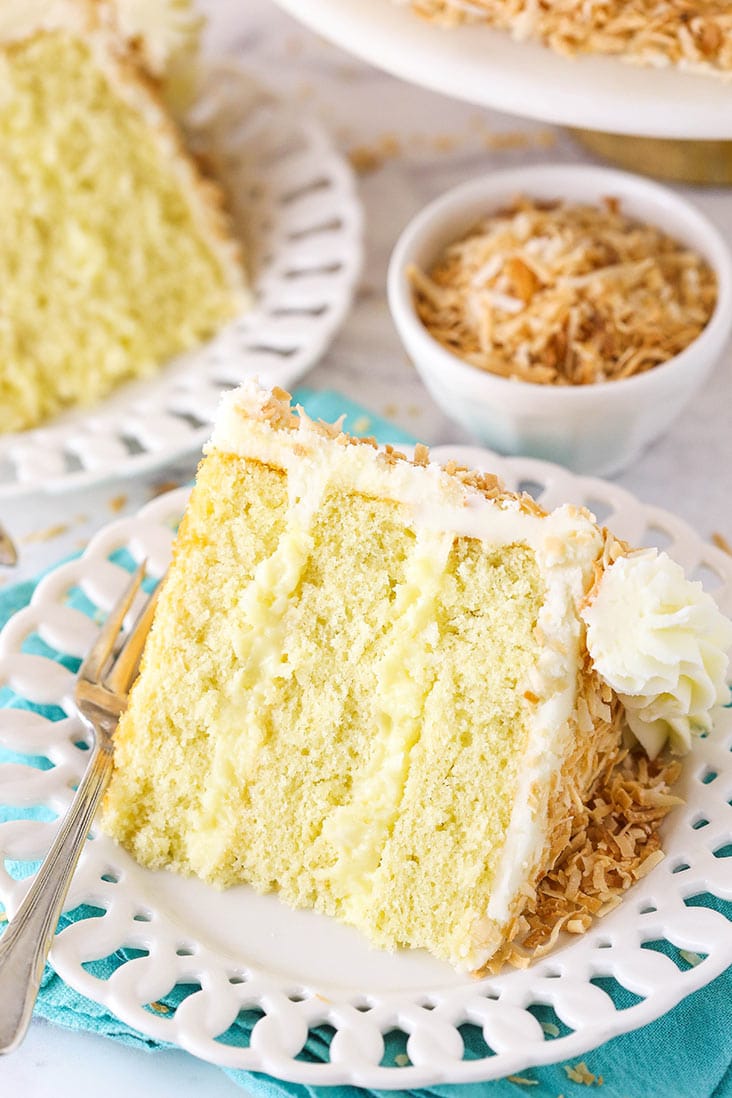
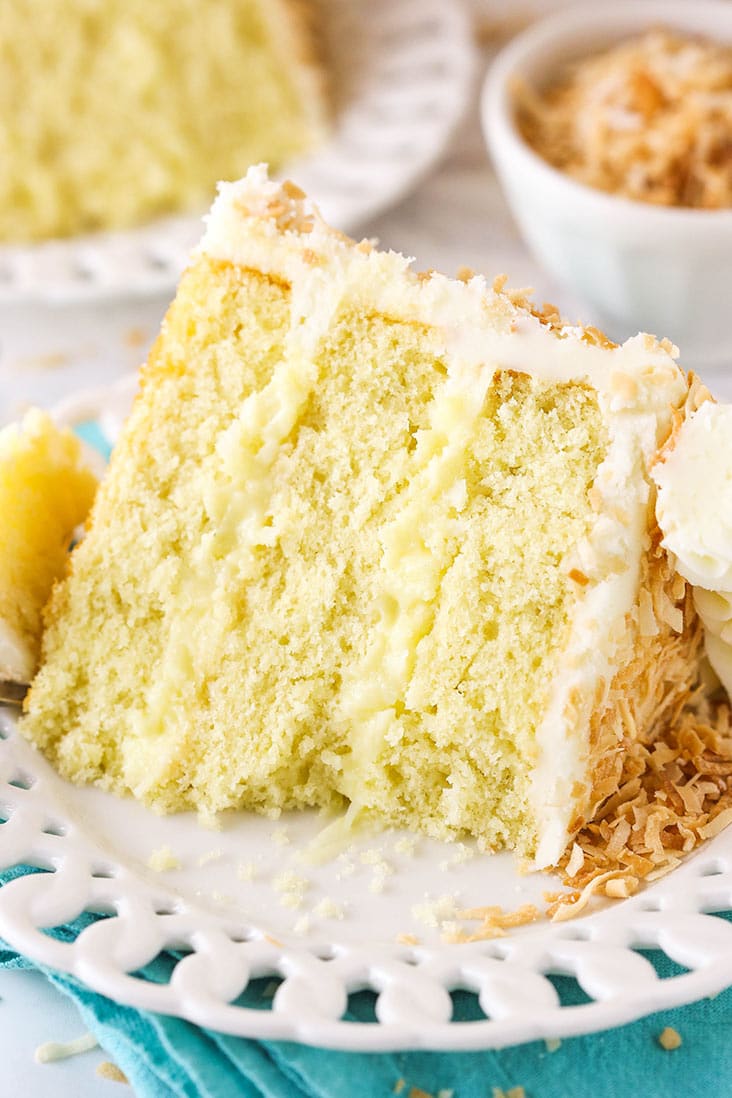
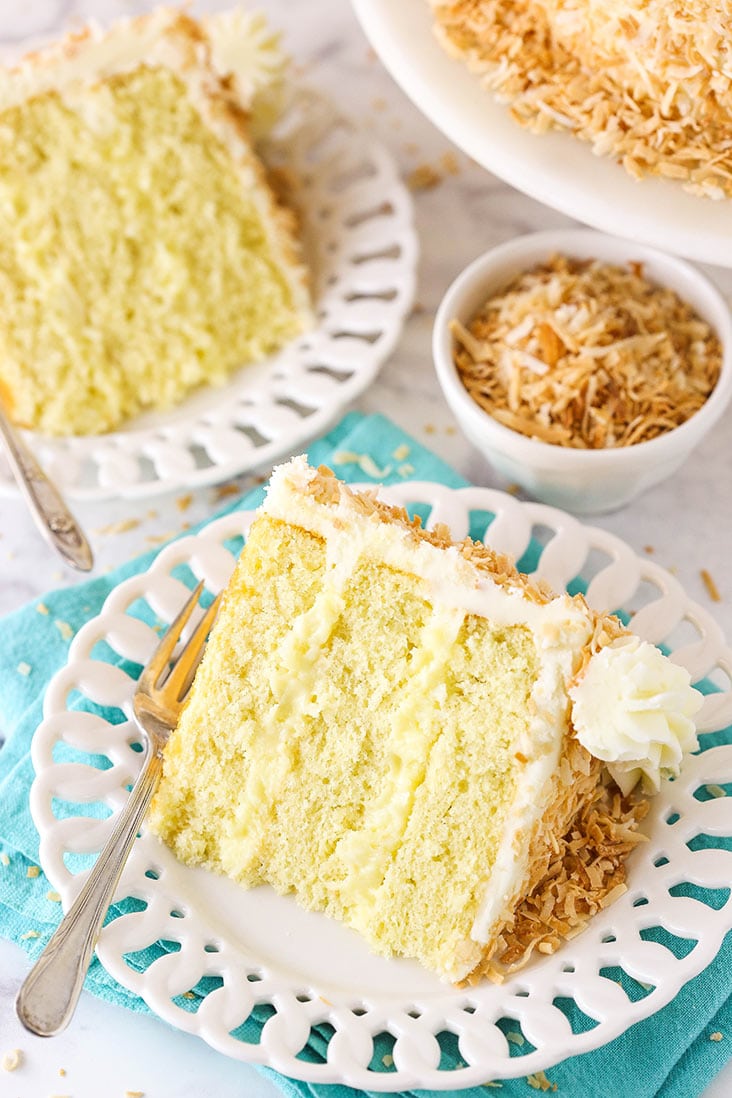
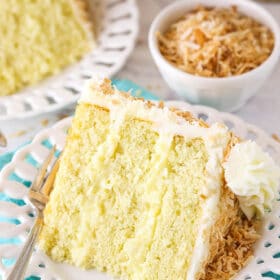
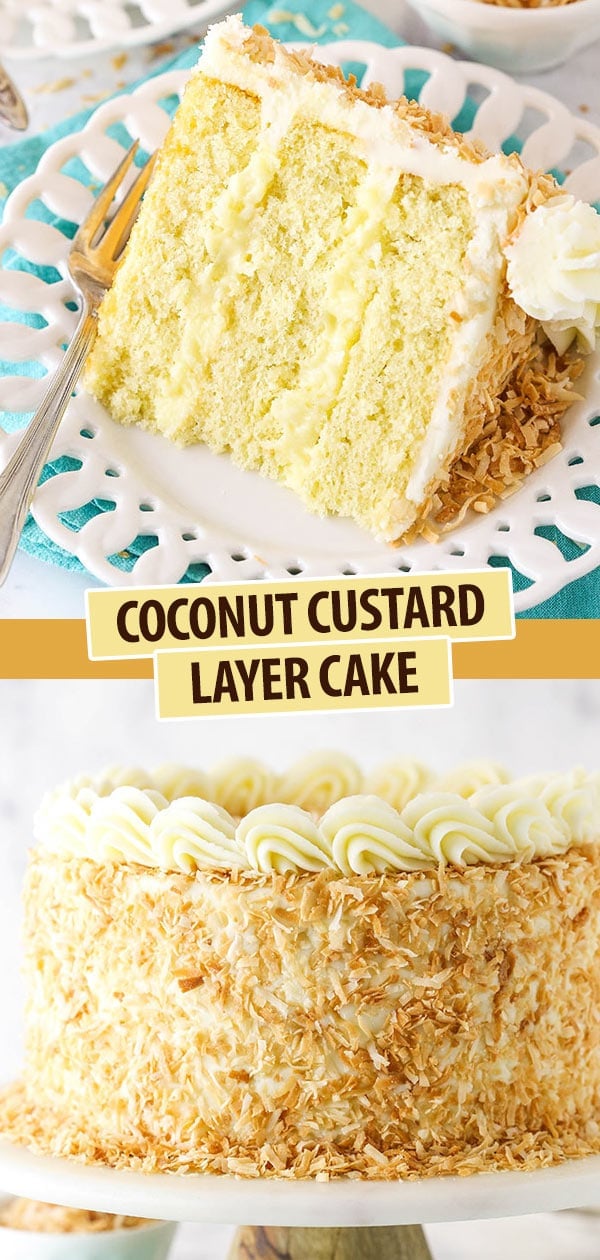
This Coconut Custard Cake is made with layers of moist coconut cake, a creamy coconut custard and coconut cream cheese frosting! It’s absolutely delicious and a dream cake for any coconut lover!
If you’re in the mood for a pie instead of a cake, this coconut custard pie is the perfect choice.
This post is sponsored by Challenge Butter, but all opinions are my own.

Coconut Custard Cake
This cake is seriously dreamy. The coconut cake layers are tender and moist and made with coconut milk and coconut extract for lots of great flavor. The coconut custard is rich and creamy and easily my favorite part of this cake. And the cream cheese frosting compliments everything perfectly.
So let’s talk about the custard filling a bit. This filling is just so darn good you’ll want to eat it on it’s own. Typically a custard is going to be made with eggs, but not all “custards” use eggs. This filling definitely uses eggs and is therefore cooked over the stove to heat the eggs. If you ever do a taste comparison of custards with and without eggs, you will notice a HUGE difference in flavor. The eggs don’t make it eggy, but instead add richness. It’s kind of like the difference between a no bake cheesecake and a baked cheesecake. The richness of the baked cheesecake comes from the addition of eggs and it applies here too.
This cake is truly a winner. It’d be a hit for Easter or any occasion. It’s full of flavor and texture, and for as yummy as it is, it’s not hard to make.
Ingredients
Most of the ingredients used in this cake are pretty straight forward, you’ll just need some coconut things. Have plenty of coconut extract on hand, along with coconut milk and shredded coconut.
For the Coconut Cake Layers
- All-Purpose Flour
- Baking Powder: No baking soda here.
- Salt: If you only have salted butter on hand, just leave out the salt the recipe calls for.
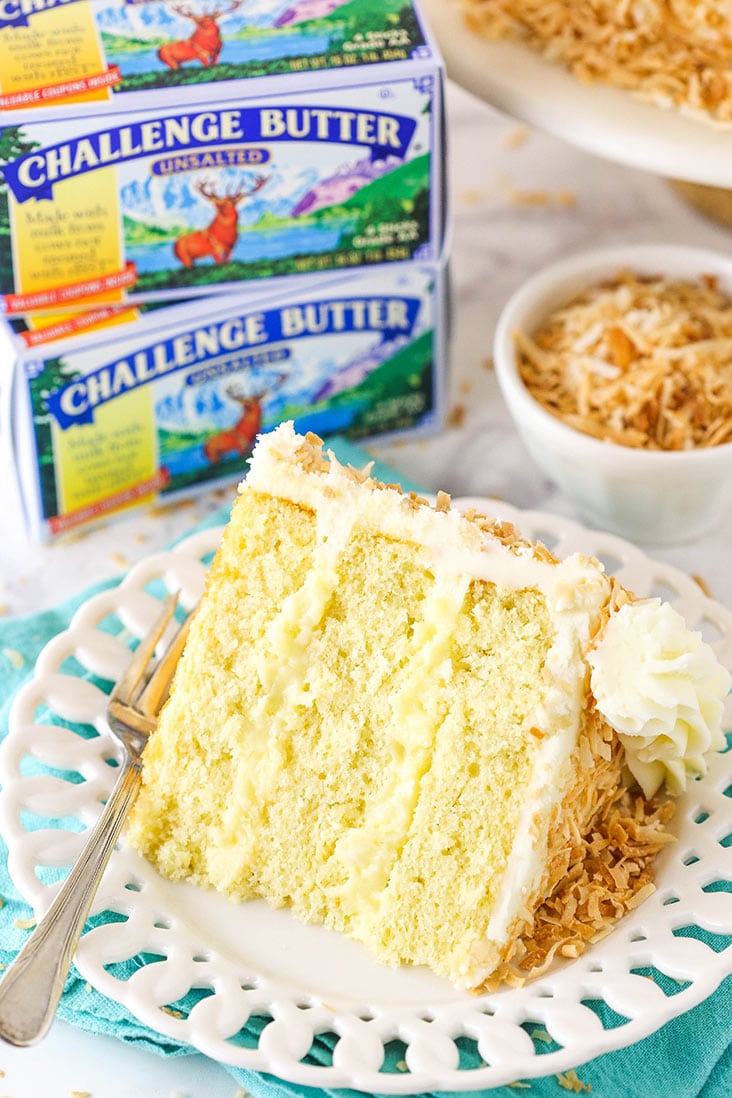
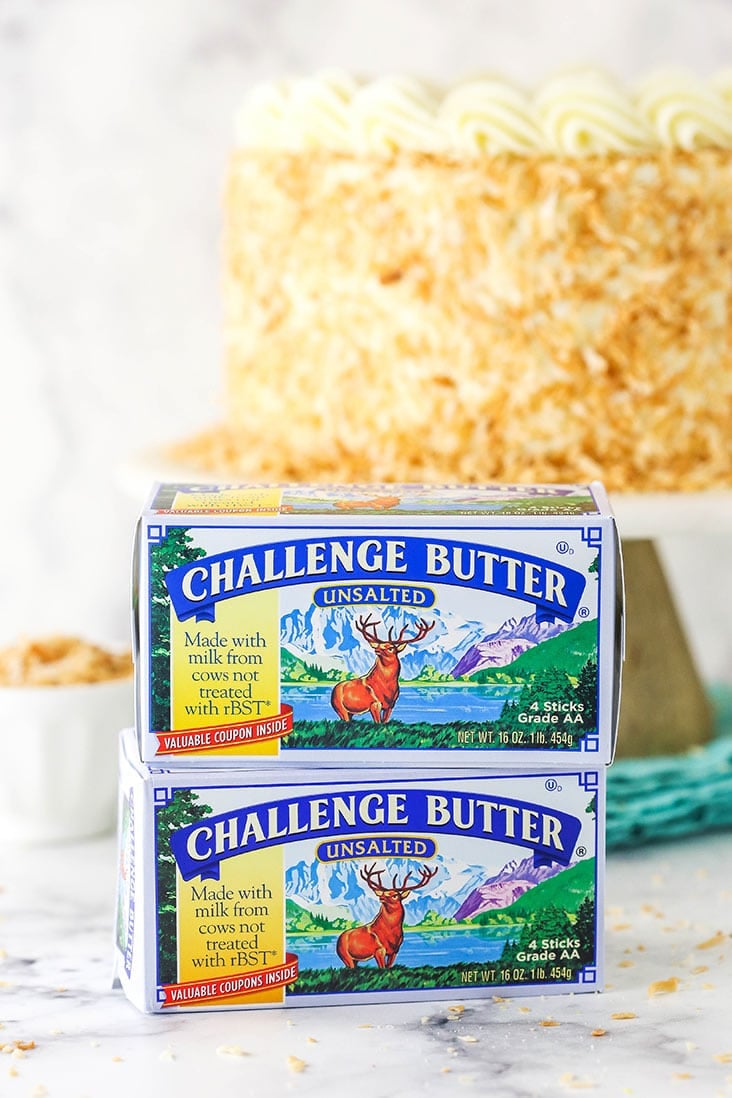
- Unsalted Butter: It should be room temperature. And of course I used my favorite butter here, Challenge Butter. Challenge Butter is a high quality, creamy butter that goes from farm to fridge in just two days, ensuring that it’s nice and fresh. It has no added hormones, artificial flavors or fillings, so you can feel good about feeding it to your family. If you haven’t tried it before, you definitely need to. It will definitely elevate your baking and cooking.
- Vegetable Oil: For extra moisture.
- Sugar
- Coconut Extract: For coconut flavor.
- Vanilla Extract: Be sure to use pure vanilla extract.
- Large Eggs
- Coconut Milk: For more coconut flavor. Be sure to use coconut milk and not cream of coconut.
For the Coconut Custard Filling
- Egg Yolks: These help thicken the filling, but also add that classic custard-y flavor.
- Sugar
- Cornstarch: Also helps to thicken the filling.
- Milk: I’d recommend whole milk or 2%. The higher fat content helps make the filling extra creamy.
- Shredded Coconut: I use sweetened coconut, but unsweetened would be fine.
- Butter: Again, I’m using Challenge Butter here for superior flavor.
- Coconut Extract: Bring on the coconut flavor!
- Vanilla Extract
For the Coconut Cream Cheese Frosting
- Cream Cheese: Should be room temperature. And Challenge Cream Cheese is definitely the way to go. It’s made with real milk, cream and natural ingredients for amazing flavor and creaminess.
- Butter: Room temperature, as well. And again, Challenge Butter is the best!
- Powdered Sugar: You’ll find a decent amount of powdered sugar in the cream cheese frosting, which adds both volume and stability so that it stays in place on your cake.
- Coconut Extract: For even more coconut flavor!
- Vanilla Extract
- Shredded Coconut: I toasted mine, but you could leave it un-toasted, if you prefer.
How to Make Coconut Custard Cake
For the Cake
- Prep For Baking: Prepare three 8 inch cake pans with parchment paper circles in the bottom and grease the sides. Preheat oven to 350°F.
- Combine Dry Ingredients: Add all dry ingredients to a large bowl and whisk together.
- Cream Butter, Oil, Sugar and Extracts: Add the butter, oil, sugar and extract to a large mixer bowl and cream them together for about 2-3 minutes. You’ll notice the mixture lighten in color and get a nice, creamy texture to it when it’s ready.
- Add Eggs: Add the eggs one at a time and mix until mostly combined after each.
- Start adding dry ingredients: Add about half of the dry ingredients first and mix that until mostly combined.
- Add coconut milk.
- More Dry Ingredients: Add the remaining dry ingredients and mix until well combined. Don’t over mix.
- Bake: Divide the batter evenly between cakes pans and bake.
- Let Cool: Remove cakes from oven and allow to cool for a few minutes, then remove to cooling racks to cool completely. The cakes will be nice and tender.
For the Filling
- Prep Egg Yolks: Put the egg yolks in a medium sized bowl and gently beat them together so they are ready for when you need them.
- Heat Sugar, Cornstarch and Milk: Add the sugar, cornstarch and milk to a large saucepan and whisk until smooth. Cook over medium heat, stirring continuously, until mixture begins to thicken and bubble. You don’t want to turn up the heat to make this happen faster. The mixture needs time to thicken properly. You also don’t want to over heat it or you could actually break down the cornstarch.
- Temper the eggs: Remove the pan from the heat and add a little bit of milk mixture to the egg yolks and whisk together, then add egg mixture to milk mixture. This process slowly heats the eggs, ensuring that you don’t scramble them.
- Boil Lightly: Place everything back in the pan and the pan back on the heat. Stir in the shredded coconut. Bring the mixture to a light boil. Allow to boil for 1 minute or so, stirring continuously, until thickened. Keep in mind that it will continue to thicken as it cools. Don’t boil for longer than 2 minutes, or you can overcook it and it’ll actually break down, rather than get thicker.
- Add Flavorings and Cool: Remove from heat and add the butter and extracts. Stir until smooth, then pour into a bowl and cover with clear wrap pressed against the top so that it doesn’t get a film on top. Set in the fridge to cool completely.
For the Frosting
- Butter and Cream Cheese: Beat the butter and cream cheese together in a stand mixer until smooth.
- Add the sugar: Slowly add about half of the powdered sugar and mix until smooth.
- Flavorings: Add vanilla and coconut extract and mix until smooth.
- More sugar: Add the remaining powdered sugar and mix until smooth.
Build the Cake
Time to layer everything together! See my tips on how to fill and stack a cake.
- Assemble Cake: To put the cake together, each layer must be completely cooled. Place the first cake on a serving plate or a cardboard cake round. Pipe a dam of frosting around the outer edge of the cake to hold the filling in place and fill it with half of the coconut custard filling. Top with the second layer of cake and another layer of coconut filling.
- Add Final Layer & Decorate: Add the final layer of cake on top and frost the cake with the remaining frosting. Press the toasted coconut onto the sides of the cake. You’ll want to do this right after frosting it so that the coconut will stick. Pipe a border around the top edge of the cake using the remaining frosting.
- Serve or Store: Store the cake in the fridge until you’re ready to serve it.
Tips for Success
This cake isn’t terribly hard to make, but here are some tips to make sure it turns out perfectly.
- Level the Cakes for Easy Layering: I recommend using a large serrated knife to remove the domes from the top of the cakes so that they’re flat. These cakes don’t have a large dome, but I like to make sure they’re completely flat for layering purposes. Particularly with a softer filling like this one, it’s nice to be sure things won’t slip around. I have a handy tutorial to show you how to do this: How to Level and Torte a Cake.
- Don’t Skimp on the Creaming Time: Make sure you fully cream the butter, sugar, oil and vanilla for your cake batter. The mixture is ready when the color lightens and texture gets fluffy and light.
- Don’t rush making the custard: Heating the mixture too quickly can keep it from thickening properly and so can over cooking the mixture. Take your time and remove the finished custard before it’s too thick, because it will thicken more as it cools.
How to Store Coconut Custard Cake
This cake lasts in the fridge for 3-4 days. Store in an airtight container if you have one. If you’d like, you can make the cake layers and filling a day in advance. Let the cake layers cool and store them in an air tight container or wrap each one in plastic wrap and store them in the fridge overnight. Store the filling in the fridge. When you’re ready to put it together, make the cream cheese frosting, assemble and enjoy!
More Great Coconut Recipes
Coconut Cream Pie
Coconut Cream Pie Cupcakes
Easy Coconut Cheesecake
Coconut Poke Cake
Key Lime Coconut Cupcakes
Watch The Video
Coconut Custard Cake
- Prep Time: 1 hour 25 minutes
- Cook Time: 45 minutes
- Total Time: 2 hours 10 minutes
- Yield: 12–14 slices 1x
- Category: Dessert
- Method: Oven
- Cuisine: American
Description
This Coconut Custard Cake is made with layers of moist coconut cake, a creamy coconut custard and coconut cream cheese frosting! It’s absolutely delicious and a dream cake for any coconut lover!
Ingredients
Coconut Cake Layers
- 2 1/2 cups (325g) all purpose flour
- 2 1/2 tsp baking powder
- 1/2 tsp salt
- 3/4 cup (168g) unsalted Challenge Butter, room temperature
- 1 1/2 cups (310g) sugar
- 1/4 cup (60ml) vegetable oil
- 2 tsp coconut extract
- 1/2 tsp vanilla extract
- 4 large eggs
- 1 1/4 cups (300ml) coconut milk
Coconut Custard
- 2 egg yolks
- 6 tbsp (78g) sugar
- 2 tbsp cornstarch
- 1 1/2 cups (360ml) milk (whole or 2%)
- 1 cup (75g) shredded coconut, sweetened
- 1 tbsp (7g) salted Challenge Butter
- 1/4 tsp coconut extract
- 1/4 tsp vanilla extract
Coconut Cream Cheese Frosting
- 16 oz (452g) Challenge Cream Cheese, room temperature
- 1 cup (224g) unsalted Challenge Butter, room temperature
- 11 cups (1265g) powdered sugar
- 2 tsp coconut extract
- 1/2 tsp vanilla extract
- 1 1/2 cups (113g) shredded coconut, sweetened, toasted
Instructions
FOR THE CAKE:
- Prepare three 8 inch cake pans with parchment paper circles in the bottom and grease the sides. Preheat oven to 350°F (176°C).
- Combine the flour, baking powder and salt in a medium sized bowl and set aside.
- Add the butter, sugar, oil and extracts to a large mixer bowl and beat together until light in color and fluffy, about 3-4 minutes. Do not skimp on the creaming time.
- Add the eggs one at a time, mixing until mostly combined after each. Scrape down the sides of the bowl as needed to be sure all ingredients are well incorporated.
- Add half of the dry ingredients to the batter and mix until mostly combined.
- Add the coconut milk and mix until well combined. The batter may look a little curdled, but that’s ok.
- Add the remaining dry ingredients and mix until well combined and smooth. Scrape down the sides of the bowl as needed to be sure all ingredients are well incorporated. Do not over mix the batter.
- Divide the batter evenly between the cakes pans and bake for 20-25 minutes, or until a toothpick comes out with a few crumbs.
- Remove the cakes from the oven and allow to cool for about 2-3 minutes, then remove to cooling racks to cool completely.
FOR THE CUSTARD:
- To make the custard, put the egg yolks in a medium sized bowl and gently beat them together. Set aside.
- Add the sugar, cornstarch and milk to a large saucepan and whisk until smooth. Cook over medium heat, stirring continuously, until mixture begins to thicken and bubble. You don’t want to turn up the heat to make this happen faster. The mixture needs time to thicken properly.
- Remove the pan from the heat and add a little bit of milk mixture to the egg yolks and whisk together, then add egg mixture to milk mixture. This process tempers the eggs and ensures that you don’t scramble them.
- Place everything back in the pan and the pan back on the heat. Stir in the shredded coconut. Bring the mixture to a light boil. Allow to boil for 1 minute or so, stirring continuously, until thickened. Keep in mind that it will continue to thicken as it cools. Don’t boil for longer than 2 minutes, or you can overcook it and it’ll actually break down, rather than get thicker.
- Remove from heat and add the butter and extracts. Stir until smooth, then pour into a bowl and cover with clear wrap pressed against the top so that it doesn’t get a film on top. Set in the fridge to cool completely.
FOR THE FROSTING:
- To make the cream cheese frosting, beat the cream cheese and butter together until smooth.
- Add half of the powdered sugar and mix until well combined and smooth.
- Add the coconut extract and vanilla extract mix until well combined.
- Slowly add the remaining powdered sugar and mix until well combined.
TO BUILD THE CAKE:
- To assemble the cake, use a large serrated knife to remove the domes from the top of the cakes.
- Place the first layer of cake on a serving plate or a cardboard cake round. Pipe a dam of frosting around the outside of the cake. I use Ateco tip 808 for the dam so that it’s tall.
- Spread half of the coconut custard evenly on top of the cake layer, inside the dam.
- Add the second layer of cake, another dam of frosting and the remaining coconut custard.
- Add the final layer of cake on top, then frost the outside of the cake.
- Press the toasted coconut onto the sides and top of the cake, covering it fully. Do this immediately after frosting it. The frosting will “crust” as it sits and the coconut will not stick if you try to add it later.
- Pipe shells or swirls of frosting onto the top of the cake. Note that it’s a little tricky for the frosting to stick to the coconut, so you may want to pipe the frosting onto the cake prior to adding the coconut. It just depends on the look you want.
- Refrigerate well covered until ready to serve. Cake should be eaten within 3-4 days.
Nutrition
- Serving Size: 1 slice
- Calories: 1081
- Sugar: 129.1 g
- Sodium: 271.1 mg
- Fat: 51.3 g
- Carbohydrates: 151.8 g
- Protein: 8.5 g
- Cholesterol: 175.9 mg


I don’t usually leave comments, but I made this cake for Easter and wanted to let you know it was a huge hit! It was absolutely delicious and perfect and my family went crazy over it! Thank you for sharing your recipe!
Awesome! I’m so glad it was a hit!
I made this cake for the first time. The layers aren’t very high. Is this normal? I used fresh baking powder and followed the directions exactly.
They layers should be roughly an inch or so tall. All together, it makes a cake that’s about 3 1/2 – 4 inches tall.