This post may contain affiliate sales links. Please read my disclosure policy.
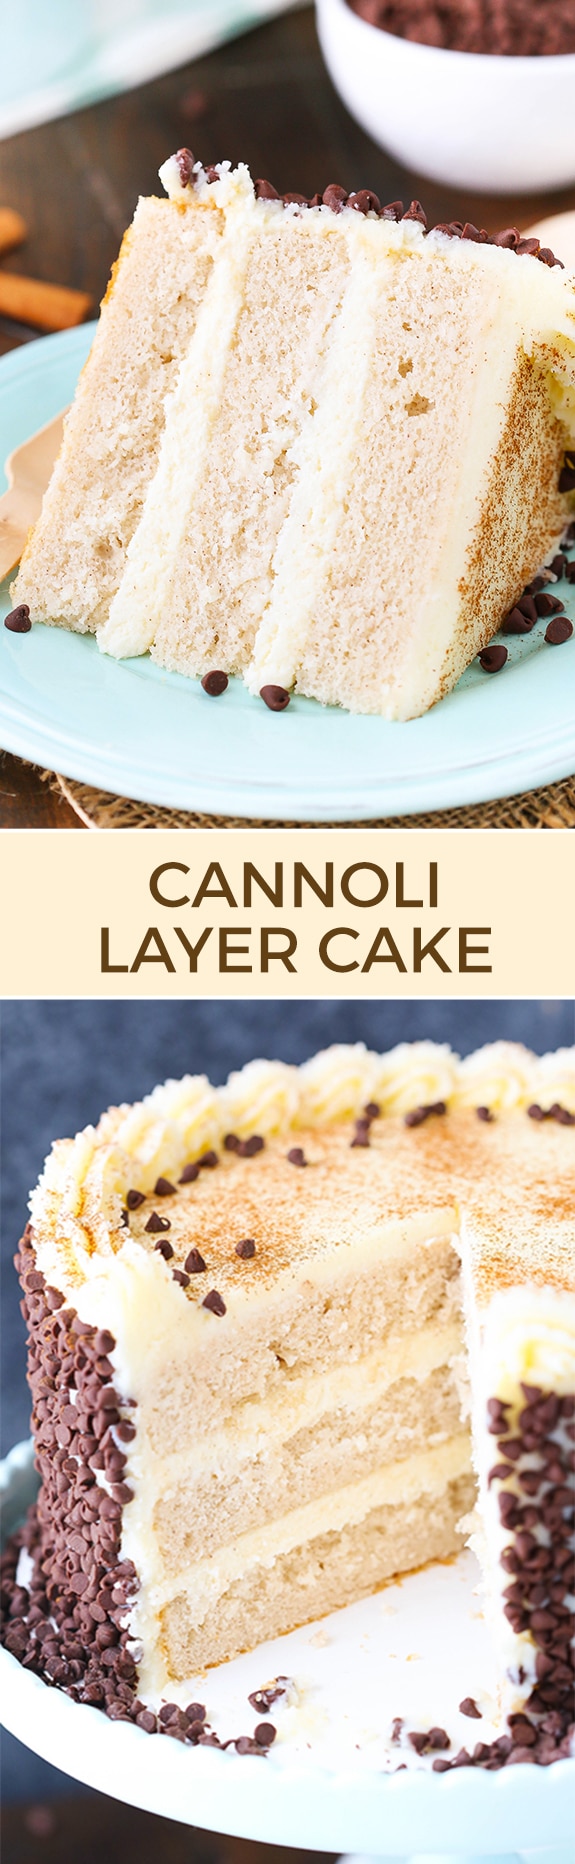
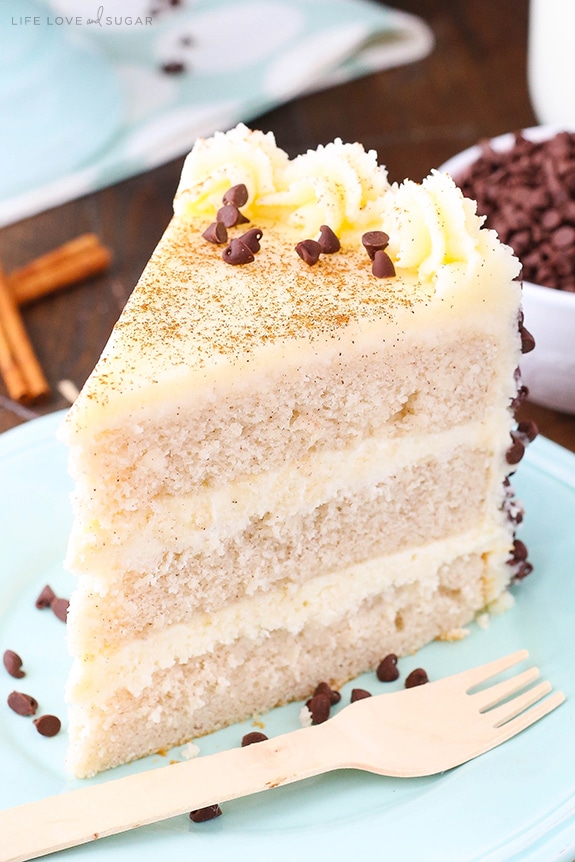
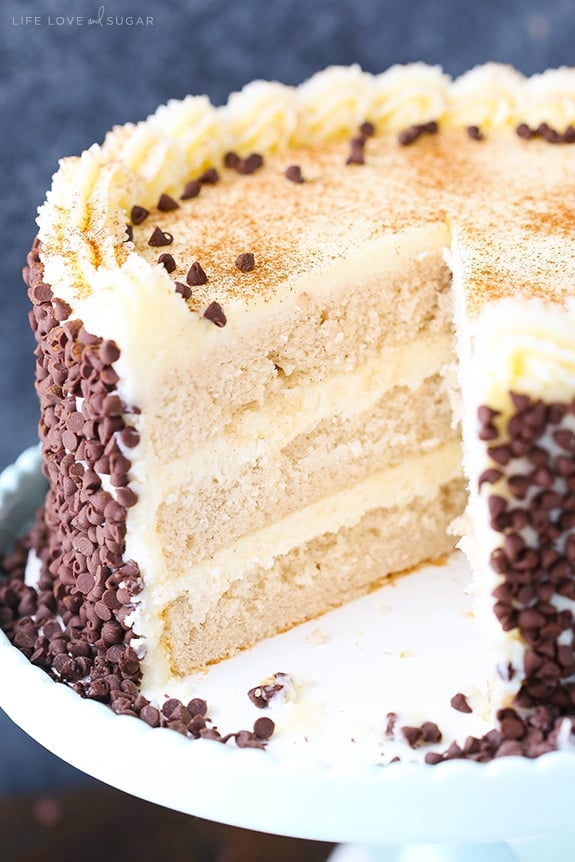
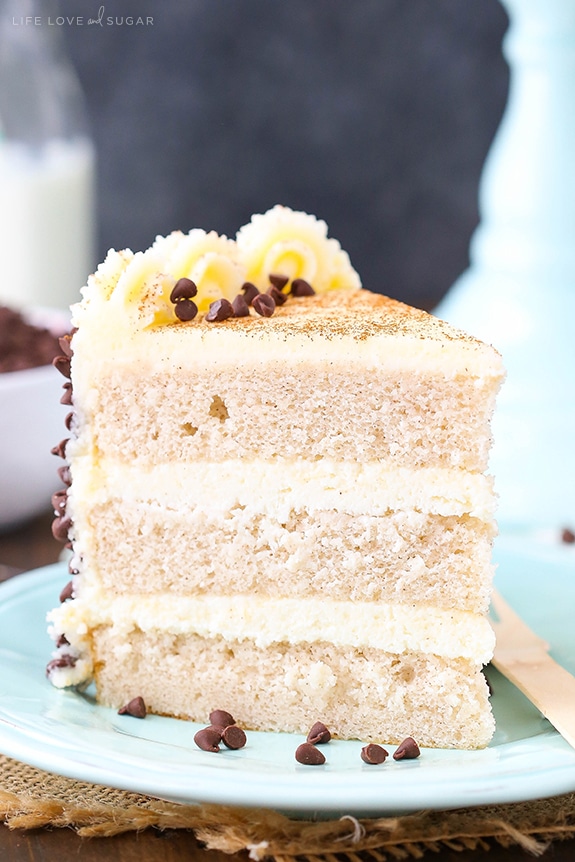
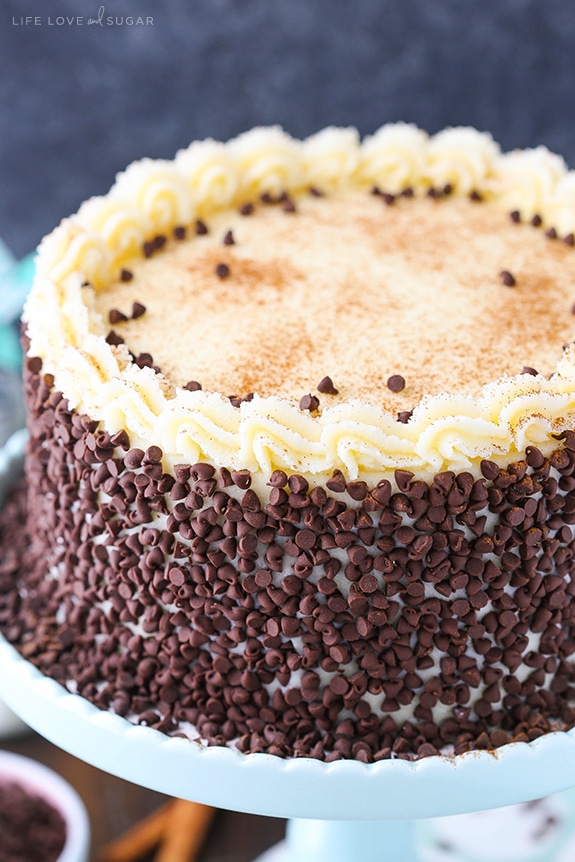
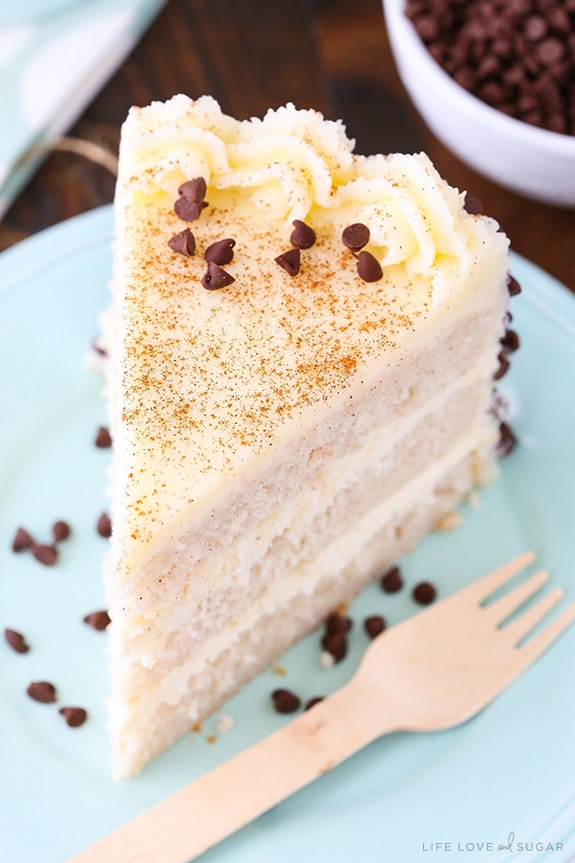
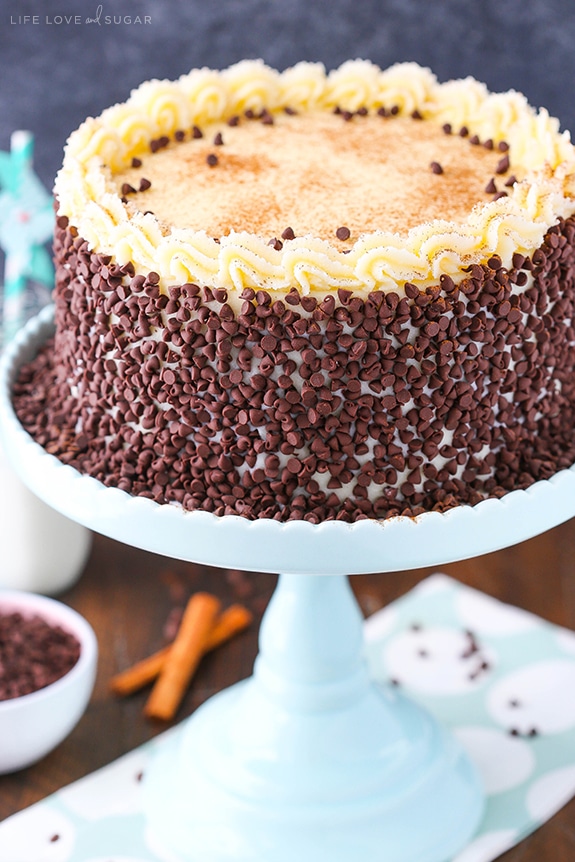
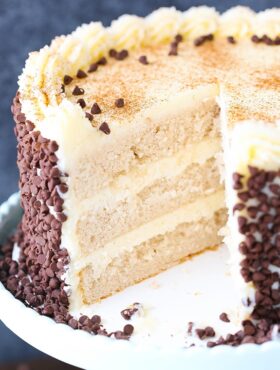
This Cannoli Layer Cake is a light, moist cinnamon cake filled with mascarpone & ricotta filling, then frosted with mascarpone frosting! Covered in mini chocolate chips, this treat has all the best parts of a cannoli in one delicious cake!

Table of Contents
Cannoli Layer Cake
So all of a sudden over the past week, I’ve had this crazy feeling like I just want to rid our house of all the stuff we don’t use. It’s like a spring cleaning bug hit me late. I’m actually a pretty big pack rat, so this has basically never happened to me before. It’s a strange feeling. I know my mom is probably reading this and dying to jump in the car as soon as possible to come help me get rid of things before I change my mind. 🙂
I’ve got several piles of clothing that haven’t been worn in years and the same for shoes. I’m even going through the kitchen cabinets. These days I have so much baking equipment that I’m running out of space. Things are piling up and it’s like towers of pans fall over every time I need to get one thing out. It’s time to remove the things I don’t use to make space for all the things I do. I’m pretty pumped to get everything out of the house and donate it to someone who can use it.
Of course all the baking things that now fill my cabinets are totally worth having because I get to make fun cakes like this one. 🙂
And this cake is so darn delicious. Cannoli as a flavor for cakes and such always surprises me. It seems like a flavor that’s so light and primarily composed of a little cinnamon and a couple kinds of cheese would be fairly boring – and yet every cannoli dessert I make I totally fall in love with. They are anything but boring. Mascarpone cheese has easily become one of my favorite things to use in desserts. The flavor is incredibly light, but so darn good and just sweet enough.
The one thing you have to be careful of when using mascarpone cheese is that you don’t want to over mix it or mix it at a high speed. The lowest speed you have is best. It easily gets watery if you aren’t careful.
Because the filling and frosting for this cake are made with ricotta and mascarpone cheeses, you’ll need to pay careful attention to the process of building the cake. You’ll want to have the cheeses at room temperature when you mix them so that they incorporate easily without being lumpy, but you’ll want to leave time to set them in the fridge to firm back up before layering and frosting the cake. There’s a bit of waiting involved at a couple points to make sure things are firm, since the cheeses aren’t naturally firm at room temperature. If you use a ricotta cheese that’s fairly watery, you may want to strain it before using. If you would prefer not to use ricotta, you could also replace it with additional mascarpone cheese.
How to Complete Your Cannoli Cake
As far as flow goes with putting the cake together, I made the filling first and let it firm up while the cakes cooled after baking. Once things are ready you want to be fairly quick about building the cake and adding the filling layers, since the filling can soften again if it sits out for too long. Once it’s all layered, I used any remaining filling to add a crumb coat, then refrigerated the cake until the filling was nice and firm, about 2-3 hours.
Once firm, you’ll use the frosting to cover the cake. Again, you’ll want to work relatively quickly so things don’t soften too much. While I usually use a fair number of steps to make a nice, smooth cake, I just used my offset spatula to frost this one. The mascarpone frosting is quite sticky, so it’d be much harder to use my usual paper towel and such to smooth it. Plus, since the chocolate chips are added to the sides, there’s really no need to get it perfect.
To finish of the cake, press mini chocolate chips into the sides and add a little border. I also sprinkled on a little cinnamon, but that’s totally optional.
This cake really is exceptional. It takes a little time and finesse to work with the soft filling and frosting, but it’s totally worth it. You won’t want to share a single crumb with anyone. 🙂

You might also like:
Cannoli Cheesecake
Cannoli Poke Cake
Cannoli Icebox Cake
Cannoli Tart
Tiramisu Cupcakes
Cannoli Cheeseball
Cannoli Layer Cake
- Prep Time: 15 minutes
- Cook Time: 21 minutes
- Total Time: 36 minutes
- Yield: 14-16 Servings
- Category: Dessert
- Method: Oven
- Cuisine: American
Description
This Cannoli Layer Cake is a light, moist cinnamon cake filled with mascarpone & ricotta filling, then frosted with mascarpone frosting! Covered in mini chocolate chips, this treat has all the best parts of a cannoli in one delicious cake!
Ingredients
CINNAMON CAKE LAYERS
- 3/4 cup (168g) unsalted butter, room temperature
- 1 1/2 cups (310g) sugar
- 3/4 cup (173g) sour cream
- 2 tsp vanilla extract
- 6 large egg whites, room temperature
- 2 1/2 cups (325g) all purpose flour
- 4 tsp (15g) baking powder
- 1 tsp ground cinnamon
- ½ tsp salt
- 3/4 cup (180ml) milk
- 1/4 cup (60ml) water
FILLING
- 1 1/4 cups (315g/12 oz) ricotta cheese, room temperature
- 1 1/4 cups (283g/10 oz) mascarpone cheese, room temperature*
- 1 1/4 cup (144g) powdered sugar
- 2 tsp vanilla extract
FROSTING
- 2 1/2 cups (565g/20 oz) mascarpone cheese, room temperature*
- 2 1/2 cups (288g) powdered sugar
- 1 tsp vanilla
12 oz bag mini chocolate chips
Instructions
1. Prepare three 8 inch cake pans with parchment paper circles in the bottom and grease the sides. Preheat oven to 350°F (176°C) .
2. In a large mixing bowl, cream butter and sugar together until light in color and fluffy, about 3-4 minutes. Do not skimp on the creaming time.
3. Add sour cream and vanilla extract and mix until well combined.
4. Add egg whites in two batches, mixing until well combined after each. Scrape down the sides of the bowl as needed to be sure all ingredients are well incorporated.
5. Combine dry ingredients in a separate bowl, then combine the milk and water in a small measuring cup.
6. Add half of the dry ingredients to the batter and mix until well combined. Add the milk mixture and mix until well combined. Add remaining dry ingredients and mix until well combined. Scrape down the sides of the bowl as needed to be sure all ingredients are well incorporated.
7. Divide the batter evenly between the cakes pans and bake for about 21-23 minutes, or until a toothpick comes out with a few crumbs.
8. Remove the cakes from the oven and allow to cool for about 3-5 minutes, then remove to cooling racks to cool completely.
9. While the cakes cool, make the filling. To make the filling, add all the ingredients to a mixer bowl and mix on low speed until well combined. Do not overmix or mix on a high speed or the mascarpone cheese will become thin and watery. If you are using a ricotta cheese that is watery, you may want to strain it first.
10. Place the filling in the fridge to firm up a bit, about 2-3 hours.
11. When the cakes are cool and the filling is ready, build the cake. First, remove the domes from the tops of the cake layers with a large serrated knife.
12. Place the first layer of cake on a cake circle or serving stand, then spread about 1 1/2 cups of filling on top. It should have firmed up in the fridge, but might still be a bit soft, so work relatively quickly.
13. Repeat with the next layer of cake and filling, then top the cake with the final layer of cake.
14. Use any remaining filling to quickly add a crumb coat to the cake, then place the cake in the fridge to firm up, 2-3 hours. If you have a large cake carrier to store it in, that’s best.
15. While the cake firms up, make the frosting. To make the frosting, add all the ingredients to a mixer bowl and mix on low speed until well combined. Do not overmix or mix on a high speed or the mascarpone cheese will become thin and watery.
16. Place the frosting in the fridge to firm up a bit, about 2-3 hours.
17. When the cake and frosting are ready, frost the outside of the cake. I used my offset spatula to get a nice, even layer. Keep aside about 1/2 – 3/4 cup of frosting for the border.
18. Press the mini chocolate chips onto the sides of the cake.
19. Pipe a border around the top edge of the cake. I used Ateco tip 844, but Wilton 2D or 1M would work as well.
20. Refrigerate cake until ready to serve.
* Room temperature is relative, as some people’s homes are warmer than others. Mascarpone cheese is quite sensitive to heat. You want it to still be a bit chilled, but not too cold or firm. I often take it out of the fridge about 15 minutes before I need it to take some of the chill off of it, but still have it cool. Mascarpone cheese, if it gets too warm, will get too soft and doesn’t do well at firming back up.
Nutrition
- Serving Size: 1 Slice
- Calories: 762
- Sugar: 58.6 g
- Sodium: 155.2 mg
- Fat: 45.9 g
- Carbohydrates: 78.9 g
- Protein: 13.4 g
- Cholesterol: 105.8 mg
Filed Under:
Enjoy!