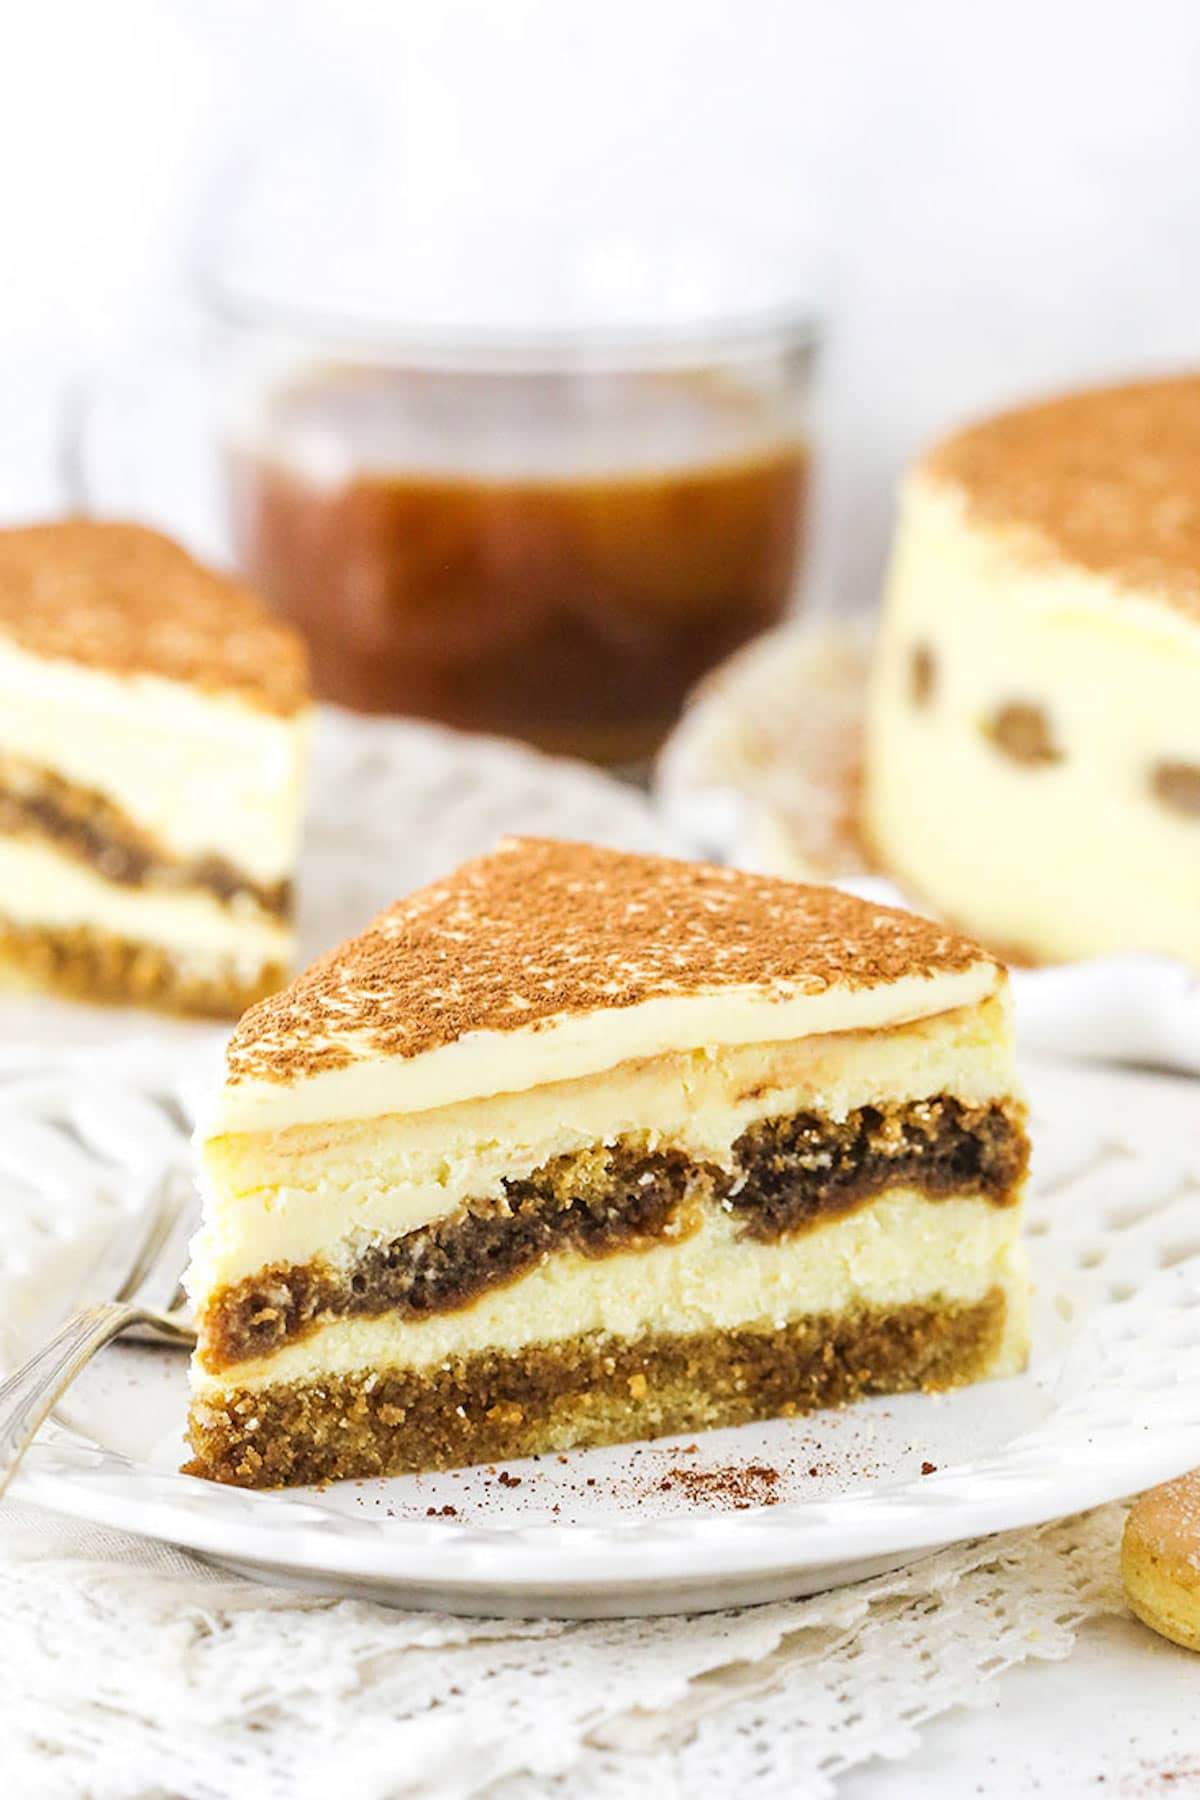
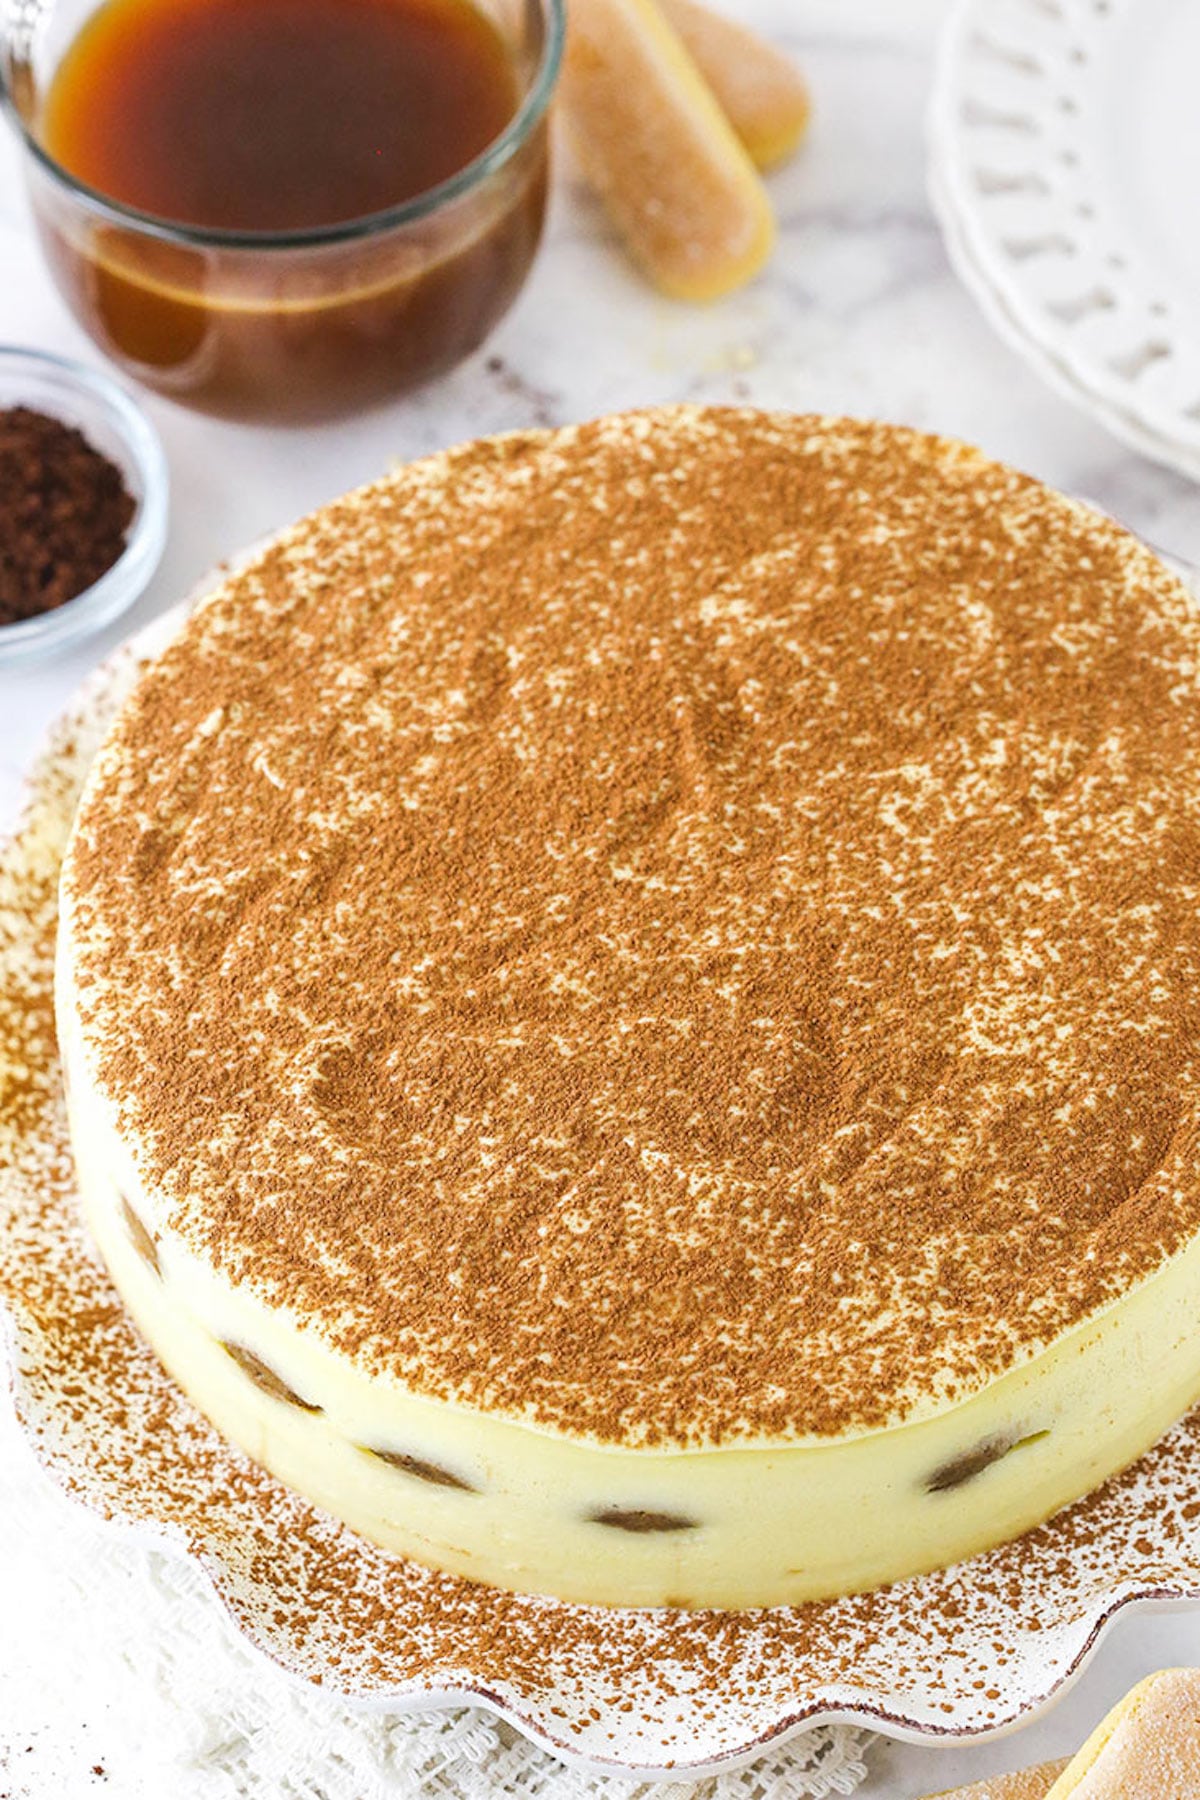
Inspired by your favorite Italian dessert, this Tiramisu Cheesecake is a showstopper! It’s made with a fluffy espresso-soaked cake layer, a creamy cheesecake filling, espresso-soaked ladyfingers and a silky tiramisu topping. Talk about a crave-worthy treat!
Creamy Tiramisu Cheesecake Layer Cake
Tiramisu is a fancy dessert and so is cheesecake… but have you ever thought of combining the two? Well, I have. And I took the liberty of experimenting with the idea to bring you this epic tiramisu cheesecake! And let me just say, it has exceeded all my expectations.
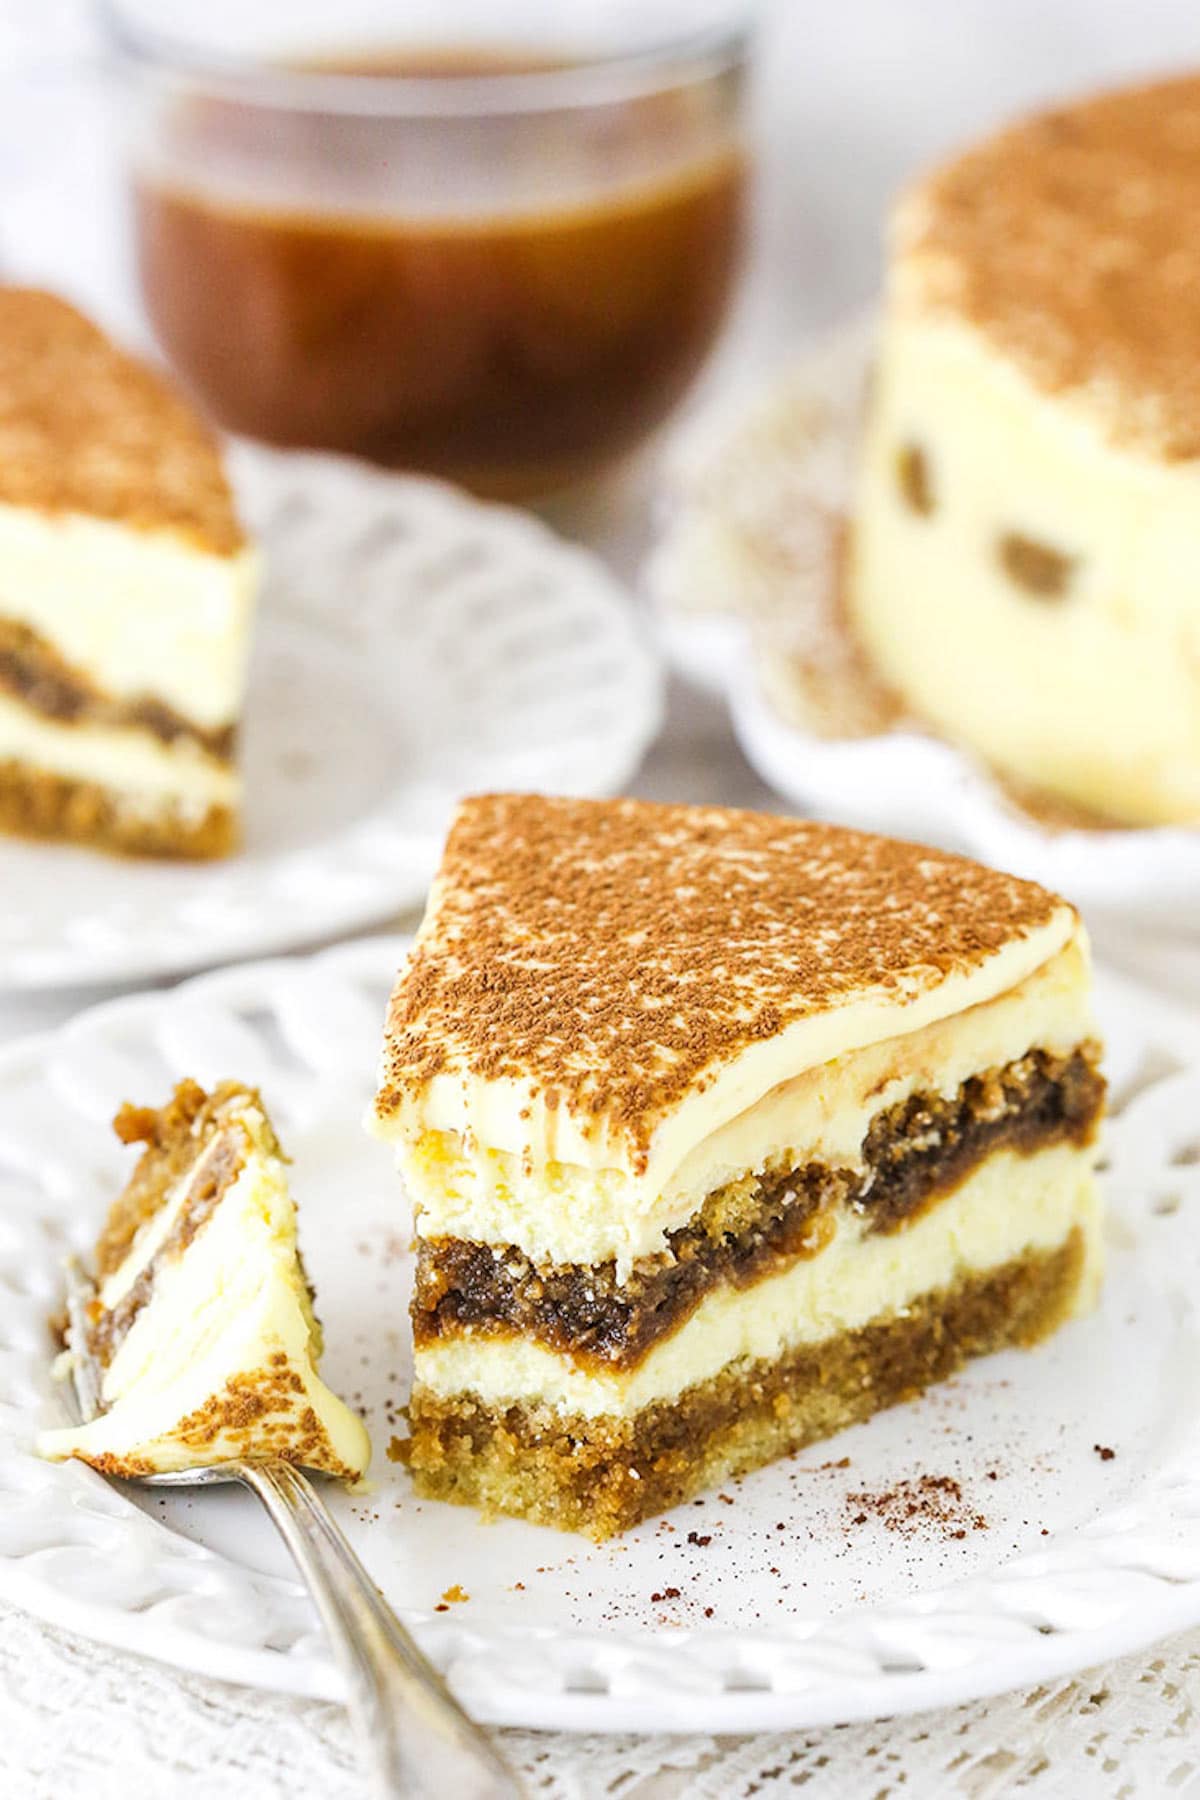
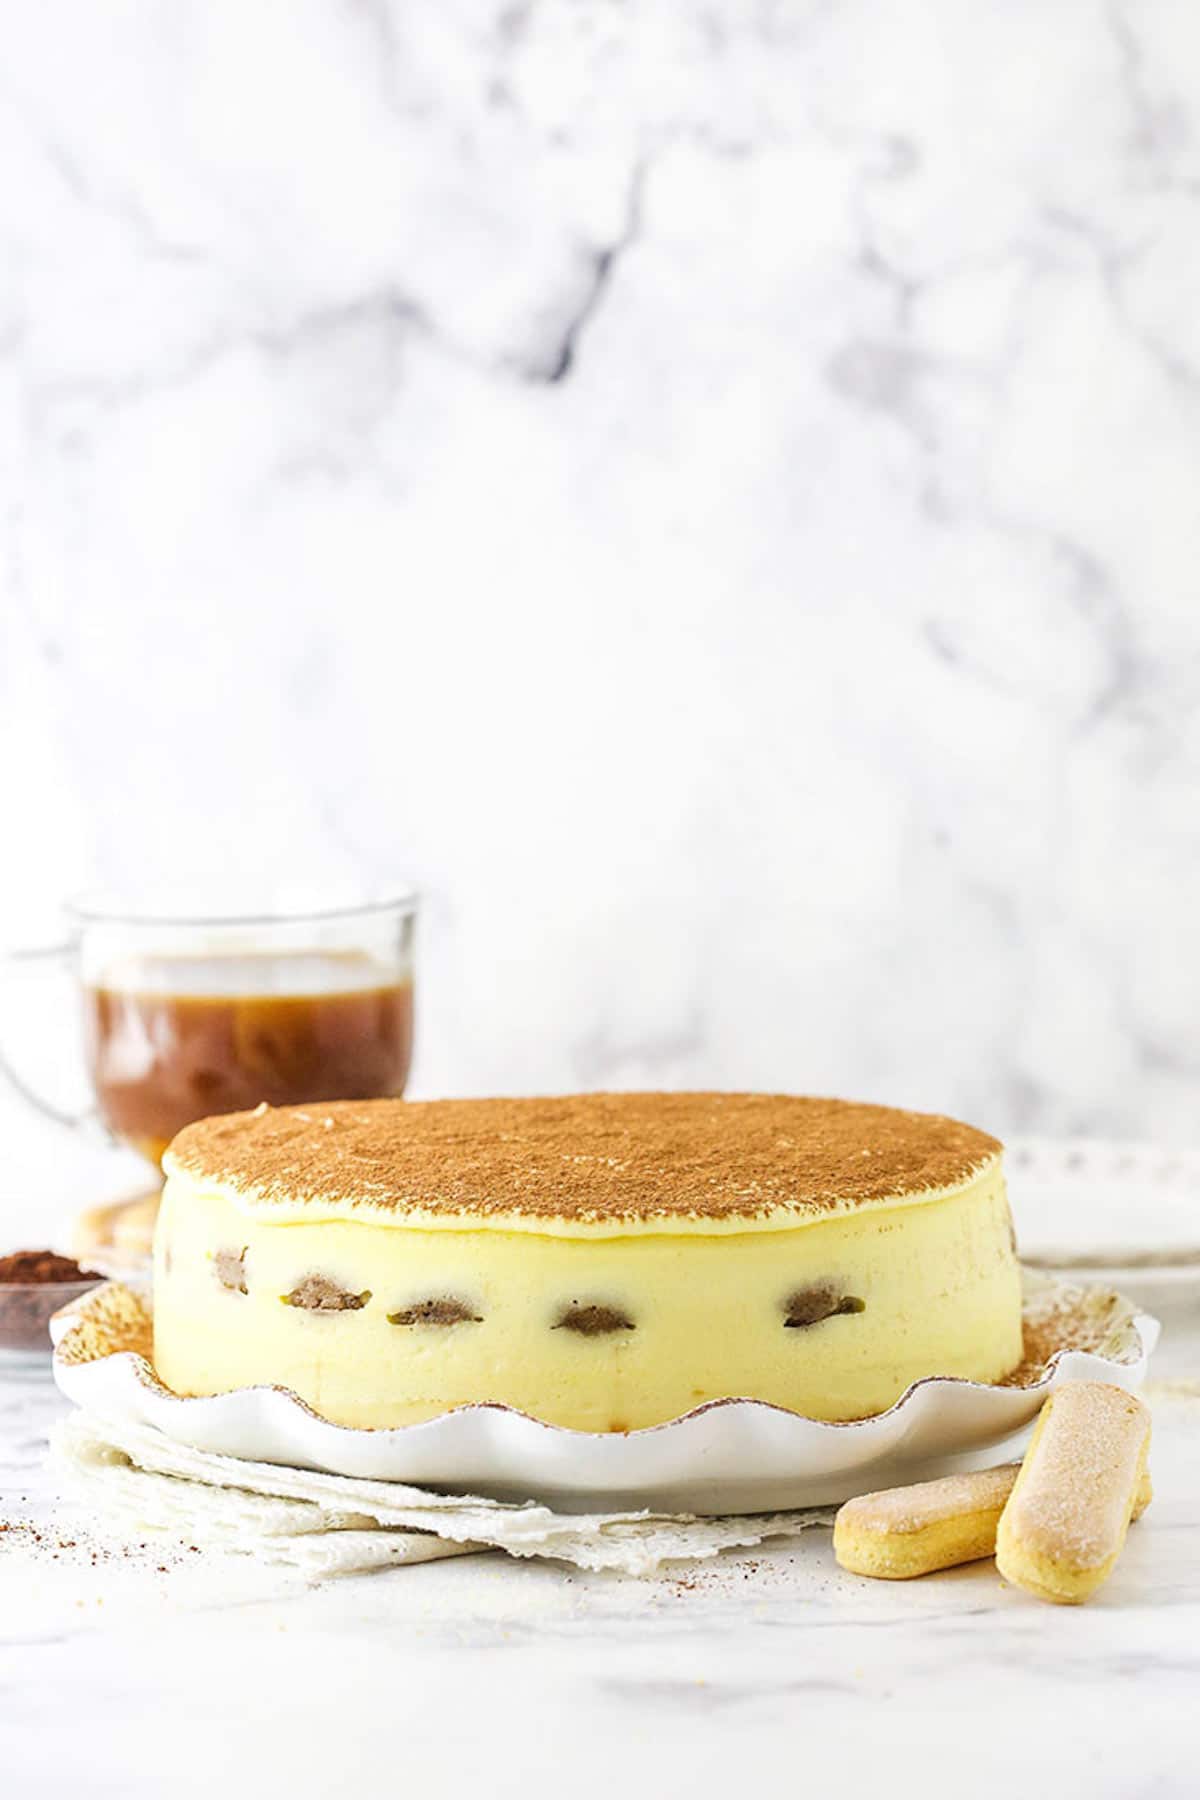
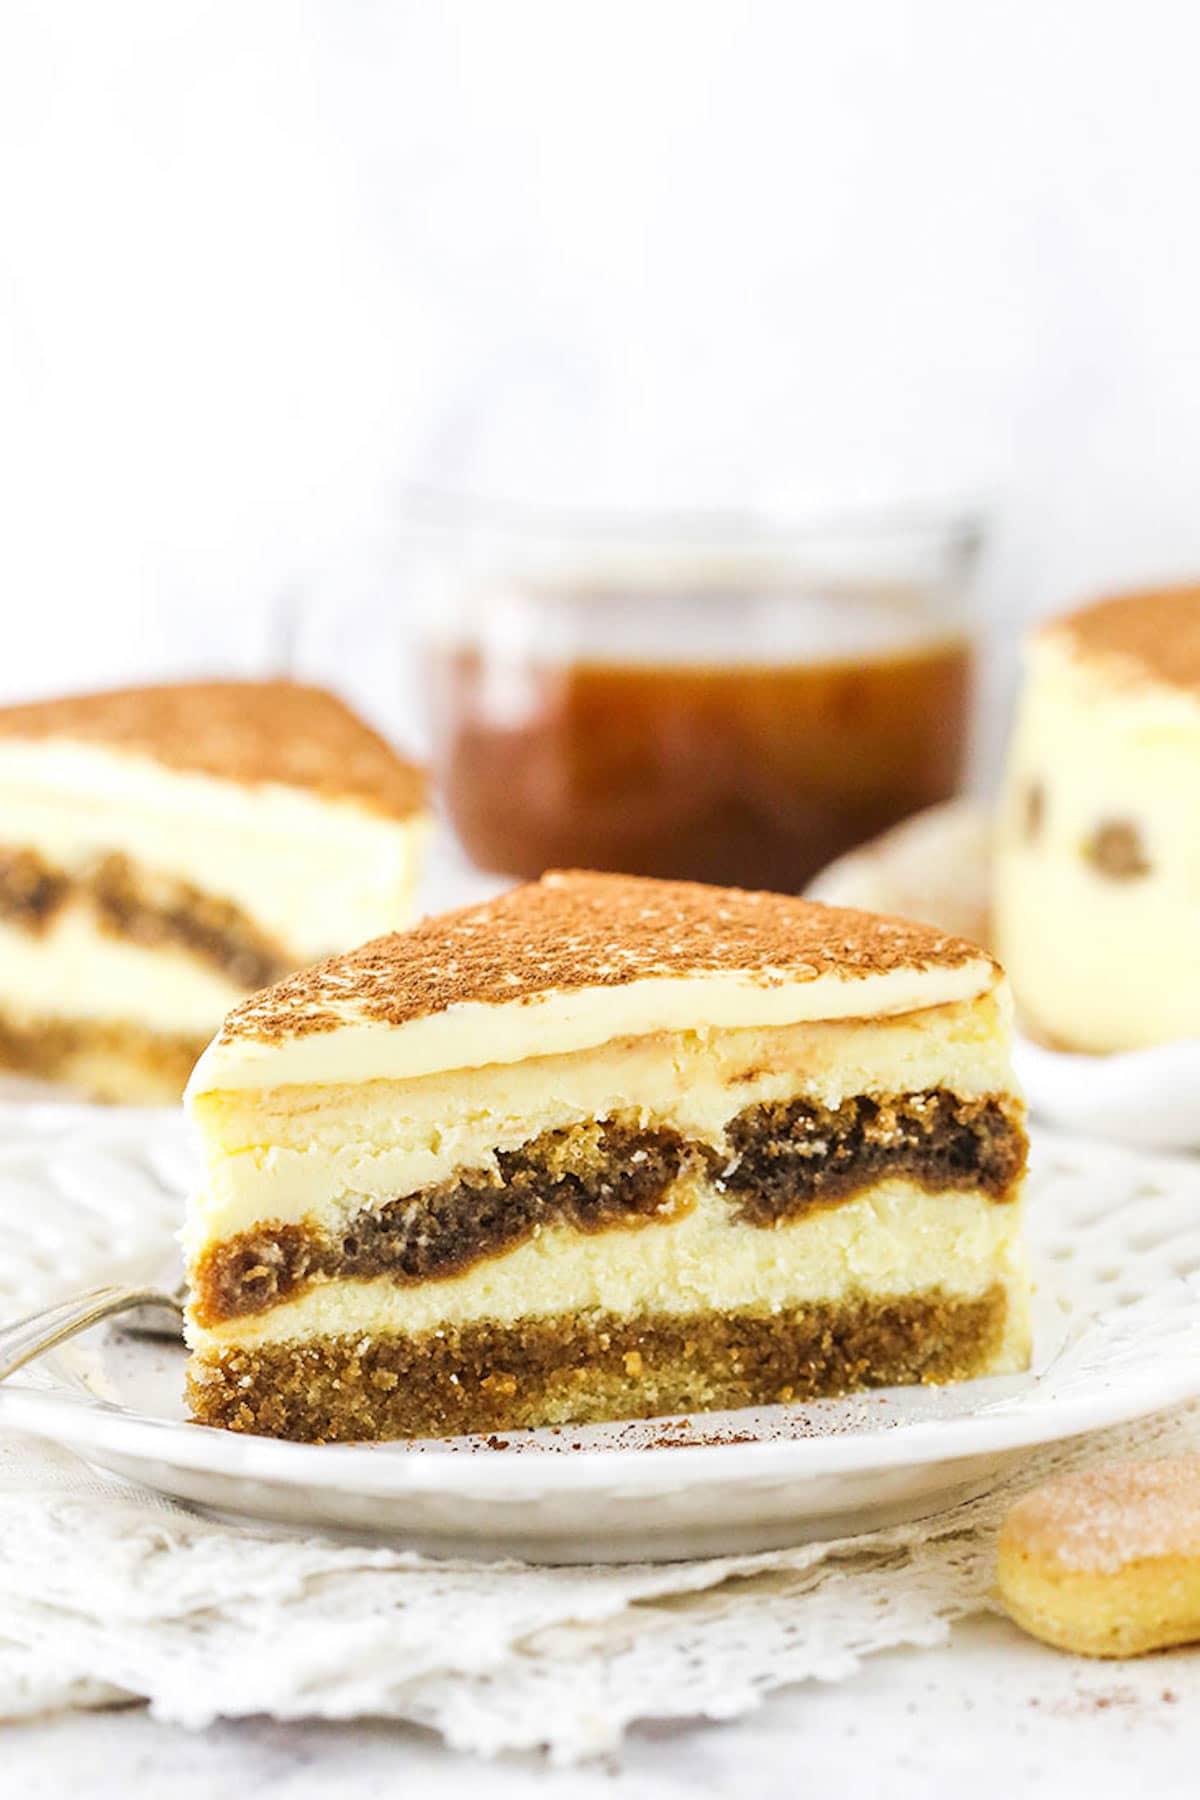
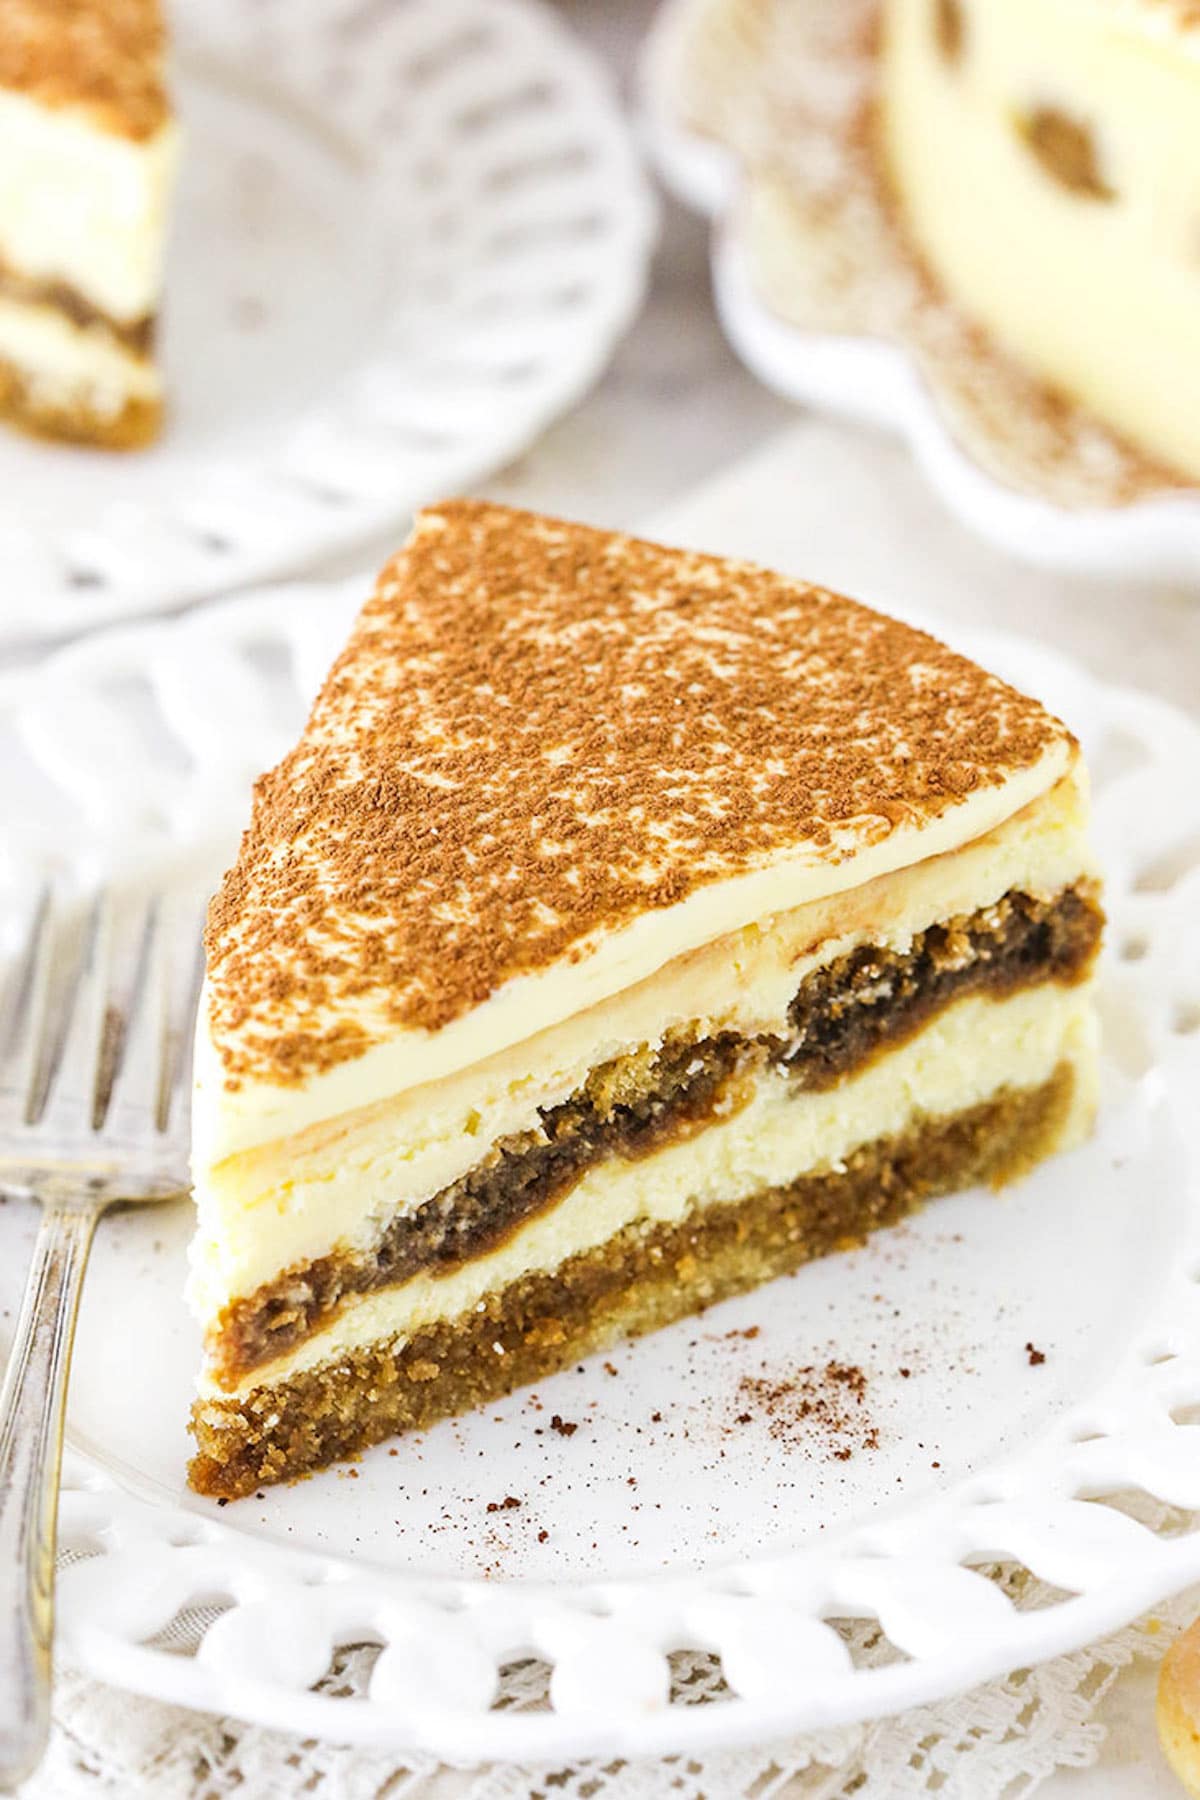
One of the things I had to experiment with a bit was how to layer everything together. I initially had ladyfingers on the bottom of the cheesecake instead of a cake layer, but the weight of the cheesecake completely crushed it. Even with the ladyfingers in the middle of the cheesecake, they got crushed if they were to far down. So I went with a cake layer on the bottom that still tastes so very much like the ladyfingers. And in the middle of the cheesecake, I recommend how much filling to put on top of the lady fingers and you really don’t want to do more than that or it’ll crush them. You also don’t really want to do less or you’ll have a lot of funky lumps on top from the ladyfingers being so high up. You may still be able to tell where they were placed, but it’s not nearly as dramatic. And once you add the topping, you don’t notice it.
This cheesecake cake is seriously amazing. The flavors are spot-on for tiramisu, but in over-the-top cheesecake form! Because of all the different elements to this dessert, it takes some time to make – but it’s not hard by any means. The heavenly end result will have you setting time aside on all future holidays to make this tiramisu cheesecake! It’s that good. Dare I say life-changing. And definitely a dessert made to impress.
What You’ll Need
Let’s get into the ingredients you’ll need for each component of this cake. We’ll start with the base cake layer and its espresso mixture, then we’ll move on to the filling and the topping.
For the Cake Layer
- All-Purpose Flour: You’ll need half a cup plus two extra tablespoons.
- Baking Powder: Not baking soda.
- Salt: Just a pinch!
- Unsalted Butter: Bring the butter to room temperature.
- Sugar: 1/4 cup plus two extra tablespoons.
- Vegetable Oil: For extra moisture.
- Vanilla Extract: For flavor.
- Egg: You’ll need one large egg.
- Milk: Use 1/4 cup. I use 2%.
For the Espresso Mixture
- Water: Hot, for melting the powder.
- Instant Espresso Coffee Powder: You’ll need 2-and-a-half tablespoons.
- Sugar: To sweeten things up so it’s not too bitter.
- Kahlua: For more great flavor.
For the Cheesecake Filling
- Cream Cheese: Bring to room temperature.
- Mascarpone Cheese: Cool, but not cold.
- Sugar
- All-Purpose Flour: Just 3 tablespoons.
- Sour Cream: For an extra creamy cheesecake.
- Vanilla Extract
- Eggs: You’ll need 2 full eggs plus 3 yolks, all at room temperature. The yolks contribute to the tiramisu-like flavor.
- Ladyfingers: These will be soaked in the same espresso mixture used to flavor the cake layer.
For the Tiramisu Cake Topping
- Egg Yolks: Room temperature.
- Sugar
- Heavy Whipping Cream: Cold.
- Mascarpone Cheese: Cool, but not cold.
- Cocoa Powder: A sprinkling of cocoa powder is the perfect garnish for tiramisu cake.
How to Make The Ultimate Tiramisu Cake
If you take things one step at a time, your tiramisu cake will be done before you know it. You may be tempted to omit the topping to save time, but I’m telling you – the topping takes it over the top! Don’t do all that work and then shortchange yourself of the topping. Like I said, it takes time, but it’s 110% worth it!!
Make the Cake Layer
I’m often asked one question when I use cake layers or brownies for the “crust” of a cheesecake – will baking it again with the filling dry it out? The answer is no. You’ll see!
- Prep for Baking: Prepare a 9-inch cake pan or springform pan (just be sure it doesn’t leak so that your cake batter doesn’t ooze out) with parchment paper in the bottom and grease the sides. Preheat the oven to 350°F.
- Combine Dry Ingredients: Combine the flour, baking powder and salt in a medium-sized bowl and set aside.
- Cream Butter, Sugar, Oil & Vanilla: Add the butter, sugar, oil and vanilla extract to a large mixer bowl and beat together until light in color and fluffy, about 3-4 minutes. Don’t skimp on the creaming time.
- Add Egg: Add the egg to the creamed butter and sugar mixture, mixing until mostly combined. Scrape down the sides of the bowl as needed to be sure all ingredients are well incorporated.
- Start Adding Dry Ingredients: Add half of the dry ingredients to the batter and mix until mostly combined.
- Slowly Add Milk: Slowly add the milk and mix until well combined. The batter will look a little curdled, but that’s ok.
- Finish Adding Dry Ingredients: Add the remaining dry ingredients and mix until well combined and smooth. Scrape down the sides of the bowl as needed to be sure all ingredients are well incorporated. Do not overmix the batter.
- Bake: Spread the cake batter evenly into the bottom of the prepared pan and bake for 13-15 minutes, or until a toothpick comes out with a few crumbs.
- Let Cool: Remove the cake from the oven and allow it to cool for about 2-3 minutes, then transfer it to a cooling rack to cool completely. Set aside.
Make the Espresso Mixture and Cheesecake Filling
While the cake is cooling, it’s time to work on the espresso mixture and the cheesecake filling. The espresso mixture flavors both the cake layer and the ladyfingers in the filling to keep this cake strong in its tiramisu spirit!
- Make Espresso Mixture: Add the espresso coffee powder and sugar to the hot water and stir to dissolve, then add the Kahlua. Set aside.
- Begin Making Cheesecake Batter: Add the cream cheese, mascarpone cheese, sugar and flour to a large mixer bowl and beat on low speed until combined and smooth. Scrape down the sides of the bowl.
- Add Sour Cream & Vanilla: Add the sour cream and vanilla extract mix on low speed until well combined.
- Add Eggs: Add the eggs and egg yolks one at a time, mixing slowly to combine after each addition. Scrape down the sides of the bowl as needed to make sure everything is well combined
Assemble and Bake
One of the things I had to experiment with was the placement of the ladyfingers in the cheesecake. I got the best results when I layered them in after just over half of the filling was added. They didn’t get squished and they didn’t affect the texture of the top of the cheesecake!
- Prep for Baking: Once everything is ready to go, reduce the oven temperature (or preheat) to 300°F. Prepare a springform pan with parchment paper in the bottom and grease the sides. If you used the springform pan to bake the cake, clean it, then respray it with non-stick spray.
- Drizzle Espresso Mixture Over Cake: Reset the springform pan edges around the cake layer and drizzle 6-7 tablespoons of the espresso mixture evenly over the cake.
- Add Some Filling: Set aside about 2 cups of the cheesecake filling, then add the remainder of the cheesecake filling to the pan and spread evenly.
- Soak Ladyfingers & Add to Cake: One at a time, dip each ladyfinger in the remaining espresso mixture, then add it to the pan on top of the cheesecake filling. Make an even layer, breaking the ladyfingers if needed for them to fit.
- Add Remaining Filling: Pour the cheesecake filling that was set aside over the top of the ladyfingers, using a spoon to drop spoonfuls, then spreading them evenly.
- Assemble Water Bath: Prepare the pan for a water bath – see my leak-prevention methods here – by wrapping the outside of the pan with aluminum foil, then place the springform pan inside another larger pan. Fill the outside pan with enough warm water to go about halfway up the sides of the springform pan. The water should not go above the top edge of the aluminum foil on the springform pan.
- Bake: Bake the cheesecake for about 1 hour and 15 minutes. The center should be set, but still jiggly.
- Turn Off Oven: Turn off the oven and leave the door closed for 30 minutes. The cheesecake will continue to cook, but slowly begin to cool as well.
- Crack Oven Door: Crack open the door of the oven for 30 minutes to allow the cheesecake to continue cooling slowly. This process helps prevent cracking.
- Transfer to Fridge: Remove the cheesecake from the oven and the water bath wrapping, then refrigerate it until firm. This will take a minimum of 5-6 hours – feel free to chill it overnight. Once it’s completely cool and firm, remove it from the springform pan.
Make the Tiramisu Cake Topping
This topping is actually the very filling I use in my Classic Tiramisu Recipe! It’s so smooth and velvety, adding the perfect finishing touch to this dreamy cheesecake.
- Combine Egg Yolks & Sugar: Combine the egg yolks and sugar in the top of a double boiler or in a metal mixer bowl over a pot of simmering water. Whisk to combine. The mixture will seem a little chunky at first, but it will thin out as it heats up.
- Cook: Continue cooking and whisking continuously for about 5-8 minutes, until the mixture grows in volume, thickens and turns a pale yellow color. The sugar should melt, but if it’s still a little grainy, that’s okay – it will smooth out as you go. The temperature of the mixture should reach 160°F.
- Let Cool: Set the egg mixture aside to cool to a little warmer than room temperature.
- Make Whipped Cream: While eggs cool, make the whipped cream. Add the heavy whipping cream to a large mixer bowl and whip on high speed until stiff peaks form.
- Add Mascarpone Cheese: When the egg mixture has cooled, add the mascarpone cheese and gently fold together until combined.
- Fold in Whipped Cream: Gently fold the whipped cream into mascarpone/egg mixture in two parts. Set aside.
- Add Topping to Cheesecake: Remove the cheesecake from the springform pan and set it on a serving platter. Spread the topping evenly onto the cheesecake, then sprinkle with cocoa powder.
- Serve or Chill: Refrigerate the cheesecake until you’re ready to serve it.
Tips for Success
Is your mouth watering yet? These simple tips and tricks will make sure your tiramisu cake comes out flawless!
- Pay Attention to Ingredient Temperatures: It’s just as important to use room temperature butter for the cake as it is to use cold heavy cream for the topping. Don’t forget to bring your ingredients to the proper temperatures when necessary.
- Don’t Skip the Cake Layer: It may be tempting to put ladyfingers on the bottom of this cheesecake instead of the cake layer, but I actually tested that and the weight of the cheesecake crushes them. You want to stick with the cake layer.
- Cream Butter & Sugar Mixture Fully: Be sure to cream the butter, sugar, oil and vanilla for the cake until the mixture becomes fluffy and lightens in color. It will take at least 3 minutes.
- Beat Cheesecake Filling at Low Speed: Make sure you’re using low speed when making the cheesecake filling. This reduces the amount of air added to the batter, which prevents the cheesecake from cracking.
- Pay Attention to Layering: I experimented with where to place the ladyfingers a good bit. If they are too low in the filling, the weight of the filling on top of it will crush them. Be sure follow the instructions on how to layer them properly so they turn out nicely but don’t sit too high in the cheesecake and cause it to crack.
- Follow Cooling Instructions: Another way to prevent your cheesecake from cracking is by cooling it slowly, according to the recipe directions.
- More Tips & Tricks: For more advice on making perfect cheesecake at home, be sure to check out this comprehensive list of tips and tricks!
How to Store Homemade Cheesecake
This tiramisu cake should be stored in an airtight container in the fridge. It’s best if eaten within 4-5 days.
Can I Freeze This Tiramisu Cake?
It should be fine frozen. Just don’t add the topping until you plan to thaw and serve it. Without the topping, this cheesecake can be frozen for up to 3 months. Just wrap it well in a layer of plastic wrap, followed by a layer of aluminum foil.
Print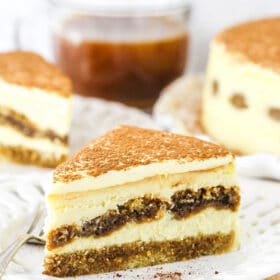
The Ultimate Tiramisu Cheesecake
- Prep Time: 1 hour 30 minutes
- Cook Time: 2 hours 30 minutes
- Total Time: 4 hours
- Yield: 14 1x
- Category: Dessert
- Method: Oven
- Cuisine: Italian
Description
Inspired by your favorite Italian dessert, this Tiramisu Cheesecake is a showstopper! It’s made with a fluffy espresso cake layer, a creamy cheesecake filling, espresso-soaked ladyfingers and a silky tiramisu topping. Talk about a crave-worthy treat!
Ingredients
For the Cake Layer
- 1/2 cup plus 2 tbsp (81g) all-purpose flour
- 1/2 tsp baking powder
- Pinch of salt
- 3 tbsp (42g) unsalted butter, room temperature
- 1/4 cup plus 2 tbsp (78g) sugar
- 1 tbsp (15ml) vegetable oil
- 3/4 tsp vanilla extract
- 1 large egg
- 1/4 cup (60ml) milk
For the Espresso Mixture
- 3/4 cup (180ml) hot water
- 2 1/2 tbsp (8g) instant espresso coffee powder
- 4 tbsp (52g) sugar
- 6 tbsp (90ml) Kahlua
For the Cheesecake Filling
- 8 oz (226g) cream cheese, room temperature
- 16 oz (452) mascarpone cheese, room temperature
- 1 cup (207g) sugar
- 3 tbsp (24g) all-purpose flour
- 3/4 cup (173g) sour cream
- 1/2 tbsp vanilla extract
- 2 large eggs, room temperature
- 3 egg yolks, room temperature
- 12 ladyfingers*
For the Tiramisu Topping
- 3 large egg yolks, room temperature
- 5 tbsp (65g) sugar
- 7 tbsp (105ml) heavy whipping cream, cold
- 3 oz (86g) mascarpone cheese, cool but not cold
- Cocoa powder
Instructions
Make Cake Layer
- Prepare a 9-inch cake pan or springform pan (just be sure it doesn’t leak so that your cake batter doesn’t ooze out) with parchment paper in the bottom and grease the sides. Preheat the oven to 350°F.
- Combine the flour, baking powder and salt in a medium-sized bowl and set aside.
- Add the butter, sugar, oil and vanilla extract to a large mixer bowl and beat together until light in color and fluffy, about 3-4 minutes. Do not skimp on the creaming time.
- Add the egg to the creamed butter and sugar mixture, mixing until mostly combined. Scrape down the sides of the bowl as needed to be sure all ingredients are well incorporated.
- Add half of the dry ingredients to the batter and mix until mostly combined.
- Slowly add the milk and mix until well combined. The batter will look a little curdled, but that’s ok.
- Add the remaining dry ingredients and mix until well combined and smooth. Scrape down the sides of the bowl as needed to be sure all ingredients are well incorporated. Do not overmix the batter.
- Spread the cake batter evenly into the bottom of the prepared pan and bake for 13-15 minutes, or until a toothpick comes out with a few crumbs.
- Remove the cake from the oven and allow it to cool for about 2-3 minutes, then transfer it to a cooling rack to cool completely. Set aside.
Make Espresso Mixture & Filling
- While the cake is cooling, work on the espresso mixture and the cheesecake filling. Add the espresso coffee powder and sugar to the hot water and stir to dissolve, then add the Kahlua. Set aside.
- Add the cream cheese, mascarpone cheese, sugar and flour to a large mixer bowl and beat on low speed until combined and smooth. Be sure to use low speed to reduce the amount of air added to the batter, which can cause cracks. Scrape down the sides of the bowl.
- Add the sour cream and vanilla extract mix on low speed until well combined.
- Add the eggs and egg yolks one at a time, mixing slowly to combine after each addition. Scrape down the sides of the bowl as needed to make sure everything is well combined.
Assemble & Bake
- Once everything is ready to go, reduce the oven temperature (or preheat) to 300°F. Prepare a springform pan with parchment paper in the bottom and grease the sides. If you used the springform pan to bake the cake, clean it, then respray it with non-stick spray.
- Reset the springform pan edges around the cake layer and drizzle 6-7 tablespoons of the espresso mixture evenly over the cake.
- Set aside about 2 cups of the cheesecake filling, then add the remainder of the cheesecake filling to the pan and spread evenly.
- One at a time, dip each ladyfinger in the remaining espresso mixture, then add it to the pan on top of the cheesecake filling. Make an even layer, breaking the ladyfingers if needed for them to fit.
- Pour the cheesecake filling that was set aside over the top of the ladyfingers, using a spoon to drop spoonfuls, then spreading them evenly.
- Prepare the pan for a water bath – see my leak-prevention methods here – by wrapping the outside of the pan with aluminum foil, then place the springform pan inside another larger pan. Fill the outside pan with enough warm water to go about halfway up the sides of the springform pan. The water should not go above the top edge of the aluminum foil on the springform pan.
- Bake the cheesecake for about 1 hour and 15 minutes. The center should be set, but still jiggly.
- Turn off the oven and leave the door closed for 30 minutes. The cheesecake will continue to cook, but slowly begin to cool as well.
- Crack open the door of the oven for 30 minutes to allow the cheesecake to continue cooling slowly. This process helps prevent cracking.
- Remove the cheesecake from the oven and the water bath wrapping, then refrigerate it until firm. This will take a minimum of 5-6 hours – feel free to chill it overnight. Once it’s completely cool and firm, remove it from the springform pan.
Make Topping
- Combine the egg yolks and sugar in the top of a double boiler or in a metal mixer bowl over a pot of simmering water. Whisk to combine. The mixture will seem a little chunky at first, but it will thin out as it heats up.
- Continue cooking and whisking continuously for about 5-8 minutes, until the mixture grows in volume, thickens and turns a pale yellow color. The sugar should melt, but if it’s still a little grainy, that’s okay – it will smooth out as you go. The temperature of the mixture should reach 160°F.
- Set the egg mixture aside to cool to a little warmer than room temperature.
- While eggs cool, make the whipped cream. Add the heavy whipping cream to a large mixer bowl and whip on high speed until stiff peaks form.
- When the egg mixture has cooled, add the mascarpone cheese and gently fold together until combined.
- Gently fold the whipped cream into mascarpone/egg mixture in two parts. Set aside.
- Remove the cheesecake from the springform pan and set it on a serving platter. Spread the topping evenly onto the cheesecake, then sprinkle with cocoa powder.
- Enjoy or refrigerate until ready to serve.
Notes
Serves 12-14.
You want to use the firm type of ladyfingers, not the soft ones.
Nutrition
- Serving Size:
- Calories: 573
- Sugar: 31.8 g
- Sodium: 307 mg
- Fat: 34 g
- Carbohydrates: 54.4 g
- Protein: 9.7 g
- Cholesterol: 252.3 mg


I made this cake for Thanksgiving and it was such a hit that I was asked to make it again for Christmas, which is tomorrow 🙂 Just curious…. Maybe it’s just the color on my monitors, but you’re topping looks white and both times mine has turned out yellow because of the egg yolks. I tried adding some white food coloring but that didn’t really help. Am I doing something wrong or are my eyes just deceiving me? Merry Christmas!
I’m glad it was a hit! My topping wasn’t white – just light yellow. Certainly the egg yolks are going to give it some color.
Hi! I have read your notes about the lady fingers and cake layer for the cheesecake, but was wondering if you’ve ever tried doing a cake layer for the bottom as well as the middle, instead of the lady fingers? I personally, much prefer a cake layer in tiramisu than lady fingers and was wondering if I could use a cake layer in both the bottom and middle of this cheesecake?
I didn’t test it that way, but I imagine it would work just as well as the lady fingers.
I make many of your recipes and they always turn out great. This one has me wondering what I might be doing wrong. My topping seems kind of on the thinner side. It did thicken but it wants to roll over the side of the cake. Any ideas?
It’s hard to say from a distance, but a few things that could have happened – if the egg mixture wasn’t cooked to the proper temperature, it would be thinner. If the whipped cream wasn’t fully whipped or perhaps was over mixed/stirred when adding it to the egg mixture, it could have deflated (and would make the topping thinner). If the whipped cream was added when the egg mixture was still too warm, it would melt the whipped cream and make it thinner. The last thing is that mascarpone cheese can thin out if it gets too warm and it doesn’t firm back up very well. I hope something in there is helpful. Sorry you had trouble with it!
Glad to hear you’ve enjoyed the other recipes! I’d love some reviews on those, if you can. 🙂 Thanks!
I really want to make this, but am I crazy or is it missing how to make the crust?
The cake layer is the crust.
Hi Lindsay,
I am making half recipe of cheesecake just wanted to ask will the baking time will be same or it should reduce by half?
Thanks in advance
It depends a little on what size your baking it as. Here is my guide to reducing cheesecake sizes.
Omg. Followed your recipe to tee. Fantastic result. Thank you for sharing
I’m so glad you enjoyed it!