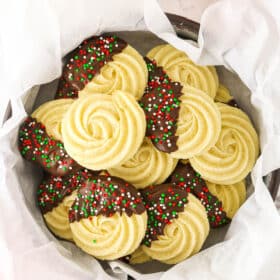
These tender Danish Butter Cookies are dipped in chocolate and decorated with your favorite sprinkles. They’re melt-in-your-mouth delicious and super easy to make!
If you want to try more easy cookie recipes that are perfect for the holidays or any time of year, check out these vanilla butter cookies, gingersnap cookies, and soft sugar cookies!

Why You’ll Love These Danish Butter Cookies
This Danish butter cookies recipe is a longtime favorite of mine. Here’s why I think you’ll love it just as much as I do:
- Perfectly soft make-ahead cookies. Danish butter cookies are wonderfully buttery and tender – especially after sitting for a day. They’re ideal for making ahead!
- Quick and easy. The cookie dough comes together super quickly. There’s no need to refrigerate it and no need to make cookie dough balls. Just pipe the cookies onto the pan and bake.
- Chocolate-covered crowd-pleaser. I’m a lover of any cookie dipped in chocolate, and these are no exception. The chocolate adds flavor and texture to the cookies and helps seal in their moisture so they stay fresh for longer. I added red, green, and silver sprinkles to these cookies to give them a festive Christmas flair, too!

What Are Butter Cookies?
I would describe butter cookies as a cross between a cutout sugar cookie and shortbread. Sugar cookies are generally a little softer and use a leavening agent, which these don’t. But shortbread is often more dry and crumbly, and it doesn’t use egg.
With the addition of the egg to these cookies, they are more tender and don’t fall apart when you bite into them. Instead, they melt in your mouth. So, they’re kind of a mix between the two cookies.
These butter cookies are perfect if you have a family where some like cookies that are more crunchy and some like cookies that are more soft. These fall right in the middle as long as you don’t overbake them.

Recipe Ingredients
You only need 8 ingredients to make these buttery, chocolatey cookies. I’m willing to bet that you already have them all on hand! (If you’re looking for exact amounts, check out the recipe card below.)
- Unsalted butter – Remember to bring your butter to room temperature before you begin.
- Granulated sugar – Regular white granulated sugar is all you need for today.
- Egg – To bind all of the ingredients for the cookie dough together.
- Vanilla extract – Pure vanilla extract provides the best, strongest flavor.
- All-purpose flour – I recommend using a food scale to weigh your flour in order to avoid over-measuring it.
- Salt – You can use kosher salt, sea salt, table salt, etc. Also, if you prefer to bake with salted butter, simply omit this extra salt.
- Milk – I generally use 1 or 2% milk when I make these cookies.
- Melting chocolate – Feel free to also use milk chocolate, dark chocolate, or whatever kind you prefer.
- Sprinkles – If desired, add your favorite sprinkles onto the chocolate part of your cookies.
How to Make Danish Butter Cookies
These cookies are not only easy to make, but it’s also really easy to make them look good. They’re piped onto the baking pan rather than scooped, and you can use a fancy piping tip to give them a cool pattern!
- Prepare for baking. Preheat the oven to 350°F and line baking sheets with silicone baking mats or parchment paper.
- Cream the butter and sugar. Cream the butter and sugar together in a large bowl on medium speed until the mix is light in color and fluffy (about 3-4 minutes). You should be able to see the mixture lighten in color and get a creamy texture.
- Add the egg and vanilla. Add the egg and mix until well-combined. Then, add the vanilla extract and mix again.
- Stir in the flour and salt. Add in the flour and salt and mix until the dough is just combined, then remove the bowl from the mixer and finish combining with a rubber spatula, if needed. Do not over-mix.
- If needed, pour in some milk. Pour in the milk a teaspoon at a time, as needed, to get the dough to a pipeable consistency. The best way to test this is to put a little bit in a piping bag and see if it pipes. You don’t want to add milk if you don’t need it, because then the cookies will spread more.
- Pipe the cookies. Pipe the cookies onto the prepared baking sheet. I used Ateco tip 825 and found that to be the best size. I recommend an open star tip, as opposed to a closed star. You don’t want it to be too big or your cookies will spread more.
- Bake the cookies. Bake the cookies for about 8-10 minutes, or just before they turn golden on the edges. Timing can vary by oven as well as the size of your piping tip and the size of cookie it makes.
- Let the cookies cool. Remove your cookies from the oven and allow them to cool on the baking sheet for 2-3 minutes, then transfer them to a cooling rack to finish cooling.
- Melt your chocolate. To dip the cookies in chocolate, melt the chocolate according to the package directions.
- Dip the cookies in the chocolate. Dip about half of each cookie into the chocolate and then shake off the excess. Place the cookies on parchment paper to dry and add the sprinkles of your choice, if desired.
Watch This Danish Butter Cookies Recipe Come Together
Check out the video below to see the step-by-step process for making these Danish butter cookies!
How to Make These Cookies Ahead
These cookies are great to make in advance because they taste even better a day or two after they’re made! Once the chocolate has hardened onto the cookies, store them in an airtight container at room temperature. You can make them up to a week ahead of time, but I recommend making them one or two days in advance for the best results.
Tips for Success
These butter cookies are pretty straightforward, but I’ve got a few decorating pointers to share that you might find helpful!
- Use an open star piping tip. An open star tip produces a better ridge than a closed star, which makes a deeper ridge that tends to kind of fall over when baking and not hold its shape. If you can find the Ateco 825 tip, or have time to order it, I definitely recommend it. If you can’t get the Ateco 825 tip, I recommend going a touch smaller.
- Test the cookie dough before piping it. Before adding any milk to your dough, check to see if it’s the right consistency for piping by adding a small amount of dough into the piping bag and testing it. If it’s too thick, add a teaspoon of milk at a time and keep testing the dough.
- Add coarse sugar. If sprinkles aren’t your thing, you can sprinkle some coarse sugar over your cookies instead.
- Make them colorful. If you’re using white chocolate for your cookies, you can add a drop or two of gel icing color to make them really pop or get colored candy melts!

How to Store Butter Cookies
Once the chocolate has set on your cookies, store them in an airtight container on the counter. They’re best if eaten within 5-7 days. I recommend saving at least a few cookies for the day after you bake them, because they taste even better after sitting overnight!
Can I Freeze These Cookies?
These cookies are freezer-friendly if you want to store them long-term. You can store the cookies with the chocolate and sprinkles already on or add them later so that they look more fresh. Frozen butter cookies will last for up to 3 months! Just thaw them out in the fridge before enjoying.

More Easy Cookie Recipes
On the lookout for more classic cookie recipes? Take a look at these ones!
- Buttery Classic Spritz Cookies
- Italian Ricotta Cookies
- Peanut Butter Blossoms
- White Chocolate Macadamia Nut Cookies
Danish Butter Cookies
- Prep Time: 15 minutes
- Cook Time: 10 minutes
- Total Time: 25 minutes
- Yield: 30 1x
- Category: Dessert
- Method: Oven
- Cuisine: Danish
Description
Danish butter cookies are ultra-buttery and tender. Dip them in sweet melted chocolate and decorate them with your favorite sprinkles, and they’re a guaranteed crowd-pleaser!
Ingredients
- 1 cup (224g) unsalted butter, room temperature
- 2/3 cup (138) granulated sugar
- 1 large egg
- 1 teaspoon vanilla extract
- 2 1/4 cups (293g) all purpose flour
- 1/2 teaspoon salt
- 1–3 teaspoons milk
- 6–8 ounces melting chocolate
- Sprinkles, optional
Instructions
- Preheat oven to 350°F (180°C). Line baking sheets with silicone baking mats or parchment paper.
- Cream the butter and sugar together in a large mixer bowl on medium speed until light in color and fluffy, about 3-4 minutes. You should be able to see the mixture lighten in color and get a creamy texture and know it’s ready.
- Add the egg and mix until well combined.
- Add the vanilla extract and mix until well combined.
- Add the flour and salt and mix until the dough is just combined, then remove the bowl from the mixer and finish combining with a rubber spatula, if needed. Do not over mix.
- Add milk a teaspoon at a time as needed to get a pipeable consistency. The best way to test this is to put a little bit in a piping bag and see if it pipes. You don’t want to add milk if you don’t need it, because then the cookies will spread more.
- Pipe the cookies onto the prepared baking sheet. I used Ateco tip 825 and found that to be the best size. I recommend an open star tip, as opposed to a closed star. You don’t want it to be too big or your cookies will spread more.
- Bake cookies for about 8-10 minutes, or just before they turn golden on the edges. Timing can vary by oven as well as the size of your piping tip and the size of cookie it makes.
- Remove cookies from the oven and allow to cool on the baking sheet for 2-3 minutes, then transfer to a cooling rack to finish cooling.
- To dip the cookies in chocolate, melt the chocolate according to the package directions.
- Dip about half of each cookie into the chocolate and then shake off the excess. Place on parchment paper to dry and add the sprinkles of your choice, if desired.
Notes
- Be careful not to over-measure your flour. Too much flour can lead to a thick cookie dough that’s hard to pipe and dry cookies. A food scale is always the best way to ensure it’s accurate.
- To store. Once the chocolate has set on your cookies, store them in an airtight container on the counter. They’re best if eaten within 5-7 days. I recommend saving at least a few cookies for the day after you bake them, because they taste even better after sitting overnight!
- To freeze. These cookies are freezer-friendly if you want to store them long-term. You can store the cookies with the chocolate and sprinkles already on or add them later so that they look more fresh. Frozen butter cookies will last for up to 3 months! Just thaw them out in the fridge before enjoying.
Nutrition
- Serving Size:
- Calories: 147
- Sugar: 8.7 g
- Sodium: 48.7 mg
- Fat: 8.7 g
- Carbohydrates: 15.9 g
- Protein: 1.7 g
- Cholesterol: 24 mg


I use a lot of your recipes but this one was very frustrating. Difficult getting consistency to pipe added milk and still very hard. Also baking them they did spread, I don’t know if it was flour measurement or they were overmixed.
It’s very hard to say what may have been the issue from a distance, but here are a couple thoughts. Often people are surprised by how thick cookie dough has to be in order to make a cookie that doesn’t spread. It’s possible you added too much milk. What piping tools did you use? Which piping tip? The size of the tip could have had an affect on how difficult it seemed to pipe the dough. Also, the spread could be from the milk. But also, I just read yesterday that people have been have issues with store brand butters lately and that the quality isn’t great and it’s causing inconsistency with baking. Depending on the brand of butter you used, you may want to try another one. I use challenge butter.
Can I use a cookie press instead of piping them?
Here is my spritz cookie recipe, which uses a cookie press. The recipes are quite similar, but I might go with that one just to be safe.
How can I tell when the cookies are done but before they are golden brown?
One way to tell is that they should look matte rather than have a sheen.
Hi, what if I only have salted butter, do I just omit the extra salt from the recipe? Thanks.
I just made these for the first time and WOW. They are really delicious! I only had the wilton 1M on hand and I probably added a tad bit too much milk (two teaspoons) when probably none was needed. I will recheck next time. THEY ARE SO GOOD EVERYONE MAKE THEM RIGHT NOW. Gonna add some espresso to my chocolate! Woohoo! Thank you so much.
How much should 2 1/2 cups of flour weigh on a scale?
325g
I only have the Wilton tips, so I’m going to try that. When making the spiral, do you start in the middle and spiral out, or do you start on the outside and end in the center?
You start in the middle and spiral out. Feel free to check out the video where I walk you through it.
Where is the video you mentioned…I can’t seem to find it anywhere on this page ?
It’s right above the recipe card.
Really love your recipes
Hi Lindsay!
These look delicious! My two daughters have some serious cookie cravings right now so I’m planning on making these either today or tomorrow.
I’ve tried many recipes but I have one question that still remains unanswered: do I really need a stand mixer? So I don’t have a stand mixer or hand mixer, just a whisk and spatula. I typically use them to mix/whisk. I would like to ask you if a stand mixer or hand mixer is necessary. I am asking if it is necessary, not helpful. I am asking if you NEED it to bake things. I’ve heard it can be helpful, but is it NECESSARY? Can I just use a whisk/spatula and get the same perfect outcome in recipes?
Thank you so much!
Samantha
I’ve honestly never tried to fully and properly cream butter and sugar together without a mixer of some kind. It seems to me that it would be pretty difficult to do that properly without one. But again, having not tried it and tested and compared, it would be hard for me to say for sure. Everything else should probably be fine in this recipe.
I’m always looking FOR easy delicious recipes!! BUT definitely continue to use ALL the recipes I’ve saved up!! Lol I’m going to make these this week with MY 4 grandbabies THEY are going to love it!! Thank you VERY much for sharing!! I will definitely let YOU know how WE do!!😂😂😂😂😂
I’ve used this recipe four times and the cookies are delicious but I would like to have the higher ridges like you have. I did purchase the tip you suggested and the third time I made it I even use more flour so it would be even stiffer but they still weren’t quite as high as I would like. Should I freeze or refrigerate them and then bake them? I do use a kitchen scale for measuring the flour and the sugar.
I’m glad you’ve enjoyed them! You could definitely try refrigerating or freezing them before baking them. It might help.
I made 2 batches of these today. Super good!
So glad you enjoyed them!
Yum! Melt in your mouth cookies are the best, especially with a cup of coffee or tea.
I will definitely make these for my cookie tray. Thanks, Lindsay!
How simple and easy to make! This is exactly what I’m looking for my kids, thanks a lot for sharing, Lindsay!
I would like to know what Wilton tip is similar to the Ateco #825? I have some Wilton tips that look like the Ateco #825. Thank you. These cookies look like they would be a big hit! Looking forward to trying them.
It would be another closed star tip but unfortunately I don’t really think Wilton has ones that are super similar. Their biggest tips seem to be the 1M and 2D and they are definitely smaller. I tested the 1M and personally didn’t like it as much. The ridges are much deeper and didn’t look as nice after being baked. It works in a pinch though.
Hi Lindsay,
Thank you so much for answering my question about the Ateco tip #825. I have ordered one online. I can’t seem to find them in the stores here. They only have Wilton. Your recipes are always so awesome. I look forward to seeing them. Thank you again.
I have a question- will these cookies ship well? They’re my sons absolute favorite (other than my cranberry orange biscotti) I live in NC and all my kids are in CO. Please let me know..I adore your website!
I would think they’d do well. Especially with the chocolate, which I’d think would help them hold together and stay fresher.
I’m not crazy about ‘melting chocolate’, it usually has too much palm oil and artificial ingredients- would any other form of chocolate work as well?
Thank you, Christine
As long as it’ll dry firmly onto the cookie, it should be fine.