Description
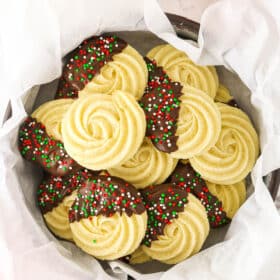
Danish butter cookies are ultra-buttery and tender. Dip them in sweet melted chocolate and decorate them with your favorite sprinkles, and they’re a guaranteed crowd-pleaser!
Ingredients
Scale
- 1 cup (224g) unsalted butter, room temperature
- 2/3 cup (138) granulated sugar
- 1 large egg
- 1 teaspoon vanilla extract
- 2 1/4 cups (293g) all purpose flour
- 1/2 teaspoon salt
- 1-3 teaspoons milk
- 6-8 ounces melting chocolate
- Sprinkles, optional
Instructions
- Preheat oven to 350°F (180°C). Line baking sheets with silicone baking mats or parchment paper.
- Cream the butter and sugar together in a large mixer bowl on medium speed until light in color and fluffy, about 3-4 minutes. You should be able to see the mixture lighten in color and get a creamy texture and know it’s ready.
- Add the egg and mix until well combined.
- Add the vanilla extract and mix until well combined.
- Add the flour and salt and mix until the dough is just combined, then remove the bowl from the mixer and finish combining with a rubber spatula, if needed. Do not over mix.
- Add milk a teaspoon at a time as needed to get a pipeable consistency. The best way to test this is to put a little bit in a piping bag and see if it pipes. You don’t want to add milk if you don’t need it, because then the cookies will spread more.
- Pipe the cookies onto the prepared baking sheet. I used Ateco tip 825 and found that to be the best size. I recommend an open star tip, as opposed to a closed star. You don’t want it to be too big or your cookies will spread more.
- Bake cookies for about 8-10 minutes, or just before they turn golden on the edges. Timing can vary by oven as well as the size of your piping tip and the size of cookie it makes.
- Remove cookies from the oven and allow to cool on the baking sheet for 2-3 minutes, then transfer to a cooling rack to finish cooling.
- To dip the cookies in chocolate, melt the chocolate according to the package directions.
- Dip about half of each cookie into the chocolate and then shake off the excess. Place on parchment paper to dry and add the sprinkles of your choice, if desired.
Notes
- Be careful not to over-measure your flour. Too much flour can lead to a thick cookie dough that’s hard to pipe and dry cookies. A food scale is always the best way to ensure it’s accurate.
- To store. Once the chocolate has set on your cookies, store them in an airtight container on the counter. They’re best if eaten within 5-7 days. I recommend saving at least a few cookies for the day after you bake them, because they taste even better after sitting overnight!
- To freeze. These cookies are freezer-friendly if you want to store them long-term. You can store the cookies with the chocolate and sprinkles already on or add them later so that they look more fresh. Frozen butter cookies will last for up to 3 months! Just thaw them out in the fridge before enjoying.
Nutrition
- Serving Size:
- Calories: 147
- Sugar: 8.7 g
- Sodium: 48.7 mg
- Fat: 8.7 g
- Carbohydrates: 15.9 g
- Protein: 1.7 g
- Cholesterol: 24 mg