This Red Velvet Ice Cream Cake might just be my new favorite cake, period. I couldn’t decide if I want to give it all away so that I couldn’t eat it all or just give in and eat it every last bite. The longer it stayed in the house, the more I ate.
One of my great taste testers said, and I quote, “You told me it was good, but you didn’t tell me it was this good!”
Well friends, you can’t tell me I didn’t tell you now. It is that good!
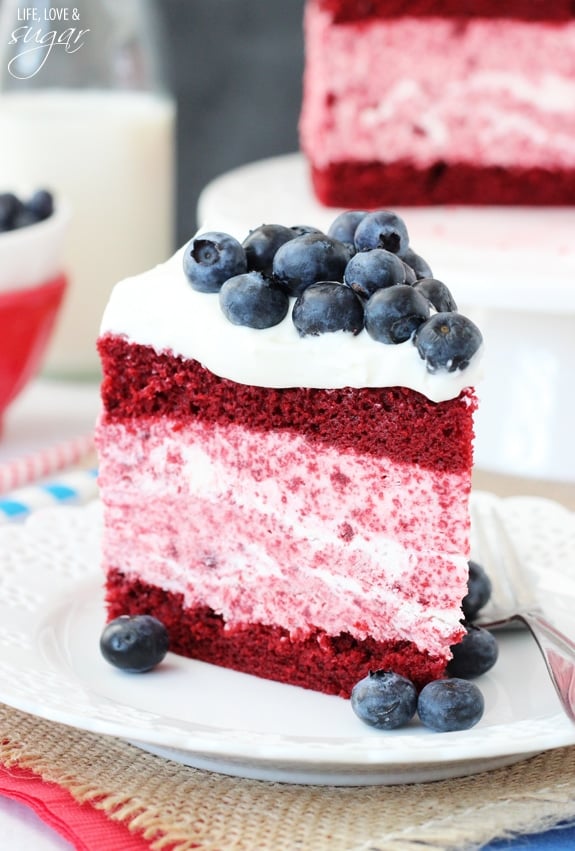
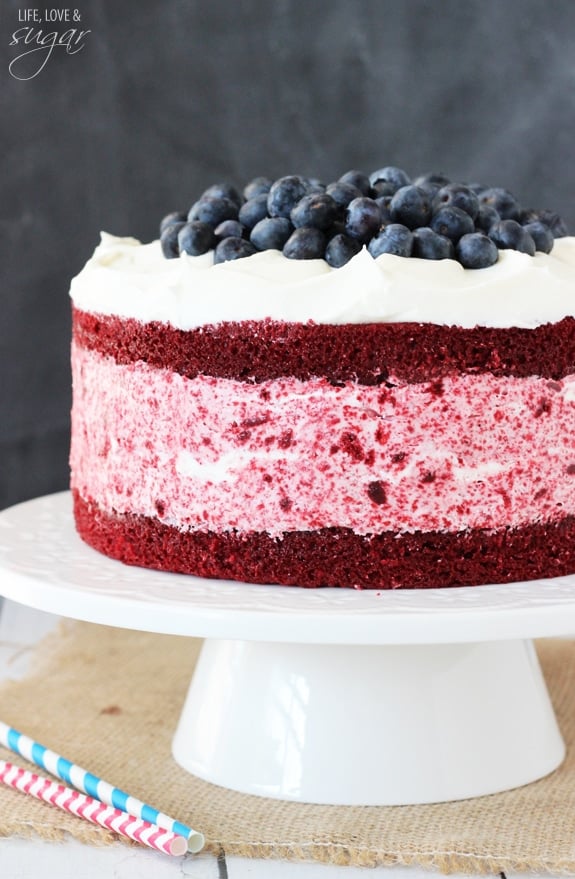
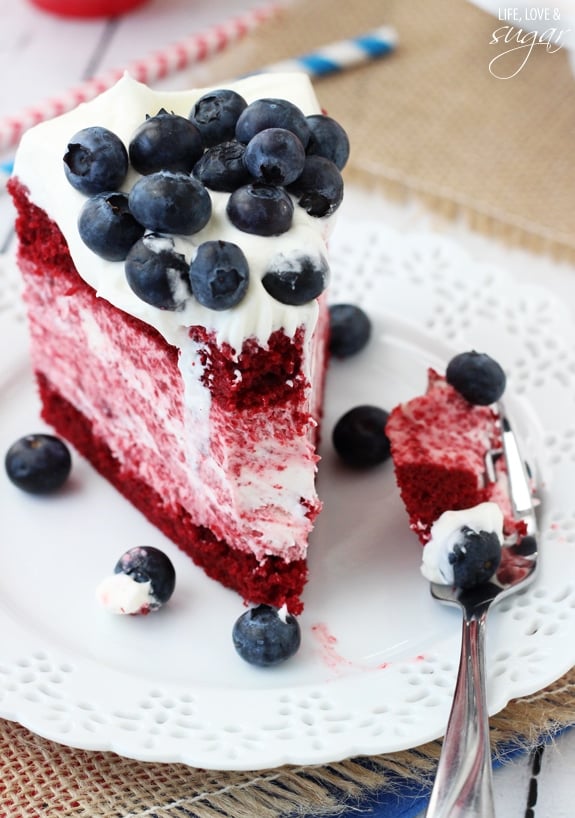
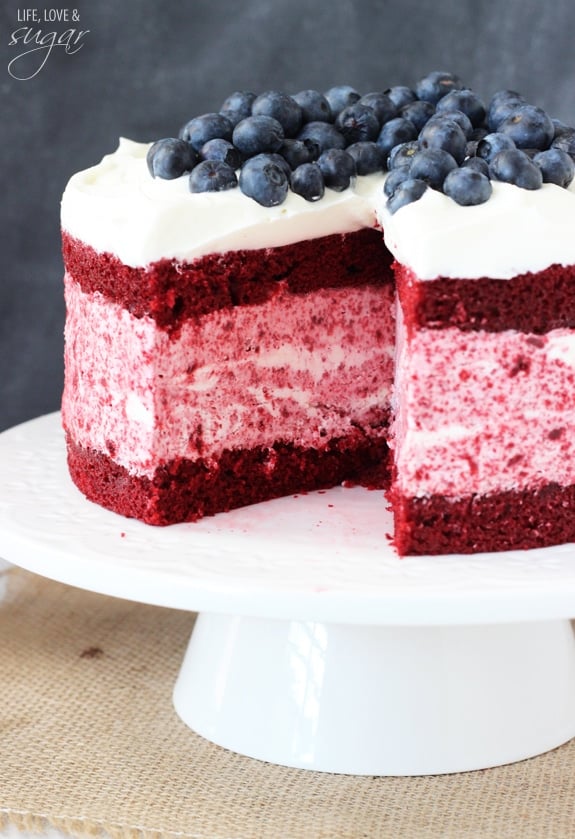
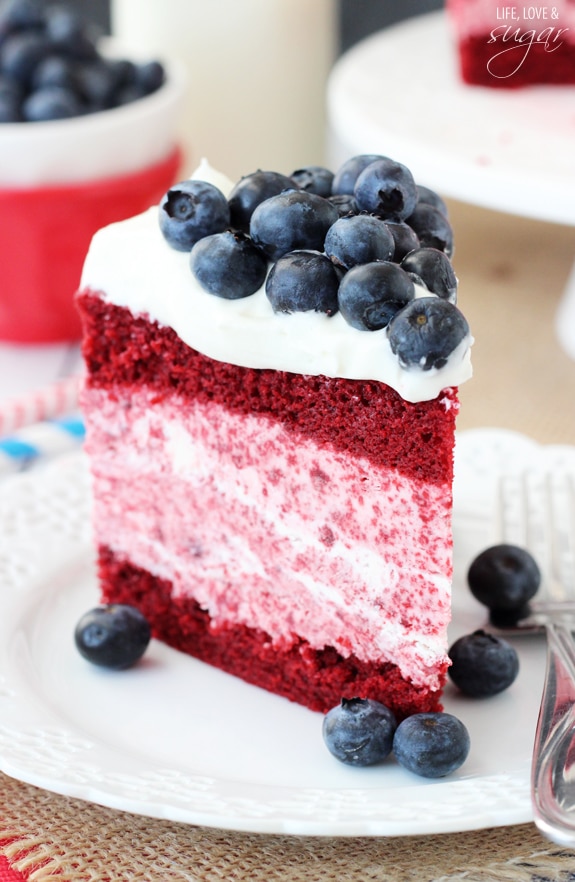
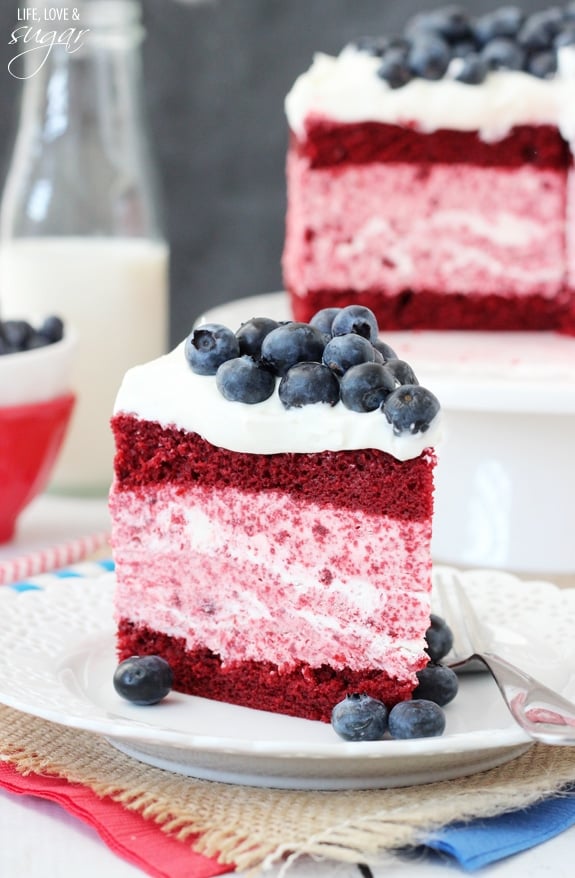
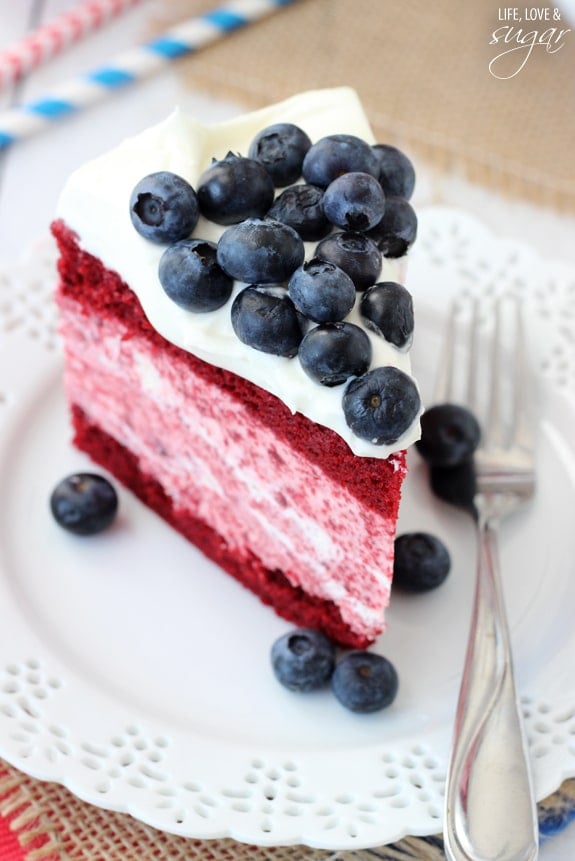
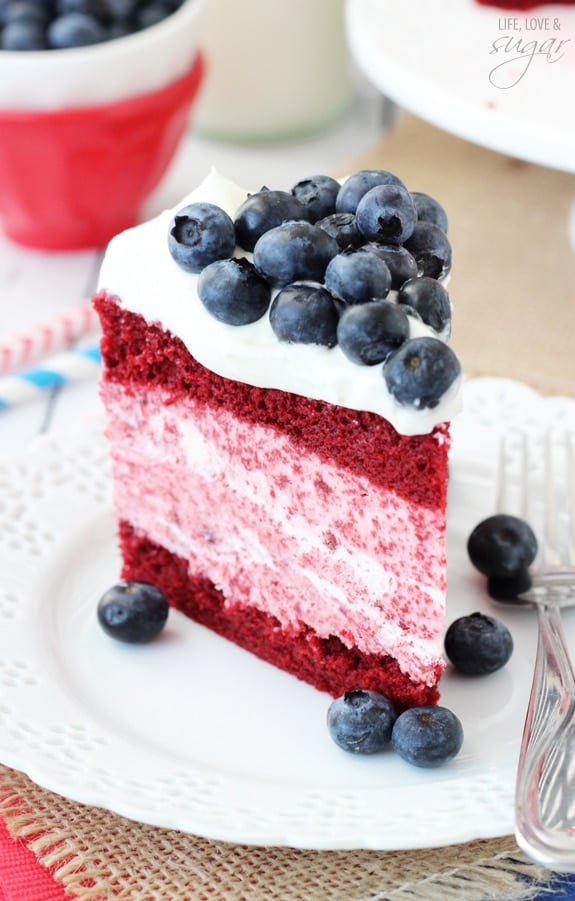
I utilized my favorite, super moist red velvet cake, originally Bakerella’s Red Velvet Cake recipe, but with a tad more cocoa. The cake alone is amazing. The cake layers sandwich ice cream that is just full of red velvet cake crumbs, as well as a whipped cream cheese icing.
Heaven in a massive frozen sandwich, I tell you.
Most store-bought red velvet ice creams are just disappointing because they lack enough cake and cream cheese flavor. This ice cream does not disappoint.
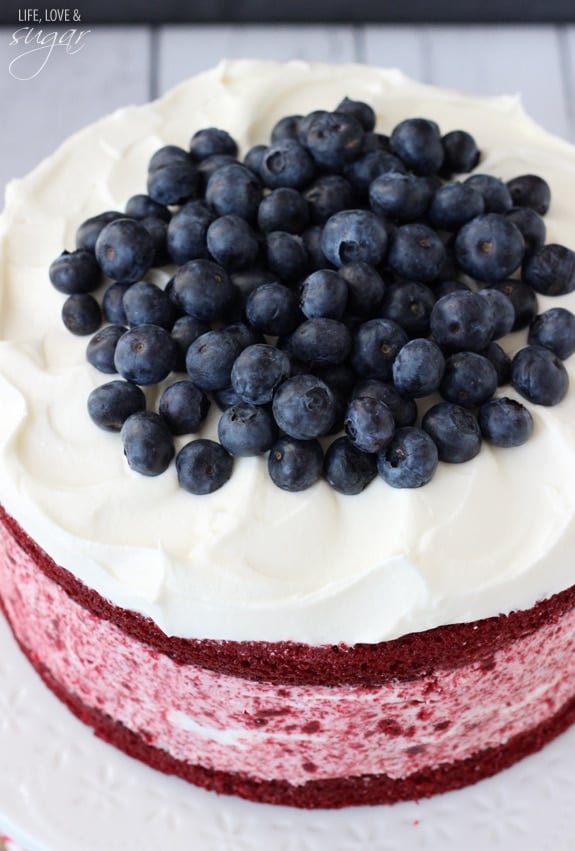
And the stuff on top? Well that is a cream cheese whipped cream that completely fulfilled all my hopes and dreams. It’s amazing stuff. I’m already dreaming about eating it again.
And the blueberries add the perfect amount of blue for this Red Velvet Ice Cream Cake to be an excellent choice for the 4th of July, or any other patriotic holiday. Plus, blueberries go surprisingly well with red velvet cake and the cream cheese whipped cream on top. Who knew?
I actually put this cake together on a Saturday during a girls night. It was super fun.
Most of the girls from our small group came over for drinks and food and they requested some kind of baking lesson. I have a feeling there are more of those in my future.
Since this cake needed to be put together, it became the demonstration.
We made homemade whipped cream, cut off cake domes, checked out how I set up the pan, put the layers together, and made this crazy ice cream without an ice cream maker. I mean honestly, ice cream without an ice cream maker is pretty much the best thing ever.
They asked questions and checked things out as I was doing them. It all seems such second nature to me now, it was fun to see what kinds of questions they had. Honestly, prior to starting to bake a few years ago they were all similar questions to what I would’ve asked, I just forget now until someone asks. It was actually pretty fun.
And this beautiful baby was the fruits of our labor.
It was actually the second version so even though I let it freeze overnight, they still got to taste it because I had the first version in the freezer still. All the same stuff, just put together a little differently. We’d already had some other desserts I’d made, but when they got a taste of this, they couldn’t resist having more. 🙂
I know you’ll love it too!
More Delicious Recipes
- Red Velvet Cheesecake Bundt Cake
- Red Velvet Cupcakes with Cream Cheese Icing
- Strawberry and Blueberry Cheesecake Icebox Cake
- Red Velvet Berry Trifle Recipe
- Strawberry and Blueberry Oatmeal Cheesecake Cookie Bars
Red Velvet Ice Cream Cake
- Yield: 10–12 Servings 1x
- Category: Dessert
- Method: Oven
- Cuisine: American
Ingredients
CAKE
- 1 egg
- 1/2 + 1/8 cup oil
- 1/2 + 1/8 cup buttermilk
- 1/2 tbsp vinegar
- 1/2 tsp vanilla
- 1 oz red food coloring
- 1 1/4 cups flour
- 1 cup sugar
- 1 tbsp cocoa
- 1/2 tsp baking soda
ICE CREAM
- 8 oz cream cheese, room temperature
- 1/2 cup sugar
- 1/8 cup milk
- 1 tsp vanilla extract
- 8 oz Cool Whip (or homemade whipped cream)
- cake crumbs (from cutting off tops of cakes)
- 12 ounce can cream cheese frosting (I used a whipped icing)
TOPPING
- 3/4 cup heavy whipping cream
- remainder of cream cheese icing
- 3/4 cup blueberries
Instructions
TO MAKE THE CAKE:
ONCE CAKE HAS COOLED, MAKE THE ICE CREAM:
ASSEMBLING IT ALL:
ADDING THE TOPPING:
Nutrition
- Serving Size: 1 Slice
- Calories: 519
- Sugar: 47.3 g
- Sodium: 184.9 mg
- Fat: 30.8 g
- Carbohydrates: 59.1 g
- Protein: 4.3 g
- Cholesterol: 52.6 mg
Enjoy!


Hello, I have a 9” springform pan so I will double the cake recipe & use 9” cake pans. Should I also double the ice cream recipe also? Looking forward to making this, my grands love red velvet!! Thanks
Doubling would probably be too much for the cake and ice cream. At most, I’d do 1 1/2 recipes worth.
Confused- what am I mixing in metal bowl until good and cold for the topping!
It says to put the metal mixing bowl in the freezer until good and cold. It’s common when making whipped cream to freeze the bowl and whisk prior to whipping the cream to ensure it whips nicely. You don’t have to do that though as long as your cream is cold from the fridge.
I’m of used on the red velvet ice cream cake. Do you add the whole 12 ounce frosting to the ice cream part or with the whipping cream. It is with the ice cream ingredients but states to add remainder to the cream. Wasn’t sure. Looks delicious
A cup of the cream cheese frosting is layered into the ice cream mixture and the remainder goes into the whipped cream that goes on top. I hope that helps!
Hi!
I really would love to make this recipe, but im having some troubles with meseaurements.
It could be fine if i ask you to put everything in grams, please? I found a lot of conversion tables, but all shows diferent results!
Thank you VERY VERY much!
I have a handy little conversion chart here, since it’s hard to go back and update all these older recipes. I hope that helps! Enjoy!
This cake is beauty to my eyes, cant wait to make it. Thank you for sharing your recipes.
Saludos de Espana, Yve
This looks absolutely delicious! I would love to make this for the Fourth of July family party, but I have an hour drive. Do you have any recommendations or tips for transporting the cake that far without it melting? Thanks so much!!
Hmm, because this cake uses a no-churn ice cream instead of a traditional one, it has a better chance of holding up for your drive. If you want to give it a try, you could put the cake in a cooler?
Absolutely Love this Recipe , a must try