Enjoy an ooey, gooey campfire s’more in decadent cheesecake form with this easy recipe! A classic graham cracker crust surrounds a rich chocolate filling topped with toasted marshmallows and chocolate ganache. You simply have to try this S’mores Cheesecake!

This Chocolate S’mores Cheesecake is Downright Heavenly
What do you get when you combine a crunchy graham cracker crust with creamy chocolate cheesecake and gooey golden-brown marshmallows? The most irresistible smores dessert you’ve ever tasted. You seriously have to stop whatever you’re doing and start whipping up this masterpiece.
I added an extra layer of marshmallows and ganache between the crust and the filling for even more melty goodness, and I absolutely loved the results. Taking a bite of this cheesecake will instantly set your new standard for s’mores-inspired treats. You can serve it cold or warm up individual pieces for an even more delicious experience! All that graham cracker, chocolate and marshmallow bliss just melts in your mouth and leaves you breathless!

What You’ll Need
This over-the-top cheesecake relies on a surprisingly simple ingredient lineup. Scroll down to the recipe card to see the exact amounts.
For the Graham Cracker Crust
- Graham Crackers: Use a food processor to crush the crackers into crumbs. Alternatively, you can place them into a heavy-duty storage bag, remove the air, seal the bag and pound the crackers with a mallet (or the back of a serving spoon).
- Sugar
- Salt
- Unsalted Butter: Melted.
For the Chocolate Cheesecake Filling
- Cream Cheese: Be sure to bring this to room temperature before you use it.
- Sugar
- Cocoa Powder: Natural and unsweetened.
- Sour Cream: For extra creaminess.
- Vanilla Extract
- Eggs: The eggs should be at room temperature as well.
- Mini Marshmallows
- Semi-Sweet Chocolate Chips
- Heavy Whipping Cream: This will be combined with the chocolate chips to create a crave-worthy ganache. You can omit the ganache in favor of chocolate syrup if you’d like.
For the Marshmallow Topping
- Large Marshmallows
- Semi-Sweet Chocolate Chips
- Heavy Whipping Cream: For the ganache.
- Graham Crackers: Crushed into crumbs, for the garnish.

How to Make S’mores Cheesecake
Because of the mini marshmallows beneath the filling, rising air will cause small cracks to form on top of the cheesecake as it bakes. Those imperfections will get covered up by the topping, so don’t sweat it! You could leave out the mini ‘mallows if you’d like, but I do hope you include them. Serious yum.
Make the Crust
- Heat Oven & Prepare Pan: Preheat the oven to 325°F. Line a 9-inch springform pan with parchment paper in the bottom and grease the sides.
- Combine Ingredients: Combine the crust ingredients in a small bowl. Press the mixture into the bottom and up the sides of the prepared springform pan.
- Pre-Bake: Bake the crust for 10 minutes, then set it aside and allow it to cool.
- Reinforce Pan With Foil: Cover the outsides of the pan with aluminum foil so that water from the water bath cannot get in (check out my post on how to prepare your pan for a water bath if needed). Set the prepared pan aside.
Make the Filling
- Reduce Oven Temperature: Lower the oven temperature to 300°F.
- Beat Cream Cheese, Sugar & Cocoa: Beat the cream cheese, sugar and cocoa powder in a large bowl on low speed until well combined and smooth. Scrape down the sides of the bowl as needed to make sure everything is incorporated.
- Add Sour Cream & Vanilla: Add the sour cream and vanilla extract and mix on low speed until well combined.
- Add Eggs: Add the eggs one at a time, mixing slowly to combine after each addition and scraping down the sides of the bowl as needed. Set the batter aside.
- Assemble Marshmallow Layer: Pour the mini marshmallows evenly over the cooled crust.
- Add Ganache Layer: Add the chocolate chips and heavy whipping cream to a medium-sized bowl and microwave in 20-second intervals, stirring well between each one, until melted and smooth. Pour the ganache evenly over the mini marshmallows.
- Add Filling: Pour the cheesecake batter evenly over the ganache-covered marshmallows. To prevent the marshmallows and chocolate from moving around too much, spoon the batter evenly over the top.
- Build Water Bath: Place the springform pan inside another larger pan. Fill the outside pan with enough warm water to go about halfway up the sides of the springform pan. The water should not go above the top edge of the aluminum foil on the springform pan.
- Bake: Bake the cheesecake for 80-90 minutes. The center should be set, but still jiggly.
- Let Cool Slowly: Turn off the oven and leave the door closed for 30 minutes. The cheesecake will continue to cook, but slowly begin to cool as well. Crack the door of the oven for 30 minutes to allow the cheesecake to continue to cool slowly. This process helps prevent cracking.
- Refrigerate: Remove the cheesecake from the oven and water bath wrapping and refrigerate it until it’s firm, 5-6 hours or overnight.
Add the Topping
- Remove Cheesecake From Pan: Once the cheesecake is chilled and firm, remove it from the springform pan and set it on an oven-safe platter. You could also leave it on the bottom of the springform pan or place it on a baking sheet – you mainly need to remove the sides of the pan and loosen the cheesecake from the bottom so it’ll be easy to remove later.
- Top With Marshmallows: Place the marshmallows upright on top of the cheesecake, covering it fully but leaving some space around the outer edge for the marshmallows to puff up and out.
- Toast: Place the cheesecake into the oven on convection bake for 5-10 minutes, or until the marshmallows are puffy, then switch the setting to broil for 2-3 minutes, or until the marshmallows are golden-brown.
- Let Cool: Remove the cheesecake from the oven and set it aside to cool.
- Make Ganache: While the marshmallows cool, add the chocolate chips and heavy cream to a medium-sized bowl and microwave in 20-second intervals, stirring well in between, until melted and smooth.
- Drizzle Over Cheesecake: Move the cheesecake to a serving plate, then drizzle it with the ganache. Sprinkle on some graham cracker crumbs to finish it off.
- Enjoy! Slice and serve the cheesecake immediately – it won’t be hot throughout, but it’ll be just warm enough to give you that gooey, melty smores goodness without losing its structure. If you don’t want to serve it right away, return it to the fridge until you’re ready to dig in. Microwave each slice for 10-15 seconds before devouring if desired.

What Happens if You Don’t Bake Cheesecake in a Water Bath?
There are a few things that could go wrong if you bake your cheesecake without a water bath. Over-baking, falling in the center while cooling and cracking all become more likely without the evaporating water to ensure evenly dispersed heat throughout the cheesecake filling. The water bath is 100% worth those extra few minutes of effort.
Tips for Success
Want to make sure your smores cheesecake is pure and utter perfection? Take these tips and run with them.
- Mix the Filling on Low Speed: Stick with low speed whenever you’re combining ingredients for the cheesecake filling. This limits the amount of air whipped into the batter, which is a common culprit of cracking.
- Leave a Rim Around the Marshmallows: Try to leave at least an inch of free space around the top rim of your cheesecake when you add the raw marshmallows. As they warm up, they puff up, and this breathing room will prevent them from spilling over the edge of the cheesecake.
- Go Back to the Basics: If you’re looking for more cheesecake-making dos and don’ts, I’ve got you covered with this detailed guide to a perfect cheesecake.
- Warm Slices Before Serving: For best results, warm your slices for 10-15 seconds before serving. The marshmallows will melt a bit and the filling will warm up a touch (you don’t want it to get too soft) and it’ll be the perfect smores dessert.

Storage Instructions
Keep this cheesecake in an airtight container in the fridge. It will stay good for up to 5 days. I highly recommend popping each slice into the microwave for 10-15 seconds before digging in. You just can’t beat melty marshmallows!
Does This Freeze Well?
Yes – without the marshmallow topping, this cheesecake freezes like a dream. Place the fully set cheesecake on a cardboard cake round and wrap it tightly in plastic wrap. Place the wrapped cheesecake into a freezer-safe container or storage bag and freeze it for up to 3 months. Thaw it out in the fridge overnight before adding the topping and enjoying.
More Decadent Smores Desserts
Looking for more luxurious smores dessert ideas? Take your pick!
Print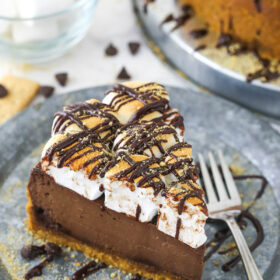
S’mores Cheesecake
- Prep Time: 1 hour 20 minutes
- Cook Time: 2 hours 30 minutes
- Total Time: 3 hours 50 minutes
- Yield: 14 1x
- Category: Dessert
- Method: Oven
- Cuisine: American
Description
Enjoy an ooey, gooey campfire s’more in decadent cheesecake form with this easy recipe! A classic graham cracker crust surrounds a rich chocolate filling topped with toasted marshmallows and chocolate ganache. You simply have to try this S’mores Cheesecake!
Ingredients
For the Crust
- 2 1/4 cups (302g) graham cracker crumbs (about 17 full sheet graham crackers)
- 5 tbsp (65g) sugar
- 1/8 tsp salt
- 10 tbsp (140g) unsalted butter, melted
For the Filling
- 24 oz cream cheese, room temperature
- 1 cup (207g) sugar
- 3/4 cup (85g) natural unsweetened cocoa powder
- 1 cup (230g) sour cream
- 1/2 tsp vanilla extract
- 4 large eggs, room temperature
- 1 1/2 cups (78g) mini marshmallows
- 3 oz (about ½ cup) semi-sweet chocolate chips
- 5 tbsp (75ml) heavy whipping cream
Topping
- 45–50 large marshmallows, for topping
- 3 oz (about ½ cup) semi-sweet chocolate chips
- 5 tbsp (75ml) heavy whipping cream
- Graham cracker crumbs
Instructions
Make the Crust
- Preheat oven to 325°F (163°C). Line a 9-inch (23cm) springform pan with parchment paper in the bottom and grease the sides.
- Combine the crust ingredients in a small bowl. Press the mixture into the bottom and up the sides of the springform pan.
- Bake the crust for 10 minutes, then set aside to cool.
- Cover the outsides of the pan with aluminum foil so that water from the water bath cannot get in (see how I prepare my pan for a water bath). Set prepared pan aside.
Make the Cheesecake
- Reduce oven temperature to 300°F (148°C).
- In a large bowl, beat the cream cheese, sugar, and cocoa powder on low speed until well combined and smooth. Be sure to use low speed to reduce the amount of air added to the batter, which can cause cracks. Scrape down the sides of the bowl.
- Add the sour cream and vanilla extract and mix on low speed until well combined.
- Add the eggs one at a time, mixing slowly to combine after each addition. Scrape down the sides of the bowl as needed to make sure everything is well combined. Set aside.
- Pour the mini marshmallows into the bottom of the crust.
- Add the chocolate chips and heavy whipping cream to a medium sized bowl and heat in 20 second intervals, stirring well in between, until melted and smooth. Pour the chocolate mixture evenly over the marshmallows.
- Pour the cheesecake batter evenly over the marshmallows and chocolate. To help the marshmallows and chocolate not move around and adjust too much, spoon the batter evenly over the top.
- Place the springform pan inside another larger pan. Fill the outside pan with enough warm water to go about halfway up the sides of the springform pan. The water should not go above the top edge of the aluminum foil on the springform pan.
- Bake for 1 hour and 20-30 minutes. The center should be set, but still jiggly.
- Turn off the oven and leave the door closed for 30 minutes. The cheesecake will continue to cook, but slowly begin to cool as well.
- Crack the door of the oven for 30 minutes to allow the cheesecake to continue to cool slowly. This process helps prevent cracking.
- Remove the cheesecake from the oven and water bath wrapping and refrigerate until firm, 5-6 hours or overnight.
Add the Topping
- When the cheesecake is chilled and firm, remove it from the springform pan and set on an oven safe platter. You could leave it on the bottom of the springform pan or place it on a baking sheet. You mainly need to remove the sides of the pan and loosen the cheesecake from the bottom so it’ll remove easily later.
- Place the marshmallows upright on top of the cheesecake, covering it fully but leaving some space around the outer edge for the marshmallows to puff up and out or they’ll spread too much and fall down the sides of the cheesecake.
- Place the cheesecake in the oven on convection bake for 5-10 minutes or until the marshmallows are puffy, then switch to broil for 2-3 minutes or until golden.
- Remove the cheesecake from the oven and set aside to cool.
- While it cools, add the chocolate chips for the topping and heavy whipping cream to a medium sized bowl and heat in 20 second intervals, stirring well in between, until melted and smooth.
- Move the cheesecake to a serving plate, then drizzle with the melted chocolate. Sprinkle on some graham cracker crumbs.
- The cheesecake can be served warm or cold, but I personally love the smores feel of it when it’s slightly warm after being toasted. The cheesecake won’t be hot throughout, but it’ll be just warm enough without losing its structure. The chocolate and marshmallows from the inside of the cheesecake will also be more melty this way.
- Store the cheesecake covered in the fridge. Cheesecake is best if eaten within 4-5 days.
Notes
- Makes 12-14 slices.
- The original version of this recipe used 1/2 cup hot fudge topping in place of chocolate ganache in the cheesecake filling (I used Hershey’s Hot Fudge Topping ).
- To Store: Store cheesecake in an airtight container in the fridge and enjoy within 4-5 days.
- To Freeze: Leave off topping & place fully set cheesecake on a cardboard round. Wrap tightly in plastic wrap and freeze in an airtight container or storage bag for up to 3 months. Thaw in the fridge overnight before adding the topping and enjoying.
- To warm slices, heat in the microwave for 10-15 seconds before serving.
Nutrition
- Serving Size: 1 Slice
- Calories: 518
- Sugar: 44.1 g
- Sodium: 295.5 mg
- Fat: 26.5 g
- Carbohydrates: 64.1 g
- Protein: 8.4 g
- Cholesterol: 119.1 mg


I have a convection option on my oven, but what temp do I set it for melting the marshmallow topping before the broiling?
350 degrees. Just keep a close eye on it.
Hi Lindsay! I have a question about the mini marshmallows at the bottom – won’t they just evaporate? Making this tomorrow!
They do, but they add a gooey-ness that I like. I hope you enjoyed it!
Can I only use a torch for the top?
When i toast the marshmallows that are on top, what temp does my oven need to be on?
You want to turn it on broil on high. Just keep a close eye on it. It doesn’t take long.
Made this for my sons birthday last week!! It was fantastic! The cheesecake part was so smooth and tasty. The large toasted marshmallows on top have the wow factor for a 7 year olds birthday. Will absolutely make this again!
So glad you enjoyed it!
Hello, quick question- do you need to melt the mini marshmallows before putting them at the bottom ? Please let me know, would love to try this out for Christmas!
No, you don’t.
I made this using gluten free graham crackers, which seem to only need half the melted butter for the crust. It was sooooo good!!! I made it for my new son-in-law that that never had any of my baking before and worried that gluten free wouldn’t taste good. I have Celiac Disease so I bake that way so I can taste test. I wondered how the mini marshmallows would taste on the bottom….they gave such a great chew!! You could t see them, but they added to the cheesecake for sure!! It was my first chocolate cheesecake! I’ve made a ton of cheesecakes! But this was my first chocolate but this is not my last and this is not my last but it is my ONLY s’mores cheesecake!! Thank you for the recipe!! It’s well written! The pics are great! Thank you!
Awesome! So glad you enjoyed it!