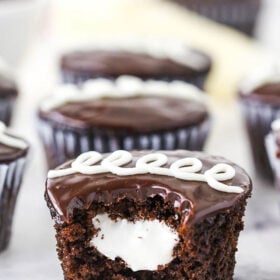
These Homemade Hostess Cupcakes elevate classic snack food into something truly special and decadent. A super moist chocolate cupcake is filled with a light marshmallow filling and covered in chocolate ganache, then frosted with a swirl of vanilla icing!

Easy Copycat Hostess Cupcakes Recipe
These cupcakes are inspired by the classic Hostess cupcakes, but they are SO much better! The flavors are just right, and while they’re sweet, their lack of a heavy frosting keeps them relatively light and not as rich as some cupcakes. There’s nothing like biting into a moist, chocolatey cupcake and finding a sweet marshmallow surprise!
While these Hostess Cupcakes are certainly gourmet, they are quick and easy to make. All you have to do is bake chocolate cupcakes, stuff them with marshmallow filling, then add chocolate ganache and a swirl of vanilla icing.
Pretty much everyone will reach for this satisfying homemade version of a classic childhood treat!

Recipe Ingredients
You don’t need a whole lot of ingredients to replicate these famous Hostess goodies. Just a basic chocolate cupcake recipe and a few tasty components made with 2-4 ingredients. Easy peasy!
For the Chocolate Cupcakes
- All-Purpose Flour
- Sugar
- Cocoa Powder
- Baking Soda
- Salt
- Egg
- Milk
- Vegetable Oil
- Vanilla
- Water: Use hot water to help the cocoa “bloom” and bring out it’s rich flavor.
For the Marshmallow Filling
- Unsalted Butter: Bring the butter to room temperature.
- Powdered Sugar
- Marshmallow Creme: You can also use Fluff, if desired.
For the Chocolate Ganache
- Chocolate Chips
- Heavy Whipping Cream
For the Vanilla Icing
- Unsalted Butter: Room temperature.
- Powdered Sugar
- Milk: Add milk to make a creamy icing that’s perfect for drizzling over your cupcakes.
- Vanilla Extract

How to Make Hostess Cupcakes
These cupcakes have a lot of yummy components, but they’re all super easy and straightforward. Simply make the cupcakes, make the filling, whip up the ganache and the icing and put it all together!
Make the Cupcakes
- Prepare for Baking: Preheat the oven to 300°F and prepare a cupcake pan with liners.
- Combine Dry Ingredients: Add the dry ingredients to a large bowl and whisk together to combine. Set aside.
- Combine Wet Ingredients: Whisk together the egg, milk, vegetable oil and vanilla in another medium-sized bowl.
- Mix Together: Add the wet ingredients to the dry ingredients and mix until well combined.
- Add Hot Water: Add the water to the batter and mix until well combined. The batter will be very thin.
- Bake: Fill the cupcake liners a little more than halfway and bake for 18-23 minutes, or until a toothpick comes out with a few moist crumbs.
- Let Cool: Remove the cupcakes from the oven and allow them to cool for 2 minutes, then transfer them to a cooling rack to finish cooling.
Make the Filling
- Beat Butter for Filling: When the cupcakes are cool, make the filling. Add the butter to a mixer bowl and beat it until smooth.
- Add Powdered Sugar: Add about half of the powdered sugar and mix until well combined and smooth. It may take a few minutes to incorporate, but it will. Add the remaining powdered sugar and mix until well combined and smooth.
- Add Marshmallow Creme: Add the marshmallow creme and stir until well combined.
Assemble and Decorate
- Remove Center of Cupcakes: To fill the cupcakes, cut out the centers of the cupcakes. You can use a cupcake corer or a knife.
- Fill Cupcakes: Fill the centers of the cupcakes with the filling and replace the core of the cupcake that you removed on top of the filling. I cut a little bit of the core off before placing it back on top, since there’s a filling there now and you don’t need all of that cake core.
- Start Making Ganache: To make the chocolate ganache topping, add the chocolate chips to a medium sized bowl.
- Melt Chocolate: Heat the heavy whipping cream just until it begins to boil, then pour it over the chocolate chips. Allow it to sit for 2-3 minutes, then whisk until smooth.
- Top Cupcakes: Spread the chocolate ganache onto the top of each cupcake, all the way to the edges. If it starts to cool and get a bit firm, heat it back up for 5-10 seconds, until it’s spreadable again.
- Beat Butter for Icing: To make the icing for decorating on top, beat the butter in a mixer bowl until smooth.
- Add Powdered Sugar: Add the powdered sugar and mix until evenly combined. It’ll be lumpy and dry.
- Finishing Adding Ingredients: Add the milk and vanilla extract and mix until everything comes together and smooths out.
- Drizzle Over Cupcakes: Pipe the loop design on top of each cupcake using a small round tip. I used Wilton tip 3.
- Chill Until Ready to Serve: Refrigerate the cupcakes until you’re ready to serve them. Serve cool but not cold.

Tips for Success
These quick tips will guide you toward making the ultimate homemade Hostess cupcakes. Bake away!
- Use Unsweetened Cocoa Powder: There’s a difference between unsweetened cocoa powder and Dutch process cocoa powder. Be sure to use natural unsweetened cocoa powder.
- Don’t Overfill Cupcake Liners: You should fill your cupcake liners slightly over the midway point. If you put too much batter in your liners, the tops of the cupcakes could sink and your cupcakes could overflow.
- Transfer to Cooling Rack: Once your cupcakes have cooled for about two minutes, transfer them to a cooling rack to avoid continued baking in the pan.
- Pipe with Gentle Pressure: If you want to make the classic Hostess cupcake loop-de-loop with your vanilla icing, apply a gentle, constant pressure to your piping bag for a smooth and controlled swirl. Practice on a plate prior to piping on your cupcakes so that you get it just right.

How to Store Extras
Store the homemade Hostess cupcakes in the fridge, but allow them to sit at room temperature for a bit before serving so that they aren’t too cold and firm. Your cupcakes will stay fresh for up to about 5 days in the fridge.
Freezing Hostess Cupcakes
You can freeze these cupcakes, unfrosted, if you’d like. Just keep them in an airtight container. Frozen Hostess cupcakes will last for 2-3 months. Thaw them in the fridge overnight before frosting them and digging in.
Watch How They’re Made
Homemade Hostess Cupcakes
- Prep Time: 1 hour 30 minutes
- Cook Time: 20 minutes
- Total Time: 1 hour 50 minutes
- Yield: 15 1x
- Category: Dessert
- Method: Oven
- Cuisine: American
Description
These Homemade Hostess Cupcakes elevate a mass-produced treat into something truly special and decadent. A super moist chocolate cupcake is filled with a light marshmallow filling and covered in chocolate ganache, then frosted with a swirl of vanilla icing!
Ingredients
For the Chocolate Cupcakes
- 1 cup (130g) all purpose flour
- 1 cup (207g) sugar
- 6 tbsp (43g) unsweetened cocoa powder
- 1 tsp baking soda
- 1/2 tsp salt
- 1 large egg
- 1/2 cup (120ml) milk
- 1/2 cup (120ml) vegetable oil
- 3/4 tsp vanilla extract
- 1/2 cup (120ml) hot water
For the Marshmallow Filling
- 1/4 cup (56g) unsalted butter, room temperature
- 1/2 cup (58g) powdered sugar
- 5 oz marshmallow creme
For the Chocolate Ganache
- 4 oz (113g) semi sweet chocolate chips
- 6 tbsp (90ml) heavy whipping cream
For the Vanilla Icing
- 2 tbsp unsalted butter, room temperature
- 1/2 cup powdered sugar
- 1 tbsp milk
- Splash of vanilla extract
Instructions
For the Cupcakes
- Preheat oven to 300°F (148°C) and prepare a cupcake pan with liners.
- Add the dry ingredients to a large bowl and whisk together to combine. Set aside.
- Whisk together the egg, milk, vegetable oil and vanilla in another medium-sized bowl.
- Add the wet ingredients to the dry ingredients and mix until well combined.
- Add the water to the batter and mix until well combined. The batter will be very thin.
- Fill the cupcake liners a little more than half way and bake for 18-23 minutes, or until a toothpick comes out with a few moist crumbs.
- Remove the cupcakes from the oven and allow to cool for 2 minutes, then transfer to a cooling rack to finish cooling.
For the Filling
- When the cupcakes are cool, make the filling. Add the butter to a mixer bowl and beat until smooth.
- Add about half of the powdered sugar and mix until well combined and smooth. It may take a few minutes to incorporate, but it will.
- Add the remaining powdered sugar and mix until well combined and smooth.
- Add the marshmallow creme and stir until well combined.
To Assemble
- To fill the cupcakes, cut out the centers of the cupcakes. You can use a cupcake corer or a knife.
- Fill the centers of the cupcakes with the filling and replace the core of the cupcake that you removed on top of the filling. I cut a little bit of the core off before placing it back on top, since there’s a filling there now and you don’t need all of that cake core.
- To make the chocolate ganache topping, add the chocolate chips to a medium sized bowl.
- Heat the heavy whipping cream just until it begins to boil, then pour it over the chocolate chips. Allow it to sit for 2-3 minutes, then whisk until smooth.
- Spread the chocolate ganache onto the top of each cupcake, all the way to the edges. If it starts to cool and get a bit firm, heat it back up for 5-10 seconds, until spreadable again.
- To make the icing for decorating on top, beat the butter in a mixer bowl until smooth.
- Add the powdered sugar and mix until evenly combined. It’ll be lumpy and dry.
- Add the milk and vanilla extract and mix until everything comes together and smooths out.
- Pipe the loop design on top of each cupcake using a small round tip. I used Wilton tip 3.
- Refrigerate the cupcakes until ready to serve. Serve cool but not cold.
Notes
Makes 14-16 cupcakes.
Cupcakes are best when stored in an airtight container and eaten within 3-5 days.
Nutrition
- Serving Size:
- Calories: 309
- Sugar: 30.6 g
- Sodium: 180.2 mg
- Fat: 15.8 g
- Carbohydrates: 41.9 g
- Protein: 2.7 g
- Cholesterol: 28.2 mg
Other Copycat Dessert Ideas to Try
There are so many other iconic treats you can make from the comfort of your home. And, like this recipe, they’re even better than the real thing!
- If you’re an ice cream cake fanatic, you know about the classic Dairy Queen ice cream cake. You seriously have to try my tasty copycat ice cream cake!
- Speaking of ice cream, my Copycat Birthday Cake Remix Ice Cream puts Cold Stone Creamery to shame – and it doesn’t even require an ice cream maker.
- These homemade Bojangles Cinnamon Biscuits are the ultimate sweet tooth’s breakfast recipe! Buttery, cinnamon-filled biscuits are drizzled with a smooth 2-ingredient vanilla glaze.


Hi Lindsay,
Vanilla – do you use liquid, syrup, powder? what do you suggest? Thanks
I use vanilla extract, which is a liquid.
Absolutely delicious! Rich, soft, and easy to bake! I was proud of myself for not over baking as my oven temp is inaccurate. I just kept a close eye on them towards the end. 100 percent would recommend!
I’m so glad you enjoyed them!
So good, and so much fun! I made homemade marshmallow creme because the store didn’t have any – super easy! Also needed about 1.5x the ganache to cover all the cupcakes – maybe I’m a heavy hand lol. Took them to a party and after eating three someone went “Wait, you made these???” so I think that speaks for itself!
Awesome! I’m so glad they were a hit!