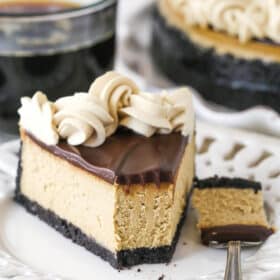
If you love the classic combo of coffee and chocolate, this Coffee Cheesecake is for you! With a creamy coffee-infused filling, an Oreo crust, and a glossy chocolate ganache, it’s like your favorite mocha in dessert form.

Cheesecake is one of my favorite desserts, and I LOVE playing with fun, unique flavors. That being said, sometimes you just need something classic, and what (aside from my Vanilla Bean Cheesecake, this No-Bake Chocolate Cheesecake, or my Biscoff Cheesecake) could be more wonderfully classic than coffee and chocolate? I don’t know about you, but I am a HUGE fan of the combo. The bold, rich flavor of coffee balances the sweetness of chocolate in a magical marriage that’s been delighting taste buds for centuries.
This Coffee Cheesecake is the ultimate celebration of that timeless duo. With a chocolatey Oreo crust, a creamy coffee-infused filling, and a luscious layer of chocolate ganache, it’s like your go-to mocha but on a whole other level of yum. Plus, it’s a total show-stopper. The glossy ganache topping and swirls of coffee whipped cream make it just as stunning as it is indulgent.
Coffee Cheesecake with a Mocha Twist
You won’t fully understand how tasty this cheesecake is until you take your first bite, but until then, here are a few of the reasons I am convinced you won’t be able to stop at just one slice:
- One of the best flavor combos. The coffee flavor in this cheesecake is unmissable, and it’s sandwiched between a buttery Oreo crust and a rich chocolate ganache. The glorious combination of coffee and chocolate is a classic favorite that’ll keep you coming back for more.
- Thick, creamy texture. This cheesecake itself is perfectly thick and creamy without being too heavy. The sour cream does a great job of lightening things up and making the filling extra silky smooth.
- A real show-stopper. Simple yet elegant, the smooth ganache that covers the cheesecake and the delicate swirls of coffee whipped cream that surround it make this dessert a magnet for anyone who lays eyes on it.
What You’ll Need
Ready to head to the grocery store? Here’s what you’ll need to make this glorious dessert. You’ll find precise measurements in the recipe card below.

- Oreo crumbs – I went with classic Oreos, but who’s to say you can’t use another flavor! Golden Oreos would be fun. So would the peanut butter ones! Just don’t use double stuf, since the extra stuff throws off the butter amount you’ll need.
- Cream cheese – Start with room-temperature cream cheese. If it’s too cold, your filling will turn out lumpy. I recommend full fat, brick style cream cheese for the best texture and thickness.
- All-purpose flour – A 1:1 gluten-free flour should also do the trick, or cornstarch (but half the amount).
- Sour cream – If you don’t have sour cream and/or don’t want to use it, you could also use greek yogurt or heavy cream. Just keep in mind that heavy cream may add to your bake time.
- Instant coffee – Or espresso granules. Either will work.
- Eggs – It’s best if the eggs are at room temperature. They will mix more easily into the batter than cold eggs. Be sure to use large eggs, not medium or extra large.
- Semi-sweet chocolate – Feel free to use a chocolate bar or chocolate chips. But if you use another type of chocolate, you may want to adjust the heavy cream amount to get the right ganache consistency.
- Heavy whipping cream – Don’t try to use a lower-fat dairy product. You need the extra fat content in the heavy cream for proper results. Make sure it’s cold for the whipped cream, or it won’t whip up and hold volume properly.
- Powdered sugar – For sweetness and structure. It keeps the whipped cream from wilting.
How to Make a Coffee Cheesecake
Here comes a quick overview of how to make this mocha-inspired cheesecake. Be sure to scroll to the recipe card below for more detailed instructions.
Make the crust
- Prep. Preheat the oven to 325°F, line the bottom of a 9-inch springform pan with parchment paper, and grease the sides.
- Make the crust. Combine the crust ingredients and press the mixture into the bottom and up the sides of the pan. Bake the crust for 8-10 minutes.
- Prepare a water bath. Wrap the outsides of the pan with aluminum foil.


Make the filling
- Lower the oven temperature. Reduce the oven to 300°F.
- Make the filling base. Beat the cream cheese, sugar, and flour on low speed until smooth. Mix in the sour cream.
- Make it coffee-y. Mix together the espresso powder and hot water until dissolved. Mix the coffee and vanilla into the cream cheese mixture.


- Add the eggs. Mix in the eggs one at a time.
- Bake. Pour the cheesecake batter into the crust and set the pan in a water bath. Bake for 1 hour 15 minutes.


- Cool. Turn off the oven and leave the door closed for 30 minutes. Crack the door and leave the dessert inside for another 30 minutes.
- Chill. Remove the cheesecake from the oven and the water bath. Chill in the fridge for 5-6 hours.
Finish off the Cheesecake
- Prep. Remove the cheesecake from the springform pan and set on a serving plate.
- Make the chocolate ganache. Microwave the heavy cream just until it begins to boil. Pour it over the chocolate chips and let rest for 2-3 minutes. Stir until smooth.
- Spread. Spread the ganache over the top of the cheesecake.


- Chill. Let the cheesecake sit in the refrigerator while you make the whipped cream.
- Make the whipped cream – Beat the heavy whipping cream, powdered sugar, espresso powder, and vanilla on high speed until stiff peaks form.
- Finishing touches. Pipe the whipped cream around the edge of the cheesecake.

Tips for Success
- Use a springform pan. You can use a standard cake pan, but I promise you will be SO much happier if you use a springform pan. It makes removing the cheesecake from the pan 1000 times easier.
- Room temperature eggs and dairy. The cream cheese, sour cream, and eggs should all be at room temperature. Cold cream cheese will give you a lumpy filling, while cold sour cream and eggs will have a harder time mixing into the batter, which can lead to over-mixing (see my next point).
- Mix on low speed, and not too much. Mixing at a higher speed (or for too long) will introduce excess air into the batter, which can cause cracks to form in the cheesecake as it bakes.
- Scrape down the sides of the bowl. Do this periodically as you make the filling to ensure all the ingredients are incorporated into your masterpiece.
- HOT water. The water must be hot in order to properly dissolve the instant coffee. Otherwise, it won’t release its full flavor potential.
- Don’t skip the water bath. It might seem like a hassle, but it really is necessary for even cooking. Additionally, the steam released from the water bath in the oven will help prevent cracks in the cheesecake. Take a look at How to Bake Cheesecake in a Water Bath to see how it’s done.
- Don’t over-bake. The cheesecake will keep baking as it cools (see my next point). So bake just until the center is set but still jiggly. Check out my post on How to Tell When Your Cheesecake Is Done for more information.
- Cool gradually. The cheesecake needs some extra time in the oven after you turn it off—30 minutes with the door closed and 30 more with the door cracked. During this time, the filling will finish baking. This slow cooling process also helps prevent cracks in the cheesecake.
- Don’t skip the chill. This cheesecake needs at least 5 hours in the fridge to firm up. If you skimp on this time, it will fall apart when you try to remove it from the pan.
- Cold heavy cream. Start with super cold heavy cream. If it’s too warm, it won’t whip up and hold volume properly.

How to Store
- Refrigerator. Seal any leftovers in an airtight cake carrier or wrap the cheesecake in a double layer of plastic wrap (I like to use toothpicks to prop the plastic away from the whipped cream). You could also arrange slices in a single layer in an airtight container. Regardless, the cheesecake will keep in the fridge for up to 5 days.
- Freezer. Pop the cheesecake in the freezer for a couple of hours to firm up. Then, wrap it in a double layer of plastic wrap. Alternatively, arrange slices in a single layer in an airtight, freezer-safe container. You can store it in the freezer for up to 3 months. Allow the dessert to thaw in the fridge before serving.
For more information, check out my post on how to store cheesecake.
More Cheesecake Recipes
If you’re new here, you should know that I’m a cheesecake nut. I have about a zillion cheesecake recipes ready for you to explore. Here are just a few of my favorites:
Creamy Coffee Cheesecake
- Prep Time: 50 minutes
- Chill Time: 4 hours
- Cook Time: 2 hours 15 minutes
- Total Time: 7 hours 5 minutes
- Yield: 12–14 slices 1x
- Category: Cheesecake
- Method: Oven
- Cuisine: American
Description
Love the classic coffee-chocolate combo? This Coffee Cheesecake is for you! With a creamy coffee filling, an Oreo crust, and a glossy chocolate ganache, it’s like your favorite mocha, but better!
Ingredients
Crust
- 2 1/2 cups (335g) Oreo crumbs (about 30 Oreos)
- 1/4 cup (56g) unsalted butter, melted
Filling
- 24 ounces (678g) cream cheese, room temperature
- 1 cup (207g) sugar
- 3 tablespoons (24g) all-purpose flour
- 1 cup (230g) sour cream, room temperature
- 3 tablespoons instant coffee/espresso granules
- 1 1/2 tablespoons (30ml) hot water
- 2 teaspoons vanilla extract
- 4 large eggs, room temperature
Chocolate Ganache Topping
- 4 oz | 113g | 2/3 cup semi-sweet chocolate
- 6 tablespoons heavy whipping cream
Coffee Whipped Cream
- 1 cup (240ml) heavy whipping cream, cold
- 1/2 cup (58g) powdered sugar
- 1 teaspoon instant coffee/espresso granules
- 1 teaspoon vanilla extract
Instructions
Make the crust
- Preheat oven to 325°F (163°C). Line a 9-inch (23cm) springform pan with parchment paper in the bottom and grease the sides.
- Combine the crust ingredients in a small bowl. Press the mixture into the bottom and up the sides of the springform pan.
- Bake the crust for 8-10 minutes, then set aside to cool.
- Cover the outsides of the pan with aluminum foil so that water from the water bath cannot get in (see how I prepare my pan for a water bath). Set prepared pan aside.
Make the filling
- Reduce oven temperature to 300°F (148°C).
- In a large bowl, beat the cream cheese, sugar and flour on low speed until well completely combined and smooth. Be sure to use low speed to reduce the amount of air added to the batter, which can cause cracks. Scrape down the sides of the bowl.
- Add the sour cream and mix on low speed until well combined.
- Add the espresso powder to the hot water and stir until dissolved. Add the coffee to the cream cheese mixture, along with the vanilla extract. Mix on low speed until well combined.
- Add the eggs one at a time, mixing slowly to combine after each addition. Scrape down the sides of the bowl as needed to make sure everything is well combined.
- Pour the cheesecake batter into the crust.
- Place the prepared springform pan inside another larger pan. Fill the outside pan with enough warm water to go about halfway up the sides of the springform pan. The water should not go above the top edge of the aluminum foil on the springform pan.
- Bake for 1 hour 15 minutes. The center should be set, but still jiggly (See how to tell if your cheesecake is done baking).
- Turn off the oven and leave the door closed for 30 minutes. The cheesecake will continue to cook, but slowly begin to cool as well.
- Crack the door of the oven for 30 minutes to allow the cheesecake to continue to cool slowly. This process helps prevent cracking.
- Remove the cheesecake from the oven and water bath wrapping and refrigerate until firm, 5-6 hours or overnight.
Finish off the Cheesecake
- Remove the cheesecake from the springform pan and set on a serving plate. Set aside.
- To make the chocolate ganache, put the chocolate chips in a heat proof bowl.
- Microwave the heavy whipping cream just until it begins to boil, then pour it over the chocolate chips. Allow it to sit for 2-3 minutes, then stir until smooth.
- Pour the ganache onto the cheesecake and spread into an even layer. Use an offset spatula to add a little texture/design, if you like. Place the cheesecake in the refrigerator while you make the whipped cream.
- To make the whipped cream, add the heavy whipping cream, powdered sugar, espresso powder and vanilla extract to a large mixer bowl and whip on high speed until stiff peaks form.
- Pipe the whipped cream around the edge of the cheesecake, then serve. I used Ateco tip 844.
- Store the cheesecake in an airtight container or well-covered in the fridge. Cheesecake is best if eaten within 4-5 days.
Nutrition
- Serving Size: 1 slice
- Calories: 464
- Sugar: 29 g
- Sodium: 248.9 mg
- Fat: 32.2 g
- Carbohydrates: 38.1 g
- Protein: 7.6 g
- Cholesterol: 130 mg


This was unbelievably good. I made this for our Christmas Eve family get together and it was devoured by everyone. I have made many cheesecakes, but this may be my favorite one yet.
I’m so glad you enjoyed it!
can I turn this recipe into cheesecake bars?
Sure! If you want to use a 9 x 13 pan, I would reduce the eggs to three and do it similar to this cheesecake and cut it into bars.
This was a good recipe but I feel like 3 tablespoons of espresso or coffee gradual was a bit to much, I would suggest maybe 1 tablespoon
Sure, it would depend on how much you like the coffee flavor. You can definitely adjust.
it’s really a nice recipe, like to make it, but there’s an error. three tablespoons of flour are definitely not only 24 gramms, or am l wrong?
24 grams is correct.
I LOVE all the recipes I’ve tried and look forward to your emails! I have an issue, though—I am now baking/cooking for only two of us and I don’t want things to last too long—I would rather make new. Therefore could you reduce the size of your 3 layer cakes and a cheesecake like this coffee to a pie pan size—then I could use a pre-made Oreo crust, too.
I’m so glad to hear you’re enjoying the recipes! 🙂
Yes, you can reduce their size. I actually have a guide to adjusting cheesecake sizes that you could look at. I’ve never made one of my cheesecakes in a pie pan, but I imagine you could. For the layer cakes, I find that cutting them in half usually works for a 6 inch cake (not a super tall one, but a normal height one – 3-4 inches tall). I hope that helps!