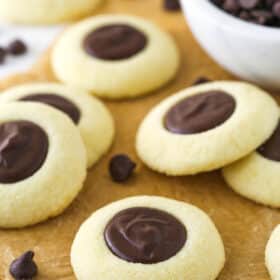
These Chocolate Thumbprint Cookies are a holiday classic! The shortbread-like vanilla cookie base is filled with a silky chocolate ganache for a wonderful cookie you’ll come back to each year.

Why I Love These Chocolate Thumbprint Cookies
- Buttery and chewy. The cookie base in this recipe is similar to buttery shortbread, but with the addition of egg yolks to keep them chewy and help them stay fresh for longer.
- A chocolate lover’s dream. The rich chocolate ganache filling is delicious and sure to keep any chocolate lovers happy!
- An easy holiday crowd-pleaser. With Christmas cookies, there tends to be a mix of super simple cookies and more complicated cookies. Only some fall in that lovely middle space where the effort is fairly low, but the results are stellar. These chocolate thumbprint cookies fit that bill and are sure to be a hit with your family. The flavors are simple and classic, yet irresistible.
Why Are They Called Thumbprint Cookies?
Thumbprint cookies get their name because of the divot made from your thumb that is then filled with something like jam, or in this case, chocolate. You certainly don’t have to use your thumb – I use a measuring spoon – but that’s where the name comes from. Thumbprint cookies can be filled with many things, from chocolate or jam, to buttercream. I even have turtle thumbprint cookies inspired by the famous holiday candy!

What You’ll Need
These chocolate thumbprint cookies are made with staple pantry ingredients, so there’s no need to run out and grocery shop! If you’re looking for exact ingredient amounts, check out the recipe card below.
Cookies
- Unsalted butter – Bring your butter to room temperature before starting on your dough.
- Sugar – You’ll use some for your cookie dough and some for rolling the cookie dough in.
- Egg yolks – You won’t be needing any egg whites for this recipe. The yolks contribute to a chewier cookie.
- Vanilla extract
- All-purpose flour
- Salt – Don’t underestimate the salt! It adds and accentuates the flavor of baked goods.
Chocolate Filling
- Semi-sweet chocolate – Stick with semi-sweet. If you use another kind, like milk chocolate, the chocolate filling may not firm up as well.
- Heavy cream – Be sure to use heavy cream, not milk or something like milk. It will be too thin (not enough fat) and will thin out the chocolate mixture too much.

How to Make Chocolate Thumbprint Cookies
- Prepare for baking. Preheat the oven to 350°F (180°C) and line baking sheets with parchment paper or silicone baking mats.
- Cream the butter and sugar. Cream the butter and sugar together in a large mixer bowl on medium speed until light in color and fluffy.
- Mix in the egg yolks and vanilla extract. Add the egg yolks one at a time and mix until well combined after adding each one. Next, pour in the vanilla extract and mix again.
- Add the flour and salt. Add the flour and salt and mix until the dough is just well combined. Do not over-mix.


- Form the cookies. Create 1 1/2 tablespoon sized balls of cookie dough. Gently roll them into a ball, then roll them in additional sugar if desired. Set the balls on the baking sheet.
- Press the centers. Use the end of a spatula, your thumb, or the bottom of a measuring spoon to press the centers of the cookies down. Do this immediately after rolling them to help prevent the cookies from cracking.
- Bake. Bake your cookies for 10-13 minutes or until the edges JUST begin to brown.


- Let the cookies cool. Allow the cookies to cool on the baking sheet for 5-10 minutes, then transfer them to a cooling rack to finishing cooling.
- Heat the cream. While the cookies cool, make the chocolate filling. Add the semi-sweet chocolate to a medium sized bowl and set it aside. Heat the heavy cream until it just begins to boil, then pour it over the chocolate. Let it sit for 2-3 minutes, then whisk until well combined and smooth.
- Add the vanilla extract. Add the vanilla extract and stir to combine. Let the chocolate filling cool for about 10 minutes.
- Add the filling to the cookies. Spoon the chocolate filling into the cookies and allow them to cool completely.

Tips for Success
- Use a food scale for measuring. It’s important to measure all your ingredients accurately, but flour is the one that causes the most issues. If you don’t have enough, your cookies will spread too much and not hold shape. If you have too much, they will be dry, dense and crumbly. Use the scoop and level method, or to be sure of accuracy, use a food scale. I use this OXO food scale, but this one would also work well.
- Press the centers immediately. As soon as you form the cookie dough balls (and roll them in sugar, if you choose to do that step), press the centers down. As the cookie dough balls sit, the edges start to dry out, so waiting to press the cookies down can lead to cracking.
- Use a medium-colored baking sheet. Try to use a medium-colored baking sheet for this recipe. Lighter colored baking sheets cause cookies to spread more, and darker baking sheets cause them to spread less and brown more on the bottom. A medium-colored sheet is just right!
- Avoid chilling the dough. There’s no need to refrigerate this cookie dough. You can if you’d like to, but I found that the cookies actually did more spreading after being refrigerated, so keep that in mind.

Proper Storage
- Fridge. I recommend keeping these cookies in an airtight container in the fridge. Serve them at room temperature. They will stay good for up to a week.
- Freezer. If you don’t want to mess up the tops of the cookies, I recommend flash freezing them for about an hour, then you can stack them between sheets of parchment paper in an airtight container or in a ziplock bag. They should be fine frozen for up to 3 months.
More Holiday Cookies
Chocolate Thumbprint Cookies
- Prep Time: 25 minutes
- Cook Time: 10 minutes
- Total Time: 35 minutes
- Yield: 28 1x
- Category: Cookies
- Method: Oven
- Cuisine: American
Description
These chocolate thumbprint cookies are made with a shortbread-like vanilla cookie base, and a smooth chocolate ganache filling. They’re great for the holidays and more!
Ingredients
Cookies
- 1 cup (224g) unsalted butter, room temperature
- 1/2 cup (104g) sugar (plus 3–4 tbsp for rolling)
- 2 large egg yolks
- 1 teaspoon vanilla extract
- 2 cups (260g) all purpose flour (measured accurately)
- 1/4 teaspoon salt
Chocolate Filling
- 8 ounces semi-sweet chocolate, chopped
- 1/2 cup (120ml) heavy cream
- 1/2 teaspoon vanilla extract
Instructions
- Preheat oven to 350°F (180°C). Line baking sheets with parchment paper or silicone baking mats. Set aside.
- Cream the butter and sugar together in a large mixer bowl on medium speed until light in color and fluffy. You should be able to see the change in color happen and know it’s ready.
- Add the egg yolks one at a time and mix until well combined after each.
- Add the vanilla extract and mix until well combined.
- Add the flour and salt and mix until the dough is just well combined. Do not over mix.
- Create 1 1/2 tablespoon sized balls of cookie dough. Gently roll into a ball, then roll in additional sugar (if using), then set the balls on the baking sheet.
- Use the end of a spatula, your thumb or the bottom of a measuring spoon to press the centers of the cookies down. Do this immediately after rolling them to help prevent the cookies from cracking.
- Bake cookies for 10-13 minutes or until the edges JUST begin to brown. You don’t want to over bake them and have dry cookies.
- Allow cookies to cool on the baking sheet for 5-10 minutes, then move to a cooling rack to finishing cooling.
- While the cookies cool, make the chocolate filling. Add the semi-sweet chocolate to a medium sized bowl and set aside. Heat the heavy cream until it just begins to boil, then pour it over the chocolate. Let it sit for 2-3 minutes, then whisk until well combined and smooth.
- Add the vanilla extract and stir to combine. Let the chocolate filling cool for about 10 minutes.
- Spoon the chocolate filling into the cookies and allow them to cool completely.
Notes
- To store. I recommend keeping these cookies in an airtight container in the fridge. Serve them at room temperature. They will stay good for up to a week.
- To freeze. If you don’t want to mess up the tops of the cookies, I recommend flash freezing them for about an hour, then you can stack them between sheets of parchment paper in an airtight container or in a ziplock bag. They should be fine frozen for up to 3 months.
Nutrition
- Serving Size: 1 cookie
- Calories: 157
- Sugar: 8.3 g
- Sodium: 64.6 mg
- Fat: 10.1 g
- Carbohydrates: 15.7 g
- Protein: 1.8 g
- Cholesterol: 33 mg


Dang! They spread- and bottoms were lacy and not formed well. Cant even put anything into the prints- cause theyre no longer prints- just globs. Butter was soft. Measured out flour by grams. Could my egg yolks have been too cold? Such a bummer!
Hmm, they shouldn’t spread like that. If you weighed your ingredients, then those should be correct. Cold egg yolks shouldn’t be an issue. Did you fully cream the butter and sugar? Did you by any chance make the balls a little bigger?
How much do the cookies spread? Do you need to chill the dough before baking?
It’s hard to quantify exactly how much they spread. But they do spread a decent amount. If you take a look at the step-by-step photos, you can see the cookie dough before it’s baked and then the cookies after they are baked. They’re the exact same cookies in the exact same spot, so you can see how the space between them changes from unbaked to baked. Hopefully that helps. Keep in mind that if you make cookie dough balls that are larger or smaller, that can make them spread differently. You do not need to chill the cookie dough.
Do these cookies freeze well?
I would expect them to freeze just fine.
These are delicious! I made them with my baking obsessed 3 year old. Her favorite part was making the thumbprints (and eating the cookies!). The recipe was easy to follow and they turned out so good! I followed it exactly as written and baked for 12 minutes, let cool on sheet for 5. Absolutely perfect. Our only addition was rainbow sprinkles on top of the chocolate because they are my daughter’s favorite. We’ll be making these again! Thanks for the recipe!
Awesome! So glad you enjoyed them!
Can I replace the chocolate filling with a fruit jelly as the filling?
Yes, you can find my jam thumprint cookies here.
Merry Christmas! I just wanted to wish you and your family a blessed holiday.
I made many of your cookies to share with family and friends. When the post for chocolate thumbprint cookies popped up, I just had to make them for my cookie plate.
I put the granddaughters to work and enjoyed our time together. Delicious home made cookies are the best! Thank you!