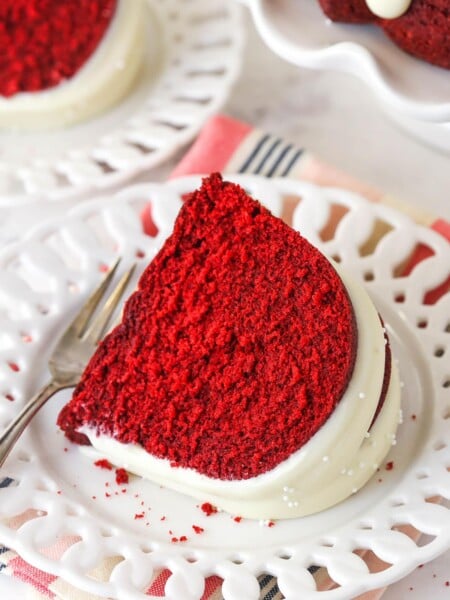
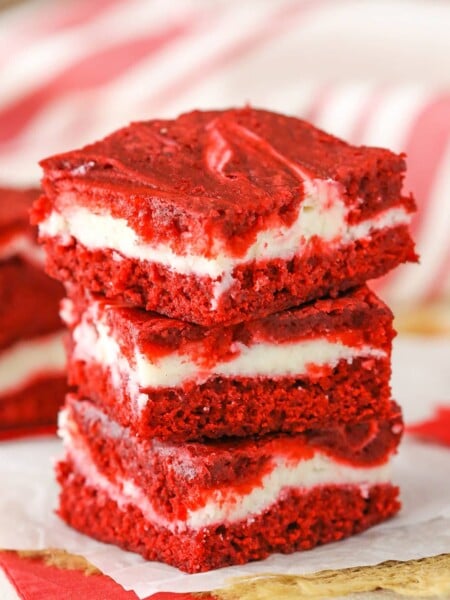
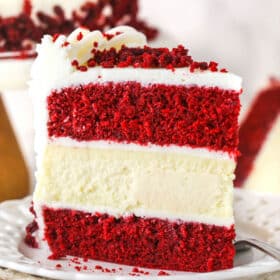
This Red Velvet Cheesecake Cake recipe has layers of moist red velvet cake and creamy cheesecake all covered in cream cheese frosting! If you’ve ever had the cheesecake by the same name at The Cheesecake Factory and loved it, this is the perfect recipe to make at home!

You guys know that I love a good cheesecake and when we get out to eat, I always have to try the cheesecake if it’s on the menu. Which is how I first ended up trying this red velvet cheesecake cake, one of the popular options at The Cheesecake Factory. It combines two of my favorite things – red velvet cake and vanilla cheesecake. I actually already have a red velvet cheesecake recipe but I love that this one has the actual cake layers along with the cheesecake too.
This isn’t the first time I’ve recreated a dessert from The Cheesecake Factory. I have several other cheesecakes inspired by theirs, including the Banana Cream Cheesecake (my all-time fave), Oreo Dream Extreme Cheesecake, Mango Key Lime Cheesecake and Kahlua Coffee Brownie Cheesecake. If you love red velvet, though, this red velvet cheesecake cake will be your favorite.

Why You’ll Love Red Velvet Cheesecake Cake
- Cheesecake AND cake. The best of both worlds! The red velvet cake layers are super moist and full of great flavor, and the cheesecake is creamy and delicious.
- Tangy red velvet flavor. I’ve become a lover of red velvet cake since I started making it myself from scratch, so I personally LOVE the flavor of this cake. I pulled from my classic red velvet cupcake recipe to get the perfect balance of tangy, slightly chocolatey flavor.
- Holiday ready. This gorgeous cake makes the perfect centerpiece for Valentine’s Day, Christmas, and any other special occasion. It’s definitely a cake meant to impress!

Is Red Velvet Cake Just Chocolate Cake?
Before we dive into all my best tips for making this red velvet cheesecake cake, let’s address this question. I feel like I see everywhere that red velvet is just chocolate and, as someone who loves red velvet, I have to disagree.
First, red velvet cake has always been made with vinegar and buttermilk. The acidity reacts with the cocoa to reveal the red anthocyanin in the cocoa, which would give it its red-ish color, and adds the lovely tang that simply isn’t present in chocolate cake. (Though note, this doesn’t give it the bright red color we’re familiar with these days – that’s from food coloring!)
Second, and in my opinion, this is the even bigger argument, chocolate cake has considerably more cocoa in it. If you look at my Best Moist Chocolate Cake, you’ll see it has three quarters cup of cocoa in it. This cake has 4 teaspoons of cocoa. So if we break that down, that’s 36 teaspoons in a chocolate cake versus 4 in this one. I’m telling you, if you made a chocolate cake with 4 teaspoons of cocoa and tried to pass it off as chocolate, people would call you on it.
So What Does Red Velvet Cake Taste Like?
There’s quite a bit of variety in red velvet cake recipes, so it can vary. But it should be tangy, sugar moist, have a hint of chocolate and have a unique flavor that you come to know and love as red velvet.

Ingredients and Notes
Here’s a look at the ingredients needed for this cheesecake cake. Don’t be intimidated by the length – many ingredients are repeated in different layers, and most are pantry staples. Scroll down to the recipe card below for the exact measurements.
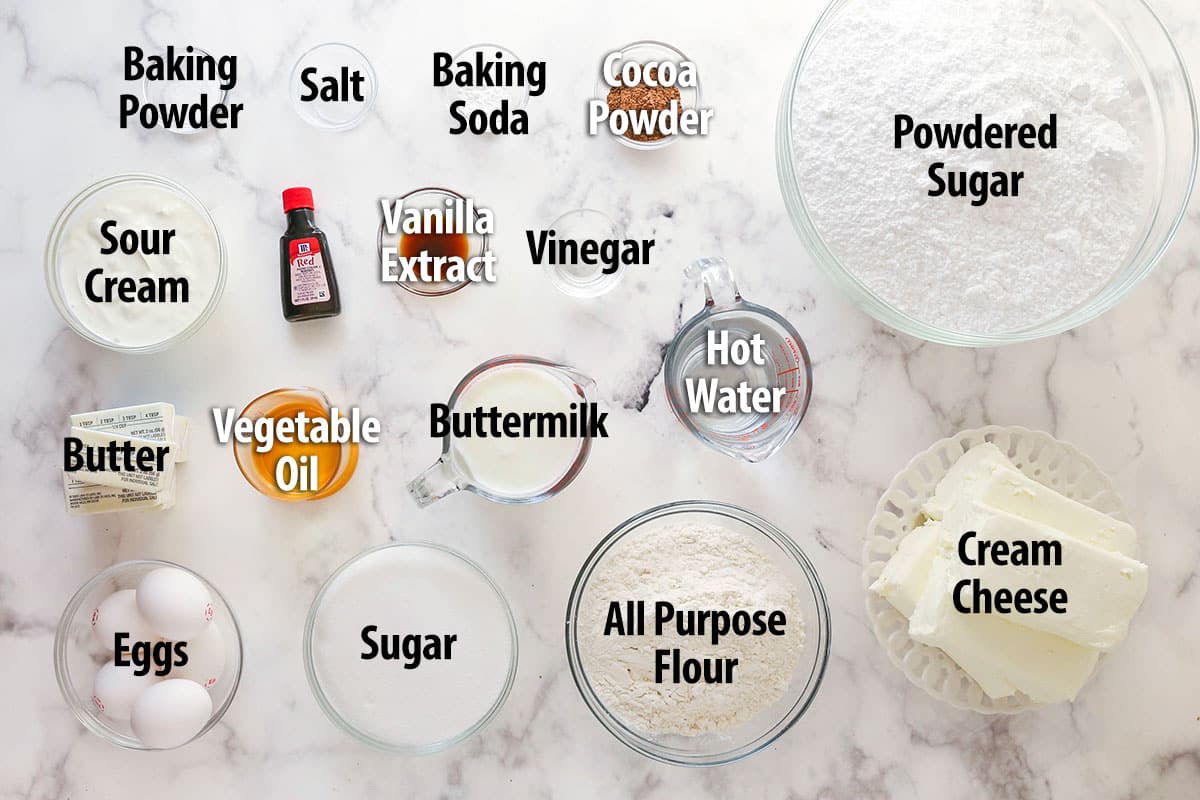
- Cream cheese – It’s important to use the brick-style full-fat cream cheese, not reduced fat or the kind in the tub. Those would be too soft for cheesecake.
- All purpose flour – For the cake layers, I recommend using a scale or spooning the flour into the measuring cup and leveling it off, so that your cake doesn’t end up dry. You can see all my tips for measuring flour here. For the cheesecake layer, the starch prevents the egg proteins from over-coagulating, giving you a creamier texture and helping you prevent any cracks. If you are looking for a gluten free alternative, cornstarch will work too. Use half as much cornstarch as you would flour.
- Sour cream – The sour cream lightens the cream cheese texture and flavor, adding some of that classic tangy flavor.
- Eggs – Be sure to use large eggs, not medium or extra large.
- Buttermilk – It’s part of what gives red velvet its classic tang. You can used powdered buttermilk or regular buttermilk.
- White vinegar – A splash of vinegar adds to the tangy flavor.
- Red food coloring – I used red food coloring, but you can also use red gel icing color.
- Powdered sugar – Adds volume to the frosting and thickens it. You could reduce the amount, but it won’t be as thick and may not pipe well.
How To Make Red Velvet Cheesecake Cake
This cake takes a little time, but each individual layer isn’t hard. Here’s a step-by-step photo overview. The more detailed printable steps can be found in the recipe card below.
Make the cheesecake layer
Preheat oven to 300°F. Line the entire inside of a 9-inch cake pan with aluminum foil. Press it into the pan to get it as flat as you can. You’ll use the aluminum foil to lift the cheesecake out of the pan when it’s baked and cooled.
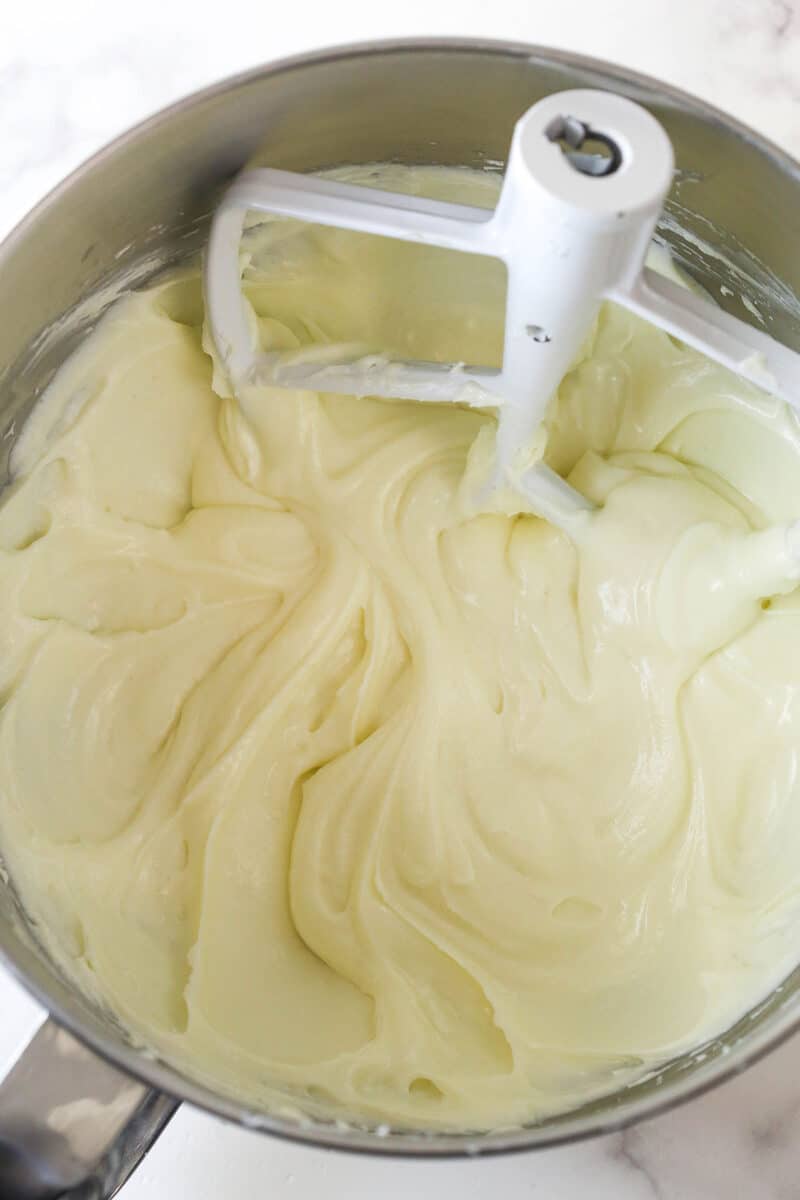
In a large mixer bowl, mix the cream cheese, sugar and flour together until combined.

Add the sour cream and vanilla extract, followed by the eggs, one at a time.
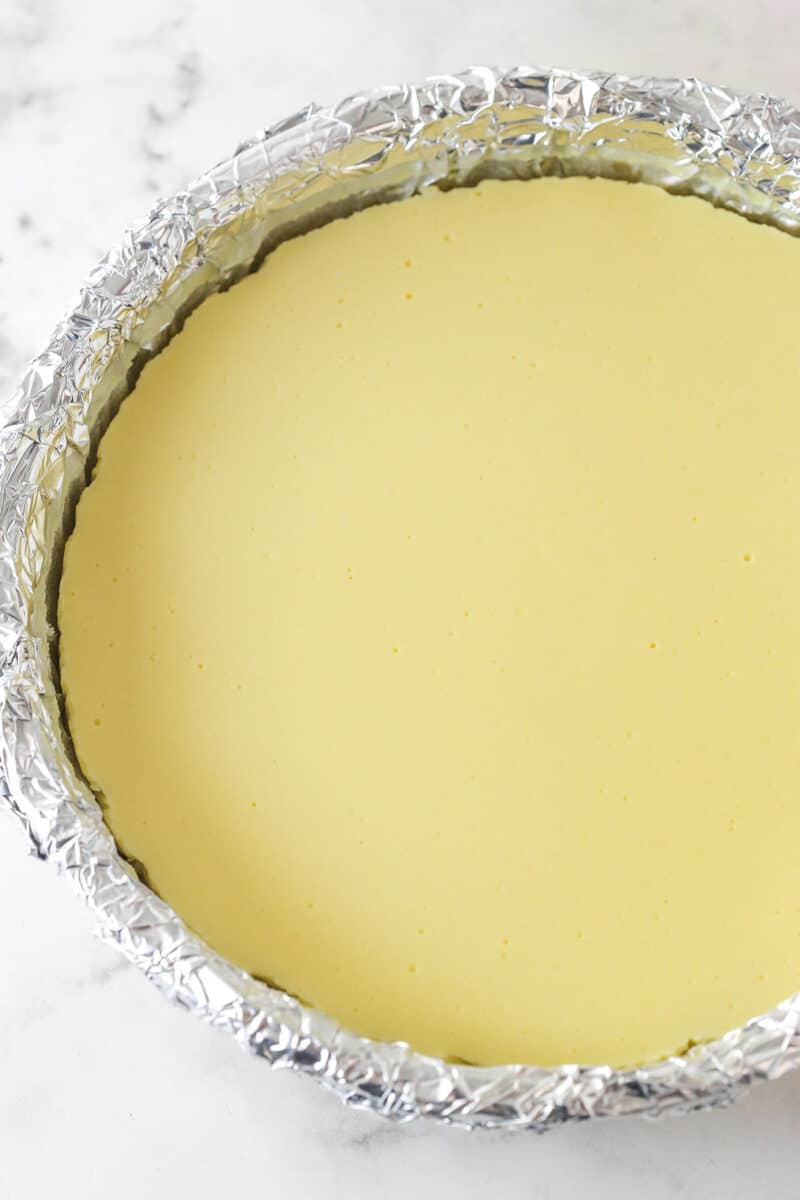
Pour cheesecake batter into the cake pan and bake for 1 hour. Cool for 30 minutes with oven door closed, then 30 minutes with it partially open.
Chill cheesecake until firm, 4-5 hours.
Make the cake layer
Preheat the oven to 350°F. Line the bottoms of two 9-inch cake pans with parchment paper and grease the sides.
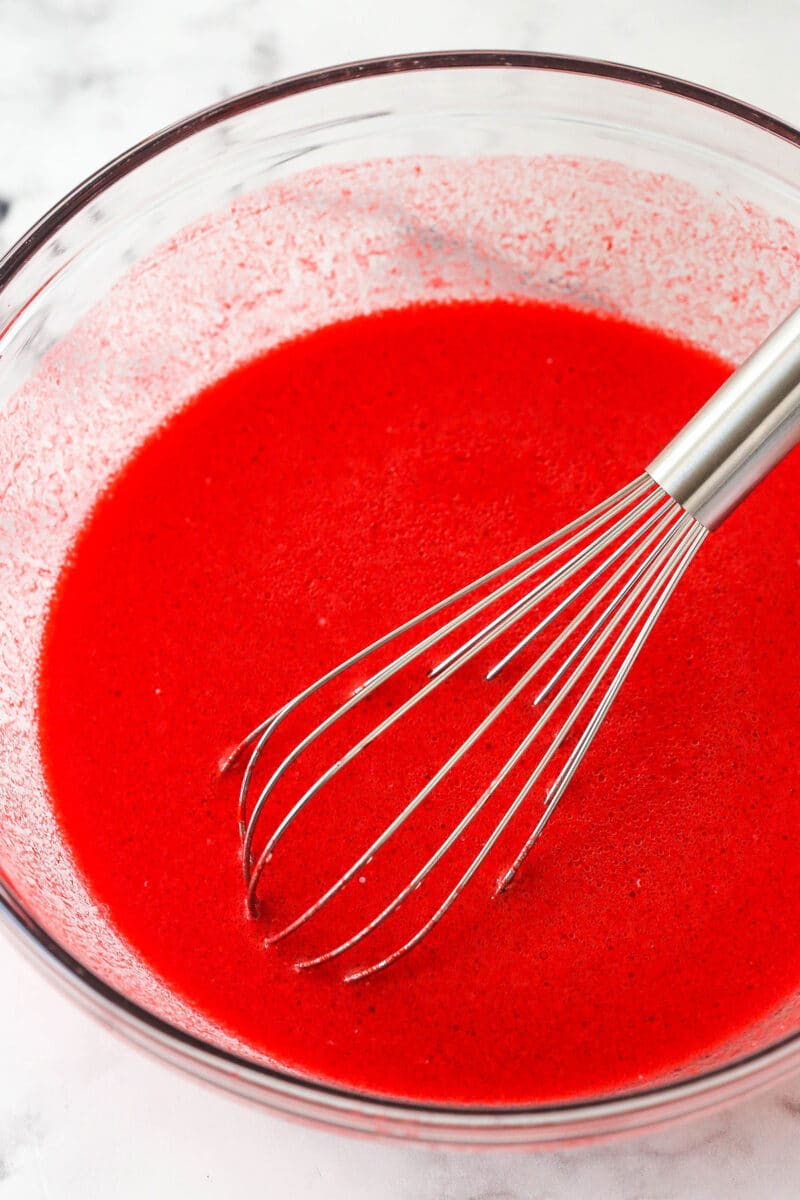
Combine dry ingredients. Set aside. Combine the buttermilk, vegetable oil, vanilla extract, eggs, vinegar and red food coloring in a large bowl.
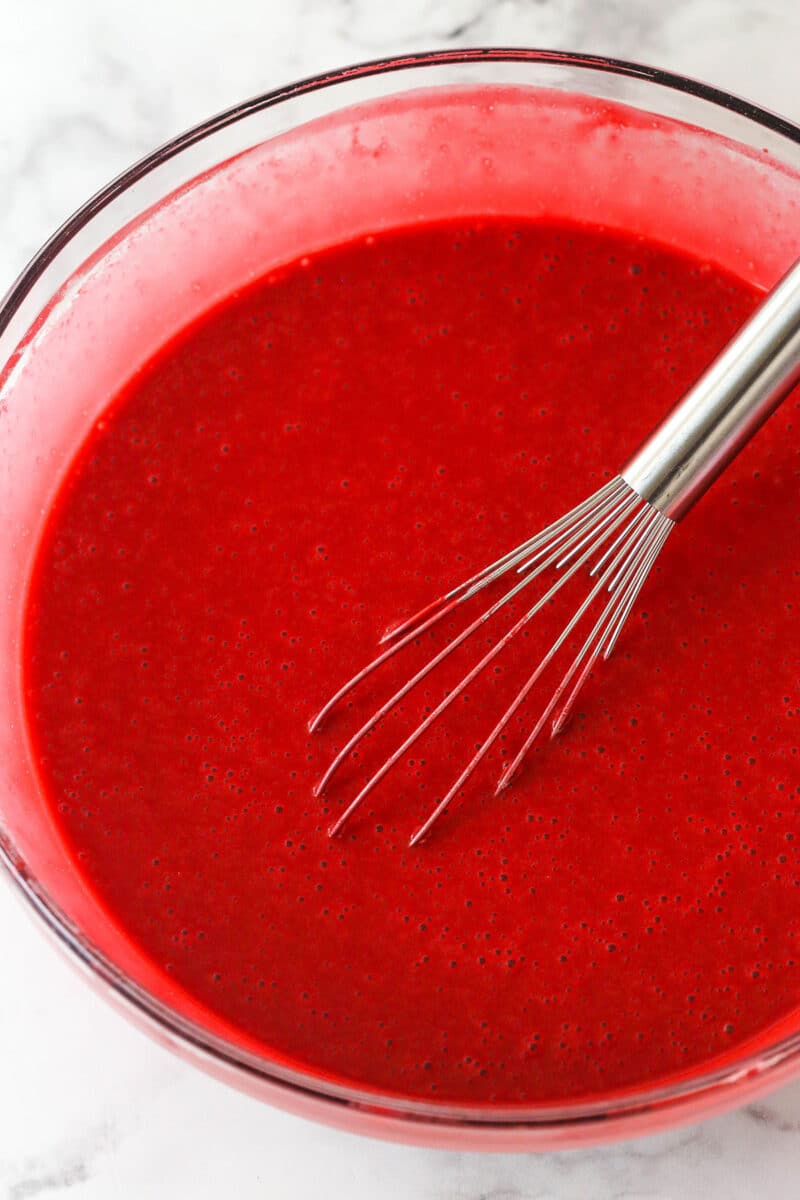
Add the dry ingredients to the wet ingredients and whisk to combine. Add the hot water and mix until combined. Batter will be thin.
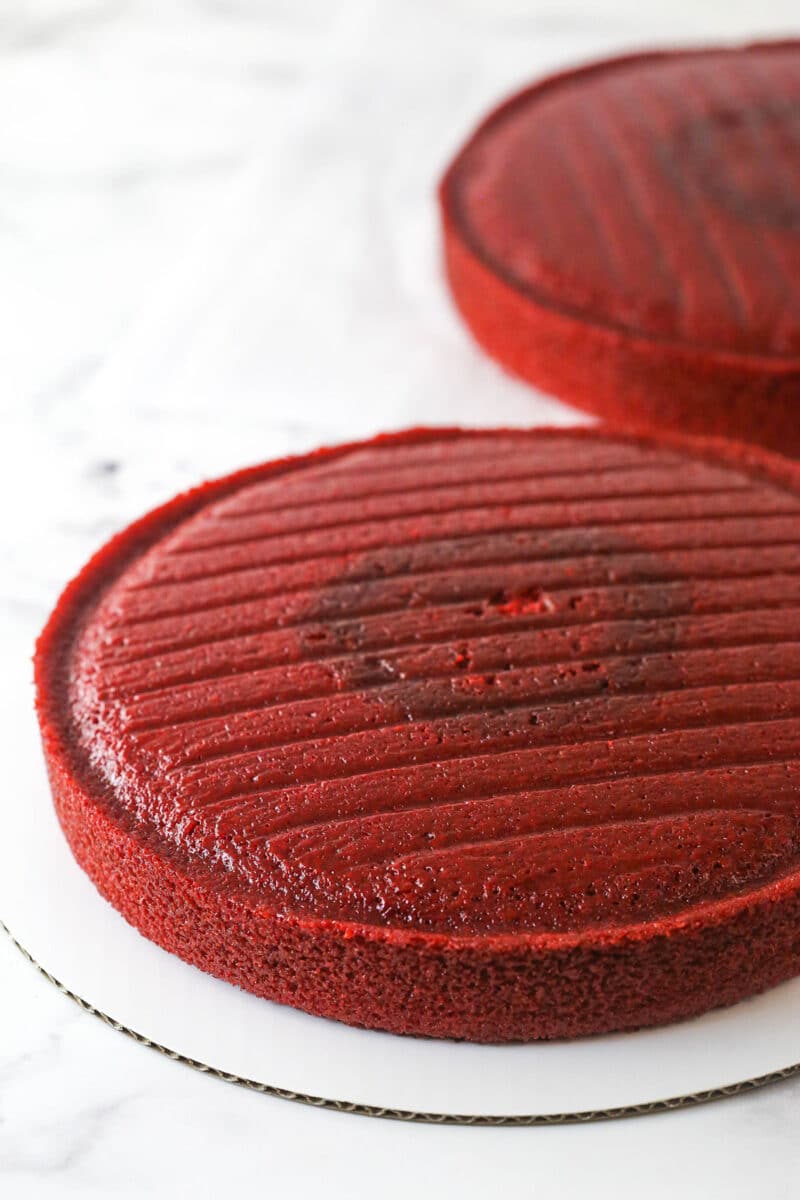
Divide the batter evenly between the two pans and bake for 23-26 minutes. Remove the cakes from the oven and allow to cool.
Make the frosting and build the cake
Use a large serrated knife to remove the domes from the top of the cake layers and save them for decorating later.
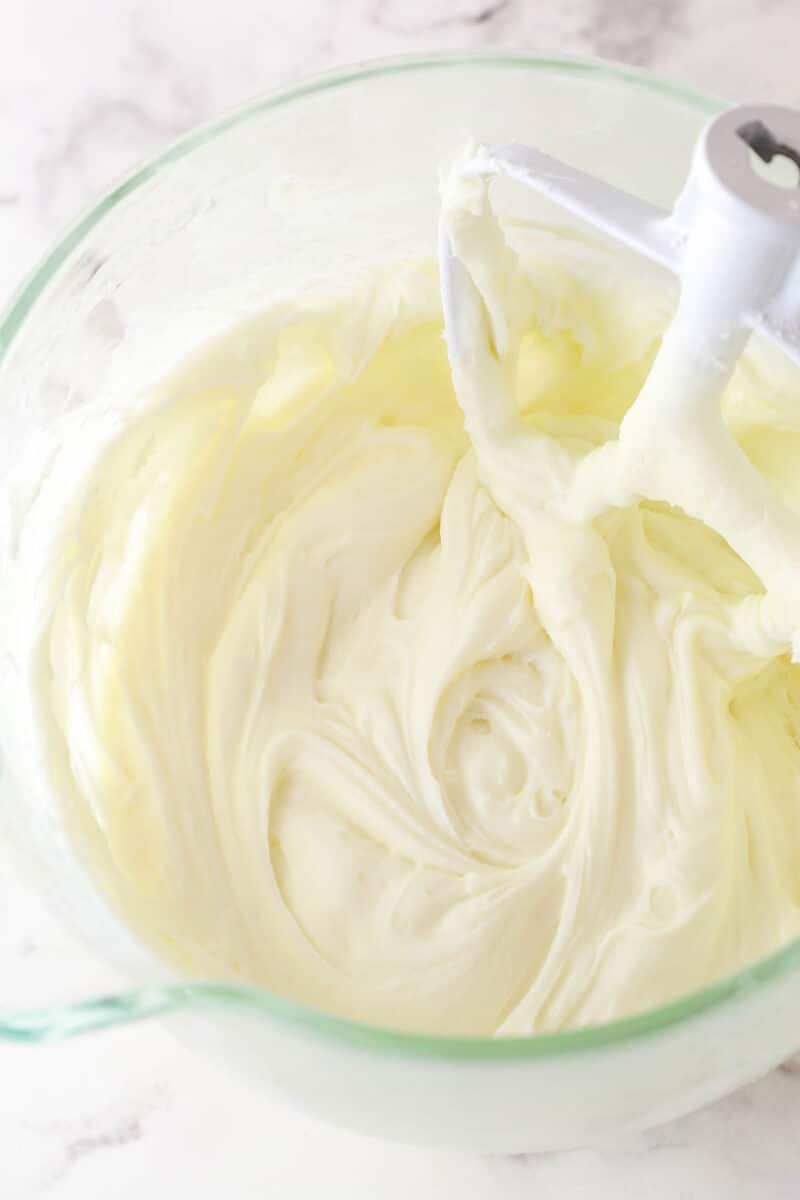
Mix the cream cheese and butter until smooth. Slowly add the powdered sugar and vanilla extract and mix until well combined.
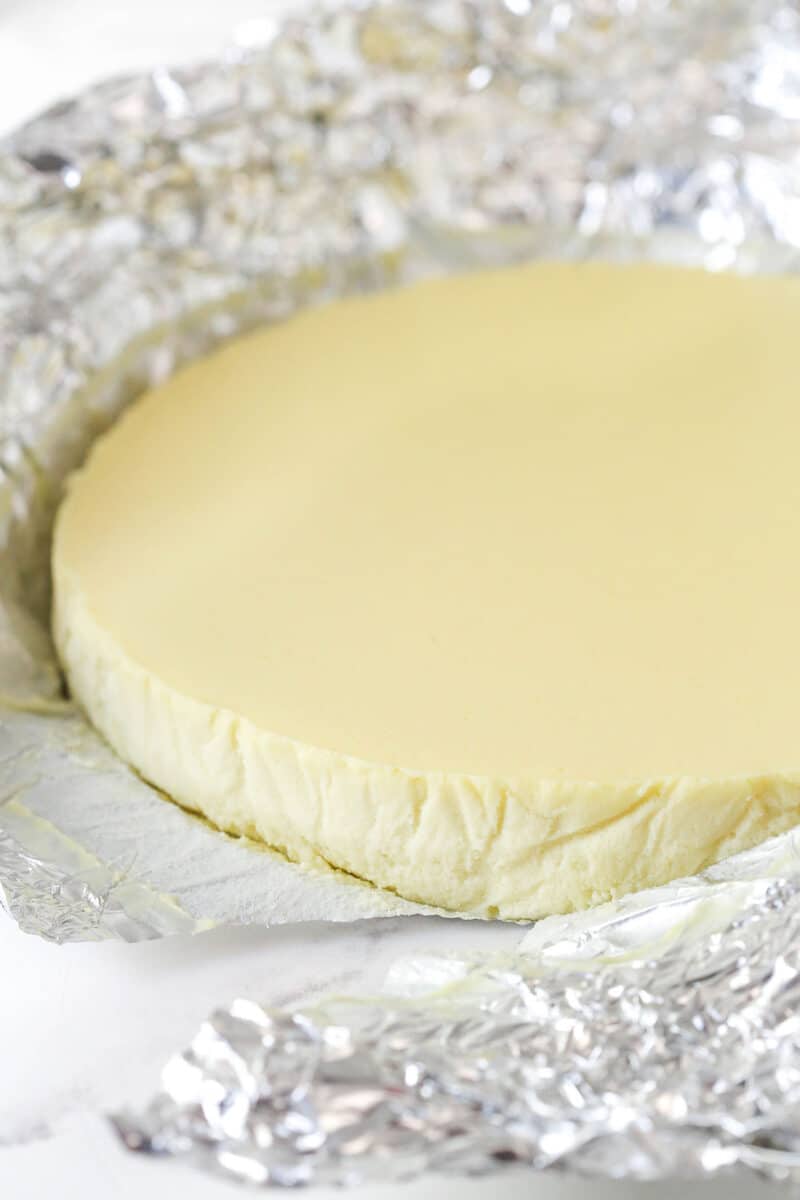
Use the aluminum foil to lift the cheesecake out of the cake pan and remove the foil.
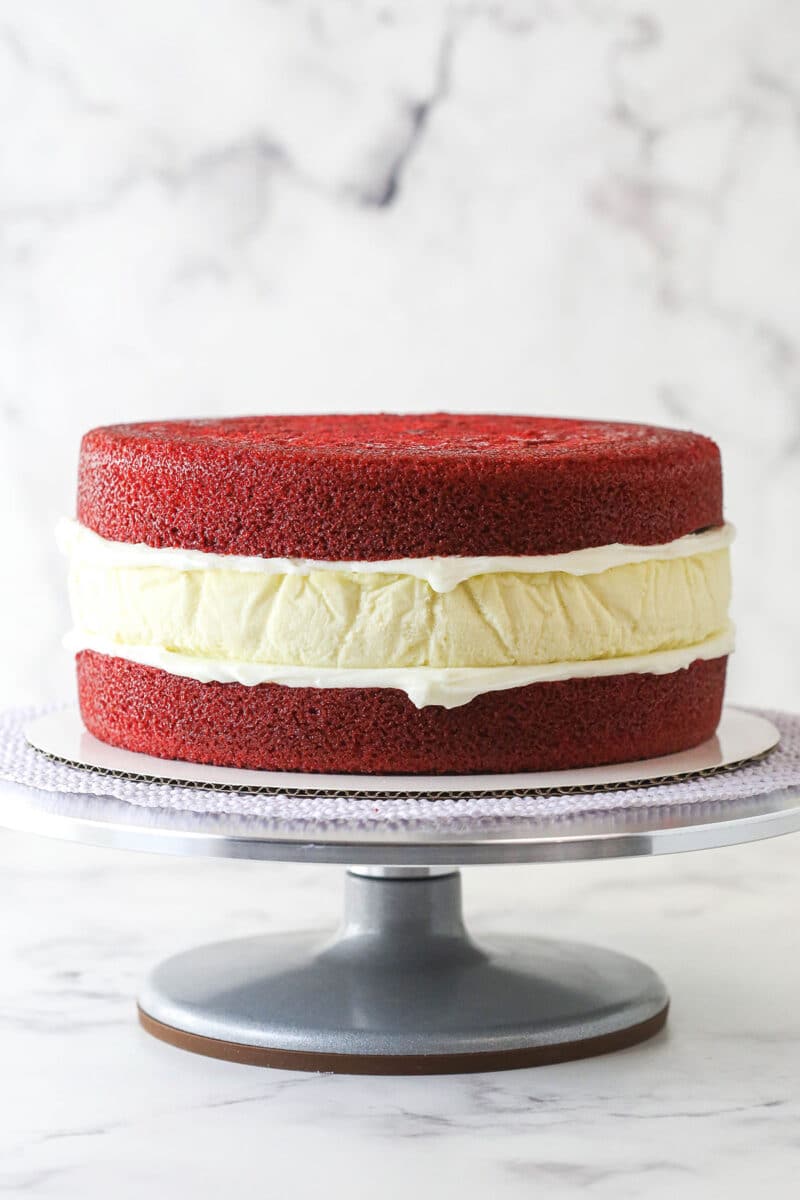
Spread 1 cup of frosting on top of the first cake layer, then add the cheesecake on top. Spread another cup of frosting on top and finish with the final cake layer.
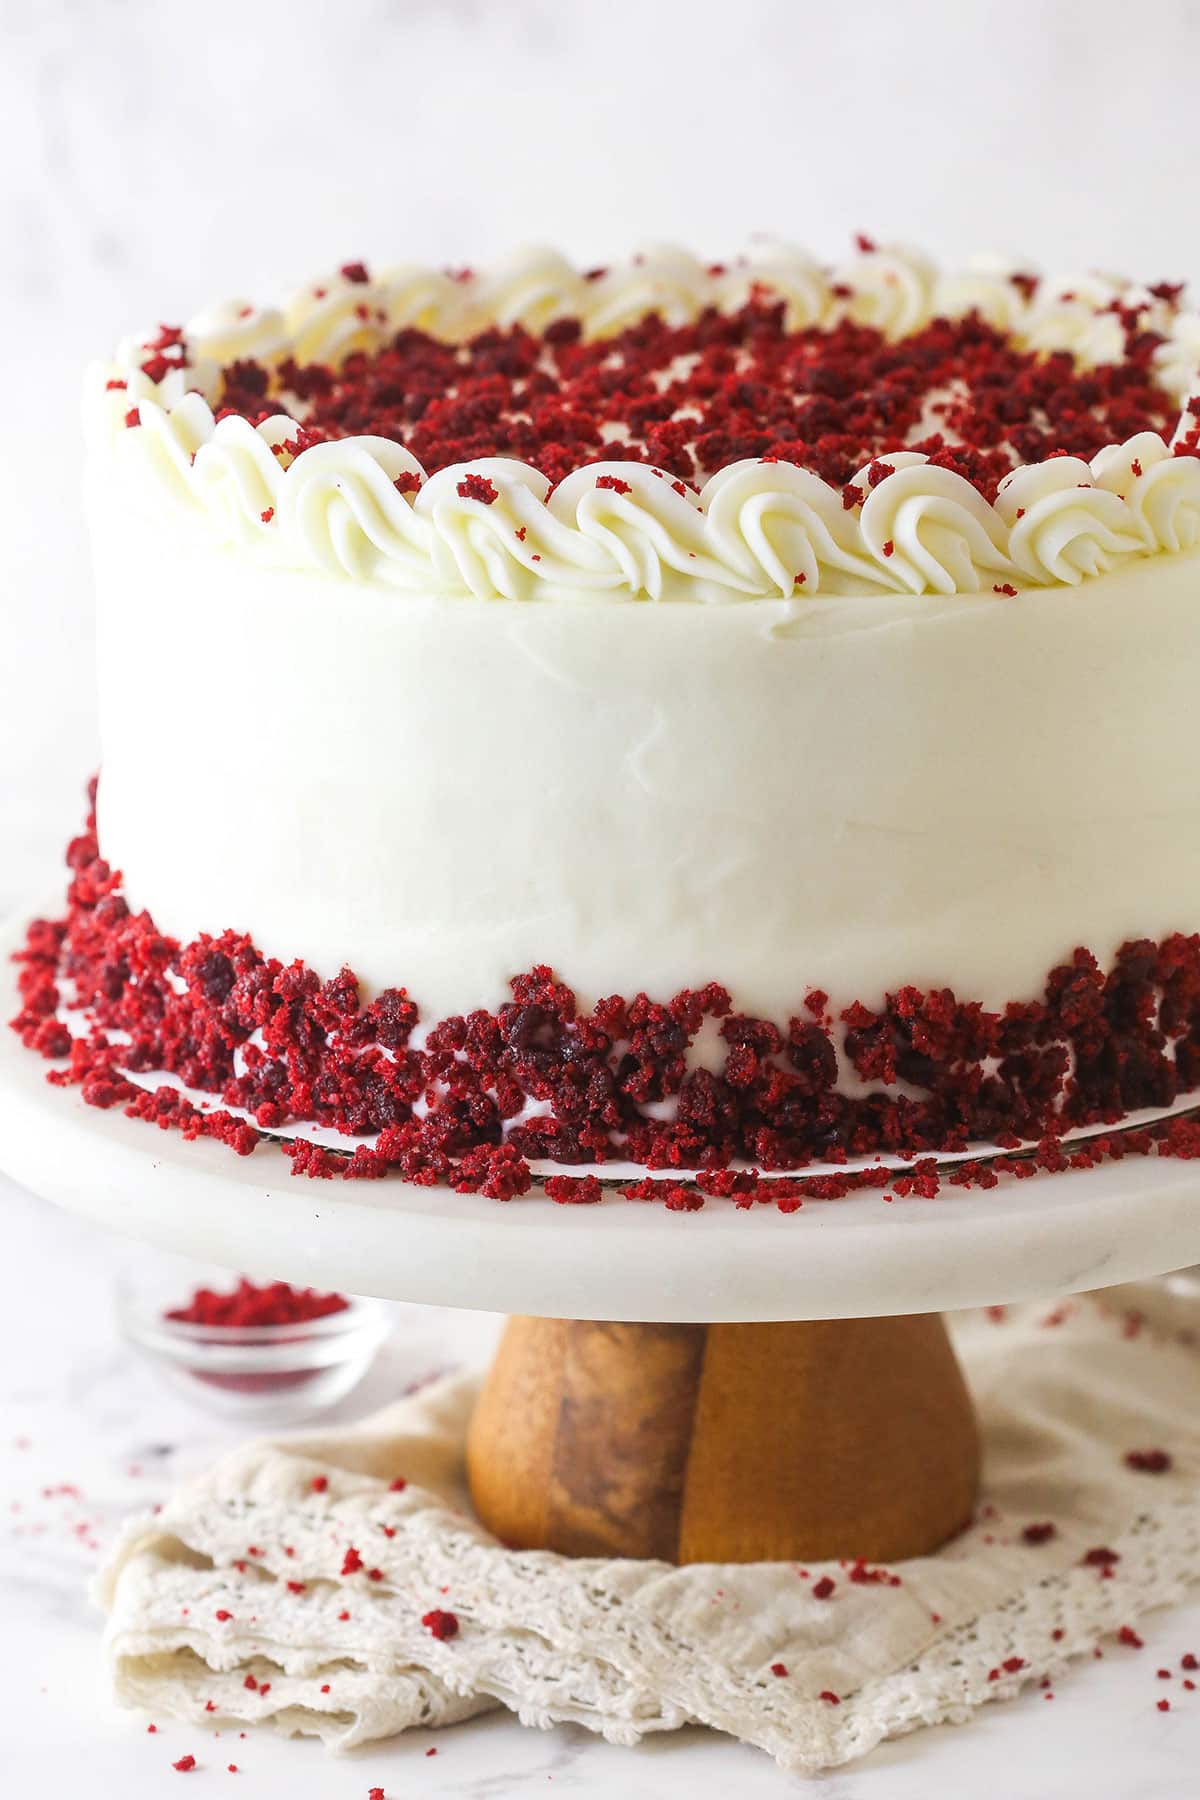
Frost the cake with the remaining frosting, pipe shells around the top edge (I used Ateco tip 847) and decorate with cake crumbs.
Tips for Success
Here are a few things I’ve found helpful to keep in mind when making this red velvet cheesecake cake recipe.
- Measure the flour accurately. Using too much or too little flour can ruin the consistency of this cake. So, use a food scale or the spoon and level method to get the proper amount.
- Don’t skip the water bath. I know it’s a step that many go to great lengths to avoid, but it really does make a creamier cheesecake that doesn’t fall in the middle, brown on the edges, or crack. Check out my post on how to bake a cheesecake in a water bath for all of my best tips on how to do it.
- Chill all layers before assembling. While this red velvet cheesecake cake is not hard to assemble, it does require some time. The cheesecake needs 4 hours or so to firm up, and the cake layers also need to cool completely.
- Prep ahead. One way to make this cake more manageable is to bake the cake layers and cheesecake the day before assembling. Both the cake and the cheesecake hold up very well, so prepping ahead is perfect here.
How to Make Sure The Layers are the Same Size
The key to making the cheesecake for a cheesecake cake is to bake the cheesecake in the same pan you’ll use for the cakes. Not all 9-inch pans are the same size, so line your cake pan with aluminum foil and press it tightly against the sides. Bake the cheesecake in that pan, let it cool, and use the foil to lift it out of the cake pan. Use the same size pan for the cake layers.

Proper Storage
- Fridge: Keep this red velvet cheesecake cake in the fridge in an airtight container. It’s best enjoyed within 3-4 days.
- Freezer: The layers can be frozen prior to assembly. Thaw in the fridge before using. You can also freeze individual slices after assembling. Flash freeze them so the frosting is solid, then wrap in plastic wrap and foil. Freeze for a month or two, then thaw in the fridge. While I haven’t tried freezing the fully assembled cake, it should do fine. Follow the same steps as freezing the slices.
Watch How To Make It
More Red Velvet Desserts

Note: This recipe was updated 1/23/2026. The only changes are that there are now 3 eggs instead of 4, the amount of frosting has been reduced by about 1/3, and the decorations have changed. If you’d like to see the original, download this recipe PDF.
Red Velvet Cheesecake Cake
save this recipe
Enter your email & we’ll send it to your inbox. Plus get new recipes from us every week!
Ingredients
Vanilla Cheesecake
- 24 ounces (678g) cream cheese (room temperature)
- 1 cup (207g) sugar
- 3 tablespoons (24g) all purpose flour
- 1 cup (230g) sour cream
- 1 tablespoon vanilla extract
- 3 large eggs (room temperature)
Red Velvet Cake Layers
- 2 ½ cups (325g) all-purpose flour
- 2 cups (414g) sugar
- 1 ¼ teaspoons baking soda
- ½ teaspoon baking powder
- 4 teaspoons (9g) natural unsweetened cocoa
- 1 teaspoon salt
- 1 cup (240ml) buttermilk
- ½ cup (120ml) vegetable oil
- 2 teaspoons vanilla extract
- 2 large eggs
- 2 teaspoons white vinegar
- 4 teaspoons red food coloring
- 1 cup (240ml) hot water
Cream Cheese Frosting
- 16 ounces (452g) cream cheese (room temperature)
- ¾ cup (168g) unsalted butter (room temperature)
- 8 cups (920g) powdered sugar
- 2 teaspoons vanilla extract
Instructions
Make the cheesecake
- Preheat oven to 300°F (148°C). Line the entire inside of a 9-inch (23cm) cake pan with aluminum foil. Press it into the pan to get it as flat as you can. You’ll use the aluminum foil to lift the cheesecake out of the pan when it’s baked and cooled.
- In a large mixer bowl, mix the cream cheese, sugar and flour together until combined. Use low speed to keep less air from getting into the batter, which can cause cracks. Scrape down the sides of the bowl.
- Add the sour cream and vanilla extract and mix on low speed until well combined.
- Add the eggs one at a time, mixing slowly and scraping the sides of the bowl after each addition.
- Pour the cheesecake batter into the lined cake pan.
- Place the cake pan inside another larger pan. I use a larger cake pan, but you can use a roasting pan or any other larger baking pan. Fill the outside pan with enough warm water to go about halfway up the sides of the cake pan. Bake for 1 hour.
- Turn off the oven and leave the cheesecake in the oven with the door closed for 30 minutes. Do not open the door or you’ll release the heat.
- Crack open the oven door and leave the cheesecake in the oven for another 30 minutes. This cooling process helps the cheesecake cool slowly to prevent cracks.
- Remove cheesecake from oven, remove from water bath and chill until firm, 4-5 hours.
Make the cake layers
- Preheat the oven to 350°F (176°C). Line the bottoms of two 9-inch (23cm) cake pans with parchment paper and grease the sides.
- Add the flour, sugar, baking soda, baking powder, cocoa and salt to a large mixer bowl and combine. Set aside.
- Add the buttermilk, vegetable oil, vanilla extract, eggs, vinegar and red food coloring to a medium sized bowl and combine.
- Add the wet ingredients to the dry ingredients and beat until well combined. Batter will be thin.
- Slowly add the hot water to the batter and mix on low speed until well combined. Scrape down the sides of the bowl as needed to make sure everything is well combined.
- Divide the batter evenly between the two pans and bake for 23-26 minutes, or until a toothpick comes out with a few moist crumbs.
- Remove the cakes from the oven and allow to cool for 3-5 minutes, then remove to a cooling rack to finish cooling.
Make the frosting
- When you’re ready to build the cake, make the frosting. Add the cream cheese and butter to a large mixer bowl and beat until smooth.
- Add about half of the powdered sugar and beat until well combined and smooth. Add the vanilla extract and mix until well combined.
- Add the remaining powdered sugar and beat until well combined and smooth. You can add a little more or less powdered sugar, to reach the right consistency.
Build and decorate the cake
- Use a large serrated knife to remove the domes from the top of the red velvet cakes. Break the domes up into crumbs for decorating later, if using. If the pieces are really moist and hard to break up, you can spread them out onto a cookie sheet and bake them in a 200 degree oven for about 15-20 minutes to help dry them out. Set aside.
- Place the first layer of cake on a serving plate or a cardboard cake round. Spread about 1 cup of frosting evenly on top of the cake layer.
- Use the aluminum foil to lift the cheesecake out of the cake pan, remove the foil and place the cheesecake on top of the cake.
- Spread another cup of frosting evenly on top of the cheesecake, then add the second layer of cake on top. If the sides of the cake don’t line up, use a serrated knife to trim off the excess cake or cheesecake.
- Frost the outside of the cake. Check out my tutorial for frosting a smooth cake, if you’d like. Pipe shells of frosting around the top edge of the cake. I used Ateco tip 844.
- Press the crumbs from earlier into the sides of the cake. You want to do this immediately after frosting, for they may not stick as well. Use some additional crumbs for decorating the top of the cake.
- Store the cake (in an airtight container, if possible) in the refrigerator until ready to serve. Cake is best if eaten within 3-4 days.
Notes
- Cream cheese – It’s important to use the brick-style full-fat cream cheese, not reduced fat or the kind in the tub. Those would be too soft.
- Red food coloring – I used red food coloring, but you can also use red gel icing color.
- Powdered sugar – This adds volume to the frosting and thickens it. You could reduce the amount, but it won’t be as thick and may not pipe well. You could also end up not having enough frosting. The layers may also move around more easily if the frosting between them is too thin.
- Use the same pan – Not all 9-inch pans are the same size, so bake your cheesecake and cake layers in the same pan so they line up when you stack them.
- Before assembling – Be sure the cheesecake is chilled and the cakes are fully cooled before layering together. It’ll make them easier to move around and keep condensation from forming inside the cake.
Nutrition
The nutrition facts provided are calculated using a third-party tool and are estimates only. Actual nutritional content may vary based on the ingredients and brands you use, as well as portion sizes. For accurate results, please consult a registered dietitian or nutritionist.
Categories:
Cakes and Cupcakes, Cheesecakes, Christmas, Holidays, July 4th, Recipes, Recipes with video, Sweets and Treats, Valentine's Day,


Hi, I love the sounds of this recipe but is there any kind of adjustment you can recommend to make the cakes chocolate instead of red velvet? Thanks!
Love all your recipes Lindsay! My question is can I swirl the red velvet cake batter into the cheesecake to make a red velvet cheesecake? I want to make it with your Oreo crust recipe! Do you think it would bake well that way or should I crumble the baked red velvet cake into the cheesecake prior to baking?
Gosh, having not done that before, I’m really not sure. The red velvet batter is pretty thin, so I’m not sure it’d support the cheesecake. You could crumble baked red velvet cake into it.
I’m glad you enjoy the recipes!
My cake layers are very very wet still after 30 minutes baking. The batter looked very thin after adding the 1 cup hot water. I triple checked all ingredients & measurements! Will the wet bake out????
All ovens are different, so you may just need more time. It is a very thin cake batter. I hope it turned out ok!
A great cake. Made it for best friend 80th birthday. I did change the red ganache to dark blue because that is her favorite color. Next time I will heat a few seconds more to do drip. Cold cake made it harden quickly. People ate at party a d took slice home.
Awesome! Glad it was a hit!
Can I freeze this cheesecake layer ahead of time and frost it frozen.
You can definitely freeze it. I don’t know that I’d frost it frozen. It will naturally create condensation as it thaws, which could interfere with frosting the cake.
Is there anything I can use instead of sour cream pls
Sure, you can use heavy whipping cream. It just may take a little longer to bake.
My cheesecake is weeping through the crumb coat! I have in the fridge with paper towels around it. How long will this happen? Will it mess up the buttercream frosting?
Sorry I’m late to respond. How did it weep through? The cheesecake should be very solid. Is it the frosting that’s coming through? If so, then it sounds like it’s not thick enough.
Is there anyway I can bake the cake in 8 in pans
You can. The layers will just be taller and need more baking time.
What tip did you use for the piping on top? 🙂 Give us for my daughter’s 19th birthday so hopefully it works for me!
Ateco 847
I’m just wondering if the measurement for red food color is correct. 4 teaspoons seems like an awful lot.
It is, but feel free to reduce it.
Could I half the recipe for a 6″ cake option? If so – how long do I bake the cheesecake for?
Here is my guide to adjusting cheesecake sizes. It includes suggestions on 6 inch ones.