Learn to blind bake your pie crust for your pie recipes! You can partially bake it for a baked pie or fully bake it for a no-bake filled pie. Either way, I’ve got you covered!
 a pie crust! This tutorial shows you how to partially or fully bake a crust for your favorite pie recipes.")
Today, I’ll show you how to blind bake a classic flaky pie crust. What does it mean to “blind-bake” a crust? So glad you asked! Blind-baking is a term for baking a pie crust either partially or fully before you add the filling. There are a few instances where you’ll need to do this: custard pie, no-bake pie, pudding pie (like chocolate cream pie), or if you’re after an extra crispy crust the next time you bake apple pie. You can also partially bake to give the crust a head start on the filling. Blind baking isn’t hard, but it is a process to ensure a nice crust that doesn’t shrink, bubble up, or become soggy.
Why Blind-Bake a Pie Crust?
- Prevent shrinking. I’ll show you how to dock a pie crust and fill it with pie weights before baking, to avoid a shrunken, puffed-up pastry crust.
- Avoid a soggy crust. Blind-baking helps the crust firm up before you fill it, creating a sturdy base for loose or liquid pie fillings.
- Give it a head start. Some fillings take longer to bake than the crust, so partially baking the crust before adding the filling allows both to finish baking at the same time.
 a pie crust! This tutorial shows you how to partially or fully bake a crust for your favorite pie recipes.")
Partial Bake vs. Fully Blind Baked
First things first. When blind-baking a pie crust, you can partially bake or fully bake it. Which way you go depends on the pie filling and recipe. The main difference is the length of baking time.
- Partial bake your crust if the pie filling you’re using won’t take quite as long to bake as the crust. This is often the case with quiche recipes or pumpkin pie.
- Fully bake the crust if you’re making a no-bake pie, or if the pie filling is pre-cooked, like the custard for banana cream pie or coconut cream pie.
How to Blind Bake a Pie Crust
Here’s the thing. As a pie crust bakes, the melting butter or fat causes the crust to shrink in the pan. The melting fat also produces steam, which is a good thing because it results in lots of flaky layers, but a bad thing if the crust puffs up too much without a filling to weigh it down.
To solve this, you’ll “dock” the crust and weigh it down before you bake it, to keep the sides in place while it bakes and prevent the crust from puffing up in the center.
How to Dock a Pie Crust
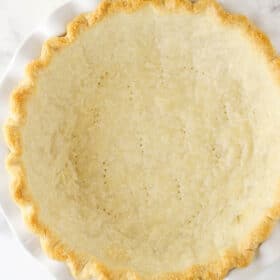
“Docking” the crust refers to pricking holes in the crust, which allows the steam from the melting fat to escape, avoiding a puffed-up pie crust. To dock your crust, prick the bottom of the crust all over with a fork. I’ve seen methods that dock the crust after baking it for a short time, but I usually dock my pie crust as soon as I’ve pressed the crust into the pie plate.
Add Pie Weights
Some bakers will simply dock their crust and bake it like that, but to further prevent the crust from shrinking in the pan, I recommend adding pie weights. Line the pie crust with parchment paper first, then fill it with weights. I have two packs of these ceramic pie weights, which work well. There are also metal pie weights. And if you don’t want to buy special equipment, there’s always dry rice or dry beans!
While I’ve used ceramic pie weights a good bit, I have come to love using rice. The smaller pieces ensure better coverage. There’s no space between or gaps, where a bubble could pop up. Once you’ve docked and weighed down your crust, it’s time to blind bake it.
 a pie crust! This tutorial shows you how to partially or fully bake a crust for your favorite pie recipes.")
How Long Should I Blind Bake a Crust?
How long you bake the crust depends a little on the particular pie crust recipe and whether or not you are partially or fully baking the crust. For a partially baked crust, I recommend baking for 20-25 minutes at 350ºF, or until it’s just beginning to turn golden. For a fully baked crust, remove the pie weights after 20-25 minutes and then bake another 5-10 minutes or until it’s nice and golden.
 a pie crust! This tutorial shows you how to partially or fully bake a crust for your favorite pie recipes.")
Tips and Troubleshooting
- Avoid glass pie plates. Glass pans with smooth sides are more likely to have the crust slide down the sides or shrink. Docking and adding pie weights should help with this, but I always recommend ceramic or metal pie plates to be on the safe side.
- Refrigerate the pie crust. After you prep your crust in the pie plate, refrigerate it for at least 3-4 hours or freeze it for 1 hour. Similar to how chilling cookie dough avoids overspreading in the oven, the same applies to a pie crust.
- Get the right temperature. Higher baking temperatures lead to more shrinkage. At higher temperatures, the gluten tightens up and leads to shrinking. Rather than baking at 400 degrees or higher, try 350 degrees.
- Give the crust a buffer. If all else fails, you can make your crust a little larger. If you make your crust a little bigger than necessary, it gives a little wiggle room so that if it does shrink a bit, all is still well. If you make my homemade crust recipe, it actually gives you two crusts, so you’ll have extra to work with to make a little bit bigger crust.
Will I Need to Blind-Bake a Store-Bought Pie Crust?
If you’re using a store-bought pie dough and the recipe calls for blind-baking, then yes, you’ll need to par-bake the crust. Follow the par-baking directions for whichever recipe you’re using.
 a pie crust! This tutorial shows you how to partially or fully bake a crust for your favorite pie recipes.")
I hope you find this method helpful. I have found it to be very successful in producing a great crust!
Watch How to Blind Bake a Pie Crust
How to Blind Bake Pie Crust
- Prep Time: 15 minutes
- Cook Time: 25 minutes
- Total Time: 40 minutes
- Yield: 1 crust 1x
- Category: Dessert
- Method: Oven
- Cuisine: American
Description
Learn to blind bake your pie crust for your pie recipes! You can partially bake it for a baked pie or fully bake it for a no-bake filled pie.
Ingredients
Instructions
- Prepare pie crust according to instructions. Place it in a 9 inch pie plate and flute or crimp the edges as desired. “Dock” the crust by pricking the crust with a fork to allow steam to escape evenly. This helps the crust not bubble up and cook unevenly.
- Refrigerate the crust for 3-4 hours or freeze for about an hour. You want to be sure the crust is very cold.
- Preheat oven to 350°F (180°C) and line the pie crust with parchment paper. Be sure the parchment paper presses all the way against the crust so that it’s flush.
- Fill the pie crust with pie weights, rice or beans.
- Bake for 20-25 minutes, or until the crust just begins to brown. At this point, the crust is partially baked and it is done if that’s what you want. For a fully baked crust, remove the parchment paper and pie weights and bake for another 5-10 minutes, or until the crust is golden.
- For a no bake pie filling, let the crust cool completely before adding the filling. For a filling that will be baked, you can add it to the crust while warm.
Categories:
Fall and Holiday Favorites, Holidays, Pie, Recipes, Recipes with video, Sweets and Treats, Thanksgiving, Tutorials,


Once I’ve totally “Blind Baked” my pie crust
Do I need to cool it before filling with a bakiable filling, that I have to bake???
If it’s a filling that you need to bake, it’s often added when the crust is still hot. But you’re recipe will usually tell you how to go about that.
Hello!! Can I use this pie crust recipe for the pecan pie?
Yes!
Very useful advice, especially to cool or freeze the pie dough before baking.
Thank you for these great tips! I wish I’d had these last month, but now I’m ready for next time! I love that your recipes are always so easy to follow and understand!
Thank you
Thanks so much, Lisa!
Great recipe. I didn’t think to post but I have been using your recipes. I am so grateful I found you. I am a big cooks illustrated fan but I find your recipes so wonderful. I will update my comments on all the recipes I have been making this past year. I use a different email address when I look up the recipes. I want to have secure comments.
Thanks so much for the feedback! Glad to hear you enjoy everything!