Breakfast for dessert anyone? Yes, please. These Fruity Pebbles Cookies bring the flavor and crunch of a much-loved breakfast cereal into a cookie. Soft, chewy Fruity Pebbles infused cookies are dipped in a light glaze and coated in more Fruity Pebbles to make a colorful dessert that will have you coming back for seconds and thirds. Eat your way over a rainbow this Saint Patrick’s Day.

Fruity Pebbles Rainbow Cookies
I love breakfast cereal. It may not be the healthiest way to start the morning, but it sure does put a smile on my face and remind me of childhood. And while I may not eat it for breakfast anymore, I still enjoy the flavor, so why not add it to a cookie? Plus, the bright rainbow colors make them a fun addition for St. Patrick’s Day!
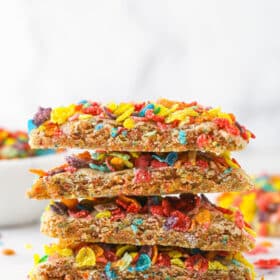
I incorporated Fruity Pebbles crumbs into one of my basic cookie dough recipes. The result was a delightfully soft and chewy cookie packed with Fruity Pebbles flavor. Honesty, the cookies alone were delicious enough. I took it two steps further, however, and dipped them in a light glaze before coating them in dry Fruity Pebbles. The breakfast cereal adhered beautifully to the cookies, giving them a delicious, flavorful crunch.

Why You’ll Love This Easy Cookie Recipe
These dreamy, crunchy, rainbow cookies are so fun to make and even more fun to eat. Here are some of my favorite things about them.
- Whimsicle. I don’t know about you, but colorful, sugary breakfast cereal sends my memory straight back to the playful, magical days of childhood.
- Texture. A soft, chewy cookie provides the perfect juxtaposition to the crunchy cereal coating. Not a dull moment here.
- Interactive. This recipe is fun, in part, because it has several components. The cookie, the glaze, and the cereal coating. They are an adventure to create.
- Flavor. These have so much Fruity Pebble flavor. Even without the crunchy cereal on the outside, you have a chewy cookie loaded with flavor.
What You’ll Need
Here is a list of all of the ingredients you will need to make these Fruity Pebbles cookies. You might already have most of them in your kitchen! Don’t forget to scroll to the recipe below for more details.
Fruity Pebbles Cookies
- Fruity pebbles
- All-purpose flour – or your favorite 1:1 gluten-free flour
- Baking soda – for a soft and chewy texture.
- Salt – for flavor.
- Unsalted butter – unsalted is best and should be at room temperature.
- Sugar – sugar adds both sweetness and moisture to baked goods.
- Egg – use large eggs, not medium or extra large.
- Egg yolk – The extra egg yolk in this recipe brings a little bit of extra moister and chewiness to the cookie. Read up on how eggs affect cookies if you are interested in learning more!
- Vanilla extract
Glaze
- Powdered sugar
- Milk – I don’t recommend heavy cream in this instance. It’s much thicker and creates a glaze that’s too thick.
- Fruity pebbles

How to Make Fruity Pebbles Cookies
This recipe is so fun and interactive. You will certainly have a blast in the kitchen. Here is a basic rundown on how to make these rainbow cookies. Scroll to the recipe below for more detailed instructions.
- Crumble the Fruity Pebbles. Pulse Fruity Pebbles in a food processor.

- Combine the dry ingredients. Mix together the Fruity Pebbles crumbs, flour, baking soda, and salt


- Cream. Cream together the butter and sugar in the bowl of a standup mixer on medium speed until light and fluffy.
- Incorporate the eggs and vanilla. Add the egg and egg yolk and mix to combine. Do the same with the vanilla.


- Mix in dry ingredients. Add the dry ingredients and combine. Don’t over-mix.
- Form dough balls. Aim for 8 evenly-sized dough balls.


- Bake. Bake on a cookie sheet lined with parchment paper or a silicone mat for 10-15 minutes at 350 degrees F.
- Cool. Allow the cookies to cool on the cookie sheet for a few minutes before transferring them to a wire rack to cool completely.


- Glaze and finish with Fruity Pebbles. Whisk together the milk and powdered sugar in one bowl and add the Fruity Pebbles to another. Dip each cookie in the glaze and then in the bowl of Fruity Pebbles.
Tips for Success
These cookies might look fancy, but they are really quite simple to make…just a cookie with a couple of extra steps. You can do it! As always I have some tips and tricks to help you succeed.
- Room temperature butter. As with any cookie, it is important to start with room-temperature butter. It will incorporate more air than melted butter will, giving you a fluffier, lighter dough.
- Don’t overmix. Overmixing cookie dough will cause the glutens in the flour to develop, ending you with a tougher, more dense cookie. So, after adding the dry ingredients, mix just enough to incorporate.
- Milk, not heavy cream. When making the glaze, avoid the temptation to use heavy cream or half and half. Both of these options will leave you with a glaze that is far too thick for this particular purpose.

How to Store These Cookies
After glazing and coating the cookies in Fruity Pebbles, seal them in an airtight container and store at room temperature for up to 3 days. The Fruity Pebbles topping will soften as time goes by, so it is best to enjoy these goodies sooner rather than later. You could also enjoy these cookies without the extra fruity pebbles on the outside, or simply store them that way and then add the extra fruity pebbles before serving so they retain their crunch.
Can I Freeze Them?
You can! Sort of. The Fruity Pebble coating will lose its crunch in the freezer, so I suggest using one of the following methods.
- Freeze the cookie dough. After forming dough balls, arrange them in an airtight container (with parchment paper between layers) and store them in the freezer for up to 2 months. When you are ready to enjoy, allow the dough to thaw in the refrigerator before baking and completing the recipe as you normally would.
- Freeze the unglazed cookies. After baking the cookies, allow them to cool completely and, instead of glazing, place them in an airtight container and store them in the freezer for up to 2 months. When you are ready to indulge, allow the cookies to thaw at room temperature before glazing and coating in Fruity Pebbles.
More Cookie Recipes for St. Patrick’s Day
- Baileys Chocolate Cookies
- Sprinkle Sugar Cookies
- Chocolate Peanut Butter M&M Cookies
- Andes Mint Cookies
- Soft Baked M&M Cookies
Fruity Pebbles Cookies
- Prep Time: 1 hour
- Cook Time: 10 minutes
- Total Time: 1 hour 10 minutes
- Yield: 8 large cookies 1x
- Category: Cookies
- Method: Baking
- Cuisine: American
Description
These bright, colorful, Fruity Pebbles infused cookies are perfect for Saint Patric’s Day. Chewy cookie, crunchy topping? Yum!
Ingredients
Fruity Pebbles Cookies
- 2 1/3 cups fruity pebbles
- 2 cups plus 2 tbsp (276) all-purpose flour
- 1 tsp baking soda
- 1/4 tsp salt
- 3/4 cup (168g) unsalted butter, room temperature
- 1 cup (207g) sugar
- 1 large egg
- 1 large egg yolk
- 1 tbsp vanilla extract
Glaze
- 1 cup (115g) powdered sugar
- 2–3 tbsp milk (not heavy cream)
- 2 cups fruity pebbles
Instructions
- Preheat oven to 350°F (180°C). Line baking sheets with parchment paper or silicone baking mats. Set aside.
- Add the fruity pebbles to a food processor and crush into crumbs. You want to end up with 1 cup of crumbs.
- Combine the fruity pebbles crumbs, flour, baking soda and salt in a medium sized bowl and set aside.
- Cream the butter and sugar together in a large mixer bowl on medium speed until light in color and fluffy, 2-3 minutes. You should be able to see the change in color happen and know it’s ready.
- Add the egg and egg yolk and mix until well combined.
- Add the vanilla extract and mix until well combined.
- Add the dry ingredients and mix until the dough is well combined. It will be thick. Do not over mix. Once it’s combined, use a rubber spatula to help it come together to form a more cohesive ball. Set aside.
- Divide the cookie dough into 8 even balls of about 5-6 tablespoons (about 105g) of cookie dough per ball.
- Bake the cookies for 10-15 minutes or until the cookies are no longer glossy and are just about to brown on the edges.
- Allow the cookies to cool for 5-10 minutes, then move to a cooling rack to cool completely.
- To add the glaze, combine the powdered sugar and milk in a small bowl. Add the fruity pebbles to another small bowl.
- Working with one cookie at a time, dip each cookie into the glaze and let the excess drip off, then press the cookie into the fruity pebbles. Set cookies aside to dry, then serve.
Notes
- These cookies will keep well for 2-3 days. Keep in mind that the fruity pebbles on the outside of the cookie will soften over time from the moisture in the cookie. If you want them to remain crisp, it’s best to serve the cookies shortly after adding the fruity pebbles.


I’m not a huge lover of Fruity Pebbles, buy my adult children are. They LOVE these cookies and can’t stop eating them! I went for a double batch right out of the gate. I even like them! A very unique cookie!
Awesome!! So glad to hear that!
This recipe looks so fun. Fruity Pebbles. I love and make so many of your recipes Lindsay.
I want to know if iI am legally allowed to use your recipes & pictures in a cook book my Church is putting together. Of course I would put your name and website as the author. We may sell the cookbooks also.
Please let me know. Thanks so much.
Jane
Cook Minnesota
I
Hi Jane, I actually just responded to your email before seeing your comment here. Sorry it took a little longer to respond – the kids and I are all getting over being quite sick. 🙂