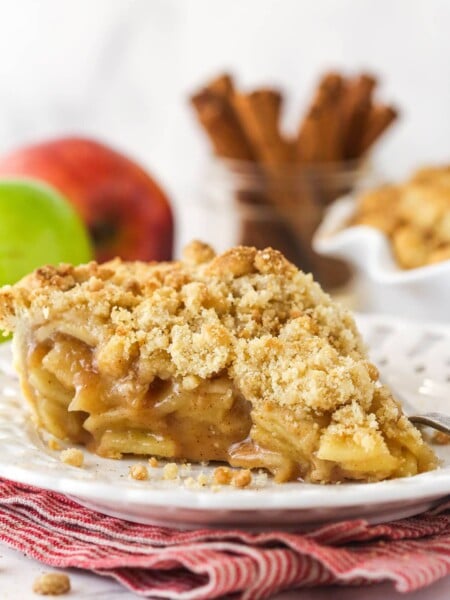
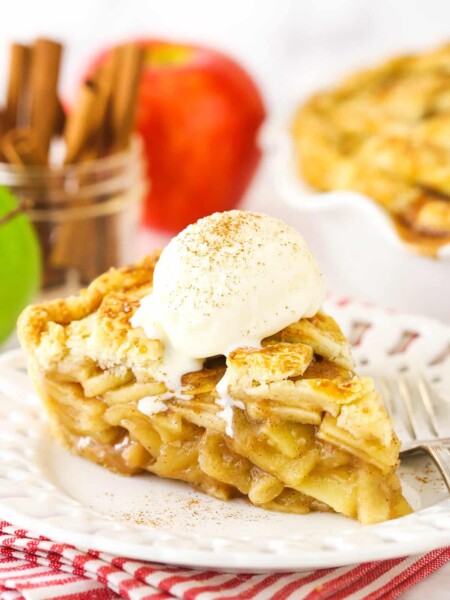
This caramel apple pie recipe takes a classic dessert to the next level with a gooey caramel sauce and perfectly tender apples. With its flaky crust, sweet-tart flavor profile, and make-ahead convenience, it’s sure to be a favorite.

This caramel apple pie is a delicious twist on my classic apple pie, swapping out traditional cinnamon for a rich, sticky caramel sauce. The combination of sweet, slightly salty caramel and tart apples, all nestled inside a buttery, flaky crust, creates a dynamic flavor profile that’s simply incredible. It was important to me when making this pie recipe that the caramel doesn’t melt and disappear during baking. So, I added a little flour to the caramel sauce, which keeps it from melting as the pie bakes and sinking to the bottom of the crust. Now every single bite is loaded with gooey, golden goodness.
And I promise the apple filling comes out perfect every time (pre-cooking the apples on the stovetop really allows you to control the texture), and this pie was made to be prepped ahead of time. So, it’s a lifesaver during the busy holiday season. You can stop fretting over what you’re going to make for your next fall-time gathering. This is it!

This Caramel Apple Pie Is All About the Sticky, Golden Goodness
Of all the apple pies out there, why this one? I’ve got a few excellent reasons for you:
- Dynamic flavor duo. This recipe is a beautiful celebration of a classic flavor combo: apples and caramel. You get both flavors is every bite with the caramel that’s layered into this pie.
- Perfectly cooked apples. You have complete control over the texture of the apples here. By pre-cooking them on the stove, you can get them just to your desired softness. They won’t soften more in the oven, so no mushy apples here!
- Make-ahead magic. This pie is designed to be prepared in advance, making it the perfect stress-free dessert for the busy holiday season and/or special occasions. Have a read through the section below titled “Can I Make This Pie Ahead of Time?” to learn how it’s done.
Key Ingredients and Notes
Here’s what you’ll need for this caramel apple recipe. Scroll to the recipe card below for precise measurements.

- Unsalted butter
- In the crust: Cut into 1/2-inch cubes. The butter must be COLD! Cold butter creates pockets in the crust. When it melts as the crust bakes and the water evaporates, you’re left with layers that give you that buttery, flaky texture you’re craving.
- In the caramel sauce: You could also use salted butter, it’ll just make the caramel a little more salty. While cold butter shouldn’t cause this caramel to seize, like dry-method caramel sauces, it’s still ideal to have the butter at room temperature or warmer for quick, even melting.
- Very cold water – You want your water for the crust to be as cold as possible so that the pockets of cold butter don’t melt while you’re mixing things together. Water temperature isn’t important for the caramel sauce. It’s going to be heated either way.
- Heavy whipping cream – This is for the caramel sauce and helps turn it into the sauce. Don’t swap it for something else. The high fat content is needed for the ideal texture.
- All-purpose flour – Adding a little flour to the caramel sauce thickens it so it clings to the apple slices instead of sinking to the bottom of the pan. This way, every bite is loaded with caramel flavor! For the pie filling, it helps to thicken the juices.
- Apples – I like using a combination of Granny Smiths and Honeycrisp apples. They both hold their shape well, and the tartness of the Granny Smiths works well with the slightly sweeter Honeycrisps. Please see the section below titled “What Are the Best Apples for Homemade Apple Pie?” for more information.
- Lemon juice – The lemon works wonders to keep the apples from browning. It also brightens the flavor profile up a bit.
What Are the Best Apples for Homemade Apple Pie?
For the best, beautifully complex flavor, I recommend using a mix of apples. Specifically, I recommend a combination of tart and sweet varieties. Granny Smith apples are a go-to tart option, and they pair wonderfully with sweeter apples like Honeycrisp, Braeburn, or McIntosh.
Why the combo? Tart apples, like Granny Smiths, hold their shape beautifully during baking, but using them alone can make your pie a little too sour. On the other hand, sweeter apples offer amazing flavor but can turn a bit mushy. By combining firm, tart apples with sweeter, softer apples, you get the best of both worlds! An incredible taste AND the perfect texture.

How to Make Caramel Apple Pie
Don’t let the long list of instructions scare you. Each component of this apple pie is actually quite simple to make. Here’s how it’s done (see the recipe card below for more detailed instructions):
Make the crust
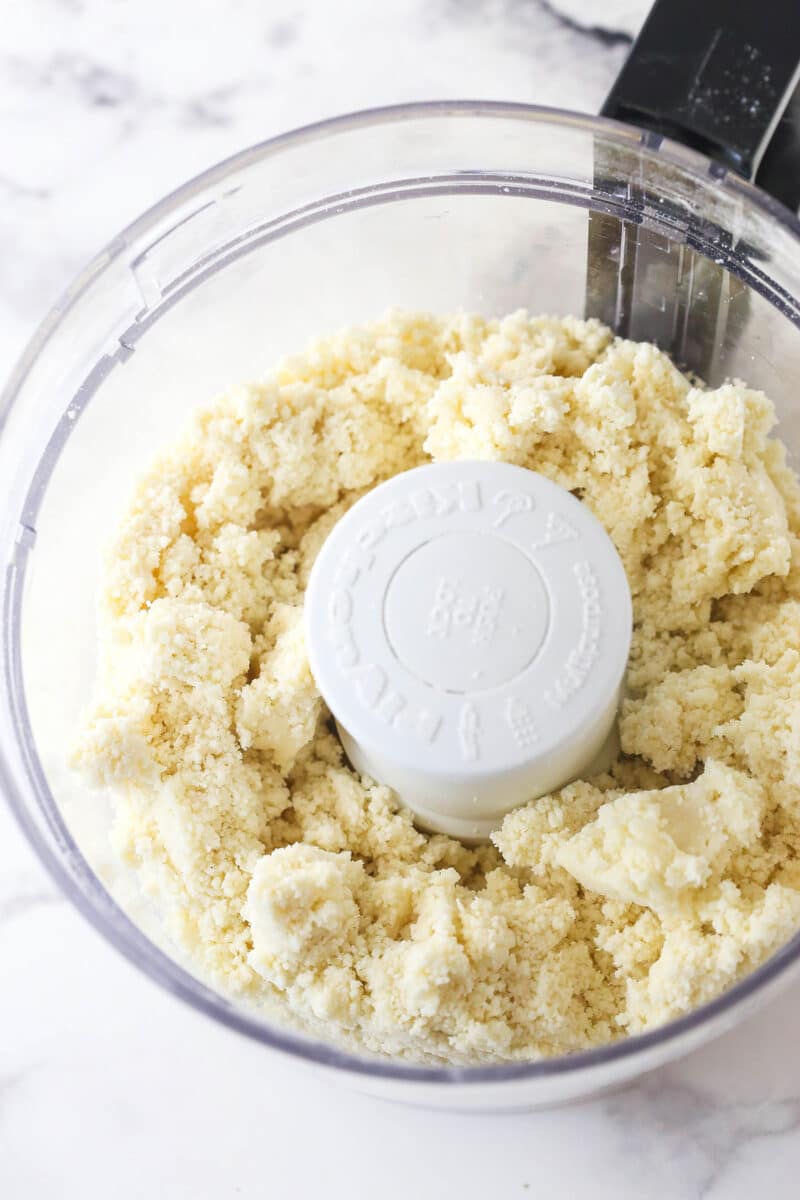
Add 1 1/2 cups of flour and the salt to a large food processor and pulse to combine. Add the butter and process until large chunks form and all flour is coated.
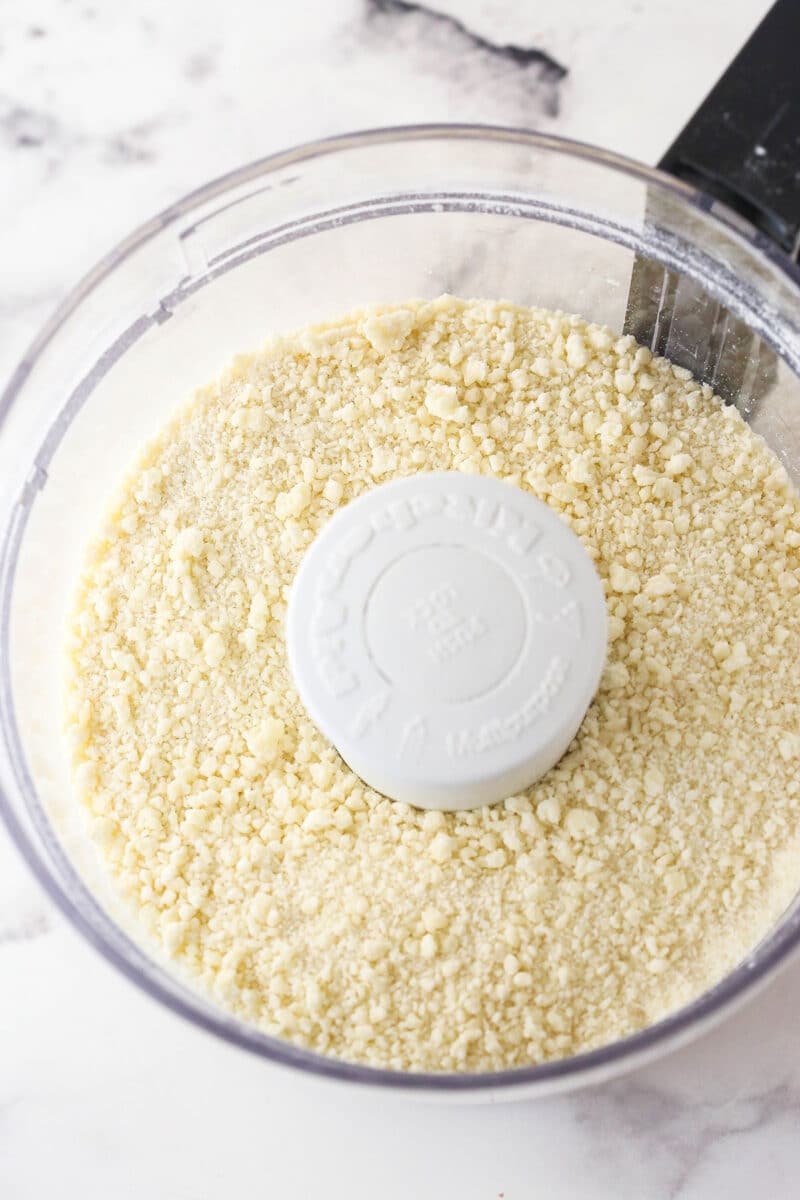
Add the remaining cup of flour and pulse a few times until everything is evenly distributed. The doughy pieces should break up and it should look sandy.

Transfer the dough to a bowl and mix in 4 tablespoons of the ice water. Keep adding more water (1 tablespoon at a time) until the dough holds together when pinched.
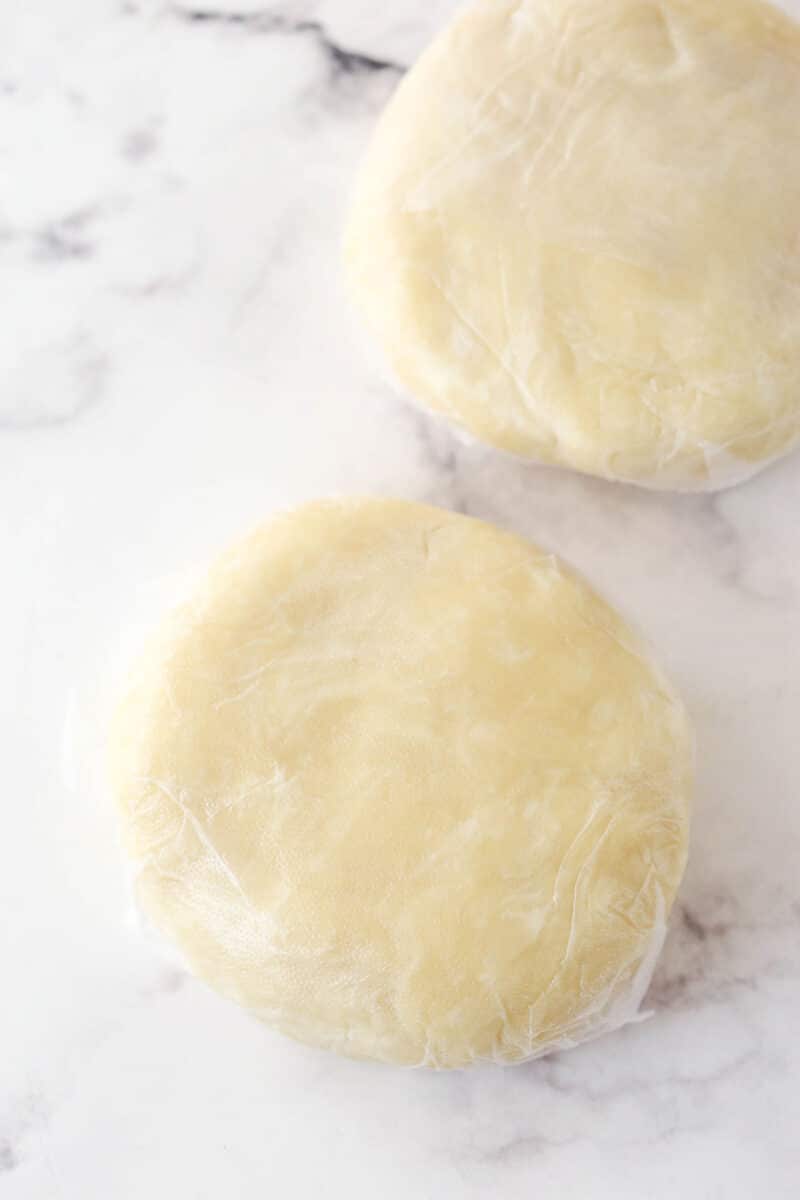
Work dough just enough for it to come together to form a ball. Cut the ball in half, shape each half into a disc, and wrap each in plastic wrap. Chill in the fridge for at least an hour.
Lindsay’s Note
Making pie crust is SO easy with a food processor, but you can also make this dough by hand! Just cut the cubed butter into the flour mixture until the largest pieces of butter remaining are about pea-sized. Then add the water and continue with the rest of the instructions.
Make the caramel sauce
For more detailed step-by-step photos and tips, check out my salted caramel sauce post (it’s the same caramel sauce).
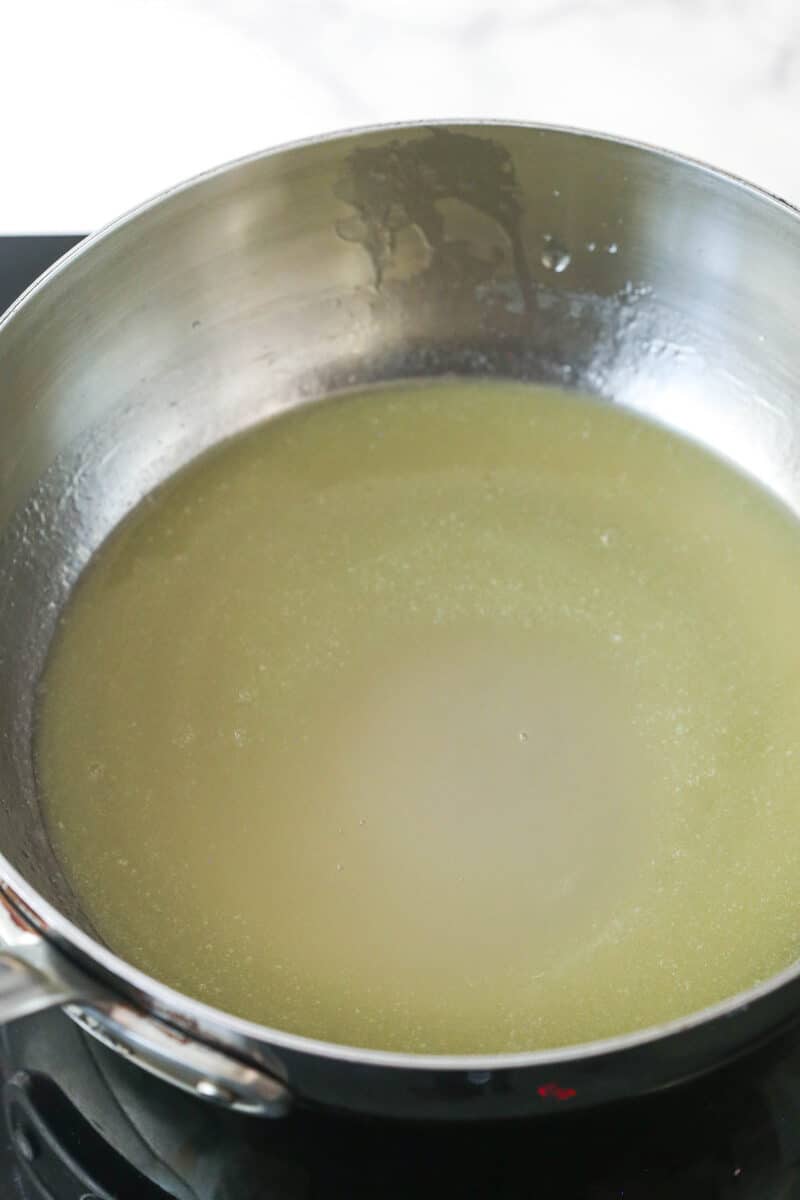
Combine sugar and water in a medium-large saucepan. Cook over medium-low heat for 3-5 minutes, until the sugar has dissolved. Add butter and let it melt.
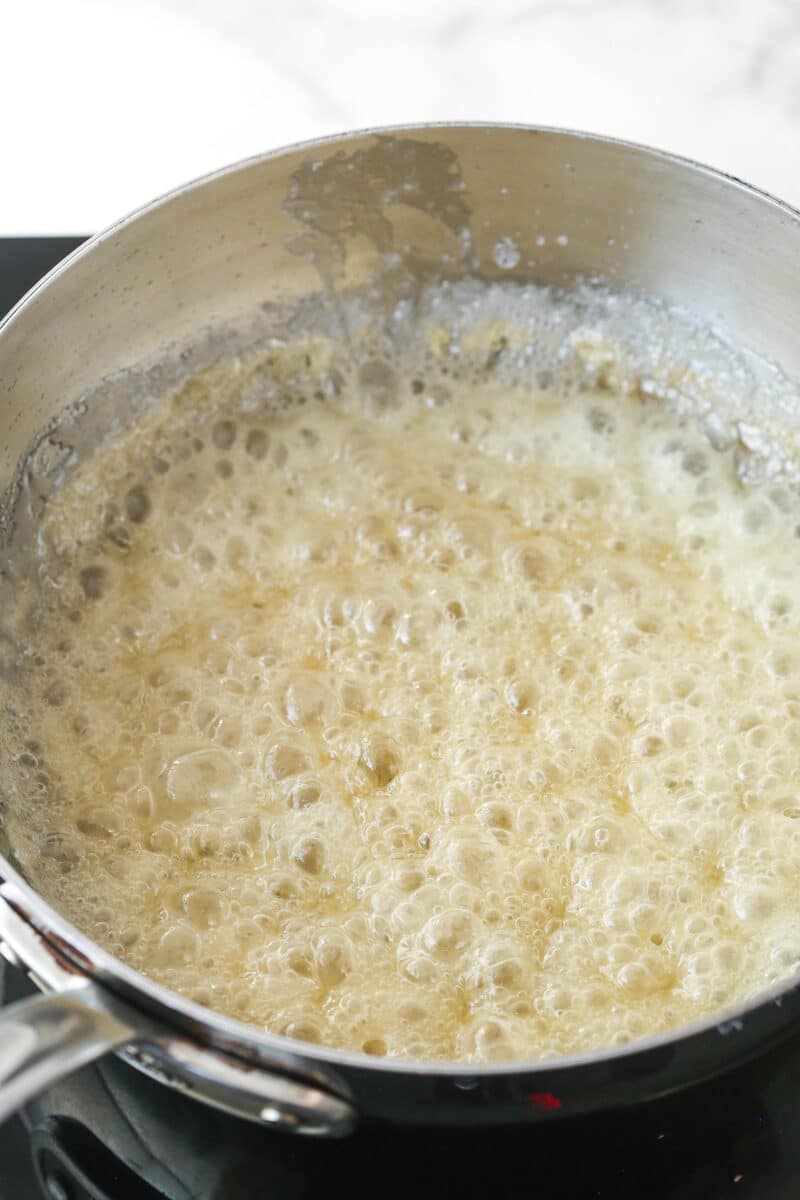
Bring the mixture to a boil over medium heat (no whisking here). Boil for 10-15 minutes until deep golden brown.
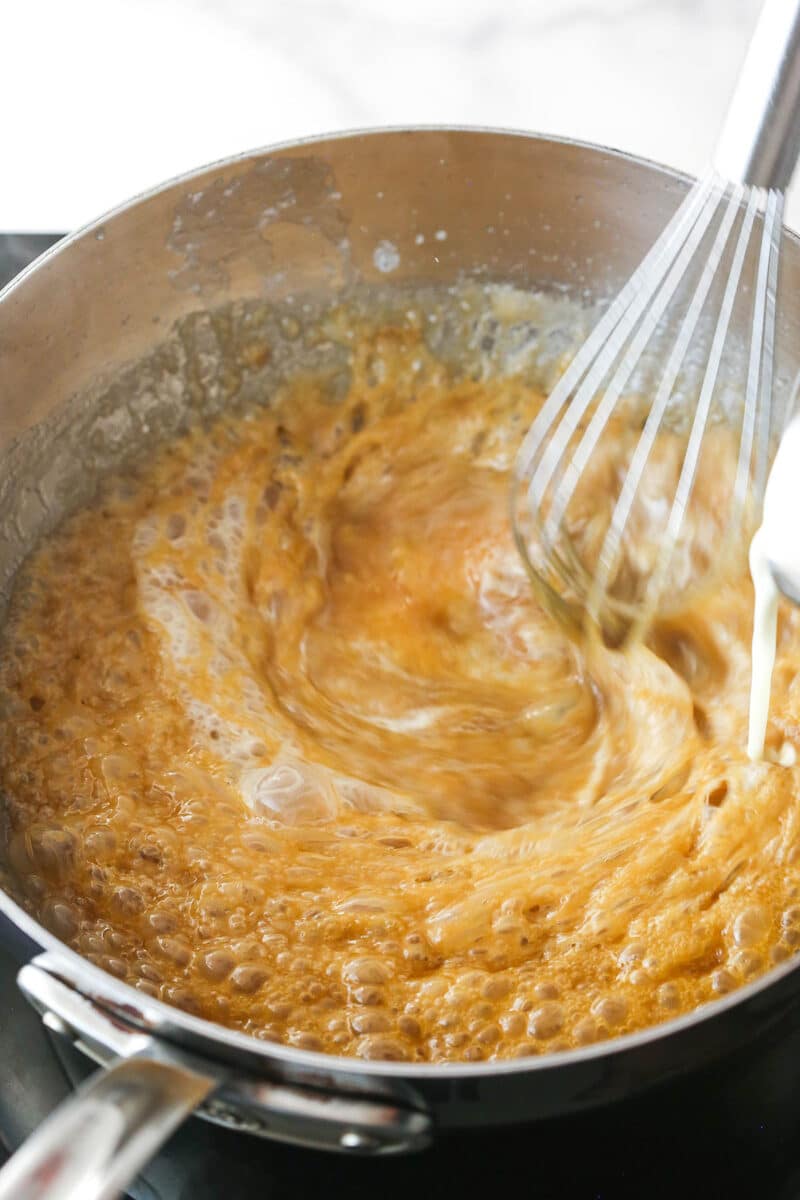
Remove the pan from the heat and whisk in the cream. It’ll bubble up quite a bit, so be careful. Add the vanilla and salt to taste.
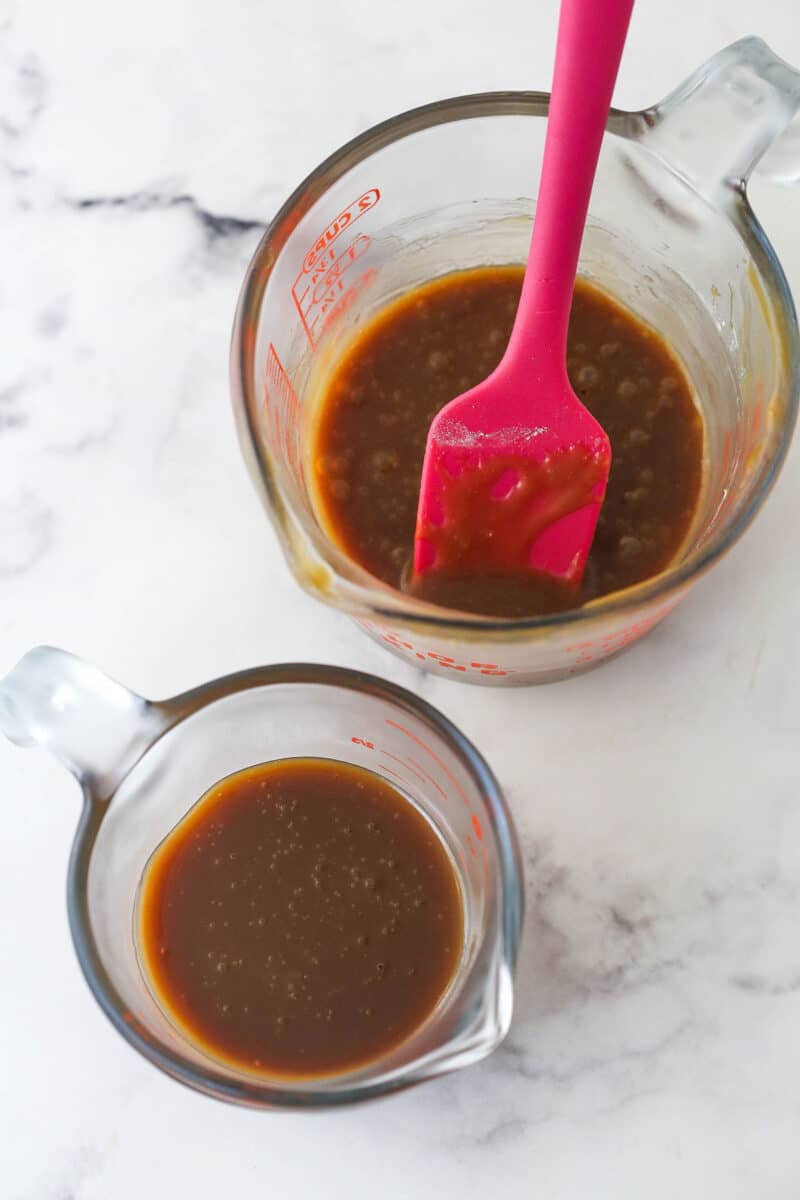
Set aside ½ cup of caramel sauce for drizzling over pie slices. Stir 2 tablespoons of flour into the remaining caramel sauce.
Make the apple filling
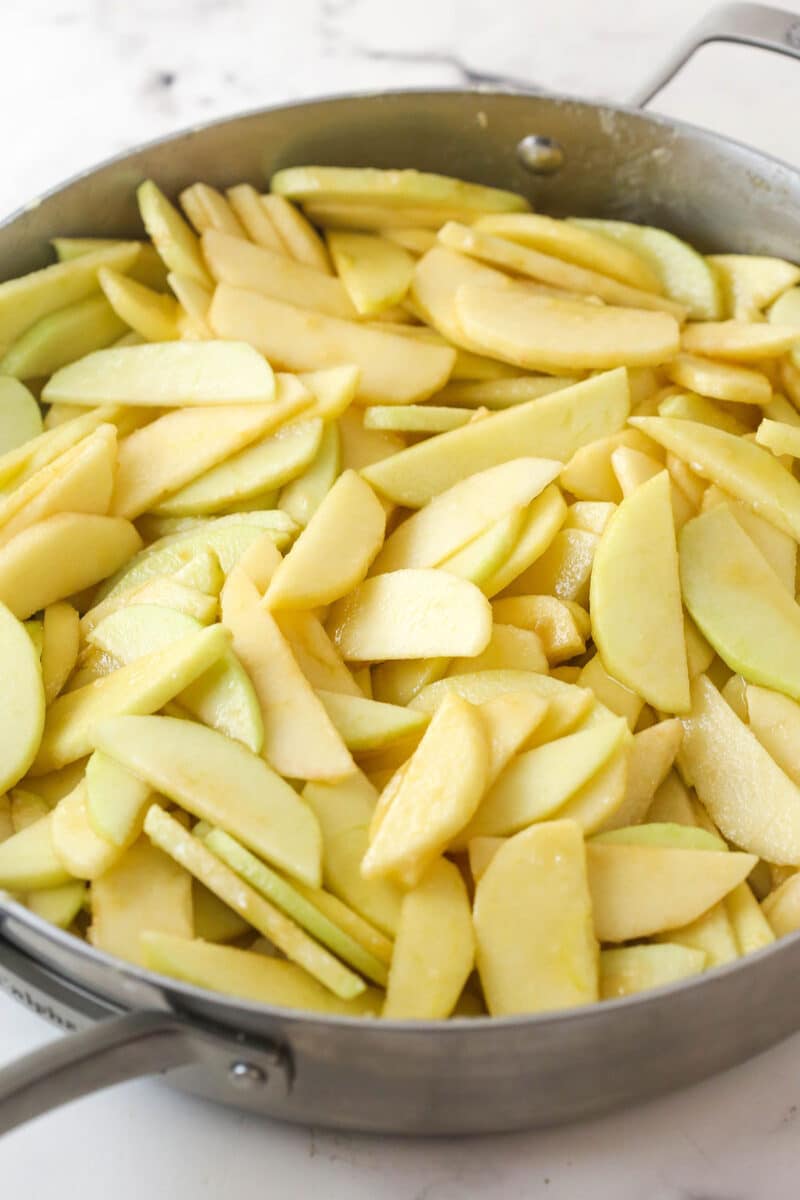
To start, peel, core, and slice the apples to about 1/8 inch thick. Toss the apple slices with the lemon juice to keep them from browning while slicing.
Toss the apples with the sugars, flour, and salt. Add the apples into a 5-quart skillet.

Cover and cook over medium heat, stirring occasionally, until fork-tender, about 20 minutes. Stir in the vanilla.

Spread the apple filling evenly in a sheet pan and refrigerate until completely cool.
Assemble the pie and bake
Roll out your pie crust so that it’s about an inch or so larger than the size of your pie plate. Place the pie crust between two pieces of parchment paper and roll it out with a rolling pin.

Peel one piece of the parchment paper off and use the other to drape the crust over the pie plate, then remove the second piece. Spread 1/3 of the apple filling into the crust.
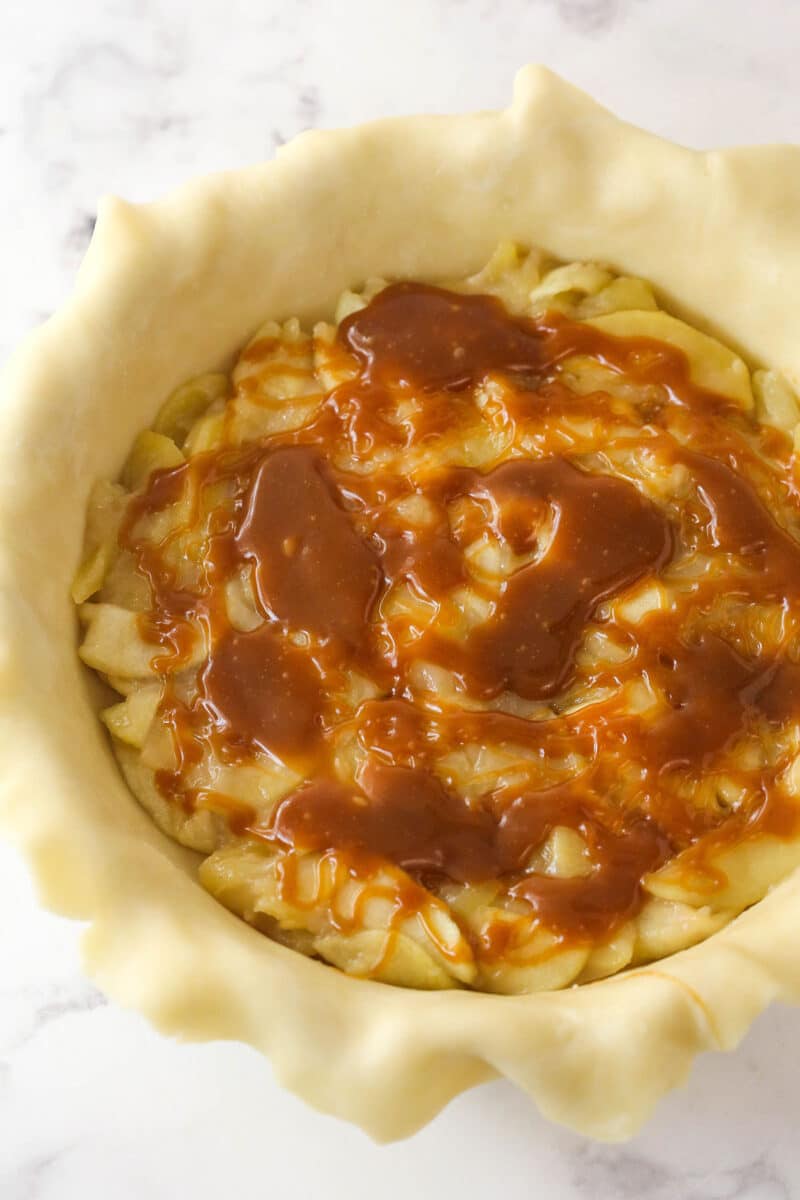
Drizzle 3-4 tablespoons of caramel sauce over the apples. Repeat with two more layers of apple filling and caramel sauce (finishing with caramel sauce).
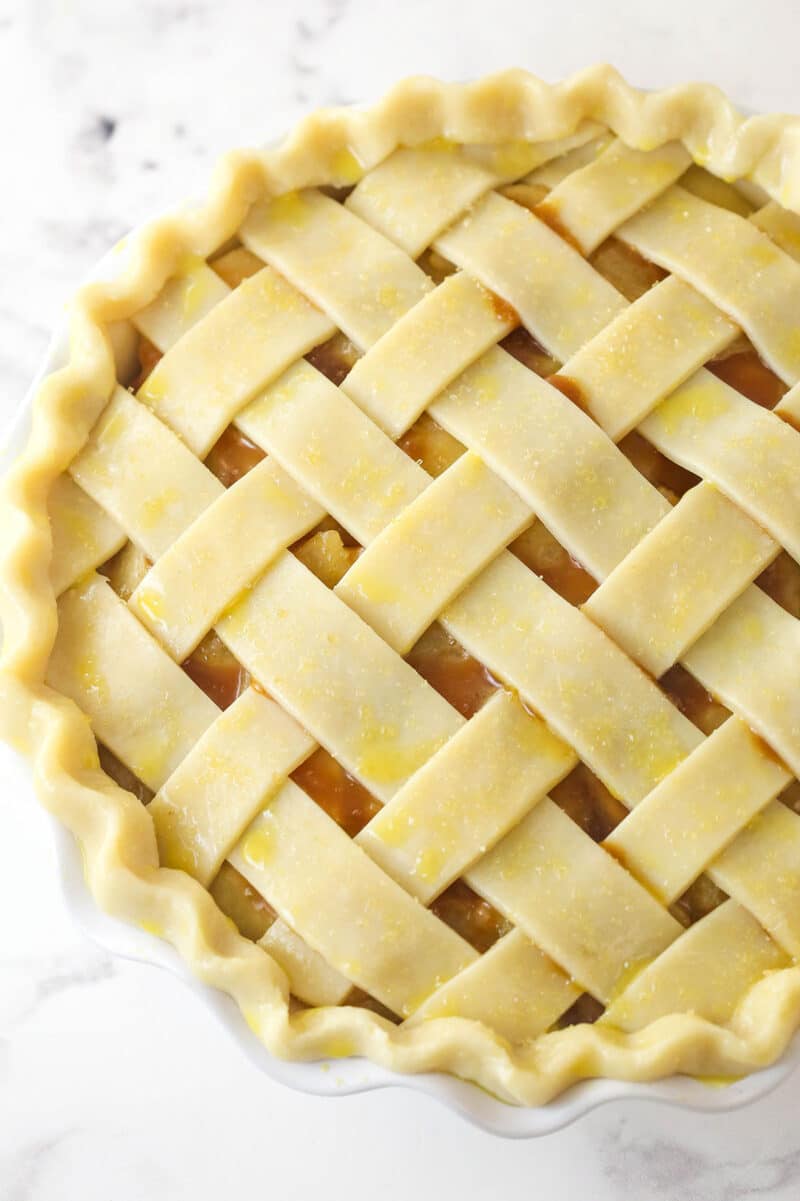
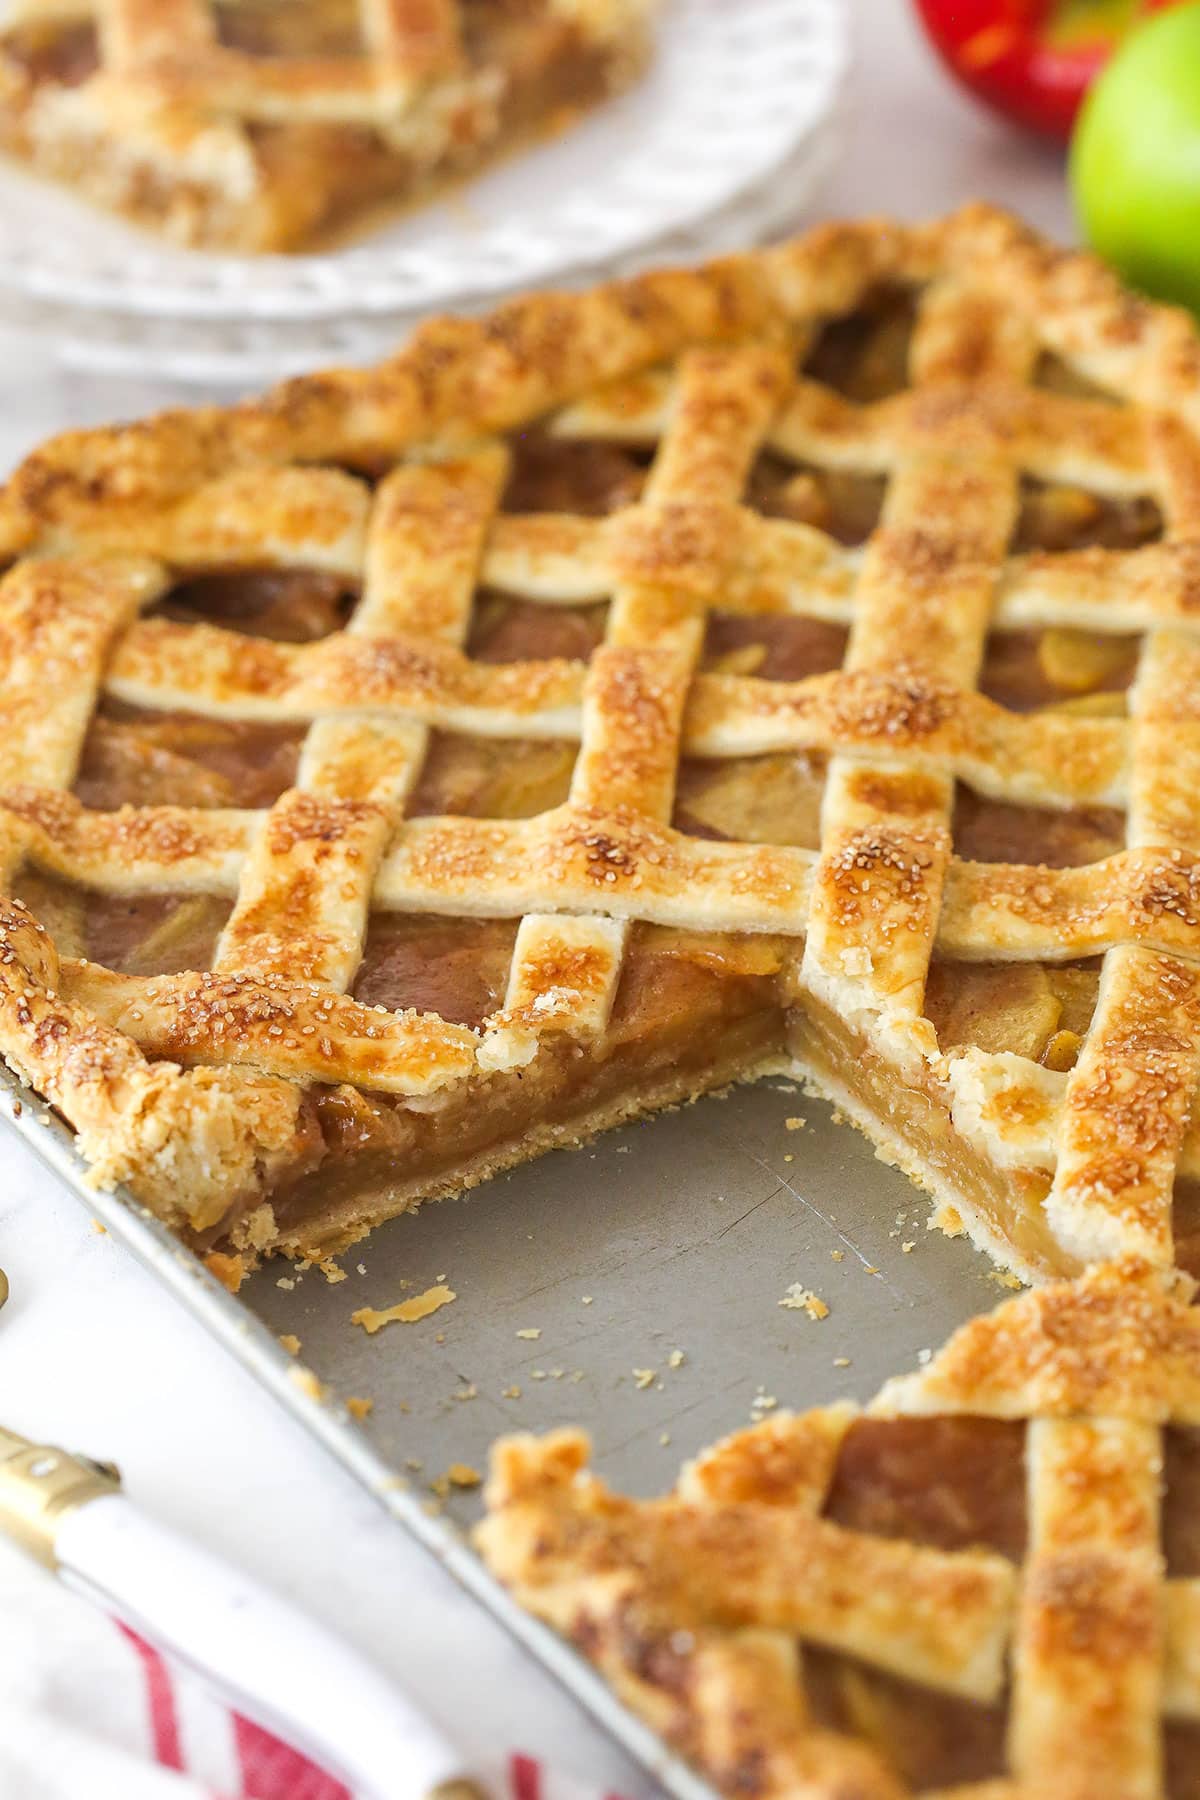
Roll out the second pie crust and add it to your pie. Shape the edges of the crust with the overhang from the bottom crust. Brush the crust with beaten egg and sprinkle with coarse sugar.
Place the pie in the fridge or freezer for 20-30 minutes, while you preheat oven to 425°F. Put the pie on a preheated baking sheet and bake for 15 minutes to set the crust. Reduce the oven temperature to 350°F and bake until bubbly, 50-60 minutes. Let the pie cool on a wire rack for 3-4 hours before slicing and serving.

Tips for Success
- Use cold butter. Starting with cold butter (and keeping it cold until baking) is a must. The cold butter creates pockets of steam in the dough as it bakes, yielding a flaky, tender crust.
- Use ice water. To help keep the butter as cold as possible!
- Don’t over-handle the dough. Don’t over-mix or over-handle the dough. The heat from your hands can melt the cold butter, and overworking the dough (whether by hand or in a food processor) will overdevelop the glutens in the flour, leading to a tough crust.
- Chill the dough. Chill the dough in the fridge for at least an hour before rolling it out. This will help ensure that the butter stays cold and the crust remains flaky.
- Hands off. When cooking the caramel, stop whisking once the ingredients are combined. This will help keep the sugars from crystallizing. If the caramel starts to burn or cook unevenly, you can tip the pan from side to side to help things cook evenly.
- Use caution. When whisking the heavy cream into the caramel, it will bubble up quite a bit, so look out for splattering and be careful not to burn yourself.
- Cool the caramel. The caramel sauce will be fairly thin when it comes off the stove, so let it cool. It will thicken.
- Even slices. Aim for even-sized apple slices for even cooking.
- Be gentle. As you toss the apples with the lemon juice and then again with the sugar, flour, etc., be gentle. You don’t want to break the slices.
- Aim for fork-tender. Cook the apples until they are fork-tender but still hold their shape. Keep in mind that they won’t soften more in the oven, so cook ’em how you want them and expect that to be your end result.
- Tent your crust. If the crust starts to brown too quickly, tent it with foil (or use a pie shield). Just be sure to allow for some ventilation so the steam can escape.
- Let the pie cool. Let the pie cool to room temperature before slicing and serving. The filling will thicken as it cools, and slicing too early will result in a runny mess!

Can I Make This Pie Ahead of Time?
Totally! All of the components of this recipe can be made in advance and then layered together when you’re ready to bake.
- Crust. Once you’ve got the pie dough wrapped in plastic wrap, you can keep it in the fridge for up to 2 days or in the freezer for up to 3 months. Allow it to thaw in the fridge before rolling it out.
- Apple filling. The filling can be made 2-3 days ahead of time. Let it cool, seal it in an airtight container, and store it in the fridge. You can also store it in a freezer bag and keep it in the freezer for up to 3 months. Allow it to thaw in the fridge when you’re ready to bake.
- Caramel sauce. Once cool, seal the caramel sauce in a mason jar. It’ll keep in the fridge for up to 2 weeks or in the freezer for up to 3 months. If you freeze it, allow it to thaw in the fridge before using. When you remove the sauce from the fridge, it’ll be stiff. Microwave it in 10-15 second bursts, stirring each time, until it’s loosened up a bit.
- Fully assembled. You can also assemble the pie, wrap it in plastic wrap, and store it in the fridge for a day or two before baking. If you need more time, wrap the fully assembled pie (minus the egg wash and sugar) in foil and place the entire thing in a freezer-safe bag. It’ll keep in the freezer for up to 3 months. Allow it to thaw in the fridge before baking as usual.
How to Store and Reheat
- Counter/refrigerator. Once cool, wrap the pie in a double layer of plastic wrap. Alternatively, arrange slices in a single layer in an airtight container. You can store it at room temperature for up to 24 hours or in the fridge for 3-4 days.
- Freezer. Wrap the fully cooled pie in a double layer of plastic wrap OR arrange slices on a baking sheet and pop ’em in the freezer. Once frozen, wrap each slice in a double layer of plastic wrap. This pie will keep in the freezer for up to 3 months. Allow it to thaw in the fridge before diving back in.
- Reheating. This pie is delicious warm or cold. If you’d like to reheat your leftovers, just pop a slice in the microwave and heat it in 15-second intervals until warm. Otherwise, arrange slices in a baking pan, cover with aluminum foil, and bake at 325°F for ~15 minutes or until heated through.
More Great Apple Pie Recipes
Caramel Apple Pie
save this recipe
Enter your email & we’ll send it to your inbox. Plus get new recipes from us every week!
Ingredients
Crust
- 2 1/2 cups (325g) all-purpose flour (measured correctly)
- 1 teaspoon salt
- 1 cup (224g) cold unsalted butter (cut into 1/2-inch cubes)
- 4-8 tablespoons cold ice water
Caramel Sauce
- 1 cup (207g) granulated sugar
- 1/2 cup (120ml) water
- 1/4 cup (56g) unsalted butter
- 1/2 cup (120ml) heavy whipping cream
- 1/2 tablespoon vanilla extract
- 1/2-1 teaspoon salt
- 2 tablespoons (16g) all-purpose flour
Apple Filling
- 2 1/2 pounds Granny Smith apples, before peeling and coring (4-5 large apples)
- 2 1/2 pounds Honeycrisp apples, before peeling and coring (4-5 large apples)
- 1 tablespoon lemon juice
- 1/2 cup (112g) packed light brown sugar
- 1/2 cup (104g) granulated sugar
- 1/3 cup (43g) all-purpose flour
- 1/2 teaspoon salt
- 1 teaspoon vanilla extract
- 1 large egg (beaten)
- Coarse sugar
Instructions
Make the crust
- NOTE: I make the crust with a food processor because it’s quicker and easier, but you can also do it by hand by adding the cubed butter to all of the flour and salt and cutting the butter into the flour until it’s all combined and the largest pieces of butter remaining are about the size of peas. Then add the water and continue with the rest of the instructions.
- Add 1 1/2 cups (195g) flour and salt to a large food processor and pulse together 2 to 3 times.
- Scatter the cubed butter over the flour and process until a crumbly dough forms, about 15 seconds. The flour should all be coated – none of the flour should be dry.
- Add the remaining 1 cup (130g) of flour and pulse a few times until everything is evenly distributed. The doughy pieces should break up and it should look sandy. There shouldn’t be a bunch of big pieces remaining. A few are fine, but it should be mostly evenly distributed.
- Move the mixture to a medium mixing bowl and add 4tablespoons of the ice water. Start with 4 tablespoons and add from there. Using a rubber spatula, gently fold everything together. The crumbs should begin to form larger clusters. If you pinch some of the dough and it holds together nicely, it’s ready. If the dough falls apart, add 1 more tablespoon of water and continue to press until dough comes together.
- Pour the dough out onto a piece of parchment paper or a lightly floured countertop and work just enough for it to come together and form a ball. Cut the ball in half and shape each half into a disc. Wrap in plastic wrap and refrigerate for at least an hour or up to 2 days.
Make the caramel sauce
- In a medium to large sauce pan, combine the granulated sugar and water. Cook over medium-low heat until the sugar is completely dissolved, about 3 to 5 minutes. Add the butter and let it melt.
- Over medium heat, bring the mixture to a boil. Stop whisking and don’t whisk at all during this part to help avoid crystallization. Allow to boil until the mixture turns a deep golden copper color, about 10-15 minutes, maybe longer depending on your stove. Keep an eye on it, but do not stir. If needed, you can occasionally tip the pan from side to side to help things cook evenly.
- Remove the pan from the heat and immediately add in the heavy whipping cream in a slow, steady stream. The caramel will bubbly up quite a bit, so be careful with this step. Whisk quickly and well as you add the cream, whisking until well combined.
- Add the vanilla extract and half a teaspoon of salt and whisk to combine. Add additional salt to your desired saltiness.
- Set aside ½ cup of caramel sauce for drizzling over pie slices when serving. Add 2 tablespoons of flour to the remaining caramel sauce.This will keep the caramel from just melting, so that it stays distributed throughout the pie.
- Allow the caramel sauce to cool. It will be fairly thin, but will thicken as it cools. Store it in the fridge for up to two weeks.
Make the apple filling
- Peel, core, and slice all of the apples to about 1/8 inch thick. You want to try to slice them all about the same thickness so they cook evenly. Add the lemon juice to a very large bowl and toss the apples in the juice as you slice them, leaving the apple slices in the bowl for later.
- Add the sugars, flour and salt to the apple slices and gently toss to coat them all with the mixture. Be careful not to break the apples as you toss them. Pour the apple mixture into a large 5-quart skillet (I use this skillet but this one would work well too.)
- Cook the apples (covered with a lid) over medium heat until fork-tender, about 20 minutes. You want the apples to be fork-tender but still hold their shape. The apples won’t soften more in the oven, so how they are when you stop cooking them is how they’ll be in the pie. Cook them to how you like them. Remove the pan from the heat and gently stir in the vanilla extract.
- Spread the apple filling evenly onto a sheet pan, or any pan with a lip around the edge, and refrigerate it until completely cool. Depending on how cold your fridge is, it’ll take a couple of hours or so to cool fully.You could also pop it in the freezer to cool more quickly, but you won’t want it to be frozen when you go to use it later. You can use it right after cooling, or store it for up to 2 days ahead of making the pie.
Assemble pie and bake
- Grab your pie plate. I use a 9-inch deep dish pie plate. Rollout your pie crust so that it’s about an inch or so larger than the size of your pie plate. If it was refrigerated for more than a couple hours, you may need to let it sit out a bit before you can roll it easily. I like to place the pie crust onto a piece of parchment paper. You can add a touch of flour if you like, but you don’t have to. Cover the crust with another piece of parchment paper and roll it out with a rolling pin.
- Peel one piece of the parchment paper off and use the other piece of parchment to lift the pie crust and drape it over the pie plate.Carefully peel off the second piece of parchment paper. You should have some overhang on the sides to use later for shaping your crust.
- Add about 1/3 of the apple filling to the pie crust. Drizzle3-4 tablespoons of the caramel sauce with the flour in it over the top. If you made it ahead and it’s too firm, heat it in the microwave for 10-15 seconds, or until drizzle consistency. Repeat with two more layers of apple filling and caramel sauce, finishing with caramel sauce on top.
- Roll out the second pie crust and create your top. I did a lattice design, but feel free to make it your own. If you don’t do a lattice or a design that is naturally vented, just be sure to score the crust so that steam can escape while it bakes. Shape the edges of the crust with the overhang from the first crust. Brush the crust of the pie with the beaten egg and sprinkle the top with the coarse sugar.
- Place the pie in the fridge or freezer for 20-30 minutes to get it cold and firm.
- Preheat oven to 425 degrees Fahrenheit. While the pie is chilling, place a baking sheet in the preheated oven for about 20 minutes to get nice and hot.
- Put the pie into the oven on the preheated baking sheet and bake for 15 minutes or until the crust is starting to brown.
- Reduce oven temperature to 350 degrees Fahrenheit and bake for an additional 50 to 60 minutes, or until the crust is golden brown and the juices of the pie are bubbling throughout. If the crust begins to brown too much, you can cover it with a pie crust shield or use foil to tent the top of it. Just be sure it’s vented for the steam to be released.
- Let the pie cool on a wire rack to room temperature, for about 3-4 hours. The filling will thicken as it cools. If you cut it when it’s still hot, the juices will pool.
- When the pie is cool, slice and serve.
Notes
- Apple type: I use Granny Smith and Honeycrisp apples, but mainly you want to be sure to use a mix of tart and sweet/flavorful apples.
- Storage: Once cool, wrap the pie in a double layer of plastic wrap. Alternatively, arrange slices in a single layer in an airtight container. You can store it at room temperature for up to 24 hours or in the fridge for 3-4 days.
- Freezing: Wrap the fully cooled pie in a double layer of plastic wrap OR arrange slices on a baking sheet and pop ’em in the freezer. Once frozen, wrap each slice in a double layer of plastic wrap. This pie will keep in the freezer for up to 3 months. Allow it to thaw in the fridge before diving back in.
- Reheating: This pie is delicious warm or cold. If you’d like to reheat your leftovers, just pop a slice in the microwave and heat it in 15-second intervals until warm. Otherwise, arrange slices in a baking pan, cover with aluminum foil, and bake at 325°F for ~15 minutes or until heated through.
Nutrition
The nutrition facts provided are calculated using a third-party tool and are estimates only. Actual nutritional content may vary based on the ingredients and brands you use, as well as portion sizes. For accurate results, please consult a registered dietitian or nutritionist.


Made this last night and it is AMAZING. I made it gluten free with a 1:1 GF blend with xanthan gum! Will definitely be making this a lot!
I’m so glad you enjoyed it!
The pie was so good my family just love it I had to turn around and make another 😋🥰
Awesome! I’m so glad to hear that!
Do you have to make a lattice top crust? Can you make a regular full top crust and put slits in it for the moister to excape?
Absolutely! You don’t have to do a lattice.