This homemade Hershey’s Chocolate Bar Cheesecake Cake is a truly decadent dessert! It has two layers of light and moist chocolate cake and a layer of chocolate cheesecake. It’s complete with a creamy chocolate buttercream and plenty of chocolate chips! It’s a chocolate cheesecake cake dream!

Homemade Hershey’s Chocolate Bar Cheesecake
This indulgent cheesecake recipe packs as much chocolate as possible into one cake! It’s a copycat version of the Hershey’s Chocolate Bar Cheesecake from Cheesecake Factory. Spoiler alert: it’s even more delicious! I had a request from a reader for this one, so naturally I couldn’t disappoint.
There are 3 pillars of this chocolatey treat – the tender cake, the rich cheesecake and the creamy frosting. In true Cheesecake Factory fashion, it’s all covered in chocolate chips! All my tasters totally fell in love with it. One even claimed that the chocolate cheesecake layer was the best cheesecake she’s ever had. And if you’ve ever had my Easy Moist Chocolate Cake, the cake layers are modified from that, so you know it’s good.
The final chocolate cheesecake cake is a bit of work, but total beauty. And this fool-proof layered chocolate cheesecake cake also keeps very well, so make way for some amazing leftovers.
What Makes this Cheesecake Cake So Good?
The use of both melted chocolate and cocoa powder give this cake the most wonderful chocolate flavor in every bite. The cake is light enough to balance out the rich and creamy cheesecake, but chocolatey enough to satisfy all its own. The creamy chocolate buttercream and chocolate chips add the perfect finishing touch to really make this cheesecake special.

Recipe Ingredients
Don’t be intimidated by all the chocolatey goodness in this dessert; it’s not complicated, it just takes time! All the components come together with basic kitchen essentials.
For the Chocolate Cheesecake
- Cream Cheese: Bring your cream cheese to room temperature.
- Sugar: You’ll need 1 cup.
- Cocoa Powder: Use natural, unsweetened cocoa powder.
- Sour Cream: For an extra creamy cheesecake.
- Vanilla Extract: To enhance the chocolatiness.
- Chocolate Chips: Semi-sweet, melted and slightly cooled.
- Eggs: Room temperature is best.
For the Chocolate Cake Layers
- All-Purpose Flour: For the structure of the cake.
- Sugar
- Cocoa Powder: Natural, unsweetened as well.
- Baking Soda: To help the cake rise and be nice and tender.
- Baking Powder: In addition to the baking soda, you’ll need a bit of baking powder. This adds a touch of firmness.
- Salt: Salt is always needed for flavor.
- Milk: I use 2%.
- Vegetable Oil: For an extra moist cake.
- Vanilla Extract
- Egg: You need the white of one large egg.
- Water: The water should be hot. This makes the cocoa “bloom” and enhances the flavor.
For the Chocolate Buttercream
- Butter: Unsalted.
- Cocoa Powder: Natural, unsweetened.
- Powdered Sugar: Adds volume and consistency.
- Heavy Whipping Cream: To get it smooth and creamy.
- Salt: Again, for flavor.
- Chocolate Chips: For sticking to the sides of the cake as the final decor.

How to Make a Hershey’s Chocolate Bar Cheesecake
It takes a little time to make this cheesecake because of the different components, but each one is very easy to make. Trust me, every second spent on this cake is well worth it!
Make the Chocolate Cheesecake
- Prepare for Baking: Preheat the oven to 300°F. Line the entire inside of a 9-inch cake pan with aluminum foil. Press it into the pan to get it as flat as you can. You’ll use the aluminum foil to lift the cheesecake out of the pan when it’s baked and cooled.
- Combine Cream Cheese, Sugar & Cocoa: In a large mixer bowl, mix the cream cheese, sugar and cocoa powder until well combined (use low speed to keep less air from getting into the batter, which can cause cracks). Scrape down the sides of the bowl.
- Add Vanilla & Sour Cream: Add the sour cream and vanilla extract, mixing on low speed until well combined.
- Add Chocolate: Slowly add the melted and cooled chocolate and mix until well combined.
- Slowly Add Eggs: Add the eggs one at a time, beating slowly and scraping the sides of the bowl after each addition.
- Make Water Bath & Bake: Place the cake pan inside another larger pan. Fill the outside pan with enough warm water to go about halfway up the sides of the smaller pan. Bake the cheesecake for about 50 minutes. The center should be set, but still jiggly.
- Let Cool in Oven: Turn off the oven and leave the door closed for 30 minutes. The cheesecake will continue to cook, but slowly begin to cool as well.
- Crack Oven Door Until Cooled: Crack the door of the oven for 30 minutes to allow the cheesecake to continue to cool slowly. This process helps prevent cracking.
- Chill: Remove the cheesecake from the oven and water bath wrapping and refrigerate until firm, 5-6 hours or overnight.
Make the Cake Layers
- Prep for Baking: Preheat the oven to 350°F. Line two 9-inch cake pans with parchment paper in the bottom and grease the sides.
- Combine Dry Ingredients: In a medium-sized bowl, combine the flour, sugar, cocoa, baking soda, baking powder and salt. Whisk until well combined.
- Combine Wet Ingredients: In another medium-sized bowl, combine the milk, vegetable oil, vanilla extract and egg white. Whisk until well combined.
- Add Dry Ingredients to Wet Ingredients: Add the dry ingredients to the wet ingredients and whisk together until well combined.
- Add Water: Add the water and whisk until well combined. The batter will be thin.
- Bake: Divide the batter between the cake pans and bake for 12-15 minutes, or until a toothpick inserted in the middle comes out with a few crumbs.
- Let Cool: Remove the cake from the pan and set it aside on a cooling rack to cool.
Make the Buttercream
- Beat Butter Until Smooth & Add Cocoa: Add the butter to a mixing bowl and beat it until smooth. Add the cocoa powder and mix until well combined.
- Add Half of Powdered Sugar & Cream: Add about half of the powdered sugar and mix until well combined and smooth. Then, add about half of the cream and mix until well combined and smooth.
- Add Remaining Powdered Sugar & Cream: Add the remaining powdered sugar and the salt, mixing until well combined and smooth. Add the remaining cream and mix until well combined and smooth.
Build the Cake
- Level Cake Layers: Use a large serrated knife to remove the domes from the top of the cakes.
- Frost First Layer: Place the first layer of cake on a serving plate or a cardboard cake round. Spread about 1 cup of frosting evenly on top of the cake layer.
- Add Cheesecake Layer: Use the aluminum foil to lift the cheesecake out of the cake pan, remove the foil and place the cheesecake on top of the frosting. The cheesecake should be firm enough to handle it, though a little messy.
- Frost & Add Final Layer: Spread another cup of frosting evenly on top of the cheesecake, then add the second layer of cake on top.
- Frost Assembled Cake: Frost the outside and top of the cake.
- Add Chocolate Chips: Immediately after frosting the cake, press the chocolate chips into the sides of the cake. If you wait to do this, the buttercream will form a crust and the chocolate chips won’t stick.
- Pipe Frosting Border: Use the remaining buttercream to pipe the border on the top of the cake. I used Ateco tip 847.
- Serve or Store: Refrigerate the cake until you’re ready to serve it.

Tips for Success
Want more advice for how to make this iconic cheesecake? Here are my top tips and tricks:
- Use Room Temperature Ingredients: It’s important to let your refrigerated ingredients come to room temperature before you make your cheesecake. This way, everything will combine nicely and you won’t be left with a lumpy cheesecake.
- Let Cheesecake Cool Slowly: Prevent cracks from forming in your cheesecake by following the cooling instructions in the recipe. Let your cheesecake cool in the closed oven for 30 minutes, then crack open the door for the remainder of the cooling time.
- Level Cake Layers: Since this is a 3-layer cake, you’ll definitely want to use a serrated knife to remove the domes from your chocolate cake layers. This will prevent your cake from looking lopsided.
- How to Frost a Cake Perfectly: If you want to master the art of spreading buttercream frosting on a homemade cake, check out my tutorial for frosting a smooth cake!

Serving Suggestions
No matter how you serve this chocolate cheesecake cake, it’s a guaranteed hit. Nevertheless, here are some ideas!
- Serve with Raspberry Sauce: If you want a pop of fruity flavor to offset the richness of this cake, add a drizzle of Homemade Raspberry Sauce. Chocolate and raspberries are such a delicious combo!
- Pair with Ice Cream: A scoop of vanilla ice cream tastes great alongside a slice of chocolate layer cake. It’s the perfect addition if you’re serving the cake for a special occasion.
- To Make Ahead: It’s easy to prepare parts of this cheesecake in advance to make it more manageable. The cake layers and cheesecake can be made the day before you want to assemble the cake. The cheesecake could even be made a couple days ahead. They both keep well in the fridge, so you don’t have to worry about your cake being stale or dry if you make it ahead of time.

How to Store Homemade Chocolate Cheesecake Cake
This cake should be stored in an airtight container in the fridge. It’s best if eaten within 4-5 days. I recommend enjoying it cold.
Can I Freeze Cheesecake?
You can store your Hershey’s cheesecake cake in the freezer, if desired. First, flash freeze it, uncovered, for 1 hour. Then, wrap the whole thing tightly in plastic wrap. Place the wrapped cheesecake in an airtight freezer bag or wrap it again with aluminum foil. You can also freeze individual slices. Thaw completely in the fridge. Frozen cheesecake will last for up to 4 months.
Print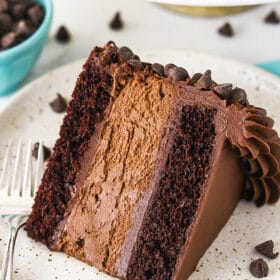
Copycat Hershey’s Chocolate Bar Cheesecake
- Prep Time: 1 hour 45 minutes
- Cook Time: 2 hours 2 minutes
- Total Time: 3 hours 47 minutes
- Yield: 16 1x
- Category: Dessert
- Method: Oven
- Cuisine: American
Description
This homemade Hershey’s Chocolate Bar Cheesecake is a truly decadent dessert! It has two layers of light and moist chocolate cake and a layer of chocolate cheesecake. It’s complete with a smooth chocolate buttercream and plenty of chocolate chips!
Ingredients
For the Chocolate Cake Layers
- 1 cup (130g) all purpose flour
- 1 cup (207g) sugar
- 6 tbsp (43g) natural unsweetened cocoa powder
- 1 tsp baking soda
- 1/4 tsp baking powder
- 1/2 tsp salt
- 1/2 cup (120ml) milk
- 1/4 cup (60ml) vegetable oil
- 1/2 tsp vanilla extract
- 1 large egg
- 1/2 cup (120ml) hot water
For the Chocolate Cheesecake
- 24 ounces (678g) cream cheese, room temperature
- 1 cup (207g) sugar
- 1/2 cup (57g) natural unsweetened cocoa powder
- 2/3 cup (153g) sour cream, room temperature
- 1 tsp vanilla extract
- 6 oz | 169g | 1 cup semi sweet chocolate chips, melted and slightly cooled
- 3 large eggs, room temperature
For the Chocolate Buttercream
- 1 3/4 cups unsalted butter
- 1 cup (114g) natural unsweetened cocoa powder
- 6 cups (690g) powdered sugar
- 3/4 cup heavy whipping cream
- Pinch of salt
- 2 1/4 cups (380g) chocolate chips
Instructions
Cheesecake Layer
- Preheat oven to 300°F (148°C). Line the entire inside of a 9-inch (23cm) cake pan with aluminum foil. Press it into the pan to get it as flat as you can. You’ll use the aluminum foil to lift the cheesecake out of the pan when it’s baked and cooled.
- In a large mixer bowl, mix the cream cheese, sugar and cocoa powder until well combined (Use low speed to keep less air from getting into the batter, which can cause cracks). Scrape down the sides of the bowl.
- Add the sour cream and vanilla extract, mixing on low speed until well combined.
- Slowly add the melted and cooled chocolate and mix until well combined.
- Add the eggs one at a time, beating slowly and scraping the sides of the bowl after each addition.
- Place the cake pan inside another larger pan. Fill the outside pan with enough warm water to go about halfway up the sides of the smaller pan.
- Bake the cheesecake for about 50 minutes. The center should be set, but still jiggly.
- Turn off the oven and leave the door closed for 30 minutes. The cheesecake will continue to cook, but slowly begin to cool as well.
- Crack the door of the oven for 30 minutes to allow the cheesecake to continue to cool slowly. This process helps prevent cracking.
- Remove the cheesecake from the oven and water bath wrapping and refrigerate until firm, 5-6 hours or overnight.
Cake Layers
- Preheat oven to 350°F (176°C). Line two 9-inch (23cm) cake pans with parchment paper in the bottom and grease the sides.
- In a medium sized bowl, combine the flour, sugar, cocoa, baking soda, baking powder and salt. Whisk until well combined.
- In another medium sized bowl, combine the milk, vegetable oil, vanilla extract and egg. Whisk until well combined.
- Add the dry ingredients to the wet ingredients and whisk together until well combined.
- Add the water and whisk until well combined. The batter will be thin.
- Divide the batter between the cake pans and bake for 12-15 minutes, or until a toothpick inserted in the middle comes out with a few crumbs.
- Remove cake from the pan and set aside on a cooling rack to cool.
Buttercream
- When you’re ready to build the cake, make the buttercream frosting. Add the butter to a mixing bowl and beat until smooth.
- Add the cocoa powder and mix until well combined.
- Add about half of the powdered sugar and mix until well combined and smooth.
- Add about half of the cream and mix until well combined and smooth.
- Add the remaining powdered sugar and salt and mix until well combined and smooth.
- Add the remaining cream and mix until well combined and smooth.
Assembly
- Use a large serrated knife to remove the domes from the top of the cakes.
- Place the first layer of cake on a serving plate or a cardboard cake round. Spread about 1 cup of frosting evenly on top of the cake layer.
- Use the aluminum foil to lift the cheesecake out of the cake pan, remove the foil and place the cheesecake on top of the frosting.
- Spread another cup of frosting evenly on top of the cheesecake, then add the second layer of cake on top.
- Frost the outside of the cake. Check out my tutorial for frosting a smooth cake, if you’d like.
- Immediately after frosting the cake, press the chocolate chips into the sides of the cake. If you wait to do this, the buttercream will form a crust and the chocolate chips won’t stick.
- Use the remaining buttercream to pipe the border on the top of the cake. I used Ateco tip 847.
- Refrigerate cake until ready to serve. This cake is best stored in an air tight container. It’s best if eaten within 4-5 days.
Notes
Makes 14-16 slices.
Nutrition
- Serving Size:
- Calories: 948
- Sugar: 95.5 g
- Sodium: 371.8 mg
- Fat: 56.3 g
- Carbohydrates: 112.5 g
- Protein: 11.3 g
- Cholesterol: 152.7 mg


Does the cake take egg white or whole egg? Says both in 3 different places.
I’m not sure where you’re seeing references to yolks or whites. You need 1 egg in the cake and 3 in the cheesecake.
I have a question I heated the cheesecake layer without putting the pan in water will it still turn out good after being cooled
If you didn’t use the water bath, you probably won’t need to cook it as long. It may also fall a little in the middle while it cools. You can try to trim the edges off or just fill it in with whipped cream.
Overall, was very good and came together nicely. We didn’t do the chocolate chips on the side. Was very rich. Thanks for the recipe!
I’m glad you enjoyed it!
I loved this. Made it for an early Thanksgiving celebration. The chocolate cake layers came out way too thin so I doubled the batter and remade them and they were perfect. I have made several of your cakes and they always come out great.
I’m so glad you enjoyed it!
hello,
I have a question. Dies it affect to the cake to leave it 24 hours in the fridge? If for any reason I just finish the cheesecake one day and the other part the next day ,will everything be ok ? Thank you
Yes, it will definitely be OK. The cheesecake will hold up very well.
Hi lindsay, did you make a video on this? I for some reason cannot find the video. Also is putting the cheesecake in a bath water very needed? what would happen if i baked the cheesecake without it? also how do i know when the cheesecake is firm enough? Can i freeze it so it’s easier to transport and place on the cake without it cracking being so soft? Sorry i have a lot of questions! i wanna make this cake properly.
I don’t believe this recipe has a video. I would highly recommend the water bath. Without it, your cheesecake can crack, fall in the center while cooling and overly brown. Here is a post on how to tell when your cheesecake is done baking. And while you could freeze the cheesecake layer, you really should not need to. If you want to put it in the freezer, I would do it for a short period of time, just to get it a little firmer. If you freeze it all the way and then add it to the cake and leave the cake at room temperature while you’re working on it, it’ll start to release condensation and could make the cake around it a little soggy. It really should not be necessary.
Can you freeze the cake assembled without the frosting?
I haven’t tried it myself, and typically I recommend freezing individual layers just because you never know how things will thaw and if moisture will seep in, but I’m guessing this cake would be fine to freeze assembled.
This cake is delicious. My 5 sons all said it needs more cake and less cheesecake, and no chocolate chips on the side. I totally agree with them completely. It was a waste of the chips. It made it pretty and that’s it. Would make it again but definitely change it. Thank you!!
Have you ever put in not coffee instead of water. Since the coffee brings out the flavor of the chocolate?
Making it for my sons bday tomorrow. Can’t wait to taste it.
I haven’t, but I’m sure it’d be fine.
Hi, I’ve never attempted a cake like this before. For the cheesecake layer before refrigerating; do I remove the cheesecake from the cake pan and wrap it in foil or something before putting it in the fridge or does it need to stay in the cake pan and wrapped up that way?
You can remove the wrapping that is added for the water bath, but it should stay in the springform pan.