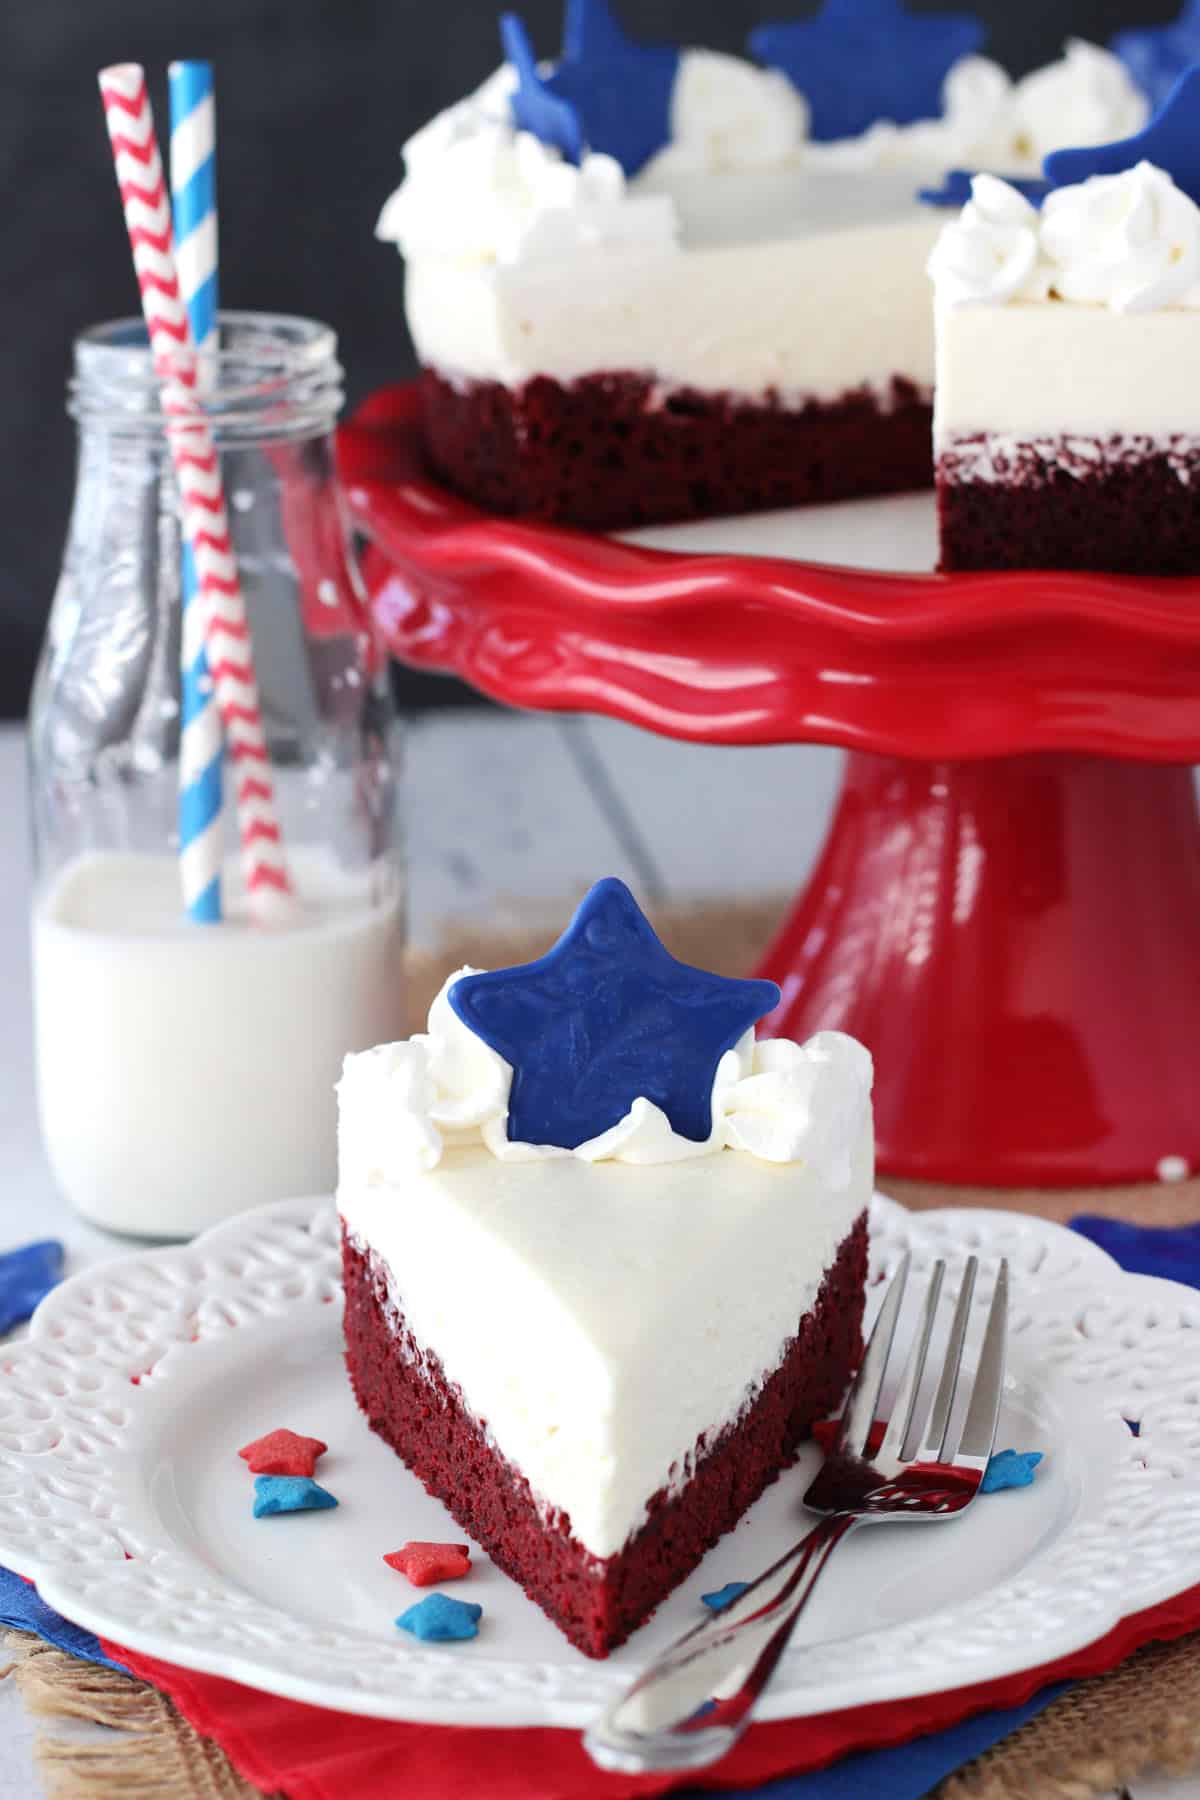
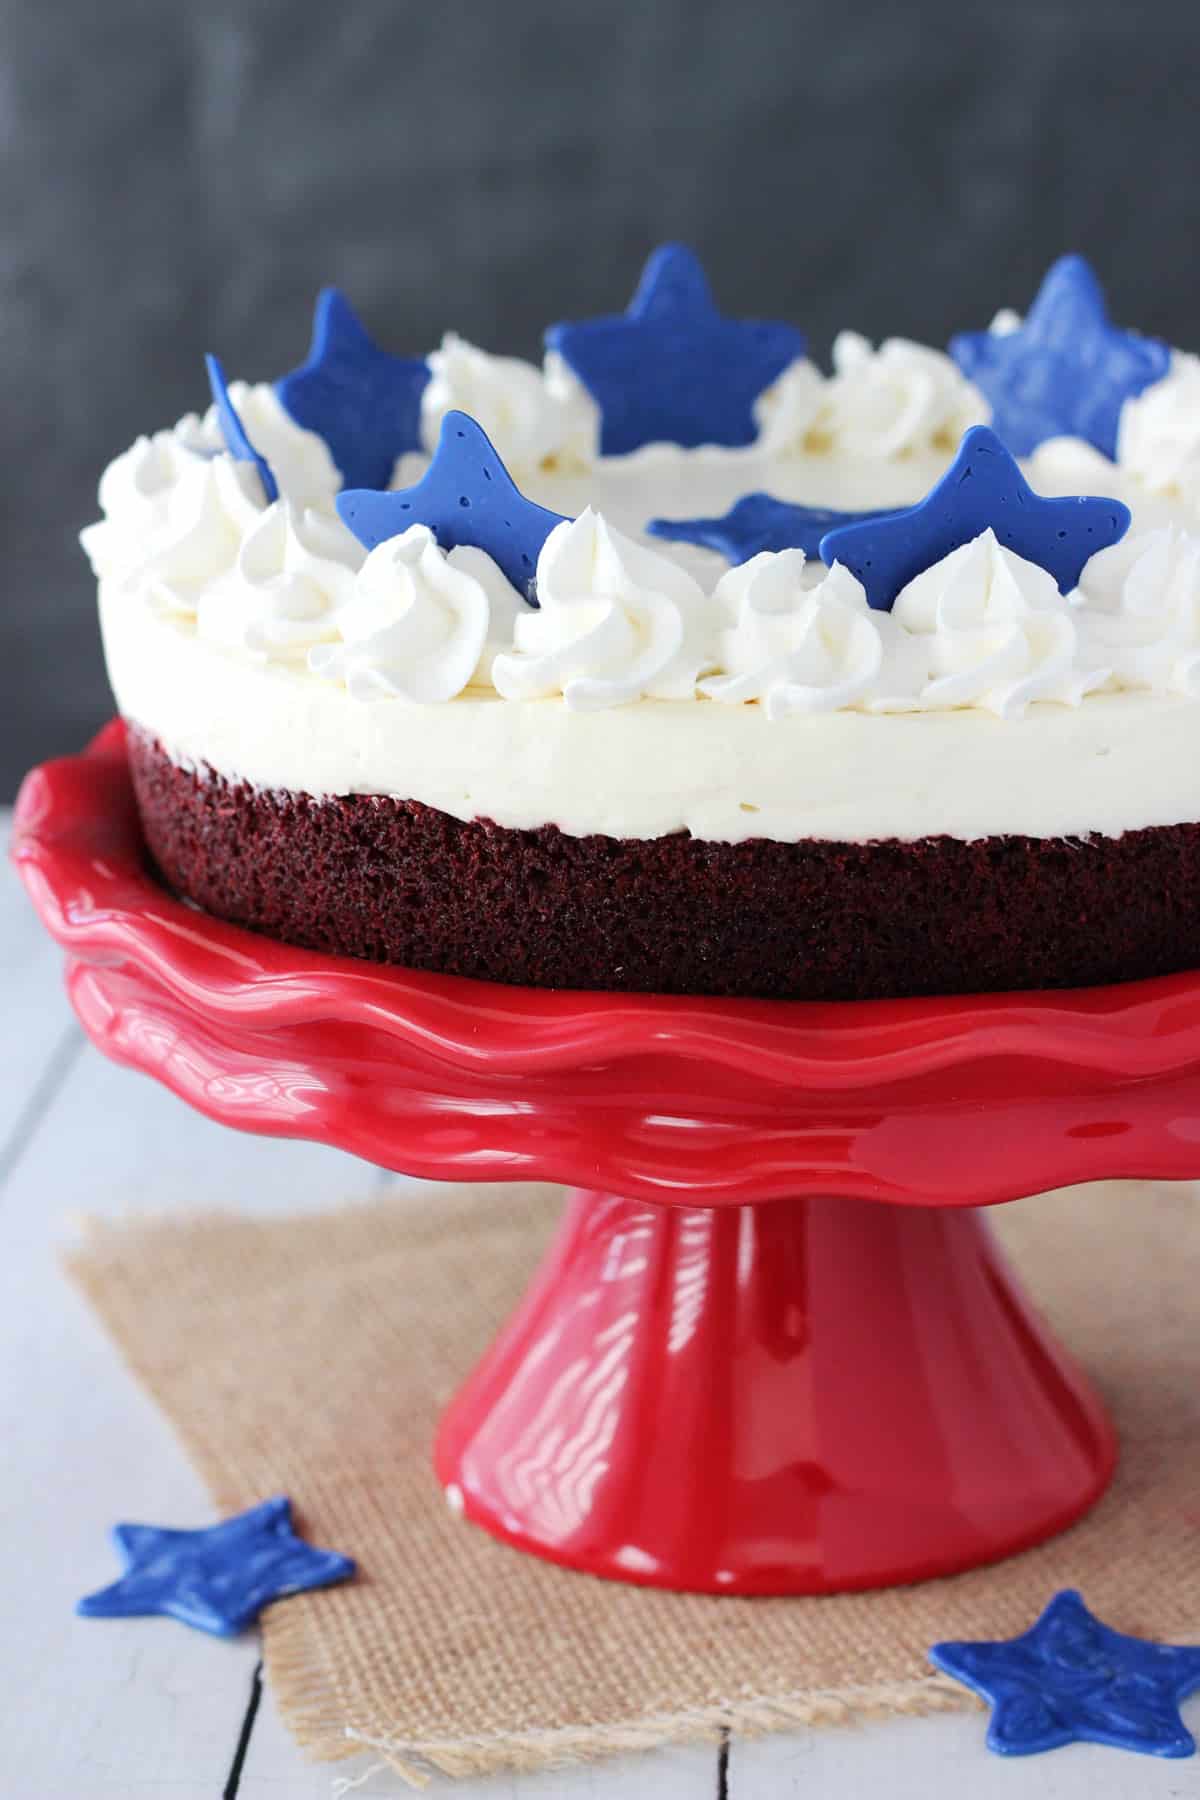
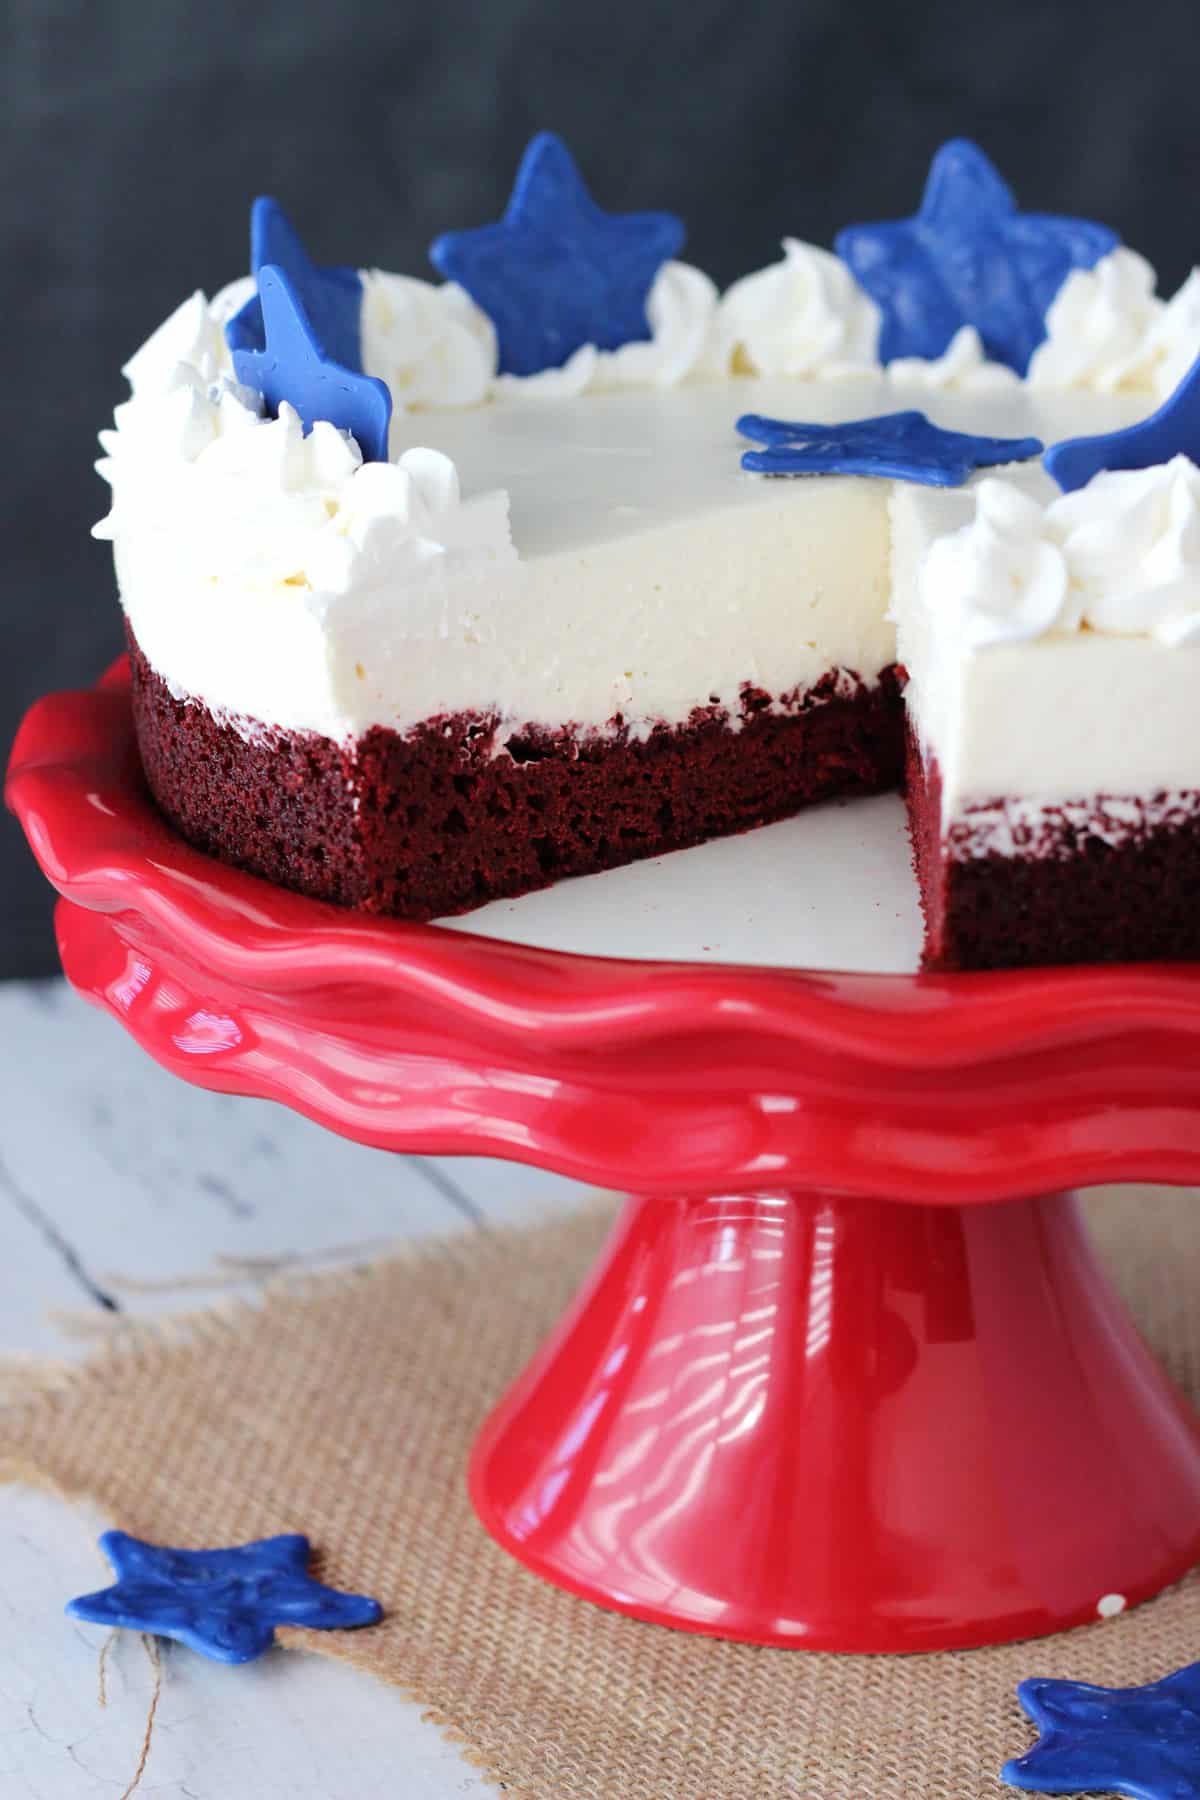
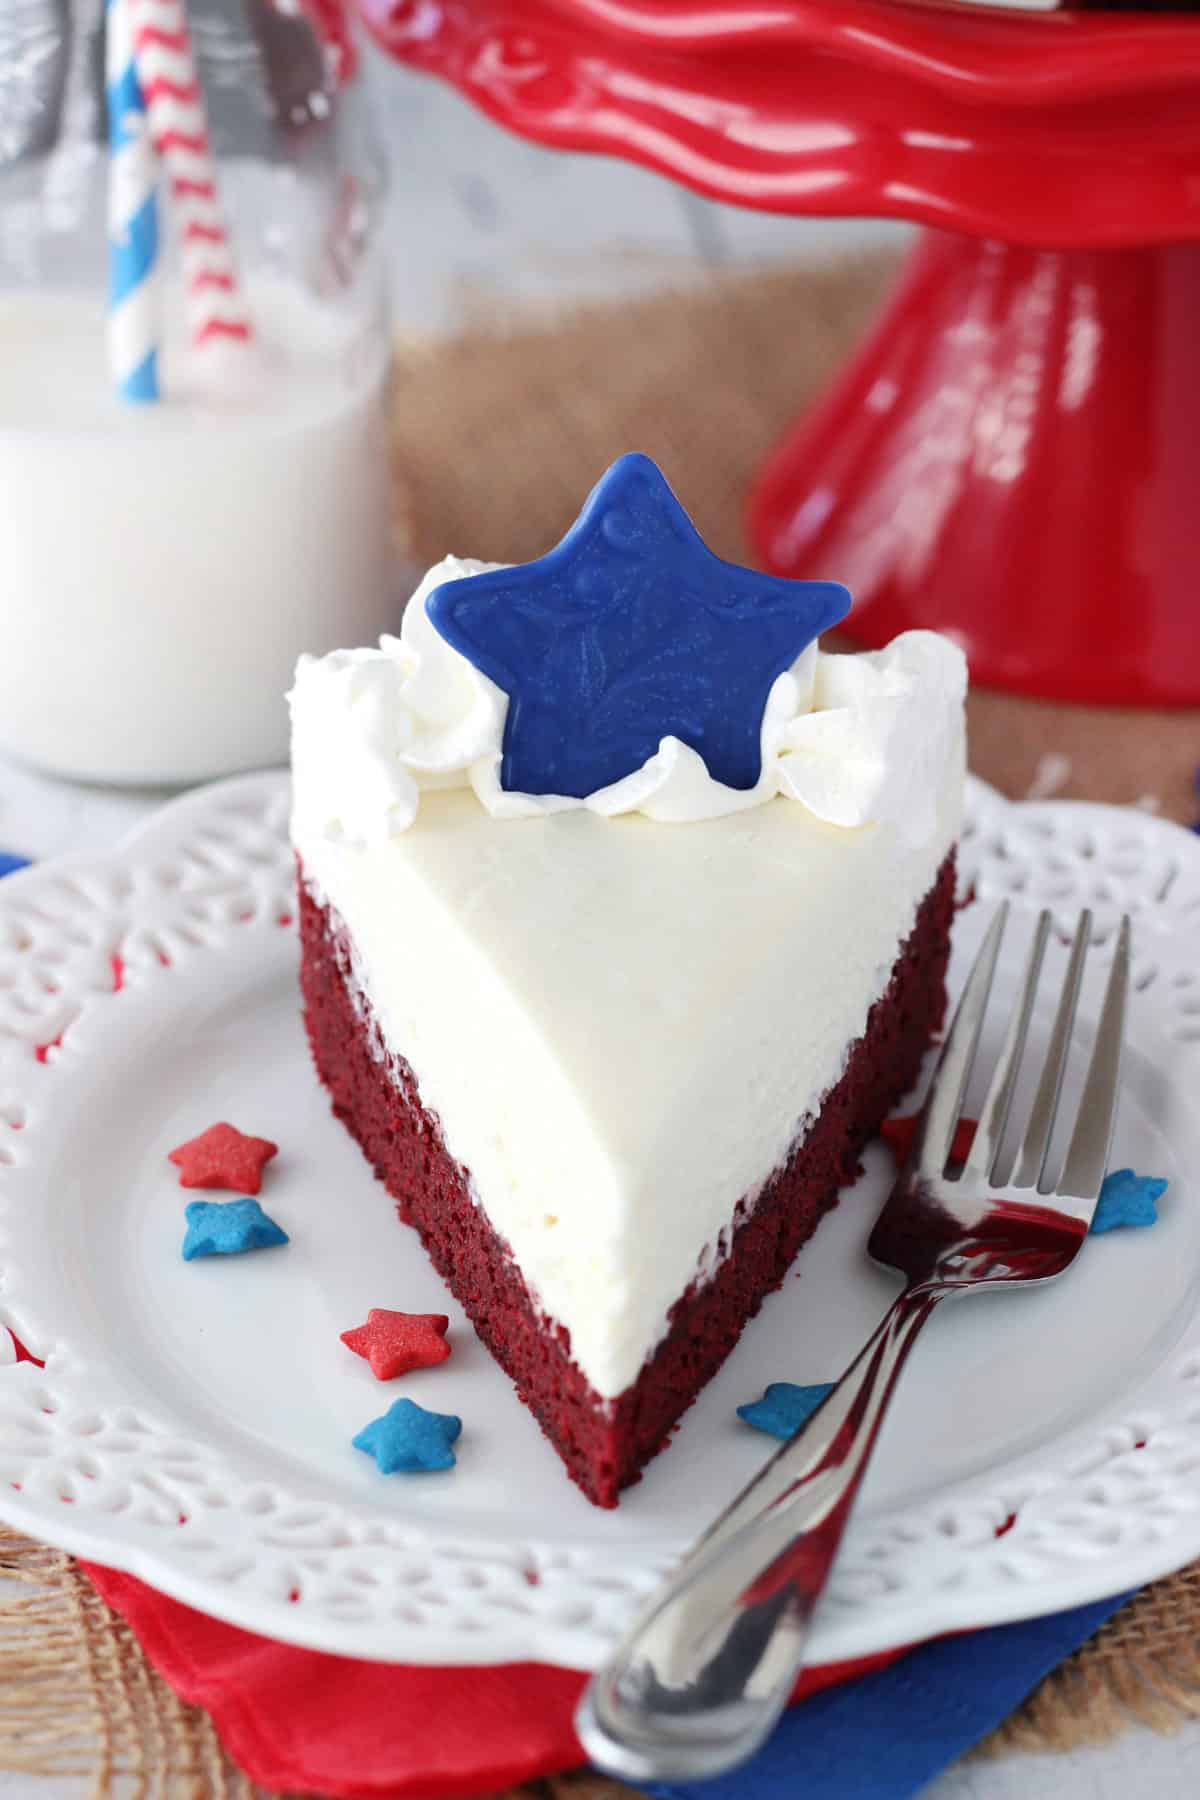
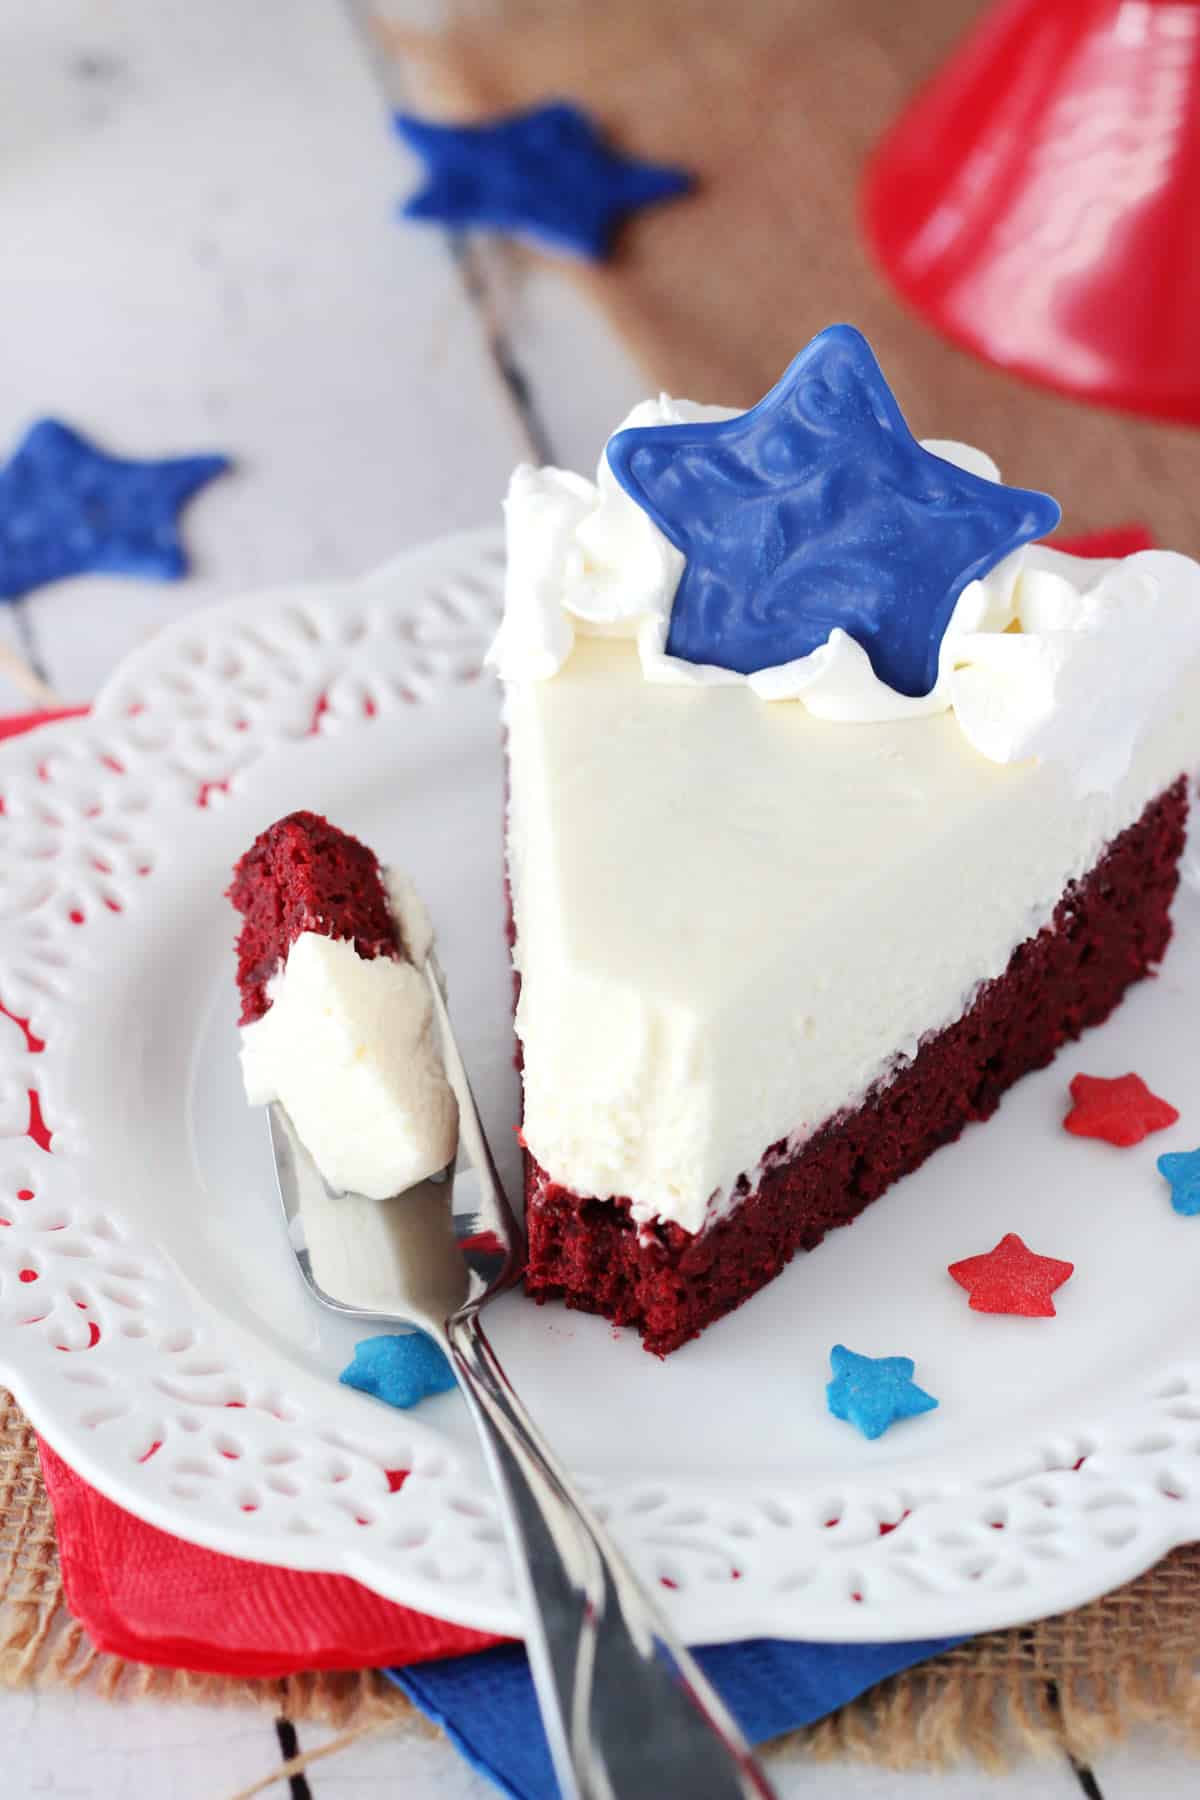
This Red Velvet Blondie Cheesecake has a layer of red velvet blondie topped with no bake cheesecake. It is a moist, chewy, creamy and classic combo. Plus, it’s super festive for July 4th with blue chocolate stars. I totally fell in love with it!
Red Velvet Blondie Cheesecake
So have you ever tried Zumba before? I feel like classes at the gym like that totally depend on the instructor as to whether they are good or not.
I’d only been to one Zumba class before and hadn’t totally been impressed. But when I showed up at the gym Saturday morning, I noticed a class was about to start and decided to break up my normal routine and give it a try. I normally love step classes, but the ones at my gym weren’t very good so it looks like they’ve cancelled them all together. 🙁
Fortunately the Zumba was actually really fun! It’s not as much of a workout as step, but it was a great change and the instructor was fun. I’ll definitely go back. In fact, the whole thing reminded me a little bit of what you might see me doing when I’m baking and dancing around my kitchen like a crazy person. You know, when I’m baking things like this cheesecake. It makes baking even more fun.
There are so many things to love about this cheesecake. First, the red velvet blondie. It’s moist, chewy and has that great flavor that you love in red velvet.
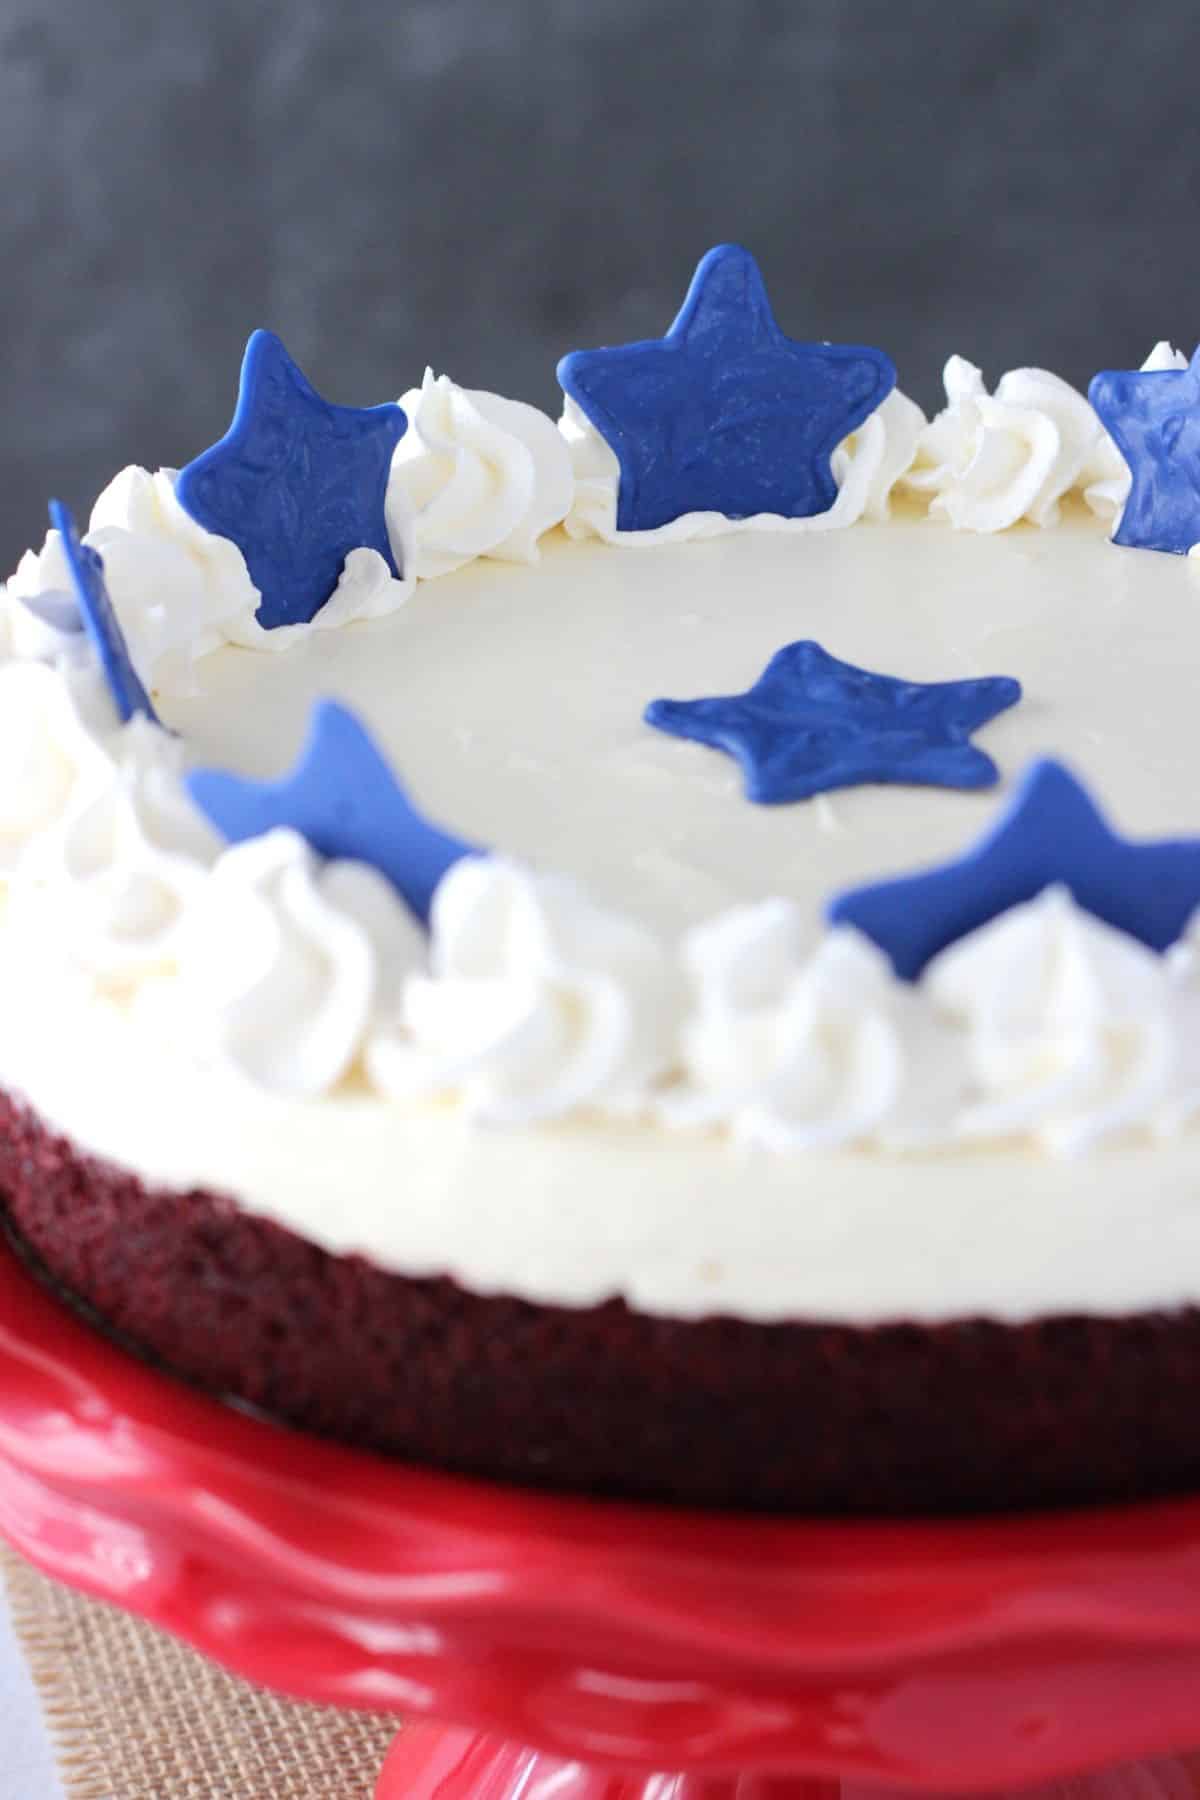
It’s topped with a smooth, creamy no bake cheesecake. Cheesecake and red velvet are a match made in heaven. I love them in this cheesecake for the 4th because I feel like they are the red and white stripes, so I topped with them some blue stars. It’s only fitting, right?
The make the layers, the blondie is baked first. It’s baked in a 9 inch cake pan. If you have a springform pan that doesn’t leak (do those exist?), you can use that. If not, go for the cake pan.
Once the blondie has baked and cooled, you’ll add it to the springform pan. I like the line the inside edges of the pan with parchment paper so that the cheesecake layer doesn’t stick to the sides at all, but that’s not required.
The cheesecake just requires a little bit of mixing, then you add it to the top of the blondie. Easy peasy.
To make the blue chocolate stars, you’ll need some blue chocolate. It’s basically colored white chocolate. I used the Wilton Blue Candy Melts, but if there are others you prefer, or you like to color your own chocolate, go for it.
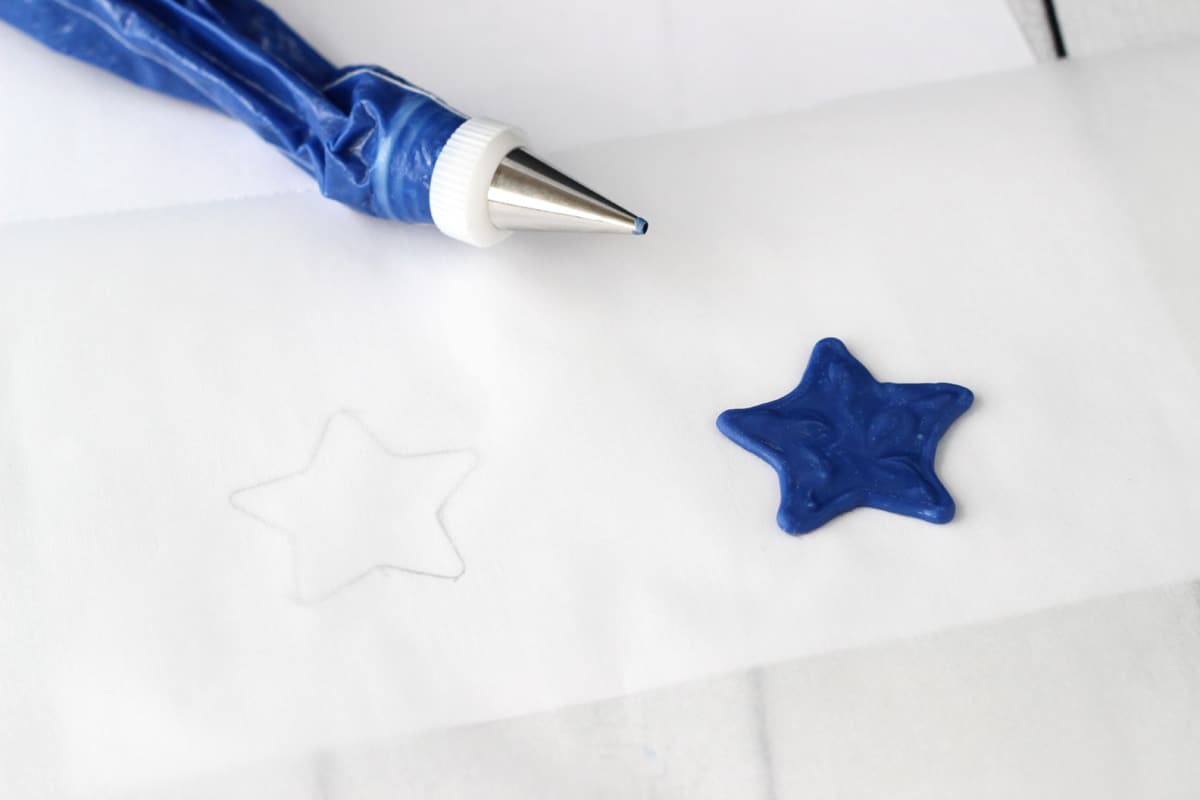
You can freehand it, or you can do like I did and print out a star that you find online. That becomes your pattern. Place a piece of parchment paper over it and pipe the melted candy melts over the star. I started with the outline and then filled it in. Once they dry, you have beautiful chocolate stars!
Once the cheesecake is firm, remove it from the springform pan, pipe on some whipped cream and decorate with the stars. Now you are ready to celebrate our wonderful country for the 4th! Yay!
More Red Velvet Desserts
- Red Velvet Ice Cream Cake
- Red Velvet Cheesecake Swirl Brownies
- Red Velvet Berry Trifle
- Red Velvet Cheesecake Cookie Cups
- Red Velvet Layer Cake
- Red Velvet Cheesecake
Red Velvet Blondie Cheesecake
save this recipe
Enter your email & we’ll send it to your inbox. Plus get new recipes from us every week!
Equipment
- Wilton tip 1M or Ateco tip 844, as I use
- Wilton tip 3
- Piping bag and coupler
Ingredients
Red Velvet Blondie
- 3/4 cup salted butter
- 1 1/2 cups brown sugar (lightly packed)
- 1 tsp vanilla extract
- 1 1/2 tsp white vinegar
- 2 large eggs
- 1 oz red food color
- 1 tbsp natural unsweetened cocoa powder
- 1 1/2 cups + 2 tbsp all-purpose flour
- 3/4 tsp baking powder
- 1/4 tsp baking soda
Cheesecake
- 16 oz cream cheese (room temperature)
- 1 cup granulated sugar
- 2 tbsp vanilla extract
- 4 oz Cool Whip
Topping and Stars
- 4 oz Cool Whip
- 4 oz Wilton Blue Candy Melts
Instructions
- Line the bottom of a 9 inch cake pan with parchment paper (if you have a springform pan that doesn't leak, you could also use that) and grease the sides. Preheat oven to 350℉.
- Melt the butter in a microwave safe bowl, then transfer to a mixing bowl.
- Add brown sugar and whisk to combine.
- Add the vanilla, vinegar, eggs and red food color and whisk until incorporated.
- In another bowl, combine dry ingredients.
- Slowly add dry ingredients to wet ingredients and mix until combined.
- Pour batter into cake pan and bake for 30-33 minutes.
- Remove blondie from oven and allow to cool for about 10-15 minutes, then remove to cooling rack to finish cooling.
- Once the blondie is cool, make the cheesecake.
- Beat cream cheese and sugar until smooth.
- Add vanilla extract and beat until combined.
- Fold Cool Whip into cream cheese mixture.
- Place blondie into a 9 inch springform pan.
- Top blondie with cheesecake mixture and spread into an even layer, then put in refrigerator until firm about 3-4 hours.
- Remove cheesecake from springform pan and pipe whipped cream around the edges. I use Ateco tip 844, but Wilton 1M is also similar.
- To make the stars, find a star pattern that you like. You can freehand draw a star, or print one from online. It should be 1½ – 2 inches in size.
- Place parchment paper over the pattern.
- Melt the candy melts according to package directions, then add to a piping bag with coupler, fitted with the Wilton tip 3.
- Pipe the candy melts along the edge of the star, tracing it, then fill it in. You can use a toothpick to help move the chocolate around and fill in holes. Allow stars to dry then place around the edge of the cheesecake. I also placed one in the center. I used about 9 stars.
- Refrigerate until ready to serve.
Nutrition
The nutrition facts provided are calculated using a third-party tool and are estimates only. Actual nutritional content may vary based on the ingredients and brands you use, as well as portion sizes. For accurate results, please consult a registered dietitian or nutritionist.
Enjoy!


This is my second year making this recipe, and it is always a hit! Rich flavor, and impressive to all your guests without hours of work. I’m not a huge fan of piping, so I used a small star mold for the candy melts last year, and opted for sprinkles instead this year.
Awesome! So glad you enjoy it!
Has anyone made the red velvet blonde no bake cheesecake a day before? Does it hole up well? 🇺🇸😎
It should be totally fine made a day ahead.
I agree with precious comments that the cheesecake to red velvet blondie ratio is a bit off. I ended up cutting a good portion off the top of my blondie layer. I’m also curious as to how you got your cheesecake layer to be so smooth? Once I poured mine on top of the blondie I had to use my rubber spatula to spread it out evenly and it didn’t settle smoothly.
I use an offset spatula to spread it and just make sure to not leave any big gaps/air bubbles.