Description
This chocolate and vanilla swirled Zebra Cake is incredibly moist and delicious. Covered in a sweet homemade buttercream, this cake is a million times better than the pre-packaged zebra cakes!
Ingredients
Scale
For the Zebra Cake
- 2 1/4 cups (293g) all purpose flour
- 2 1/2 tsp baking powder
- 1/2 tsp salt
- 1/2 cup (112g) unsalted butter, room temperature
- 1/2 cup vegetable oil
- 1 1/2 cups (310g) sugar
- 4 large eggs
- 1 tbsp vanilla extract
- 1 cup (240ml) buttermilk*
- 5 oz bittersweet chocolate (60% cacao), chopped**
- 1/2 tsp black gel icing color
For the Vanilla Buttercream
- 2 1/2 cups (560g) butter
- 9 cups (1035g) powdered sugar
- 2 tsp vanilla extract
- 6–8 tbsp (90-120ml) water/milk
- 1 cup (114g) natural unsweetened cocoa powder
- Black gel icing color
Instructions
Make the Marble Cake
- Prepare two 9 inch cake pans with parchment paper circles in the bottom and grease the sides. Preheat oven to 350°F (176°C).
- Combine the flour, baking powder and salt in a medium sized bowl and set aside.
- Add the butter, vegetable oil and sugar to a large mixer bowl and beat together until light in color and fluffy, about 3-4 minutes. Do not skimp on the creaming time.
- Add the eggs two at a time, mixing until well combined after each. Scrape down the sides of the bowl as needed to be sure all ingredients are well incorporated.
- Add half of the dry ingredients to the batter and mix until combined.
- Add the buttermilk and vanilla extract and mix until well combined.
- Add the remaining dry ingredients and mix until well combined and smooth. Scrape down the sides of the bowl as needed to be sure all ingredients are well incorporated. Do not overmix the batter.
- You should have roughly 5 1/2 cups of cake batter total. Divide it in half in two separate bowls (about 625g each, if using a food scale) and set aside.
- Melt the chopped chocolate, then add it to one of the bowls of cake batter that was set aside along with the black gel icing color and gently fold together to combine. Work somewhat quickly so that the chocolate in the cake batter doesn’t firm up too much and make the cake batter more difficult to work with. If it thickens too much, it makes it harder to layer the colors of cake batter together easily.
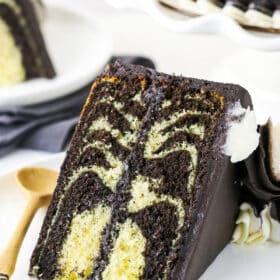
- Drop alternating heaping spoonfuls of each batter to the cake pans and gently shake the pan side to side to spread it evenly after every 2-3 spoonfuls. So add a large spoonful of the vanilla batter to each cake pan, then add a large spoonful of chocolate batter to the center of the vanilla batter. Shake side to side to spread. Repeat until you’ve used all the cake batter between the two pans.
- Bake for 25-30 minutes, or until a toothpick inserted comes out clean.
- Remove the cakes from the oven and allow to cool for about 2-3 minutes, then transfer to cooling racks to cool completely.
Make the Frosting
- To make the frosting, beat the butter in a large mixer bowl until smooth.
- Add half of the powdered sugar and mix until smooth.
- Add the vanilla extract and 3 tablespoons of water or milk and mix until well combined and smooth.
- Add the remaining powdered sugar and mix until well combined and smooth.
- Remove about 1 1/4 cups of the vanilla buttercream and set in another bowl. Add additional water or milk, if needed to get the right consistency of frosting.
- Add the cocoa powder to the remaining buttercream and mix until well combined and smooth.
- Add additional water or milk, if needed to get the right consistency of frosting, then add the black gel icing color to get the right shade of black.
Assemble and Decorate
- To put the cake together, use a large serrated knife to remove the domes from the top of the cakes so that they’re flat. These cakes don’t have a large dome, but I like to make sure they’re completely flat.
- Place the first cake on a serving plate or a cardboard cake round.
- Spread about 1 cup of chocolate buttercream evenly on top of the cake.
- Add the second layer of cake on top, then frost the outside of the cake with the chocolate buttercream.
- Use the remaining chocolate buttercream and the vanilla buttercream to create the swirls on top of the cake and the shells along the bottom. To create the two toned swirls, I find it easiest to add each color to their own piping bag, then put both piping bags into a larger piping bag fitted with the piping tip. Squeeze the larger piping bag to do your piping.
- Store in an airtight container.
Notes
Cake is best when eaten within 2-3 days.
*I use powdered buttermilk. Regular milk would work fine as a substitute.
**I strongly recommend sticking with bittersweet chocolate for this cake. I find it gives the best flavor and texture to the chocolate cake portion.
Nutrition
- Serving Size:
- Calories: 568
- Sugar: 60.6 g
- Sodium: 77.4 mg
- Fat: 31 g
- Carbohydrates: 73.4 g
- Protein: 4 g
- Cholesterol: 93.1 mg