Description
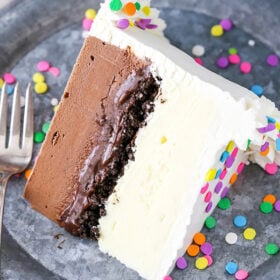
This Copycat Dairy Queen Ice Cream Cake has layers of chocolate and vanilla ice cream around the iconic layer of chocolate crunchies and chocolate fudge. It is so easy to make and tastes just like the real thing!
Ingredients
Scale
Chocolate Cookie Crunchies
- 3/4 cup (100g) Oreo crumbs (about 9 Oreos)
- 1 1/2 tbsp butter, melted
Ice Cream Layers
- 1.5 quart container vanilla ice cream
- 1.5 quart container chocolate ice cream
Chocolate Fudge
- 6 oz | 1 cup semi-sweet chocolate chips*
- 3 tbsp light corn syrup
- 1/2 tsp vanilla extract
- 1/2 cup (120ml) heavy whipping cream
Whipped Cream
- 2 cups (480ml) heavy whipping cream, cold
- 1 cup (115g) powdered sugar
- 1 1/2 tsp vanilla extract
- Sprinkles
Instructions
- Preheat oven to 350 degrees. Line a cookie sheet with parchment paper or a silicone baking mat and set aside.
- Combine the Oreo crumbs and melted butter and stir until well combined. Spread the crumbs evenly onto the prepared cookie sheet.
- Bake for 8-10 minutes, then allow to cool. Use your fingers to break any big clumps into smaller ones. Set aside.
- Line an 8×3 inch cake pan* with clear wrap that covers the bottom and goes above the sides of the cake pan. I used two pieces.
- About 20 minutes before you need it, set the chocolate ice cream out to soften. Once softened, stir it up until smooth and creamy. Add the softened chocolate ice cream to the prepared cake pan and spread into an even layer. Freeze for 30 minutes.
- To make the fudge layer, add the chocolate chips, corn syrup and vanilla extract to a medium sized bowl.
- Heat the heavy whipping cream just until it begins to boil, then pour it over the chocolate chips. Allow to sit for 2-3 minutes, then whisk until smooth.
- Remove the cake pan with the chocolate ice cream from the freezer, then pour the chocolate fudge over the ice cream and spread into an even layer. Freeze for about 10 minutes.
- Add the cookie crumbles to the top of the fudge layer, then freeze for about 2 hours, until mostly firm.
- About 20 minutes before you need it, set the vanilla ice cream out to soften. Once softened, stir it up until smooth and creamy. Add the vanilla ice cream to the top of the cake, then freeze until firm, 2-3 hours.
- Use the clear wrap to lift the frozen cake out of the pan, then place it on a cardboard cake circle or a serving plate. Set it back in the freezer.
- To make the whipped cream, add the heavy whipping cream, powdered sugar and vanilla extract to a large mixer bowl. Whip on high speed until stiff peaks form.
- Frost the cake with the whipped cream and decorate as desired. I used Ateco tip 844 for piping the borders.
- Freeze the cake until ready to serve. Cake is best when stored well covered and eaten within 4-5 days.
Notes
- I like using the 8×3 inch cake pan and having a taller cake, but if you don’t have one of those pans on hand and don’t want to purchase it, you could also use a 9 inch pan (including a springform pan). The cake just won’t be as tall.
- Semi-sweet chocolate must be used, not milk chocolate or another, for the fudge layer to set properly
Nutrition
- Serving Size: 1 slice
- Calories: 661
- Sugar: 50 g
- Sodium: 118.6 mg
- Fat: 46.3 g
- Carbohydrates: 55 g
- Protein: 8.4 g
- Cholesterol: 173.7 mg